HAMWORTHY HEATING LTD
20
SPETISBURY
500001118/C
10.6.3 Burner Adjustment
If adjustments are required to obtain the correct flue
gas temperature and CO
2
levels, do this by carrying
out the following steps;
a.
Manually drive the fan speed to maximum by
pressing the hidden button as before, but this
time at the same time as the ‘+’ (plus) button.
Hold them both down for 3 seconds.
b.
To increase the CO
2
levels at the maximum
fan speed, first remove the black plastic
throttle security cover. Below this is the 3mm
Allen key screw for throttle adjustment. To
increase the CO
2
, turn the throttle screw anti-
clockwise a quarter turn at a time, checking
the levels constantly until the desired level is
reached.
c.
To decrease CO
2
levels at the maximum fan
speed, turn the throttle screw clockwise a
quarter turn at a time.
d.
Manually drive the fan speed back to
minimum by pressing the hidden button at the
same time as the ‘-’ (minus) button. Again,
hold them both down for 3 seconds.
e.
Recheck the flue gas temperature and CO
2
levels
f.
To increase CO
2
levels at the minimum fan
speed, first remove the dust cover from the
regulator on the gas valve. Below this is the
white plastic torx offset adjustment screw.
Turn the screw clockwise a quarter turn at a
time, checking the levels constantly until the
desired level is reached.
g.
To decrease the CO
2
levels at the minimum
fan speed, turn the screw anti-clockwise a
quarter turn at a time, checking the levels
constantly until the desired level is reached.
h.
Replace the gas valve security cover.
i.
Manually drive the fan speed back to
maximum by pressing the hidden button at
the same time as the ‘+’ (plus) button. Once
again, hold them both down for 3 seconds.
Check CO
2
/ rating.
j.
Recheck the flue gas temperature and CO
2
at
minimum rate to make sure that they are still
correct. If required the flue gas temperature
should be adjusted by altering the minimum
fan speed.
k.
When finished, replace both security dust
covers over the adjustment screws.
10.6.4 Starting Up and Running
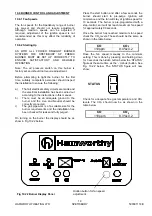
Press the On/Off button on the Burner Display Panel
(see Fig. 10.22). After a few seconds the burner
should start to pre-purge. Ignition will commence
and the fan will stay at ignition speed for a short
period. The burner is pre-programmed with a step-
control, so it will not reach maximum fan speed for
at least 90 seconds after this. The burner should
then run normally.
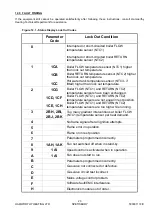
If a lock out condition occurs, refer to the Status
Display Lock Out Code Table in the Fault Finding
Section of this manual (Section 12.0) to identify the
cause. If other faults occur, refer to the Fault Finding
Flowchart in Section 12.0. If repairs are deemed
necessary ring Hamworthy Heating Technical
Department for assistance.
10.6.5 Shutting Down
To switch off the burner, press the On/Off switch on
the Burner Display Panel. The burner should shut
down immediately.
If required, an external timing device can be
attached to the burner to switch it off remotely.
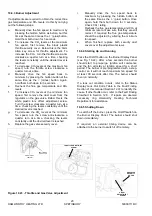
POSITION OF
VENTURI
POSITION OF
GAS VALVE
THROTTLE ADJUSTMENT
SCREW
OFFSET
ADJUSTMENT
SCREW
GAS VALVE
SECURITY
COVER
Figure 10.23 - Throttle and Gas Valve Adjustment
Содержание Spetisbury
Страница 30: ...HAMWORTHY HEATING LTD 24 SPETISBURY 500001118 C Figure 12 2 Fault Finding Flowchart...
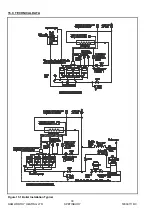
Страница 36: ...HAMWORTHY HEATING LTD 30 SPETISBURY 500001118 C Figure 15 1 Boiler Installation Typical 15 0 TECHNICAL DATA...
Страница 42: ...HAMWORTHY HEATING LTD 36 SPETISBURY 500001118 C NOTES...
Страница 43: ...Notes...

