HAMWORTHY HEATING LTD
9
SPETISBURY
500001118/C
Spetisbury
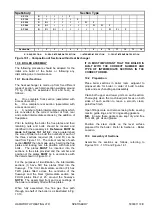
SP 110
R
I
I
I
F
SP 150
R
I
I
I
I
F
SP 220
R
RI
I
I
I
I
FI
F
SP 280
R
RI
I
I
I
I
I
FI
FI
F
SP 340
R
RI
RI
I
I
I
I
I
I
FI
FI
F
Section No.
1
2
3
4
5
6
7
8
9
10
11
12
13
14
Section Type
R - REAR SECTION RI - REAR INTERMEDIATE SECTION I - INTERMEDIATE SECTION FI - FRONT INTERMEDIATE SECTION
Figure 10.1 – Composition of Sections within Heat Exchanger
10.0 BOILER ASSEMBLY
The following procedure should be adopted for the
initial site build of the boiler or following any
dismantling due to maintenance.
10.1 Boiler Sections
The heat exchanger is made up from five different
types of section, each plain section weighing around
70 kg (140kg for assembled front and rear), as
follows:-
a.
One complete front section (assembled with
access doors etc.)
b.
One complete rear section (assembled with
access doors etc.)
c.
A number of plain intermediate sections which
are converted to the correct number of front, rear
and central intermediate sections by the addition of
flue plates.
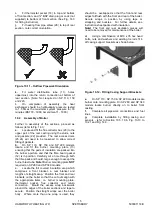
Prior to building the boiler the flue plates and their
retaining nuts and bolts should be located and
identified in the accessory kit
. Reference MUST be
made to Figures 10.1 & 10.2 .
Having determined
the size of boiler to be built the numbers of each of
the three sections required (RI, I and FI) can be
read from Figure 10.1. The correct number of each
section
MUST
then be made up by inserting the flue
plates and locking nuts into position with nuts and
bolts. The plates
MUST
be inserted into the
sections in the slots provided and the number and
position of the plates
MUST
be in accordance with
the detail shown in Figure 10.2.
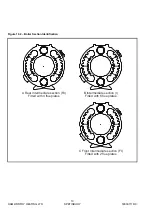
For the purposes of identification, the intermediate
sections (I) have SIX flue plates fitted into the
flueways. The front intermediate section (FI) has
TWO plates fitted across the centreline of the
flueways and the Rear Intermediate section has
FOUR plates fitted at 45
o
around the flueways.
NOTE:
The assembled front and rear castings of
the boiler are already fitted with flue plates.
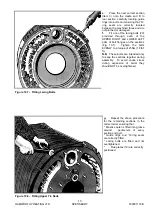
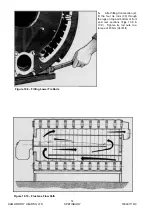
When fully assembled, the flue gas flow path
through one half of the boiler is as illustrated in Fig.
10.10.
IT IS MOST IMPORTANT THAT THE BOILER IS
BUILT WITH THE CORRECT NUMBER AND
TYPE OF INTERMEDIATE SECTIONS IN THE
CORRECT ORDER.
10.2 Preparation
Place boiler sections in boiler room, adjacent to
proposed site for boiler, in order of build to allow
quick and easy handling and assembly.
Clean both upper and lower ports on each section.
Thoroughly clean the machined joint faces on both
sides of each section to leave a smooth, clean,
paint-free finish.
Open fittings crate and remove lacing bolts, sealing
mastic, guide rings, and 'O'-ring sealing gaskets.
N.B.
Ensure these gaskets are kept dry and free
from dirt, grit, oil and grease.
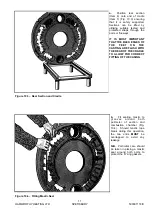
Position the steel cradle on the level surface
prepared for the boiler. Refer to Section 4 - Boiler
Location.
10.3 Assembly of Sections
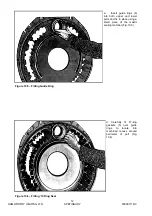
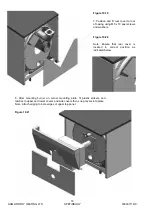
Assemble the sections as follows, referring to
Figures 10.3 - 10.10 and Figure 14.1.
Содержание Spetisbury
Страница 30: ...HAMWORTHY HEATING LTD 24 SPETISBURY 500001118 C Figure 12 2 Fault Finding Flowchart...
Страница 36: ...HAMWORTHY HEATING LTD 30 SPETISBURY 500001118 C Figure 15 1 Boiler Installation Typical 15 0 TECHNICAL DATA...
Страница 42: ...HAMWORTHY HEATING LTD 36 SPETISBURY 500001118 C NOTES...
Страница 43: ...Notes...


