4-12
I
NSTALLING
ALINTE
4
PAGE
E
QUIPMENT
AND
S
OFTWARE
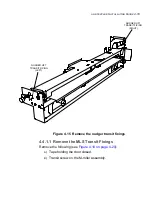
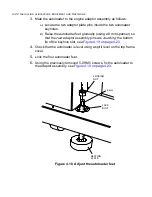
Figure 4.10 Fitting the ball cage
5.
From the service side
: from the right hand side of the carriage,
support the carriage by hand and unscrew the orange transit fixing
screw fully-anti-clockwise. It is not possible to remove it completely
until the transit bracket on the other side has been removed and the
carriage is free to move.
6.
From the service side
: using a M5 Allen key, loosen the 2-off screws
on the traverse transit bracket (left hand side of carriage), see
Figure 4.9 on page 4-11
, while supporting the traverse carriage by
hand from the motor casting.
7.
Remove the lower screw on the bracket and then the two top screws.
Remove the bracket very carefully, making sure that cables are not
damaged. Gently lower the carriage on to the traverse beam and ball
cage.
CAUTION: Hold the carriage and lower carefully so as not to damage
the ball cage race and encoder strip.
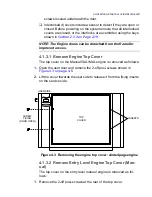
4.3.1.2 Platen Transit Fixings (Entry Level Only)
Remove the transits on the four pins (lift and centre).
CARRIAGE
RAIL
BALL CAGE
TRAVERSE
RAIL
Содержание alinte4page
Страница 1: ......
Страница 12: ...PRELIMINARIES...
Страница 29: ...ALINTE4PAGE INSTALLATION GUIDE 2 7 Figure 2 5 Autofeeder elevator warning label...
Страница 30: ...2 8 SAFETY ON THE ALINTE4PAGE Figure 2 6 Autofeeder elevator moving parts warning labels USER SIDE SERVICE SIDE...
Страница 34: ...2 12 SAFETY ON THE ALINTE4PAGE Figure 2 10 Interlock defeated warning labels typical alinte4page entry level...
Страница 35: ...ALINTE4PAGE INSTALLATION GUIDE 2 13 Figure 2 11 Interlock defeated warning labels typical alinte4page manual...
Страница 40: ...2 18 SAFETY ON THE ALINTE4PAGE Figure 2 13 Location of interlock covers alinte4page SAL 2 1...
Страница 48: ...2 26 SAFETY ON THE ALINTE4PAGE...
Страница 56: ...3 8 UNPACKING AND HANDLING...
Страница 98: ...4 42 INSTALLING ALINTE4PAGE EQUIPMENT AND SOFTWARE Figure 4 32 Removing transit fixing view 2...

