9-38
I
NHIBIT
Z
ONES
/D
OORS
This option is used for temporarily isolating troublesome zones (doors, windows,
movement detectors, etc.) which may be preventing the system from setting.
Zones/doors may be inhibited singly or in blocks.
Note
The problem zone/door will be indicated on the display, e.g. Zone 3 Tamper,
Door 4 Open. Inhibit Mode provides two identical sub-menus, for zones and doors.
Use the appropriate sub-menu to implement the inhibit.
If zones/doors have been inhibited, on selection of FULL set mode, a message
will indicate how many are inhibited.
Selection of this option is logged by the system and an asterisk appears beside
the log entry to indicate the zone has been inhibited manually (zone may also
be inhibited via literal commands). The identity of the user to select the option
is also logged.
Operation
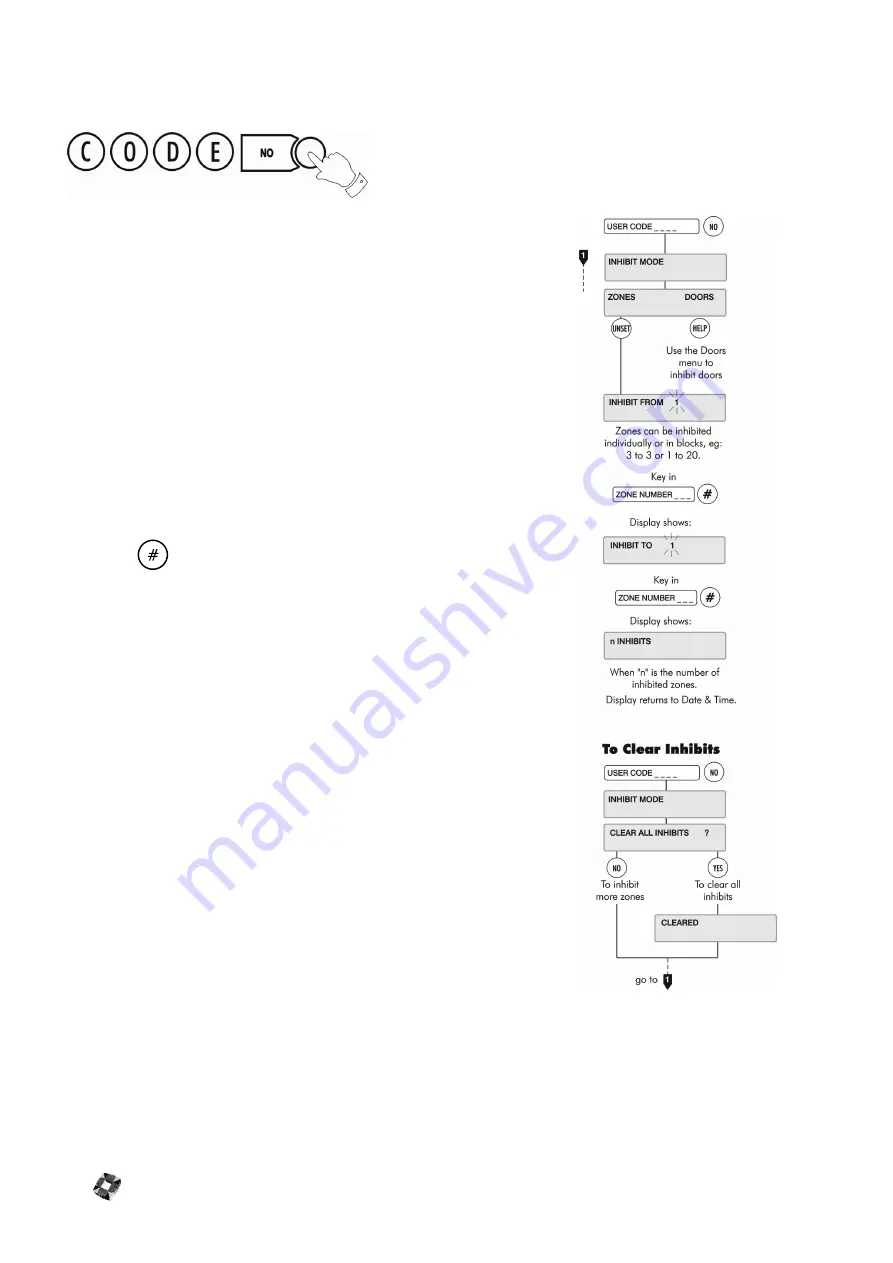
Having entered the user CODE and then pressed the NO key, the display will
read "INHIBIT FROM 1". Enter the number of the first zone to be inhibited
followed by
. The next displayed message is "INHIBIT TO 1".
Enter the number of the last zone in the block to be inhibited. This will be the
same as the first zone if only one zone is required. After the second parameter
has been entered the display will show "n INHIBITS" where n is the number of
zones/doors inhibited) and the buzzer will sound briefly before returning to
UNSET mode displaying the date and time.
The INHIBIT function can be re-entered any number of times to inhibit more
zones/doors, existing inhibited zones/doors will not be affected.
Clear Inhibits
To clear inhibits, re-enter Inhibit Mode using the engineer code followed by the
NO key. The message "CLEAR ALL INHIBITS?" will appear in the display. Press
YES to clear the inhibited zones. Press NO to inhibit more zones or to view
those zones which are already inhibited.
Содержание 3GS
Страница 4: ...Introduction iv...
Страница 12: ...Introduction 8...
Страница 14: ...1...
Страница 18: ...System Overview 1 6...
Страница 20: ......
Страница 22: ...Hardware Overview 2 4 SYSTEM CONFIGURATION The following diagram shows a typical configuration of the system...
Страница 26: ......
Страница 34: ......
Страница 38: ...Intelligent PSUs 4 6...
Страница 40: ......
Страница 97: ...Issue 4 5 August 2005 Nodes 5 59...
Страница 98: ...Issue 4 5 August 2005 Nodes 5 61...
Страница 100: ......
Страница 106: ...3GS Technical Manual...
Страница 116: ...3GS Technical Manual 7 12 Programming Overview Issue 4 5 August 2005 3GS Initial Setup Menu...
Страница 118: ...3GS Technical Manual...
Страница 146: ...3GS Technical Manual Issue 4 5 August 2005 Programming Menus 8 31 Node Configure Inputs Menu...
Страница 153: ...3GS Technical Manual Issue 4 5 August 2005 8 38 Programming Menus Service Mode Test Menu...
Страница 155: ...3GS Technical Manual Issue 4 5 August 2005 8 40 Programming Menus Service Mode Monitor Menu...
Страница 217: ...3GS Technical Manual Issue 4 5 August 2005 8 108 Programming Menus...
Страница 218: ...3GS Technical Manual Issue 4 5 August 2005 Programming Menus 8 109...
Страница 220: ......
Страница 222: ...3GS Version 5 User Guide 9 5 3GS SYSTEM KEYPAD DISPLAY...
Страница 254: ...3GS Version 5 User Guide 9 37 Some examples of Alert Messages...
Страница 262: ...3GS Version 5 User Guide 9 45 User name max 24 characters User no 17 18 19 20 21 22 23 24 25 26 27 28 29 30 31 32...
Страница 264: ......
Страница 265: ...I n t h i s c h a p t e r HHT Overview 10 3 Main Menu 10 5 HAND HELD TERMINAL HHT 10...
Страница 266: ......
Страница 280: ......
Страница 288: ......
Страница 290: ......
Страница 293: ...Issue 4 5 August 2005 DM1200 Digital Communicator Modem 12 5...
Страница 301: ...I n t h i s c h a p t e r Network Router Overview 13 3 Sample Connection Diagram Scenarios 13 4 NETWORK ROUTER 13...
Страница 302: ......
Страница 304: ...Network Router 13 4 SAMPLE CONNECTION DIAGRAM SCENARIOS...
Страница 308: ...Network Router 13 8...
Страница 310: ......
Страница 316: ...IntelliBell 14 8 SELF ACTIVATING BELL To connect a Self Activating Bell SAB to the 3GS system see the following diagram...
Страница 318: ......
Страница 338: ...Issue 4 5 August 2005 Technical Specifications 15 23...
Страница 339: ...I n t h i s c h a p t e r 3GS Overview 16 5 Installing 3GS 16 6 Installing the Dongle 16 7 Upgrading 16 8 16 PC SOFTWARE...
Страница 340: ...1...
Страница 346: ......
Страница 366: ...17 22...
Страница 367: ...I n t h i s c h a p t e r Introduction to CiTeC II 18 3 CITEC II INSTALLATION 18...
Страница 368: ......
Страница 370: ...CiTeC II Installation 18 4...
Страница 377: ...Issue 4 5 August 2005 19 7...
Страница 378: ...19 8...
Страница 385: ......
Страница 386: ......


