background image

Aquastorm 200

Overview          1-9

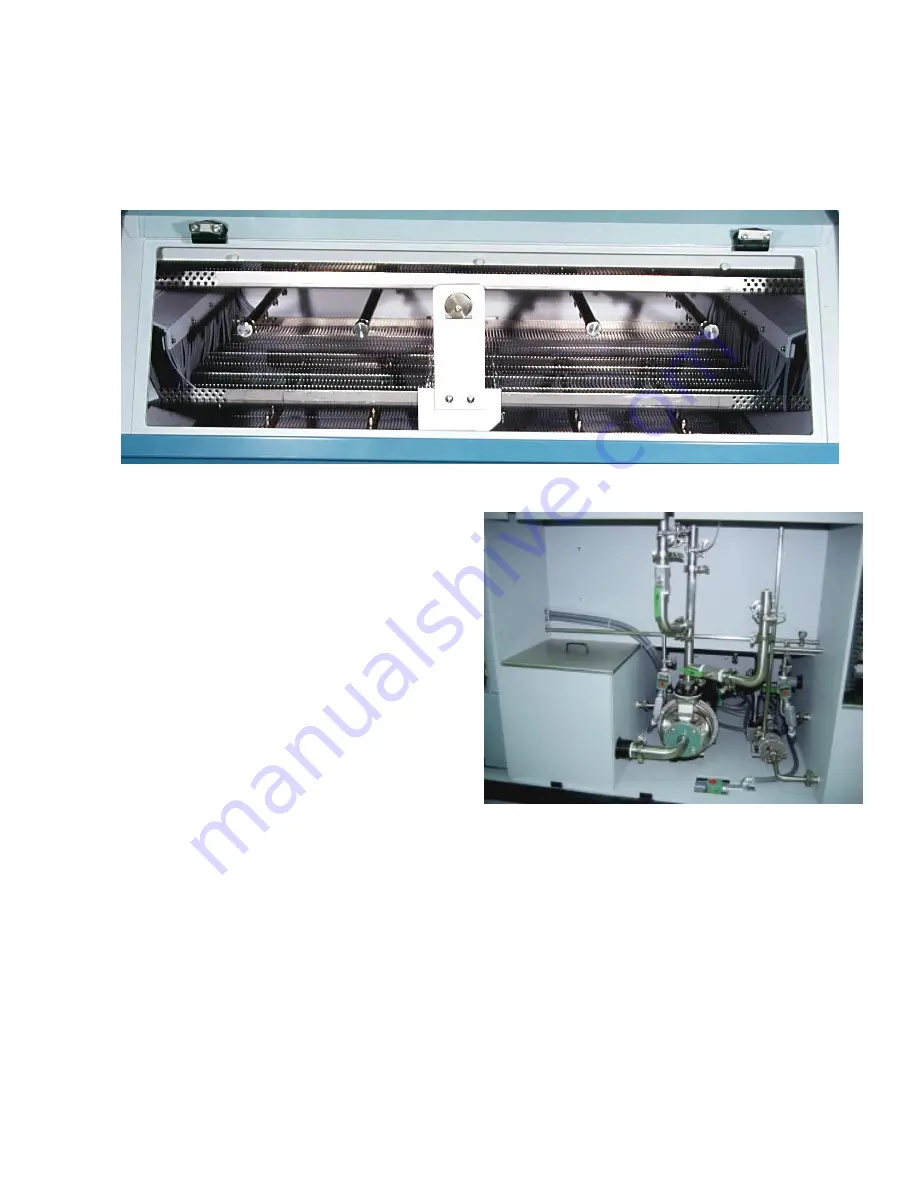
Heated Recirculating Rinse/ Hurricane Section

The Recirculating Rinse section is 122 cm (48 inches) long consisting of four (4) upper spray manifolds and
four (4) lower spray manifolds, powered by a 5 HP pump (standard configuration). A 189 liter (50 gal.)
tank is standard with two (2) 16 kw immersion heaters.Temperatures are displayed via the LCD. The
computer continually monitors and corrects the temperature in the rinse tank by means of a thermocouple
device. If the temperature exceeds 82 

o

C (180 

o

F), the tank high temperature alarm indicator illuminates,

the audible alarm sounds and the tank heater shuts off.

An optional Hurricane Jet

TM

 performance kit may

be configured to include a 10 HP pump in lieu
of the standard 5 HP pump. The Hurricane Jet

TM

manifold is configured between the standard four
(4) upper spray manifolds.

The water level in the rinse tank is monitored by
means of liquid level float switches. If the tank
fluid level falls below the low level float switch,
the tank heaters shut off and trip the tank level
alarm indicator on the front control panel along
with an audible alarm.

Tank filling is automatic via the fill solenoid,
activated by the low and/or operating liquid level
float switch(es) in the rinse tank. When the
system is initially activated and the tank is empty,
the fill solenoid activates to fill the system tanks.
During normal operation, if the water level falls
below normal operating level, the fill solenoid
activates to fill the tank.

The recirculating rinse tank is configured with a
cascade pipe to the recirculating wash tank. Flow
through the cascade pipe, from rinse to wash, is
controlled via a ball valve. O/A (Organic Acid)
or water soluble applications should be run with
the valve in the open position. Rosin or saponifier
applications should be run with the valve in the
closed position, not permitting cascading to occur.

If the system is configured with an on-board tank
for Enhanced Chemical Isolation (Level 3), a
cascade pipe from the recirculating rinse tank to

the Chemical Isolation tank is supplied as well.
The valve supplied on this cascade pipe should
remain closed for O/A applications. When
running saponifier processes, the ball valve on
the cascade pipe to the Chemical Isolation tank
should be open slightly. This is to prevent the
chemical isolation tank from loading up with
excess saponifier. The amount this valve is open
or closed is dependent upon the type of saponifer
as well as the product mix or product
configuration.

Содержание Aquastrom 200

Страница 1: ...ual may be reproduced stored in a retrieval system or transmitted in any form or by any means electronic mechanical photocopying recording scanning or otherwise without the prior written permission of Electrovert Published December 17 1996 Manual Part Number 2 9316 621 00 0 Text Part Number 2 9316 622 00 0 ...

Страница 2: ...egional Service Center 200 Technology Dr Alpharetta GA 30005 Fax 770 442 1987 Tel 770 475 6100 North Central Regional Service Center 580 A Tollgate Road Elgin IL 60123 Fax 847 289 3797 Tel 847 695 5750 North West Regional Service Center 2968 Scott Blvd Santa Clara CA 95054 Fax 408 727 0672 Tel 408 727 4650 South West Regional Service Center 1111 W North Carrier Parkway Grand Prairie TX 75050 Fax 9...

Страница 3: ...AMPERAGE LARGEST MOTOR LOAD SHORT CIRCUIT INTERRUPT CAPACITY MADE IN U S A AMP AMP AMP The Serial Tag information is to be filled by the user for Technical Support Purposes Please have this information available when contacting Technical Support or when placing parts orders ...

Страница 4: ...our machine was retrofitted or modified please specify retrofit number or description of modifications If the parts you are ordering are described in a quote please include the quote number Parts Order Sheet ELECTROVERT Please Photocopy this form for further use Fill out this sheet to order parts kits for your machine Part Number Description Quantity ...

Страница 5: ... 1 12 Optional Checkmate Hold Down Conveyor 1 13 Optional Photocell Control 1 14 Auto Start Timer 1 14 Optional Detergent Injection System 1 14 Optional Interior Lighting 1 14 Optional Electrosonic Airknife 1 15 Optional Digital pH Monitor 1 15 Optional Digital Resistivity Monitor 1 15 Optional Utility Sink 1 15 Optional Convenience Package 1 16 Angle Adjustable Transition Conveyor 1 18 2 3 Standa...

Страница 6: ...e voltage WARNING Hot Surfaces Burn Hazard During normal operation this equipment and some of its components operate at temperatures up to 60 71 o C 140 160 o F The operator must use extreme caution and wear the recommended safety garments prior to coming in contact with hot surfaces or components Closely follow and adhere to the Warnings in this manual which pertain to hot surfaces Use extreme ca...

Страница 7: ...y escape from the system cabinet when access windows are removed during operation or for maintenance procedures Steam will cause serious burns Avoid contact with steam Protective clothing is required for servicing hot machine components or areas of the machine which come in contact with chemical applications Protective clothing includes ANSI American National Standard Institute approve Safety Gogg...

Страница 8: ...ts high temperatures or other conditions that could cause personal injury DANGER Danger notices are used in this manual to warn the operator that DEATH may result if a procedure is omitted or improperly performed CAUTION Caution notices are used to call attention to a situation that could cause damage to the equipment ...

Страница 9: ...gure below for zone locations 1 Prewash 36 cm 14 inches 2 Heated Recirculating Wash 122 cm 48 inches 3 Drag Out Enhanced Chemical Isolation 91 44 cm 35 inches 4 Heated Recirculating Rinse 122 cm 48 inches 5 Fresh Water Final Rinse 46 cm 18 inches 6 Blower Drying Station 1 76 cm 30 inches 7 Blower Drying Station 2 76 cm 30 inches Optional Additional Drying Stations Not pictured 8 Blower Drying Stat...

Страница 10: ...ng the two 2 shades of gray make the system s appearance an attractive one to any manufacturing production line Plumbing All rear plumbing including fill and final rinse inlets is comprised of 3 4 1 1 2 and 2 0 inch orbitally welded tubular stainless steel pipe with Kwik Clamps Smooth transition orbitally welded stainless steel plumbing minimizes pressure drops and eliminates leaks Kwik Clamps wit...

Страница 11: ...ts provide system status of water levels temperature levels operating indication of pumps blowers fill drain solenoids radiant heaters and conveyor Prewash Section The Prewash section is 36 cm 14 inches long consisting of two 2 upper spray manifolds and two 2 lower spray manifolds Power cascade is from the Recirculating Wash tank Prewash can be directed to drain or to cascade to recirculating wash...

Страница 12: ...the system is initially activated and the tank is empty the fill solenoid activates to fill the system tanks During normal operation if the water level falls below normal operating level the fill solenoid activates to fill the tank Heated Recirculating Wash Hurricane Section The Recirculating Wash section is 122 cm 48 inches long consisting of four 4 upper spray manifolds and four 4 lower spray ma...

Страница 13: ... Excess water removed via the first set of airknives is routed back to the wash section This helps in preventing loss of saponifier as well as reducing the risk of cross contamination between cleaning sections 3 Level 2 Chemical Isolation incorporates the blower configuration in Level 1 and adds two 2 stainless steel one 1 upper and one 2 lower spray manifolds The spray manifolds are positioned be...

Страница 14: ...the fill solenoid activated by the low and or operating liquid level float switch es in the rinse tank When the system is initially activated and the tank is empty the fill solenoid activates to fill the system tanks During normal operation if the water level falls below normal operating level the fill solenoid activates to fill the tank The recirculating rinse tank is configured with a cascade pi...

Страница 15: ...or 15 HP optionally dryer section 1 only in lieu of the 7 5 HP blower This ensures maximum drying efficiency prior to product exiting the system Note that 15 HP blower applications are usually for customers with large heavy boards 15 HP blower configurations may cause smaller boards to become airborne or to become lodged in the conveyor system Each Blower Drying section is configured with thermoco...

Страница 16: ...limited to 46 cm 18 inches Optionally the wire belt conveyor may be configured with a 61 cm 24 inch wide belt 56 cm 22 inch usable width Noise Suppression Hood The Noise Suppression Hood is standard with the Aquastorm 200 This feature incorporates a 46 cm 18 inches conveyor extension for easy removal of product and extends 15 24 cm 6 inches past the exit end of the system s cabinet The noise level...

Страница 17: ...igned into the one piece construction of the internal portion of the cabinet to permit fine tuning of the system s exhaust flow The slide gate dampers are completely adjustable and are included in the Prewash Dragout Enhanced Chemical Isolation Blower Dryer Section 1 and Blower Dryer Section 2 These dampers may be adjusted from either the front of the system through the access windows or from the ...

Страница 18: ...y restrains any sized product through all washing rinsing and drying processes At the entrance end of the system an upper conveyor is gently laid across the top of the circuit boards as they travel on the lower conveyor Both the upper and lower conveyors are synchronized to operate at the same speed through the entire system Product is protected from lateral and vertical movement An additional saf...

Страница 19: ...nd Rinse tank immersion heaters prior to system start up the Auto Start Timer eliminates delays in production while the Aquastorm 200 system power is active Start and stop times for each day of the week may be configured using the timer function software and the LCD interface keypad Optional Detergent Injection System The Automatic Detergent Feed system provides automatic feed with a calculated mi...

Страница 20: ... provides a digital display via the LCD of pH levels ranging from 0 14 for water in the wash tank Displays are read in millivolts mV degrees Celsius o C and pH Input to the monitor is supplied by means of a pH sensor which is mounted through the wall of the wash tank for easy accessibility and maintenance High and low process alarms are adjustable via the LCD and interface keypad Optional Digital ...

Страница 21: ...asy maintenance The features included are Slide Out Blower Access Utility Sink On Board Tool Kit Exhaust Demisting Filter Slide out Blower Access for all blowers enables easy access to the blowers for scheduled and preventive maintenance Each blower is mounted on a slide out base Once the blowers are disconnected from the blower housing the blower is easily slid out to perform the necessary mainte...

Страница 22: ...9 16 socket 2 6013 173 00 0 3 8 Drive 5 16 hex bit 2 6013 174 00 0 1 1 8 Max 10 adjustable wrench 2 6013 175 00 0 Stainless steel probe Nozzle cleaning tool 2 6013 176 00 0 4 mm ball tip hex key driver 2 6013 177 00 0 5 mm ball tip hex key driver 2 6013 178 00 0 3 16 ball tip hex key driver 2 6013 179 00 0 Screwdriver with reversible bits 1 and 2 phillips 3 16 and 5 16 slotted 2 6013 180 00 0 3 8 ...

Страница 23: ...and in the Enhanced Chemical Isolation Section Angle Adjustable Transition Conveyor A 91 44 cm 36 inch angle adjustable transition conveyor that adjusts from a horizontal height of 91 44 cm 36 inches to an inclined maximum of 132 cm 52 inches Complies to SMEMA Surface Mount Equipment Manufacturers Association height requirements of 94 to 96 5 cm 37 to 38 inches Allows in line direct feed capabilit...

Страница 24: ...Wash 4 Upper and 4 Lower Manifolds 1 Hurricane Jet Enhanced Chemical Isolation 2 Upper Airknives 1 Lower Airknife 1 Upper and 1 Lower Chemical Isolation Spray Manifold Recirculating Rinse 4 Upper and 4 Lower Manifolds 1 Hurricane Jet Final Rinse 2 Upper and 2 Lower Manifolds Blower Dryer Section 1 2 Upper and 1 Lower Electrosonie Airknives Blower Dryer Section 2 2 Upper and 1 Lower Electrosonice A...

Страница 25: ...38 inches L x 154 cm 60 51 inches W x 128 cm 50 24 inches H Main Cabinet Control Panel and Sound Enclosure Overall Dimensions 691 cm 272 inches Exhaust Vent 5 cm 2 0 inches from top of Main Cabinet 91 44 cm 36 0 Leveling Feet 10 16 cm 4 0 inches Optional Status Tower 58 9 cm 23 2 inches from top of Main Cabinet Optional Inlet Conveyor 91 44 cm 36 0 inches ...

Страница 26: ...Aquastorm 200 Overview 1 21 Optional Sump Pump 61 6 cm 24 in L x 42 5 cm 16 6 in W x 61 8 cm 24 in H ...

Страница 27: ...nks for make up water to maintain operating temperatures Final Rinse 3 4 inch NPTM stainless steel pipe User supplied heated tap or treated water to Final Rinse Temperature 60 71 o C 140 160 o F Flow Rate 15 19 Liters Min 4 5 Gallons Min Nominal Pressure 2 8 3 3 kg cm2 35 40 PSI System Drain Common 1 1 2 inch NPTM CPVC pipe 38 Liters Min 10 GPM constant Fill 3 4 inch NPTM stainless steel pipe Heat...

Страница 28: ...ion of this equipment For additional information on specing a blower contact your local HVAC specialist for requirements and ventilation hook up Recommended venting material Seamless stainless steel or PVC Two 2 25 4 cm 10 inch diameter exhaust ports are provided at the top of the system Total system requires 72 M 3 min 2 5 cm 2400 scfm 1 H2 O static pressure Port 1 36 M 3 min 2 5 cm 1200 SCFM 1 0...

Страница 29: ...16 kVA 32 kVA 5 HP Pump Std 5 kVA 10 HP Pump Opt 10 kVA Chemical Isolation Level 1 Opt 7 5 HP Blower Std 7 7 kVA Enhanced Chemical Isolation Level 2 Opt 7 5 HP Blower Std 7 7 kVA Enhanced Chemical Isolation Level 3 Opt 7 5 HP Blower Std 7 7 kVA Single 16kVA Heater Std 16 kVA Rinse Module Heaters 2 16 kVA 32 kVA 5 HP Pump Std 5 kVA 10 HP Pump Opt 10 kVA Dryer Module 1 7 5 HP Blower Std 7 7 kVA 10 H...

Страница 30: ...nhanced Chemical Isolation Tank Heater 1 16 KW Total Rinse Pump Standard 5 HP 62 gpm 235 L Min Hurricane 10 HP 120 GPM 454 L Min Rinse Heaters 2 16 KW Heaters 32 KW Total Optional C I Blower 7 5 HP 3 Ph 460 VAC 500 CFM Turbine Blower Dryer 1 Blower Standard 7 5 HP 3 Ph 460 VAC 500 CFM Turbine Blower Option 1 10 HP 3 Ph 460 VAC 600 CFM Turbine Blower Dryer 2 Blower Standard 7 5 HP 3 Ph 460 VAC 500 ...

Страница 31: ...mical Isolation Tanks 2 3 1 4 Adjusting Tank Temperatures 2 4 Temperature Set Point Adjustments 2 4 1 5 Adjusting the Conveyor Speed 2 5 SECTION 2 WEST 6700 TEMPERATURE CONTROL SETUP 2 6 2 1 Configuring a Replacement Temperature Control 2 7 2 2 To enter Configuration Mode 2 7 2 3 To Enter Setup Mode 2 9 SECTION 3 PHOTOCELL ADJUSTMENTS 2 10 3 1 Testing and Adjusting the Optional Photocell 2 10 Alig...

Страница 32: ...ields are clean and in place Ensure all tempered glass windows are clean and in the closed position Electrical Enclosures and Maintenance Panels Verify that both electrical enclosures are closed and tightly latched The High Voltage electrical enclosure is located behind the 4th and 5th front access panels toward the front exit end of the system The System Low Voltage electrical enclosure is locate...

Страница 33: ... Wash Tank temperature indicator illuminates green if tank is not up to temperature Rinse Tank temperature indicator illuminates green if tank is not up to temperature Optional Chemical Isolation Tank temperature indicator illuminates green if tank is not up to temperature Conveyor Off indicator illuminates red Optional Interior Lights illuminate Internal Hard Drive boots up High temperature monit...

Страница 34: ... system circuits Press the System Main Power On Control The following circuits are now enabled Optional Enhanced Chemical Isolation Blower is enabled Wash Rinse and Optional Chemical Isolation Tank fill solenoids are enabled but not activated the operator must press the Fill control for the respective tanks to activate the fill solenoids Immersion Heater On indicators illuminate green indicating t...

Страница 35: ... Key on the LCD interface keypad to move the square curser to the section on the LCD requiring adjustment 2 Once the curser is in front of the required section enter the set point using the number keys on the LCD interface keypad NOTE Enter set point values between 60 71 o C 140 160 o F depending on your process application 3 When the correct set point temperature is displayed on the LCD press the...

Страница 36: ...CD interface keypad A flashing square curser is visible on the LCD screen next to the component s set point value when it is ready for adjustment 1 With system power ON press the Up or Down Arrow Key on the LCD interface keypad to move the square curser to CONVEYOR 2 Enter the set point using the number keys on the LCD interface keypad NOTE Enter a set point value between 0 and 3 65 MPM 0 and 12 f...

Страница 37: ...factory set when installed into the Aquastorm 200 system Once installed further adjustment should not be required Improper adjustment could result in damage to the equipment This device is a safety circuit The procedures outlined only apply to the replacement of a defective unit directly from stock WEST 6700 OUT EXCEED ALM F Function Key Raise Key Lower Key Reset Key Upper Display Lower Display Al...

Страница 38: ...urrent input code is selected the user may then step through the Configuration Mode parameters using the Function F Key For each parameter the lower display will show a mnemonic identifying that parameter The upper display will show the current value setting of that parameter Adjust the value setting if required by pressing the Raise or Lower Keys As soon as the value setting is changed the upper ...

Страница 39: ...Mode will be made if in Configuration Mode there is no front panel key activity for two 2 minutes NOTE Refer to the Manufacturers Data Manual for a description of the Configuration Mode Parameters for the West 6700 Temperature controller If it is necessary to change the Setup Mode values go to the Setup Mode procedure on page 2 9 after setting up and exiting the Configuration Mode Configuration Mo...

Страница 40: ...Key is displayed Refer to the Setup Mode Chart on this page and use the Raise and Lower Keys to enter the values indicated on the chart 4 Press the Function F Key 5 Follow steps 3 and 4 until all values listed on the Setup Mode Chart have been entered 6 The last value to be entered is DO NOT change this value 7 To exit the Setup Mode press and hold the Function F Key first then while still holding...

Страница 41: ...vement around the entrance end of the conveyor see Photocell Emitter Components illustration 7 Place product having the lowest components expected to be processed in the path of the photocell emtter and reflector 8 Loosen the screws securing the photocell emitter mounting bracket and photocell reflector mounting bracket enough to allow slight vertical movement 9 Slowly lower the emitter and reflec...

Страница 42: ... this indicates a need to increase sensitivity 6 Turn the sensitivity adjustment screw on the photocell emitter in 1 4 turn increments in a clockwise direction until the green LED remains illuminated 7 Now turn the sensitivity adjustment screw counterclockwise in 1 4 turn increments slowly until the LED flashes between red and green This adjustment determines the point of sensitivity 8 Turn the se...

Страница 43: ... 8 2 gpm 16 nozzle at 30 psi flow rate from table 1 063 6 3 Minimum concentration will be achieved using 18 nozzle with metering screw turned all the way in Min detergent concentration percentage with given detergent and psi 048 gpm min injection rate from table 3 15 gpm 18 nozzle at 30 psi flow rate from table 1 003 3 By changing the nozzles and adjusting the metering set screws in this applicati...

Страница 44: ...gpm under variable pressure 2 Adjust the injection rate by turning the metering screw located on the fitting Depending on the viscosity of the detergent being used the injection rate is adjustable from 90 2700 C3 min 3 100 oz min The metering screw has a range of five 5 turns 3 Turn the metering screw counterclockwise to increase the flow and clockwise to reduce the flow After adjusting the meteri...

Страница 45: ...ation Tank Drain Control 3 11 Chemical Isolation Tank High Operating Low Level Indicators 3 12 Chemical Isolation Tank Immersion Heater On Indicator Increase T emperature Control 3 12 Chemical Isolation Decrease T emperature Control 3 13 Chemical Isolation High Low Temperature Indicator 3 13 Rinse Hurricane Pump On Off Control 3 13 Rinse JIC Pump On Off Control 3 13 Rinse Tank Fill Control 3 14 Ri...

Страница 46: ...2 4 Auto Start up Timer 3 36 2 5 pH Monitor 3 36 2 6 Resistivity Monitor 3 37 SECTION 3 ROSIN O A CASCADING 3 38 3 1 Rosin Cascade Setup 3 38 3 2 O A Cascade Setup 3 39 SECTION 4 SYSTEM ACTIVATION 3 40 4 1 Facility Power 3 40 4 2 System Power 3 40 4 3 Initial Start Up 3 41 4 4 Activating Subsystems 3 41 SECTION 5 SYSTEM SHUT DOWN 3 42 5 1 Emergency Shut Down Procedure 3 42 5 2 Normal Shut Down Pro...

Страница 47: ...nd touch sensitive controls which produce an audible tone when pressed System interface functions such as temperature and conveyor speed are performed via the LCD keypad Detailed descriptions are provided in this section of the manual for Controls and Indicators used on the Aquastorm 200 Aqueous Cleaning System Read this section in its entirety to become familiar with the operations of the system ...

Страница 48: ......

Страница 49: ...stem and controls Power On Control The Power On Control enables power to all stages of the Aquastorm 200 Press the Power On Control to enable power The Power On green indicator illuminates to indicate power is on When power is activated the tank heaters activate if the tanks are at operating levels Power Off Control Press the Power Off Control to disable power to all stages of the Aquastorm 200 Wh...

Страница 50: ...on Alarms High Temperature Shutdown High Temperature Low Temperature High Level Low Level Optional Chemical Isolation Section Alarms High Temperature Shutdown High Temperature Low Temperature High Level Low Level Rinse Section Alarms High Temperature Shutdown High Temperature Low Temperature High Level Low Level Dryer Section 1 Alarms High Temperature Shutdown Dryer Section 2 with Optional Radiant...

Страница 51: ...lowing will occur Alarm message is cleared from the LCD and the Main Menu screen is displayed Alarm silences If the alarm condition still exists the red LED on the Alarm Acknowledge Control remains flashing If the alarm condition clears or is cleared the LED stops flashing When the system is restarted after clearing a SHUTDOWN condition the system Power Off indicator remains illuminated Pressing t...

Страница 52: ... 3 9th Optional blower 4 All LCD Liquid Crystal Display control interface functions listed below are now operable Conveyor speed Wash temperature Optional pH readout Optional chemical isolation temperature Rinse temperature Optional final rinse resistivity Dryer 1 temperature Dryer 2 temperature Optional radiant heater temperature Optional dryer 3 temperature Optional dryer 4 temperature Optional ...

Страница 53: ...ff Press the Wash Hurricane Pump On Off Control again to deactivate the recirculating pump Wash JIC Pump On Off Control The Wash JIC Pump On Off control is not applicable on the Aquastorm 200 series aqueous cleaning system This control is reserved for use with the 300 series cleaner Sump Pump High Level Indicator If a High Level condition becomes present in the sump pump reservoir the red sump pum...

Страница 54: ...at operating level When starting up via the Auto Start Timer the fill solenoid automatically activates to fill the tank if the level is below operating level The fill indicator will flash to indicate it is filling If the tank is already at operating level the fill indicator remains illuminated When the tank becomes full at operating level the fill solenoid shuts off the fill indicator stops flashi...

Страница 55: ...k liquid level drops below low level the following will occur Audible alarm sounds Alarm acknowledge indicator flashes Tank low level red indicator illuminates Optional status tower flashes red LCD displays Wash Low Level Alarm Tank heaters are disabled Wash pump is disabled 5 If a hardware conflict in the float switch configuration occurs such as several stuck floats in the same tank the followin...

Страница 56: ...Chemical Isolation On Off control again to deactivate the internal pump or external feed solenoid The green indicator no longer illuminates when the internal pump or external feed solenoid is off Wash Decrease Temperature Control Press the Wash Decrease Temperature control to decrease the wash tank temperature set point When pressed once and released the wash tank temperature set point is decrease...

Страница 57: ...ndicate the turbine blower is activated Press the control again to deactivate power to the chemical isolation turbine blower The indicator goes off to indicate the turbine blower is Off Chemical Isolation Tank Fill Control NOTE The Power On Control must be pressed in order to enable power prior to activating fill solenoids Press the optional Chemical Isolation Tank Fill Control to activate the tan...

Страница 58: ...e LCD Chemical Isolation Tank High Operating Low Level Indicators NOTE Only the Process Alarms configured into the Process Alarms screen with WARNING or SHUTDOWN action selected will sound an audible alarm Instructions provided here assume WARNING or SHUTDOWN is selected to sound an alarm Hardware configured alarms will always sound when activated There are five 5 indications possible by this tank...

Страница 59: ...licable on the Aquastorm 200 series aqueous cleaning system This control is reserved for use with the 300 series cleaner Chemical Isolation Decrease Temperature Control Press the Chemical Isolation Decrease Temperature Control to decrease the temperature set point When pressed once and released the chemical isolation tank temperature set point is decreased one 1 degree When the control is pressed ...

Страница 60: ...ating level 3 If the rinse tank liquid level drops below the operating level float switch but has not yet reached low level the following will occur Rinse Tank Fill Control NOTE The Power On Control must be pressed in order to enable power prior to activating fill solenoids Press the Rinse Tank Fill Control to activate the rinse tank fill solenoid The green on indicator flashes to indicate the tan...

Страница 61: ...tion only An asterik appears on the LCD in front of RINSE when the tank heaters are on The asterik is not visible when the heaters are off The On indicator turns off when the heaters are not on due to a high temperature or low level in wash tank The immersion heaters cannot be enabled and disabled via this control Press the Rinse Increase Temperature control to increase the wash tank temperature s...

Страница 62: ...eaters are disabled System shuts down If the rinse tank temperature exceeds set point temperature by the value set for alarming see page 3 29 Alarm Process Screen the following will occur Audible alarm sounds Alarm acknowledge indicator flashes Rinse tank high temperature red indicator illuminates Optional status tower flashes red LCD displays Rinse High Temp Alarm Tank heaters are disabled System...

Страница 63: ...4 Control to activate Blower 4 The green LED illuminates when the blower is on Press the control again to deactivate Blower 4 The green LED turns off when Blower 4 is off Radiant Heater On Off Control Press the Radiant Heater On Off Control to activate the optional radiant oven in Dryer 2 and optional Dryer 4 if configured The green LED on the Radiant Heater On Off Control illuminates to indicate ...

Страница 64: ...arm Instructions provided here assume WARNING or SHUTDOWN is selected to sound an alarm Hardware configured alarms will always sound when activated If the dryer cabinet temperature exceeds 82 o C 180 o F the following will occur Audible alarm sounds Alarm acknowledge indicator flashes Dryer high temperature red indicator illuminates Optional status tower flashes red LCD displays Dryer High Temp Al...

Страница 65: ...he green indicator is illuminated it is an indication that the conveyor is operating If the conveyor speed set point has already been set via the LCD interface keypad the conveyor starts to move in the forward direction at the set speed Conveyor Reverse Press the Conveyor Reverse control to operate the conveyor in the reverse direction The green LED on the Conveyor Reverse control illuminates when...

Страница 66: ...or speed set point is decreased until the control is released NOTE Actual speed and speed set points are visible on the LCD Increase Speed Press the Increase Speed control to increase the conveyor speed set point When pressed once and released the conveyor speed set point is increased one 1 FPM foot per minute When the control is pressed and held the conveyor speed set point is increased until the...

Страница 67: ... utilized to display specific information The following screens are used to convey operational information or to provide user interface for system setup Main Screen Configuration Timer Alarm Process System Clock and Date Alarm Display Main Screen MODULE SETP ACTUAL WASH 151F 141 CHEM_ISO 151F 150 RINSE 99F 86 DRYER_1 F 81 DRYER_2 F 85 CONVEYOR 3 0FPM 0 0 AQUASTORM 200 The Aquastorm s Main Screen d...

Страница 68: ...em See Configuring the Timer for more details on setting up the timer for operation Alarm Process ALARM LIMIT ACTION REALARM WASH 10 F SHUTDOWN 05 MIN CHEM 10 F IGNORE 05 MIN RINSE 10 F SHUTDOWN 05 MIN IR 10 F WARNING 05 MIN CONV 0 5 F WARNING 05 MIN RESIS 18 IGNORE 05 MIN pH 4 0 IGNORE 05 MIN The Alarm Process screen makes it possible for the operator to configure specific software related alarms...

Страница 69: ...m readout Tank high and low level alarms High and low temperature alarms Emergency Stop Immersion Heater High Temperature Radiant Heater High Temperature In addition to providing digital display for system information the LCD and keypad controls allow the user to perform specific system set up procedures The following parameters require set up via the LCD keypad Wash Temperature Set Points Chemica...

Страница 70: ...e using the number keys on the interface keypad The flashing square cursor disappears and an underscore appears below the values being entered until the Enter key is pressed When the required set point is displayed press the Enter key on the interface keypad to accept the new set point value NOTE The set point value may also be adjusted by using the up or down arrow keys on the membrane keypad per...

Страница 71: ...erator to set start up and shut down times for the Automatic start up feature RECIPE The RECIPE control functions are not yet applicable to the Aquastorm 200 Enter The Enter key when pressed accepts the changes made to Main Screen set points System Configuration Timer setup Clock and Date setup and Alarm Process values Number Keys The Number keys are used to enter Set Point values adjust Timer set...

Страница 72: ... to move the square screen cursor in the Up or Down direction respectively on the LCD Left Right Arrow Keys Use the Left and Right Arrow keys to move the screen cursor from one field to another within the Timer System Clock and Date and Alarm Process screens in either the left or right direction ...

Страница 73: ... TANK 2 NONE C I SPRAY YES C I BLOWER YES C I HEATER YES LIGHT TOWER YES BOARD_TRACKING YES SYS_CLOCK SET ALARM_PROCESS SET WATCH_DOG TEST To scroll between pages press the Page Up or Page Down keys on the LCD interface key pad To move the cursor to the option requiring configuration press the Up or Down Arrow keys until the cursor is in the required position To choose the next available configura...

Страница 74: ...rd 3rd page of the Configuration Screen 3 Press the Down arrow key on the LCD interface keypad until the underscore cursor is in line with SYS_CLOCK SET 4 Press the ENTER key on the LCD interface keypad to access the DATE CLOCK utility 5 Follow the instructions on the LCD When ENTER is pressed the underscore cursor goes to the first character of the present date displayed 6 Use the number keys to ...

Страница 75: ... on the LCD interface keypad to go to the Configuration Screen MODEL 200 TEMP_UNITS F SPEED_UNITS F Min CHECKMATE NO pH MONITOR YES WASH PUMP HURRICANE RINSE PUMP HURRICANE CONFIGURATION C I HEATER YES LIGHT TOWER YES BOARD_TRACKING YES SYS_CLOCK SET ALARM_PROCESS SET WATCH_DOG TEST ALARM LIMIT ACTION REALARM WASH 10 F SHUTDOWN 05 MIN CHEM 10 F IGNORE 05 MIN RINSE 10 F SHUTDOWN 05 MIN IR 10 F WARN...

Страница 76: ...alarm displays the alarm condition on the LCD and Shuts Down the system The REALARM value is configurable and determines when the alarm will occur again if it is not corrected initially The REALARM field can be set to a value from one 1 to 99 minutes After the audible alarm has been acknowledged by pressing the Alarm Acknowledge key on the LCD interface keypad the alarm silences and the LCD revert...

Страница 77: ... Dog may be tested from page three 3 of the Configuration Screen Follow the steps which follow to perform the WATCH_DOG TEST 1 Press the MENU key on the LCD interface keypad to go to the Configuration Screen 2 Press the Page Down key twice to go to page three 3 of the Configuration Screen 3 Press the Down Arrow key until the underscore cursor is in line with WATCH_DOG TEST then press the ENTER key...

Страница 78: ...which is to be edited NOTE The START time must be set to a time prior to the STOP time 4 When the square cursor is in the required position press the number keys to enter the required START and STOP times in military time i e 17 00 00 5 00 p m 5 Once the required START or STOP time has been entered press the ENTER key on the LCD interface keypad to accept the value entered 6 Under the ENABLE field...

Страница 79: ...ECTION SYSTEM The Auto Detergent Injection System provides automatic feed and mixture of saponifier or detergent via a 57 liter 15 gal tank located at the rear of the prewash section From the tank detergent is injected into the Wash section plumbing Liquid level operation in the tank is configured the same as the standard tanks with liquid level float switches for monitoring of the detergent level...

Страница 80: ...ell AMBER The Amber Status Tower Light FLASHES under the following conditions and takes priority over the Green Indicator Î Red Status Light Off Î System is warming up and the conveyor is coming up to speed The Amber Status Tower Light ILLUMINATES under the following conditions and takes priority over the Green Indicator Î Red Status Light Off Î Power is applied to the system system is up to set p...

Страница 81: ...stages Entrance End Emergency Stop Switch Exit End Emergency Stop Switch 2 3 EMERGENCY STOP Two large red push pull switches one 1 at the entrance end operator control panel and one 1 at the exit end front cabinet The Emergency Stop push pull switches are wired in series Either one turns off power to all stages Emergency Stop E Stop Conditions Î E Stop Switch is Depressed Î Any immersion heater hi...

Страница 82: ...ed by turning on the Main Power Disconnect located at the exit end of the system supplied with 380 and 460 V systems only See page 3 32 for details on setting up the Auto Start Timer Main Power Disconnect 2 5 PH MONITOR The Aquastorm 200 may be configured with an optional pH Monitor whereby pH levels from 0 14 are monitored in the wash tank by means of a pH probe pH levels are displayed on the cus...

Страница 83: ...vity levels in the incoming final rinse plumbing are displayed on the custom control panel s LCD Resistivity levels from 0 20 Meg Ohms are monitored continuously via a resistivity probe in line with the incoming final rinse plumbing For calibration of the Resistivity Monitor refer to the Maintenance Section of this manual Resistivity Probe Resistivity Monitor ...

Страница 84: ...ant to keep chemicals segregated Open and or close the specified cascade pipe ball valves outlined in this procedure for Rosin cleaning applications Go to the rear prewash section and locate the two 2 valves coming from prewash One 1 goes directly to drain controlled via a ball valve The other permits prewash to cascade back to recirculating wash tank also controlled via a ball valve Turn the ball...

Страница 85: ...ical Isolation tank locate the cascade pipe from the recirculating rinse tank to the Chemical Isolation tank and ensure the ball valve is COMPLETELY CLOSED It is important to keep chemicals in this section isolated to prevent cross contamination between the wash and rinse sections Remove the tag out for the system disconnect then activate power to the system Press the main power on control to enab...

Страница 86: ...nderstanding of operation for all system Controls and Indicators See Division 3 Sections 1 thru 6 4 1 FACILITY POWER Turn on the facility power to the Aquastorm 200 via the System Disconnect located at the exit end of the system on 380 and 460 volt systems only Î Optional Halogen Lights illuminate Î Computer boots up Î Power to the controls is enabled 4 2 SYSTEM POWER Press the Power On control vi...

Страница 87: ...On Off Control under the Wash section of the Main Keypad to activate the Wash Hurricane pump The wash section spray nozzles and optional Hurricane Jet and the prewash section spray nozzles energize Press the Blower On Off Control under the Chemical Isolation section of the Main Keypad to activate the Optional Dragout Blower The blower air knives in the optional Chemical Isolation section energize ...

Страница 88: ...ops all processing and can leave product in potentially damaging situations 5 1 EMERGENCY SHUT DOWN PROCEDURE Push one 1 of the large red push pull controls labeled EMERGENCY STOP to immediately shut the system down One 1 EMERGENCY STOP control is located at the front entrance end and one 1 is at the front exit end of the Aquastorm 200 Two 2 additional EMERGENCY STOP controls may be configured opt...

Страница 89: ...circuits Pumps Blowers Optional radiant heaters Fill and drain solenoids Conveyor Tank level and temperature level indicators remain illuminated 2 The system may be Shut Down by turning off each of the sub systems manually in the reverse order as performed under 4 4 Activating Subsystems see page 3 41 NOTE Perform the Post Shut Down Check in Division 4 Maintenance immediately after Shut Down This ...

Страница 90: ...omplete removal of flux residues as well as other contaminants which may be present or entrapped under components 6 5 CONVEYOR SPEED Conveyor speed affects nearly all other aspects of the aqueous cleaning process Slower speeds provide longer dwell times in the Wash and Rinse sections assuring a cleaner product Slower speeds also allow a longer drying period 6 6 COMPONENT TEMPERATURE The temperatur...

Страница 91: ...o the 3 5 floppy drive located on the left side of the low voltage control box 3 Press the black RESET button just below the floppy drive The green LED indicator illuminates and the computer re boots 4 Wait until the LED goes off then remove the floppy diskette by pressing the floppy eject button on the drive 5 Press the black RESET button again to reboot the system with the new software changes 6...

Страница 92: ...h Section 14 Conveyor Belt 15 Descaling 16 1 4 Monthly Maintenance Procedure 16 Descaling 16 Radiant Panel Heaters 21 Blower Belt Tension Inspection 22 Turbine Blower Air Filter 26 Pump Inlet Recirculation Filters 28 Liquid Level Float Switches 29 Immersion Heater Inspection 30 Rear Plumbing Inspection 31 Ventilation 31 Optional Detergent Injection System 31 1 5 Annual Maintenance Procedure 32 Ele...

Страница 93: ...44 3 4 Wire Belt Connecting Link Replacement Procedure 45 3 5 Optional Photo Sensor Adjustment 50 Alignment 50 Sensitivity Adjustment 51 3 6 Turbine Blower Belt Replacement 52 3 7 Turbine Blower Belt Tensioning Procedure 56 3 8 Turbine Blower Pulley Alignment 61 3 9 Turbine Blower Air Filter Replacement 65 3 10 Immersion Heater Replacement 66 Heater Replacement 67 3 11 Liquid Level Float Switch Re...

Страница 94: ... perodic maintenance or scheduled down time and defining the procedures required limits the need to disrupt normal operation of the production line for minor maintenance Performing preventive maintenance increases the reliability of the equipment and optimizes production quality The following maintenance schedule is provided strictly as a guideline and should be modified as necessary to meet speci...

Страница 95: ...y nozzles and Hurricane Jets Drain and rinse all system tanks Inspect and clean all tank catch baskets Thoroughly rinse all wet sections Inspect and clean all system drain screens Inspect float switch mechanisms for damage or restriction and replace if necessary Inspect and clean optional photocell emitter and reflector Inspect and clean pump recirculation filters in all system tanks COMMENTS OK I...

Страница 96: ...eaters for hard water deposits and clean if inspection warrants Inspect and retension all blower belts Inspect and clean or replace blower air filters Inspect and replace if necessary any damaged tank immersion heaters Inspect all rear plumbing clamp connections for leaks and repair if inspection warrants Verify all external exhaust venting joints are tight to prevent drippage and exhaust leaks CO...

Страница 97: ...ace all tank float switches approximately every twelve 12 months of operation or sooner if inspection warrants Lubricate conveyor drive chain Lubricate blower motors Inspect pressure gauge lines verify they are connected securely and lines are not damaged Inspect contactors verify contacts are not pitted or worn COMMENTS Initial Date __ __ __ Initial Date __ __ __ Initial Date __ __ __ Initial Dat...

Страница 98: ...polypropylene surfaces Use of these chemicals will permanently damage the polypropylene NEVER use Stainless Steel cleaner on polypropylene parts Permanent damage to the polypropylene will result Only use SD 20 All Purpose Cleaner or any All Purpose amonia based cleaner Cleaner must specify on USE Label Safe to use on plastic and vinyl surfaces Never use cleaning products that could damage the oute...

Страница 99: ... of the splash shields using window cleaner then wipe dry with clean white paper towels After cleaning and drying place in a safe location Wipe clean and dry each of the windows 1 2 POST SHUT DOWN CHECK Perform the Post Shut Down Check immediately after each normal shut down procedure is performed on the Aquastorm 200 Preliminary Clean the exterior surfaces of the Aquastorm 200 using SD 20 All Pur...

Страница 100: ...m its relaxed state Refer to the Corrective Maintenance section of this manual for the Wire Belt Tensioning procedure Spray Nozzles Inspect all upper and lower spray nozzles in spray manifold areas and remove any debris which may be clogging or altering spray nozzle patterns Refer to the Corrective Maintenance section of this manual for Cleaning or Disassembly procedures should cleaning be require...

Страница 101: ...storm 200 Wash Rinse and Chemical Isolation tank drains are controlled via brass solenoid valves and are located on the system drain plumbing at the under side of the system The wash rinse and chemical isolation tank drains are activated by the operator via the front control panel membrane keypad NOTE If your process is using deionized water in the wash and rinse tanks the tanks must be rinsed wit...

Страница 102: ...intenance 4 9 Aquastorm 200 Photocell Inspect and clean the optional photocell sensor and reflector located on the optional inlet conveyor assembly Photocell Reflector Photocell Emitter Optional Photocell ...

Страница 103: ...d of each shift of daily operation or at least every eight 8 hours of operation whichever comes first The daily maintenance procedure includes the previous listed post shut Down check prior to performing the following NOTE Before performing the Daily Maintenance Procedure complete the Normal Shut Down Procedure on page 3 43 and Post Shut Down Check on page 4 6 of this manual Wash Rinse and Chemica...

Страница 104: ...Remove the wash rinse and chemical isolation tank covers See photos on left column of this page 3 Remove the catch screens from their respective tanks See photos on right column of this page Wash Tank Chemical Isolation Tank Rinse Tank ...

Страница 105: ...er surface prior to draining the tank 6 Press each of the tank s Drain Control on the membrane keypad to drain the tanks NOTE If your application requires the use of treated deionized water be sure to use treated water when rinsing the Aquastorm 200 to avoid contamination CAUTION Use caution not to apply direct forceful streams of water to the float switches while rinsing with the hose Damage may ...

Страница 106: ...ter level is below the float mechanism Be careful not to force movement of the float to extreme positions This will result in damage to the float mechanism 10 After the wash rinse and chemical isolation sections have been thoroughly cleaned reinstall the following components or perform the following tasks Tank catch screens Tank lids System rear access panels Wash rinse and chemical isolation sect...

Страница 107: ... cleaning process is to remove residual flux oil or detergent which may be present as well as preventing the build up of these materials Rinse thoroughly for a minimum of five 5 minutes 2 Inspect and clean the drain screen in the prewash section to prevent clogging 3 Inspect all spray nozzles for debris that may be clogging or altering spray patterns If the debris cannot be easily removed from the...

Страница 108: ...sion Here or Here Refer to the wire belt connectng link replacement procedure in the corrective maintenance section of this manual 2 Check the wire belt for correct tension at the entrance or exit end of the conveyor The belt shold not extend more than 3 75cm 1 5 inches from its relaxed position Refer to the wire belt tension adjustment procedure in the corrective maintenance section of this manua...

Страница 109: ...d A high residue content will harm a rosin process 2 If tap water is used in the final rinse section perform the descaling procedure on the entire system and verify that the final rinse spray nozzles do not contain mineral deposits If they do have scale build up it will be necessary to swap the final rinse and prewash manifolds to allow descaling solution to circulate and clean out the residue bui...

Страница 110: ...caling waste products Consult descaler manufacturers Material Safety Data Sheets MSDS for instructions 4 If inspection warrants descaling of your system obtain any commercially available descaling solution from your local supplier This material should be chemically compatible with your system and process To descale the system tanks the following instructions apply 5 Ensure that the wash and rinse ...

Страница 111: ... the descaler manufacturers specifications outlined for the descaler being used Temperatures are not to exceed safety limits of 74 o C 165 o F MODULE SETP ACTUAL WASH 151F 141 CHEM_ISO 151F 150 RINSE 99F 86 DRYER_1 F 81 DRYER_2 F 85 CONVEYOR 3 0FPM 0 0 AQUASTORM 200 Main Power On Main Power Off Auto Sequential Mode Alarm Acknowledge Photocell On Off Final Rinse On Off Sump Pump On Off Hi Level Ind...

Страница 112: ...fill recirculate and drain procedure at least three 3 times to ensure complete rinsing of the descaler 17 Allow the pumps to continue circulating the descaling solution for approximately 20 40 minutes depending on the severity of the scale build up This thorough circulation process ensures that the spray jets distribute the descaling solution throughout the tanks and spray sections 18 Press the wa...

Страница 113: ...rrective maintenance section of this manual for the recirculation filter replacement Procedure 33 Inspect the immersion heaters in the wash rinse and optional chemical isolation tanks for excessive scale deposits If excessive scale is still present replacement is required Reference the following Electrovert part numbers for the immersion heater that applies to your system s voltage 230 V p n 2 500...

Страница 114: ... use a lint free soft cloth dampened with a mild solution of descaler to remove the scale build up WARNING Never operate the Radiant heaters outside of the Aquastorm 200 system cabinet The heaters can reach temperatures up to 74 o C 165 o F Serious burns may occur 3 With the Power On Control activated press the Radiant Heater On Off Control to activate the Radiant Heaters 4 Set the heater set poin...

Страница 115: ...the turbine blowers Blower Belt Tension Inspection To prolong the life of the turbine blower heads it is extremely important to inspect and maintain the correct belt tension on the blowers It is important to check the condition of the pulleys at this time If the anodizing is worn in the V groove of the pulley the pulley needs to be replaced See the Pulley Alignment procedure p 4 61 Tools and mater...

Страница 116: ...tTM II Gauge 7 5 60 3 Strand 110 120 lbs 50 54 kg 7 5 50 5 Strand 130 140 lbs 59 64 kg 10 60 3 Strand 110 120 lbs 50 54 kg 10 50 5 Strand 130 140 lbs 59 64 kg 6 Remove the blower belt cover NOTE Belt configurations on turbine blowers will vary depending on voltage horsepower and Hz rating Some turbine blowers may be configured with a three 3 strand belt and some may be configured with a five 5 str...

Страница 117: ...o measure Micro V belt tensions from 50 150 Kg 100 320 pounds Blower Configuration Chart HP Hz Belt Belt Tension KrikitTM II Gauge 7 5 60 3 Strand 110 120 lbs 50 54 kg 7 5 50 5 Strand 130 140 lbs 59 64 kg 10 60 3 Strand 110 120 lbs 50 54 kg 10 50 5 Strand 130 140 lbs 59 64 kg Place the gauge in the center of the belt and align the sides of the gauge parallel to the edges of the belt and mid way be...

Страница 118: ...e section in this manual and perform the Turbine Blower Belt Tensioning Procedure 8 Visually inspect the blower belt for wear If the belt appears to be excessively worn refer to the Corrective Maintenance section in this manual for the Turbine Blower Pulley Alignment Procedure or Turbine Blower Belt Replacement procedure 9 Reinstall the belt guard with the two 2 1 4 20 x 3 4 in socket head cap scr...

Страница 119: ...extremely important Excessive particulate build up in the impeller housing will result in damage to the unit Perform this procedure for each blower air filter 1 To access the blower air filter Remove the system rear access panels to allow maintenance access to the turbine blowers Rear view of Aquastorm 200 with access panels removed exposing blower units Blower Air Filter ...

Страница 120: ...mination Hold the air filter up to the light If the air filter appears to be black or greyish in color rather than white it is contaminated and requires replacement Reference Electrovert p n 2 8999 523 00 0 for the replacement air filter If light can easily be seen through the filter the filter may still be usable Refer to the Corrective Maintenance section of this manual for Blower Air Filter Rep...

Страница 121: ... After removal inspect and clean the filter s Use an appropriate clean up area for water clean up Spray the filters from the inside use a hose and spray nozzle to force any debris from the outside of the filter Now spray the filter s from the outside to remove any additional debris 8 If it is not possible to remove clogged material from the filter replacement is required If replacement is required...

Страница 122: ...treme positions This will result in damage to the float switch mechanism and replacement will be required 2 Inspect the float mechanisms for any debris such as scale build up which could prevent movement of the float switch mechanism If scale build up is present perform the Descaling Procedure in the Monthly Maintenance Section of this manual or replace the float switch if necessary Refer to the C...

Страница 123: ...r the Immersion Heater Replacement Procedure CAUTION The formation of scale deposits on the immersion heaters will reduce the heat transfer capability to the surrounding solution in the tank This may lead to premature burn out of the immersion heaters and faulty float switch operation 3 Inspect the immersion heaters in the wash rinse and optional chemical isolation tanks for scale build up 4 If sc...

Страница 124: ...is in the upper stainless steel plumbing area simply loosen and remove the Kwik Clamp connection Remove the Teflon O ring and replace it with a new one NOTE Once a Teflon O ring has been used and removed it cannot be re used Refer to the chart below for a list of the different size Teflon O rings and the corresponding Electrovert replacement part numbers Teflon O Ring Gasket Chart Plumbing Size 3 ...

Страница 125: ... replaced This condition would be most likely to be noticed on 230 VAC systems Liquid Level Float Switches Replace the liquid level float switches in the wash rinse and optional chemical isolation tanks every twelve 12 months or sooner if inspection warrants Refer to the Corrective Maintenance Section in this manual for the Liquid Level Float Switch Replacement Procedure Turbine Blower Motor Lubri...

Страница 126: ...sure gauges To access the pressure gauge connections behind the pressure gauges use a 4 mm hex key wrench to remove the eight 8 M5 socket head cap screws from the rear access cover Ensure that the connections are secure at both ends Inspect for nicks or slashes in the tubing lines this would cause a false pressure reading pressure drop Conveyor Drive Locate the conveyor drive motor in the rear of ...

Страница 127: ...ounterclockwise position NOTE Each trim pot will click but not stop at the full counterclockwise setting 2 Set P4 jumper between pins 2 and 3 3 Set the control voltage of pins 1 and 3 on P3 to 0 vdc 4 Turn MIN control clockwise until the conveyor starts to move then slightly counterclockwise until the conveyor just stops 5 Set the control voltage of pins 1 and 3 on P3 to 5 vdc 6 Turnt the GAIN pot...

Страница 128: ...d s TB3 terminal connectors NOTE If equipped with the three 3 Cell Input option place the Cell select switch to its CELL 1 setting and remove the five 5 wires from Cell 1 s terminal block only 5 Turn ON the main AC power and verify that the 753 digital display is indicating a full scale reading 19 9 megohms NOTE If the indicator displays an accurate reading proceed to step 7 If the indicator does ...

Страница 129: ...E1 E2 E3 R31 Set Point Adjustment R32 R8 Main Calibration Trimmer J1 Standard on all Models 752 753 762 CONTROL BOARD 7 Remove the Calibrator Module s lead wires and reconnect the Cell cable wires as depicted in the diagram below 5 4 3 2 1 TB3 3 2 1 3 2 1 TB2 TB1 Control Board Installation CELL ALARM RELAY AC POWER CONTROL BOARD COLOR CLEAR RED BLACK WHITE GREEN CONTACTS N C COMMON N O COLOR GREEN...

Страница 130: ...ne Pump On Off Control Optional Chemical Isolation Pump On Off Control The green indicators are off to indicate the pumps are off NOTE It may be necessary to decrease spray nozzle pressures to determine whether spray nozzles are clogged This can be done on the lower spray manifolds by turning the ball valve in the system rear cabinet which corresponds to the spray manifold for that section in a co...

Страница 131: ...anifolds is to be removed for servicing open the front glass window then remove the splash sheild from inside and set it in a safe place to prevent breakage 4 Turn the manifold assembly counterclockwise to remove it from the rear bulkhead Note the positioning and placement of each spray nozzle for replacement purposes 5 Locate the clogged spray nozzle s previously tagged and remove them from the m...

Страница 132: ...ng the spraying power of the nozzle 2 Use the wire and lightly scrape the inside edges of the nozzle from the opposite end to loosen any additional debris 3 Rinse thoroughly in water Use the facility air supply to blow out the nozzle 4 Reinspect the spray nozzle to ensure it is clean 5 If the spray nozzle can not be cleaned replace it with a new one 6 Proceed to the spray manifold reassembly proce...

Страница 133: ... assembly 6 Turn on the facility power safety disconnect to the Aquastorm 200 system 7 Press the Power On Control via the membrane keypad 8 Press the following controls to turn activate the recirculation pumps Wash Hurricane Pump On Off Control Rinse Hurricane Pump On Off Control Optional Chemical Isolation Pump On Off Control The green indicators are off to indicate the pumps are off CAUTION Be c...

Страница 134: ...ressures to determine whether spray nozzles are clogged This can be done on the lower spray manifolds by turning the ball valve in the system rear cabinet which corresponds to the spray manifold for that section in a counterclockwise direction until minimal spray nozzle flow is observed With the pressure decreased a clogged nozzle in the spray manifolds will have a noticeably diminished flow compa...

Страница 135: ...8999 538 00 0 1 Press the wash rinse and optional chemical isolation tank Drain Controls via the membrane keypad to activate the drain solenoids on the Aquastorm 200 2 Once the tanks have drained completely press the Power Off Control to disable system power Wash Tank Basket Being Removed Rinse Tank Basket Being Removed 3 Turn off the facility power safety disconnect for the Aquastorm 200 system 4...

Страница 136: ...ace the defective recirculation filter with a new one Reference Electrovert p n 2 8999 230 00 0 for standard or 525485 01 for Hurricane then reinstall in the reverse manner in which it was removed Hand tightening of the recirculation filter upon installation is sufficient It is not necessary to tighten using a spanner or pipe wrench Follow the same procedure for each of the recirculation filters r...

Страница 137: ...s can be done at either the entrance or exit end of the conveyor 3 Pull outward with moderate force The belt should not extend more than 3 8 cm 1 1 2 in from its relaxed state 4 If belt slack is excessive remove links as necessary by bending the U at each side of the link and weaving the link out of the wire belt Remove as many links as necessary to obtain the correct wire belt tension Follow the ...

Страница 138: ...ction as the wire belt loops Once both splicing links are in place positioned in the U shape pan tie the oposing ends of the wire belt together as depicted in photograph 2 to keep them from slipping apart while completing the wire belt splice DETAIL A DETAIL A Splice Intersection Point Splice Intersection Point DETAIL B DETAIL B 3 4 WIRE BELT CONNECTING LINK REPLACEMENT PROCEDURE ...

Страница 139: ... links through the links of the wire belt and spread the splice link ends apart Using a pair of needle nose pliers grasp one 1 end of the splicing link and insert the loop end over the belt link being spliced DETAIL C DETAIL C Pull Splice Links through the belt here Spread the ends of the Splice Link apart 4 Insert loop end of splicing link over belt link here ...

Страница 140: ...t tip of screwdriver in the Splicing Link Loop Pull up on screwdriver handle To complete the splice on one 1 end of the splicing link while still applying pressure on the handle of the screwdriver with the tip of the screwdriver inserted in the link s loop force the handle of the screwdriver over in the opposite direction to force the open end of the loop on the splicing link to catch the wire bel...

Страница 141: ...Aquastorm 200 4 48 Maintenance Refer to the Wire Belt Connecting Link weaving instrutions that follow for more details on installing the Wire Belt Connecting Links ...

Страница 142: ...Aquastorm 200 Maintenance 4 49 ...

Страница 143: ...on the emitter illuminates with normal movement around the entrance end of the conveyor 7 Place product having the lowest components expected to be processed in the path of the photocell emitter and reflector Photocell Emitter Sensitivity Adjustment Screw Photocell Emitter Green Red LED Indicator Photocell Reflector 8 Loosen the screws securing the photocell emitter mounting bracket and photocell ...

Страница 144: ...he Main Power On Control to activate system power The Main Power On indicator illuminates to indicate power is active 4 Press the Photocell On Control to activate the photocell option The green indicator illuminates to indicate the photocell is active 5 Remove any objects obstructing the emitter path 6 Observe the green LED on the photocell emitter The green LED on the photocell emitter should ill...

Страница 145: ... BLOWER BELT REPLACEMENT NOTE It is recommended to replace turbine blower belts every six 6 months or every 1000 hours of operation whichever comes first 1 Press the Main Power Off Control via the membrane keypad 2 Turn off the main power disconnect for Aquastorm 200 system 3 Locate the blower sections at the rear exit end of the Aquastorm 200 cabinet 4 Remove the rear blower section access panels...

Страница 146: ...9 then proceed to step 11 For systems configured without the M8 x 50 Hex Head Bolt M8 Nut M8 Flat Lock Washer M8 Flat Washer 3 4 Spacer Optional Slide Out Access for the blowers perform steps 10A and 10B then proceed to step 11 9 Locate the M8 hardware securing the Slide Out blower trays using a 13 mm open end wrench and a 13 mm socket with ratchet remove the M8 x 50 hex head bolt M8 nut M8 lock a...

Страница 147: ...Do not remove the four hex head bolts 15 Turn the tension adjust screw counterclockwise using a 9 16 open end wrench allowing the blower motor to slide toward the blower housing This relieves the tension on the belt 16 Turn the tension adjust screw until enough tension is relieved to remove the belts Tension Adjust Screw 3 Strand Belt Blower Motor Pulley Blower Pulley Slotted Access Holes Turn Pul...

Страница 148: ...ocedure For systems configured without Slide Out blower access position the blower assembly aligned with the mounting holes then re install the three 3 front most blower base plate mounting bolts M8 x 35 of the four 4 that were removed in step 10A 22 Replace the blower manifolds and secure them with the hose clamps Turbine Blower Blower Motor Blower Belt Cover 3 16 Allen Wrench 1 4 20 x 3 4 Socket...

Страница 149: ...chet with 3 8 Drive 2 0 Extension 3 16 Allen Wrench Krikit II Belt Tension Gauge Flashlight 1 Press the Main Power Off Control via the membrane keypad 2 Turn off the main power disconnect for Aquastorm 200 system 3 Locate the blower sections at the rear exit end of the Aquastorm 200 cabinet 4 Remove the rear blower section access panels Rear View of Aquastorm 200 with Rear Access Panels Removed Bl...

Страница 150: ...he blower to the right as far as possible to allow access to the blower belt guard L Loosen Hose Clamp Here oosen Hose Clamp Here then lift R then lift Rubber Union from ubber Union from Blower Housing Blower Housing Belt Guard Belt Guard 11 Locate the belt guard on the turbine blower 5 Access the blower assembly at the rear of the machine Use a 5 16 nut driver to loosen the hose clamp on the rubb...

Страница 151: ...ending on horsepower and Hz rating Some turbine blowers may be configured with a three 3 strand belt and some may be configured with a five 5 strand belt Refer to the Blower Configuration Chart on this page for specifications which apply to your system configuration Blower Belt Tension Chart HP Hz Belt Size Belt Tension krikit 7 5 60 3 Strand 110 120 lbs 50 54 7 5 50 5 Strand 130 140 lbs 59 64 10 ...

Страница 152: ...ick from the tension gauge immediately release pressure and carefully remove the gauge so as not to move the indicator arm 16 Refer to the photograph labeled How to Read the Krikit II T ension Gauge which illustrates how to read the Krikit II Tension Gauge accurately It is recommended to take more than one 1 belt tension reading to assure repeatable measurements Once an accurate reading has been e...

Страница 153: ...ise to decrease belt tension 20 Turn the tension adjust screw slowly in the direction required to increase or decrease the belt tension 21 When proper belt tension is achieved tighten the four hex head bolts behind the large motor pulley securely using a 3 4 socket with 3 8 drive ratchet with 2 0 extension 22 Replace the belt guard making sure the belt guard gasket is in place on the guard 23 Re i...

Страница 154: ...tchet with 2 0 Extension 9 16 Open or Box End Wrench True Straight Edge Rubber Mallet Prybar 1 Press the Power Off Control via the custom interface keypad 2 Turn off the main power disconnect for Aquastorm 200 system 3 Locate the blower sections at the rear exit end of the Aquastorm 200 cabinet 4 Remove the rear blower section access panels Main Power Disconnect Rear View of Aquastorm 200 with Acc...

Страница 155: ...e M8 haardware securing the Slide Out blower trays using a 13 mm open end wrench and a 13 mm socket with ratchet remove the M8 x 50 hex head bolt M8 nut M8 lock and flat washers and 3 4 spacers from either side of the tray closest to the rear of the machine 10A Use a 7 16 open end wrench to loosen and remove the three 3 front most blower base plate mounting bolts M8 x 35 of the four 4 that are sec...

Страница 156: ...t difference and proceed to the next step for proper alignment of the pulleys Refer to the Turbine Blower Belt Replacement Procedure to remove the belts before continuing further 15 After the belts have been removed go to the next step in this procedure Turbine Blower Blower Motor Blower Belt Cover 3 16 Allen Wrench 1 4 20 x 3 4 Socket Head Screws 13 Use a true straight edge and place it across th...

Страница 157: ...ighten the two 2 black oxides set screws on the hub taking caution not to disturb the setting 21 Re install the motor pulley onto the hub and secure using the three 3 black oxide set screws Ensure the three 3 black oxide set screws are tightened securely so that the motor pulley is flush on the back side with the flange on the hub 22 Verify alignment of the pulley surfaces after reassembly to ensu...

Страница 158: ...the rear exit end of the Aquastorm 200 4 Remove the front access panels to the blower enclosures 5 Remove the wing nut from the top of the filter houseing then remove the top housing to access and remove the blower filter 6 Remove the air filter from the filter housing 7 Place the new air filter reference Electrovert p n 2 8999 523 00 0 in the air filter housing and reassemble in the reverse manne...

Страница 159: ...d High voltage can shock burn or cause death 1 Go to the custom interface keypad and press either the wash rinse or optional chemical isolation tank drain control to activate the drain solenoid whichever pertains to the tank requiring heater replacement Allow the tank to drain completely 2 Press the Main Power Off Control via the custom interface keypad to disable system power 3 Turn the Aquastorm...

Страница 160: ... way cover to gain access to the internal connections 2 Remove the round head screws inside the heater electrical enclosure to allow the wire way mounting bracket to be removed from the immersion heater end 3 Use a nut driver to disconnect the wire connections from the terminal studs label each of them upon removal for replacement purposes 4 Disconnect the heater over temperature sensor wire from ...

Страница 161: ...the orifice to remove it NOTE Priortoinstallation verify thattheimmersionheater beinginstalledisofthe correctpartnumberand voltage Allimmersion heatersarestampedwith thisinformation Wheninstallinganew screwtypeimmersion heater itisnecessaryto applyTeflon tapeand freshsiliconetothethreads oftheimmersionheater An additionalsmoothedbead ofsiliconeisalsorequired aroundtheheaterfitting flushwiththefema...

Страница 162: ...licone directly over the Teflon tape covering all threads Teflon Tape Silicone 9 Apply fresh silicone directly over the wrapping of Teflon tape covering all of the threads of the immersion heater CAUTION Use caution when installing the screw type immersion heater into the PVC threaded coupling so as not to cross thread the fitting Stripping of the threads will result in a need to replace the PVC c...

Страница 163: ...nical support 14 Reconnect the immersion heater over temperature sensor wire disconnected in step four 4 of this procedure 15 Reconnect any ground connections disconnected in step 5 of this procedure 16 Install the immersion heater wire way cover using the Phillips head screws removed in step one 1 of this procedure Wire Way Cover Install the round Head screws around the wire way cover to secure i...

Страница 164: ... up When the tank fluid levels reach make up level the immersion heaters become enabled 19 Adjust the tank s set point temperature to a value which will allow the operator to verify operation of the replacement immersion heater 20 Use a voltmeter or clamp ammeter to verify 3 phase power to the heater This may be done at the heater wire connections using a voltmeter or inside the electrical enclosu...

Страница 165: ... Do not attempt to service the float switches until all power from the facility has been turned off 2 Turn the system disconnect for the Aquastorm 200 system to the OFF position to completely disable system power system disconnect supplied with 380 and 460 V systems only System Disconnect 3 Press the Aquastorm 200 Wash Rinse or optional chemical isolation tank Drain controls whichever pertains to ...

Страница 166: ...tch Removed from the Cabinet Reference Electrovert p n 6 1679 050 01 1 5 Remove the system front access panels 6 Locate the defective float switch The liquid level float switches for each of the tanks are located in the lower front enclosure cabinet wall 7 Remove the float switch from the front cabinet wall using a crescent wrench Turn the float switch counterclockwise to unscrew it from the cabin...

Страница 167: ... float switch Install the float switch using a crescent wrench To reinstall the float switch screw the fitting into the bulkhead in the clockwise direction 9 Check the interior of the tank to verify proper positioning of the float switch Proper positioning should allow the float mechanism on the switch to hang downwards to permit vertical movement during operation 10 Plug the male 2 pin connector ...

Страница 168: ...ypropylene or cpvc particles silicone and other foreign debris Perform the following procedures to clean the wash and or rinse Hurricane Jet Open the wash or rinse section front window Hurricane Jet Removal Procedure 1 Remove the two 2 M5 x 30 stainless steel flat head screws M5 lock washers M5 flat washers and M5 x 8 hex nuts from the bottom of the support bracket where it is secured to the conve...

Страница 169: ...004 00 0 from the end of the Hurricane Jet nozzle closest to the window 5 Slide the Hurricane Jet Nozzle 524418 01 off from the Insert Tube 3 0956 342 01 6 via the front window NOTE Make sure the white Teflon gasket 3 0304 216 01 6 is in good condition The Hurricane Jet will not function properly without the gasket 6 Obtain a 020 feeler gauge and insert it into the orifice of the Hurricane Jet noz...

Страница 170: ... through the orifice of the Hurricane Jet nozzle to remove the debris 9 Repeat the cleaning steps as necessary to remove any additional debris 10 Flush the insert tube with water and use a compressed air supply with clean dry air to blow the air through the end and through the holes to remove debris from the tube 11 Reassemble the Hurricane Jet nozzle in the reverse manner of disassembly While the...

Отзывы: