5.2 Start FIP
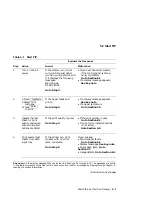
Table 5–1 Start FIP
Evaluate the Response
Step
Action
Normal
Malfunction
1
Turn on the AC
power
If the motors run, rollers
turn, control panel lights
up, fusing unit gets hot, and
if it displays the following
messages:
Warming Up
READY/IDLE
Go to Step 2.
If you hear abnormal sounds,
if the control panel is blank,
hung, or garbled,
Go to Section 6.1
If a display message appears,
See key note
2
a Press
Test/Fonts
b Select Print
test page
c Press
Enter
to print
If the paper feeds and
prints,
Go to Step 3.
If a display message appears,
See key note.
If a paper jam occurs
Go to Section 7.2.
3
Inspect the test
sheet for print
quality and make
sure all installed
options are listed.
If the print quality is good,
Go to step 4.
If the print quality is poor,
Go to Section 8.1.
If one or more installed options
is not listed,
Goto Section 6.2.
4
Print several test
sheets from each
input tray
If the printer can print
reliably with no errors,
jams, or defects,
Go to step 5.
If you see any:
Control panel faults,
Go to Section 6.1
Display messages, See key note
Paper path jams, Go to
Section 7.2
Image defects, Go to Section 8.1
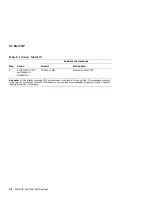
Key note: All the display message FIPs can be found in Sections 6.3 through 6.16. The messages are listed
in the table of contents at the front of this book or you can look for a message by flipping through Chapter 6
reading the section information.
(continued on next page)
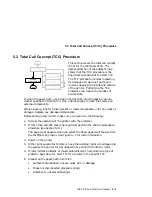
Start FIP and Total Call Concept 5–3
Содержание DEClaser 5100
Страница 10: ......
Страница 13: ...DSG 000172 Notes 1 ...
Страница 14: ......
Страница 36: ...1 8 Resolution Graphics Enhancements Option Board DSG 000172 Notes 1 22 Physical and Functional Description ...
Страница 61: ...2 5 HVPSA Figure 2 12 EP ED Cartridge DSG 000612 2 1 3 4 5 6 7 Technical Description 2 25 ...
Страница 62: ...2 5 HVPSA DSG 000172 Notes 2 26 Technical Description ...
Страница 70: ...3 2 Control Panel Operation DSG 000172 Notes 3 8 Operating the Control Panel ...
Страница 90: ......
Страница 124: ...7 5 Phantom Jams DSG 000172 Notes 7 8 FIPs for Fixing Paper Jams ...
Страница 142: ...9 3 Assembly Gear 3 Remove the gear assembly through the rear of the printer DSG 000639 9 6 Removing and Replacing FRUs ...
Страница 152: ...9 7 Assembly Paper Delivery 3 Press and release the two clips DS G 0 006 46 1 9 16 Removing and Replacing FRUs ...
Страница 167: ...9 12 Board DC Control 1 2 4 5 7 8 9 6 3 10 DSG 000657 Removing and Replacing FRUs 9 31 ...
Страница 205: ...9 26 Guide HVPSA Contact Plate b Remove the HVPSA contact plate DS G 0 00 68 5 Removing and Replacing FRUs 9 69 ...
Страница 224: ...10 1 Field Replaceable Units DSG 000172 Notes 10 4 FRU Part Numbers ...
Страница 254: ...B 4 Connecting to OpenVMS VAX or ULTRIX Systems DSG 000172 Notes B 10 General Information ...
Страница 264: ...D 3 Tools DSG 000172 Notes D 4 Training Documentation and Tools ...
Страница 274: ......


