5.1 Preliminary Information
5.1 Preliminary Information
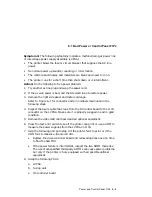
Before using the start FIP, do the following:
•
Record the symptoms, then recycle/reboot the printer.
•
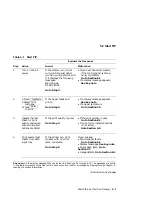
Do all steps of the start FIP shown in Table 5–1.
•
Follow the FIPs in order. The printer is not fixed until you complete the
start FIP with no errors.
•
After fixing the original malfunction, perform the TCC procedures listed in
Section 5.3 to make sure no other problems exist.
•
Keep the following in mind when the FIP tells you to check a signal or
power supply voltage:
–
Unless otherwise stated, all voltage readings should be within ±5% of
the stated value.
–
Voltage level ‘‘low’’ means 0 to +0.5V.
–
Voltage level ‘‘high’’ means 5V ±0.5V.
–
The bar over a signal name
P RNT
shows that that signal, when
asserted, is low.
5.2 Start FIP
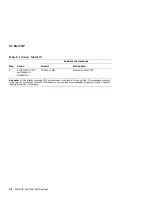
See Table 5–1 to begin the DEClaser 5100 printer FIP. If the symptoms change
or the troubleshooting path is not clear, go back to the beginning of the start
FIP.
5–2 Start FIP and Total Call Concept
Содержание DEClaser 5100
Страница 10: ......
Страница 13: ...DSG 000172 Notes 1 ...
Страница 14: ......
Страница 36: ...1 8 Resolution Graphics Enhancements Option Board DSG 000172 Notes 1 22 Physical and Functional Description ...
Страница 61: ...2 5 HVPSA Figure 2 12 EP ED Cartridge DSG 000612 2 1 3 4 5 6 7 Technical Description 2 25 ...
Страница 62: ...2 5 HVPSA DSG 000172 Notes 2 26 Technical Description ...
Страница 70: ...3 2 Control Panel Operation DSG 000172 Notes 3 8 Operating the Control Panel ...
Страница 90: ......
Страница 124: ...7 5 Phantom Jams DSG 000172 Notes 7 8 FIPs for Fixing Paper Jams ...
Страница 142: ...9 3 Assembly Gear 3 Remove the gear assembly through the rear of the printer DSG 000639 9 6 Removing and Replacing FRUs ...
Страница 152: ...9 7 Assembly Paper Delivery 3 Press and release the two clips DS G 0 006 46 1 9 16 Removing and Replacing FRUs ...
Страница 167: ...9 12 Board DC Control 1 2 4 5 7 8 9 6 3 10 DSG 000657 Removing and Replacing FRUs 9 31 ...
Страница 205: ...9 26 Guide HVPSA Contact Plate b Remove the HVPSA contact plate DS G 0 00 68 5 Removing and Replacing FRUs 9 69 ...
Страница 224: ...10 1 Field Replaceable Units DSG 000172 Notes 10 4 FRU Part Numbers ...
Страница 254: ...B 4 Connecting to OpenVMS VAX or ULTRIX Systems DSG 000172 Notes B 10 General Information ...
Страница 264: ...D 3 Tools DSG 000172 Notes D 4 Training Documentation and Tools ...
Страница 274: ......


