background image

AccuVision

®

 AV6010 Long-Range Camera Manual


Chapter 4 

57 


04-AV6010_Electrical_Installation_R12.doc 

Accu-Sort Systems, Inc. 

AV6010 SYNC Network 


The AV6010 Camera System uses Ethernet communications for a dedicated 

SYNC network. Only AV6010 cameras and the RangeFinder may be 

connected to the SYNC network. See the interconnect drawings for a single-

camera (112754) and multi-camera system (112753) in 

Appendix I.


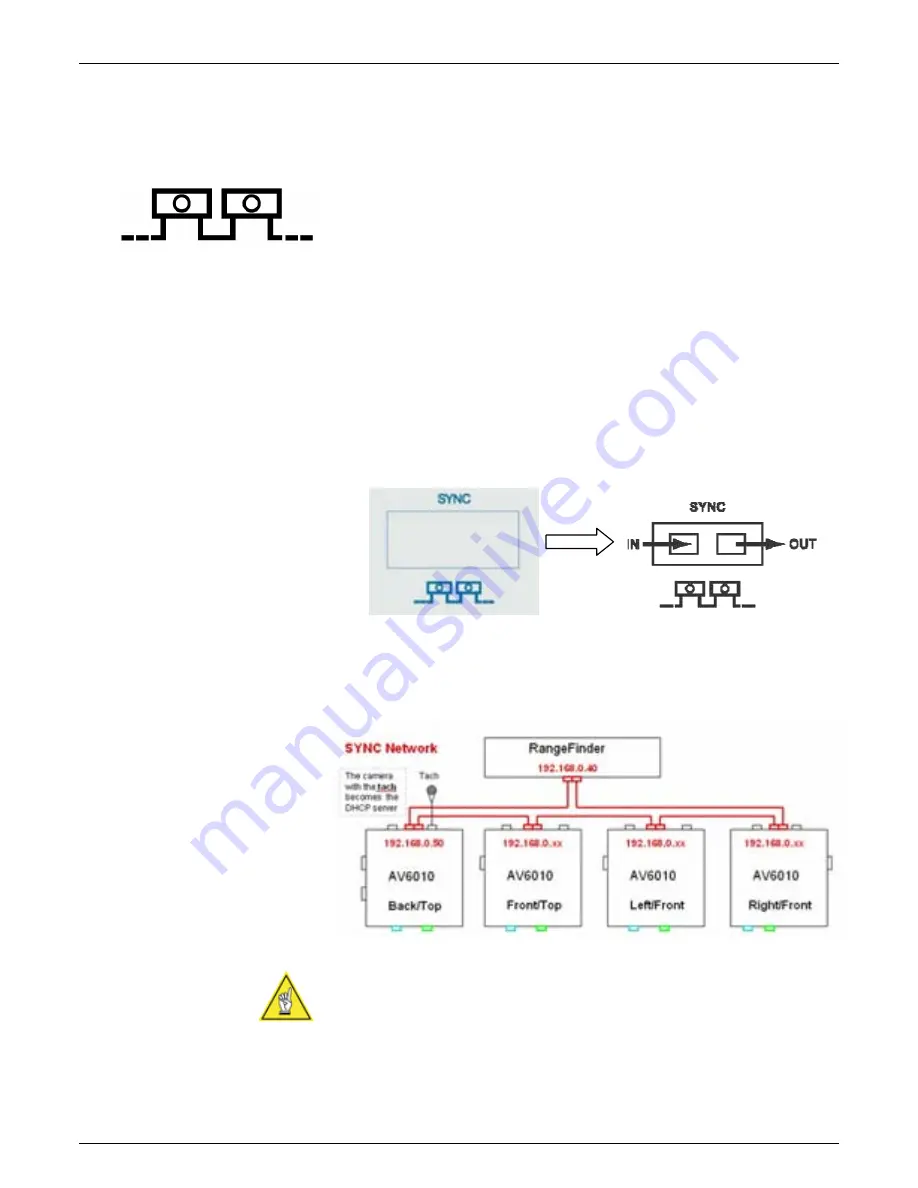
Connecting RangeFinder to Camera: 

1.  Connect the BLUE network cable to one of the SYNC ports on the 

AV6010 RangeFinder.  

2.  Insert the cable into the wiring channels of the mounting structure.  

(See illustration on page 54.)


3.  Connect the other end of the network cable to the AV6010 Camera’s 

SYNC IN port.  

4.  Connect a second network cable from the camera’s SYNC OUT port to 

the ‘open’ SYNC connection on the RangeFinder. 


 AV6010 RangeFinder 

AV6010 Camera 

Camera to RangeFinder Connection 


NOTE: 

In applications where there are two or more cameras, the SYNC 

OUT from the last camera should be connected to the ‘open’ SYNC 

connection on the RangeFinder. (See 

Connecting Camera to Camera

.) 


Содержание Accu-Sort AccuVision AV6010

Страница 1: ...AV6010 AccuVision Long Range Camera System Manual ...

Страница 2: ...AS logotype and 1 800 BAR CODE are trademarks of Datalogic Automation Inc All other company or product names are mentioned for purposes of identification only and may be trademarks of their respective owners Disclaimer Information The information contained in this manual is subject to change without notice Supplemental information or documentation may be required for certain applications or usage ...

Страница 3: ...Discharge 24 Basic Rules for ESD Control 24 Laser LED Safety 25 Safety Labels and Locations 25 3 Mechanical Installation Preparing for Mechanical Install 27 Unpacking Instructions 27 Installation Sequence 28 Installing a Single Camera System 28 Installing a Multiple Camera Tunnel 29 General Mounting Guidelines 30 Dimensions and Clearances 30 Physical Support Requirements 30 Vibration Limitations 3...

Страница 4: ...l using Power Distribution Box 73 First time Setup 74 Establish Connection and Login 74 Confirm computer is set up for DHCP 75 AV6010 User Interface System Configuration 76 Tachometer 77 Focus and Detection 78 RangeFinder Mounting 79 Camera Mounting 80 Symbologies 81 Adding a symbology 81 Deleting a symbology 82 Modifying a symbology in the Selected Symbologies list 82 Communications Transmit Poin...

Страница 5: ...tus Indicators 117 Checking Operations 118 Dimensioning Operations 119 Side by Side Package Detection Operations 121 7 Maintenance Maintenance Tools and Materials Required 123 Recommended Maintenance Frequency 123 Maintenance Tasks 124 Exterior Cleaning 124 Cleaning the Camera Window 125 Cleaning the Folding Mirror 126 Cleaning the RangeFinder Window 127 Tighten Mounting Hardware 128 Checking Conn...

Страница 6: ... FAST Monitor 199 E Image Quality Analysis IQA 201 F Error Codes 205 Software Error Codes 206 System Error Codes 208 COMe Errors 210 Focus and Illumination Errors 212 RangeFinder Errors 214 G Dimensioning 217 Overview 217 Certified Dimensioning Installation Requirements 218 User Interface Screens related to Dimensioning 220 Audit Trail and Alibi Storage Logs 222 Certified Dimensioning for Legal fo...

Страница 7: ...use most Accu Sort software applications run in the Microsoft Windows and internet browser environments you should know how to use a mouse choose commands and work with windows and dialog boxes Thank You Thank you for using the AccuVision AV6010 Camera System and this manual We value your comments and feedback Feel free to let us know what you like or dislike about the AV6010 or this manual by e m...

Страница 8: ...dimensional references in inches Metric references are provided in millimeters and enclosed in brackets For example 10 inches 254 mm Customer Service Training Accu Sort Systems offers a complete set of training courses to help you and your staff get the most out of your investment We can help you develop a training plan that provides thorough training for both your project team and your end users ...

Страница 9: ...system s features are described in detail System Overview User Interface Ordering Options and Accessories Product Overview The AccuVision AV6010 Long Range Camera System includes AV6010 Camera with integrated Camera Head Module Illumination Module DCM Distributed Computing Module Power Supplies Adjustable Folding Mirror AV6010 RangeFinder with power supply Tachometer VisionCapture Image Depot Serv...

Страница 10: ...ule DCM Figure 1 2 AccuVision AV6010 Camera Module The LED illumination floods the scanning area with light as packages are conveyed past the AV6010 camera s There are several models equipped with either a 30 inch 762 mm or 42 inch 1066 mm illumination module The AV6010 s camera head acquires and transfers image data to the DCM for decoding and processing The decoded results are then sent to a hos...

Страница 11: ...orientation enabling easy setup modification and diagnostics of the most important application parameters and functionality provides a choice of serial or Ethernet communications with your host computer network The optional COM e modules are typically used for Dimensioning Certified Dimensioning applications COM e module 2 Raw Image Export RIE for Optical Character Recognition OCR applications COM...

Страница 12: ...r Module RangeFinder Power Supply Mounting and adjustment brackets Figure 1 3 RangeFinder for AV6010 Camera Systems The RangeFinder is used to detect the presence of products as they enter the scanning area as well as report the package positions heights and sequence number to all cameras in the system RangeFinders used in dimensioning are calibrated to have an accuracy of 0 1 0 2 or 0 5 inch ...

Страница 13: ...ies to be decoded configure trigger and tracking parameters define communications and outputs monitor system performance diagnose and troubleshoot operating conditions The user interface also includes a downloadable Auto Calibration Wizard that enables static and dynamic setup of the RangeFinder and all cameras in the AV6010 system IMPORTANT The user interface enables you to easily configure the A...

Страница 14: ...ypical AccuVision AV6010 Long Range Camera Applications Use the AV6010 in the following AccuVision Long Range Camera System applications single camera applications multiple camera scanning arrays 3 sided Complete camera scanning tunnels up to 6 sides quadrant scanning tunnels Figure 1 5 Top read Single camera Application ...

Страница 15: ...es on the top and sides of packages When three or more cameras are used a Power Distribution Box PDB is typically designed into the system Figure 1 6 Scanning Tunnel 3 Sided Application A 5 sided or 6 sided scanning tunnel is used to read bar codes on most or all sides of the products passing through the tunnel including the bottom of packages See Figures 1 7 and 1 8 ...

Страница 16: ...roduction AccuVision AV6010 Long Range Camera System Manual Accu Sort Systems Inc 01 AV6010_Introduction_R10 doc Figure 1 7 Scanning Tunnel 5 Sided Application Figure 1 8 Tunnel Option Bottom Read Application ...

Страница 17: ...ter 1 17 01 AV6010_Introduction_R10 doc Accu Sort Systems Inc Quadrant scanning is used to assure high read rates on higher density bar codes when packages passing through the tunnel are significantly skewed Figure 1 9 Quadrant Scanning Tunnel Application ...

Страница 18: ... function without requiring information or signals from external systems Figure 1 10 AV6010 Camera System Functional Diagram An AV6010 Top Read Camera and RangeFinder shown in Figure 1 10 are needed for in camera dimensioning Objects are conveyed through the RangeFinder field The RangeFinder detects the presence of an object and determines the range and extents of the object and transmits that inf...

Страница 19: ... multi dimensional approach to detect whether or not the packages passing through the scanning area are two or more items side by side significantly reducing the potential for mis sorts mis ships as well as package or transport damage Side by side package detection works on both tilt tray and belt conveyors Options and Accessories Contact your sales representative for assistance in determining whi...

Страница 20: ...20 Introduction AccuVision AV6010 Long Range Camera System Manual Accu Sort Systems Inc 01 AV6010_Introduction_R10 doc Notes ...

Страница 21: ...rical shock ESD CAUTION This symbol identifies a procedure that requires you take measures to prevent Electrostatic Discharge ESD e g use an ESD wrist strap Circuit boards are most at risk Please follow ESD procedures Alerts help you to Identify a hazard and its consequences Avoid a hazard by taking adequate safety precautions Get the most out of your bar code solution General Precautions Installa...

Страница 22: ...tallation Do not touch the window glass of the RangeFinder camera or mirror Compliance Requirements FCC NOTICE The AV6010 Camera has been tested and found to comply with the limits for a Class A digital device pursuant to Title 47 Part 15 of the FCC Rules These limits are designed to provide a reasonable protection against harmful interference when the equipment is operated in a commercial environ...

Страница 23: ...erforming any type of maintenance turn off power to the unit and disconnect the power cord Be certain your hands and the floor of your work area are dry before touching electrical equipment or connecting cords Routinely check all power cords plugs wiring and cable connections for any signs of exposed wire or deteriorating insulation If you notice any damage make arrangements with service personnel...

Страница 24: ...rostatic discharge is not significant enough to cause total failure but may result in intermittent gate leakage causing loss of software or incorrect storage of information Direct catastrophic failures occur when a unit is damaged to the point where it is permanently damaged Basic Rules for ESD Control Below are some keys to effectively control unnecessary ESD damage when working with ESD sensitiv...

Страница 25: ...g the width of products WARNING Use of controls adjustments or procedures other than those specified in this document may result in hazardous laser light exposure The AV6010 RangeFinder Module is rated as a Class 2 Laser Product by the International Electrotechnical Commission Compliances are as follows Class 2 Laser Product IEC EN 60825 1 2001 Class II Laser Product 21CFR1040 1 0 mW peak cw power...

Страница 26: ...26 Safety AccuVision AV6010 Long Range Camera System Manual Accu Sort Systems Inc 02 AV6010_Safety_R10 doc AV6010 RangeFinder Module Safety Label Locations 1 3 3 2 1 2 ...

Страница 27: ...t of the conveyor from the floor Review all installation specific drawings provided with your equipment Review and plan the mechanical installation of all devices used in your application Be sure to allow adequate clearance for maintenance Review and plan the power requirements for your application Check the contents of the shipping cartons against the packing list Record all product serial number...

Страница 28: ...tallation Review the details of your application s requirements Determine and mark the mounting location If an Accu Sort structure is used mounting locations are pre marked Erect mounting structure or other supporting frame Mount AV6010 Camera and mirror in its position on the structure Mount AV6010 RangeFinder in its position on the structure Mount position any optional devices included with your...

Страница 29: ...ing locations are pre marked Erect mounting structure or other supporting frame Mount AV6010 Cameras mirrors in their positions on the structure Front Top Back cameras Side cameras Bottom camera if applicable Mount AV6010 RangeFinder in its position on the structure Mount Power Distribution Box to the structure Mount position any optional devices included with your system VisionCapture Image Captu...

Страница 30: ...y Accu Sort products parts or related equipment See Chapter 2 Safety Dimensions and Clearances The mechanical specifications dimensions and mounting footprint for the AV6010 Camera and RangeFinder are provided in Appendix A NOTE For installation wiring maintenance and service reasons allow for proper clearance Ease of access should also be considered when locating the mounting position Clearances ...

Страница 31: ...allation You will need the following Application s specifications defining proper location of structure Custom mounting structure drawings if a standard is not used Tools Required Socket Driver 1 2 battery powered recommended Tape Measure verify drawing to application recommended To assemble the mounting structure 1 Prepare the conveyor location for the structure 2 Inventory and stage the structur...

Страница 32: ...Systems Inc 03 AV6010_Mechanical_Installation_R10 doc Column Type 1 qty 2 Right back Left front Column Type 2 qty 2 Left back Right front Side Rails qty 4 Long unmarked Cross Members qty 6 Short pre marked Inner Side Rails qty 2 or 4 Long pre marked optional Mounting Structure Components ...

Страница 33: ...tional used in place of flat sled and mirror sled Corner Braces 24 inch 36 inch qty 4 each enlarged view T Stud and Flanged Nut pre assembled bulk quantity large bag Note Applications using optional equipment e g power distribution box VisionCapture Image Depot Server monitor and keyboard will have additional mounting structure components Review your installation drawings to confirm the options us...

Страница 34: ...10 Long Range Camera System Manual Accu Sort Systems Inc 03 AV6010_Mechanical_Installation_R10 doc Assembly of side rails and cross members to columns Reference drawing 110425 for details on the mounting base foot Installation of corner braces ...

Страница 35: ... Box Others Options NOTE If your application uses an Accu Sort mounting structure the positions of the RangeFinder camera sleds and mirror sleds are pre marked to simplify installation Prerequisites Structure installation completed Structure drawings standard or custom showing proper positioning of equipment on the structure Application s specifications Tools Required Socket Driver 1 2 battery pow...

Страница 36: ...ra on the sled aligning the camera mounting feet with the alignment marks 2 Attach with front loading hardware Do not over tighten which allows for adjustment during setup if necessary but assure the camera will not slide in the sled s channel when it is lifted into position 3 Assure camera is positioned with illumination side facing in the correct direction before lifting into position 4 Use two ...

Страница 37: ...rdware Do not over tighten which allows for adjustment during setup if necessary but assure the camera will not slide in the sled s channel when it is lifted into position 3 Assure camera is positioned with illumination side facing in the correct direction before lifting into position 4 Use two people to lift the camera into position as marked on the structure side rails Insert the tabs of the sle...

Страница 38: ...hten which allows for adjustment during setup if necessary but assure the camera will not slide in the sled s channel when it is lifted into position 3 Assure camera is positioned with illumination side facing in the correct direction before lifting into position 4 Use two people to lift the camera sled assembly into position as marked on the structure side rails 5 Attach with front loading hardwa...

Страница 39: ...d mounting structure drawings Determine mirror position as it relates to the camera and reading direction Remember Mirrors must be angled toward the conveyor Mirror adjustment to the correct angle is covered in Chapter 5 Tools Required Socket driver 1 2 battery powered recommended Tools optional Tape measure The mirror assembly ships pre assembled If not attach the brackets to both sides of mirror...

Страница 40: ...se there will be no marks 2 Attach with front loading hardware Assure the mirror will not slide in the sled s channel when moved into position on the structure Do not over tighten which allows for adjustment during setup if necessary 3 Assure mirror is positioned facing in the correct direction 4 Lift mirror into position as marked on the mounting structure 5 Attach with front loading hardware do ...

Страница 41: ...s are the same length as the mirror assembly in which case there will be no marks 2 Attach with front loading hardware Assure the mirror will not slide in the sled s channel when moved into position on the structure Do not over tighten which allows for adjustment during setup if necessary 3 Assure mirror is positioned facing in the correct direction 4 Insert the tabs of the sled s upper bracket in...

Страница 42: ...th front loading hardware Assure the mirror will not slide in the sled s channel when moved into position on the structure Do not over tighten which allows for adjustment during setup if necessary 3 Assure mirror is positioned facing in the correct direction and at the correct angle to the break in the conveyor belt 4 Lift mirror into position as marked on the bottom read mounting structure 5 Atta...

Страница 43: ...in the correct direction 3 Lift RangeFinder into position as marked on the mounting structure 4 Attach with front loading hardware do not over tighten 5 Tie wrap the power supply to the structure making sure the power cable can be connected 6 For RangeFinders used in applications with conveyors under 40 inches 1016 mm wide follow the procedure outlined in Chapter 5 NOTE Additional procedures relat...

Страница 44: ... to the tachometer as shown in the drawing provided with the tach The anti static brush provided with the tach must be installed to assure proper operation Mount the tach on the conveyor section where scanning is performed Mount the tach on the underside of the conveyor away from areas where the conveyor bows downward A good place to mount the tach is on one end of the conveyor underneath the driv...

Страница 45: ...nt a reflector directly opposite the photoeye on the other side of the conveyor Install the reflector within the operating range of the trigger photoeye The photoeye must be mounted so the light exit window is perpendicular to the conveyor facing the reflector The reflector must be mounted perpendicular to the conveyor facing the photoeye Secure the photoeye and reflector to the mounting brackets ...

Страница 46: ...x For installations that use the Photoeye Tach Generator Box option e g tilt tray applications see the application specific drawing for mounting details See also the documentation provided with the Photoeye Tach Generator Box See wiring information in Chapter 4 Mounting the Uninterruptable Power Supply UPS For installations that use the UPS option e g for applications that experience frequent brow...

Страница 47: ...irements See Chapter 2 Complete mechanical installation See Chapter 3 Review all installation specific drawings Compare any installation specific information to the standard Interconnection and Pinout drawings in Appendix I Note the differences if any Define and confirm the accuracy of your application s requirements Plan the power requirements for your application Define the communications requir...

Страница 48: ...nside structure channels supplied with structure Single camera system interconnect drawing 112754 in Appendix I or installation specific interconnect drawing if provided Tools Required None basic tools may be needed to make mechanical adjustments To electrically install an AV6010 single camera system 1 Ground the mounting structure to protective earth PE ground 2 Connect RangeFinder to its power s...

Страница 49: ... tachometer to the RangeFinder s TACH port 8 Connect the photoeye to the TRIG port if required 9 Connect AV6010 HOST communications as needed e g HOST serial port or HOST Ethernet network 10 Connect the VisionCapture IDS Server s LAN connection to the camera s IMAGE port if required 11 Connect the optional FAST Monitor Server s LAN connection to the camera s HOST network port if required 12 Comple...

Страница 50: ...els supplied with structure Multiple camera system interconnect drawing 112753 in Appendix I or installation specific interconnect drawing if provided Tools Required Wire cutters strippers Screwdriver Basic tools may be needed to make mechanical adjustments To electrically install an AV6010 multiple camera system 1 Ground the mounting structure to protective earth PE ground 2 Connect RangeFinder t...

Страница 51: ...ler camera and or dimensioning camera Connect the RangeFinder and all cameras completing a ring network See page 58 7 IMAGE network Connect the camera s IMAGE ports to the VIsionCapture IDS Server s network switch if required See page 59 8 Connect the optional FAST Monitor Server s LAN connection to the camera s HOST network port if required See page 59 9 Connect AV6010 HOST communications as need...

Страница 52: ...ction perpendicular Avoid running power and data wiring parallel to each other If possible maintain one of the following separations between the power and data wiring 12 inch 300 mm gap use steel conduit and 1 inch 25 mm gap 0 25 inch 6 5 mm of aluminum IMPORTANT When planning your installation wiring remember all power connections must be quick disconnect For PERMANENTLY CONNECTED EQUIPMENT a rea...

Страница 53: ... 111912 Power Distribution Box with Disconnect Wiring Diagram larger box NOTE See the standard drawings provided in Appendix I Application specific drawings supersedes those listed here AV6010 Camera Interface Connector Panel AV6010 RangeFinder Interface Connector Panel The cables are color coded SYNC cables are BLUE IMAGE cables are YELLOW for optional image capture system Avoiding Electromagneti...

Страница 54: ...our installation wiring remember all power connections must be quick disconnect See the Power Consumption Estimates table in Appendix A to determine the needs for your installation The table provides details for single camera and multiple camera applications Power Supply Connections CAUTION While performing the following wiring connection procedures be sure to follow all safety procedures regardin...

Страница 55: ...pplications using two or more cameras will use the Power Distribution Box PDB 111063 to handle power for the RangeFinder up to six cameras and the optional VisionCapture Image Depot Server IDS Power Distribution Box Connections POWER INLET 4 Wire Grounded 30 AMP 125 250 VAC NEMA L14 30P CIRCUIT BREAKERS CB1 CB7 10A POWER MONITORING CIRCUITS K1 K7 TB1 HOT NEUTRAL GROUND ...

Страница 56: ...nection procedure 1 Connect the power supply DC input connector into the RangeFinder s PWR IN DC input 2 Plug the AC power cord into the power supply 3 Plug the AC power cord into the power source 4 For multi camera systems If a Power Distribution Box PDB is used it can be plugged into the outlet box on the right side of the PDB RangeFinder PWR IN Insert AC Power Cord Connect to RangeFinder PWR IN...

Страница 57: ...ra 1 Connect the BLUE network cable to one of the SYNC ports on the AV6010 RangeFinder 2 Insert the cable into the wiring channels of the mounting structure See illustration on page 54 3 Connect the other end of the network cable to the AV6010 Camera s SYNC IN port 4 Connect a second network cable from the camera s SYNC OUT port to the open SYNC connection on the RangeFinder AV6010 RangeFinder AV6...

Страница 58: ... structure See illustration on page 54 3 Continue making the camera network connections for all cameras in the tunnel The SYNC OUT from the last camera should be connected to the open SYNC connection on the RangeFinder IMPORTANT The two most important cameras in a multi camera system should be connected to the RangeFinder For example Both the camera acting as the DHCP server i e that is most acces...

Страница 59: ...mage Network 1 Connect one end of the cable to the HOST or IMAGE network connection on a camera 2 Insert the cable into the wiring channels of the camera sled and mounting structure See illustration on page 54 3 Connect the cable s other end to the HOST or IMAGE network device 4 Continue making the network connections from each camera in the system to the HOST or IMAGE network device until all the...

Страница 60: ...s point to point communications at distances up to 50 feet 15 2 meters RS422 provides point to point communications at distances up to 1000 feet 300 meters RS422 communications require the use of an RS232 to RS422 converter NOTE See the serial port pin outs drawing 111515 in Appendix I Your application interconnections may vary from those defined here Be sure to review any application specific inf...

Страница 61: ...G may be connected it TACH TRIG NOTE In systems that involve application specific requirements it is possible that light curtains and or an Accu Sort Photoeye Tach Generator may be used instead of the standard devices See any application specific drawing s for details on installing and wiring these devices In camera Dimensioning Connections If your system includes the in camera dimensioning option...

Страница 62: ... this chapter and your application specifications to check your installation All interconnections should match the drawing that is applicable to your system s application These drawings are superseded by any customer specific documentation provided by Accu Sort The AV6010 is pre configured for your application at the factory If necessary you can change the configuration of the AV6010 s parameters ...

Страница 63: ...After configuring your system using the browser based AV6010 User Interface and AV6010 Install Wizard use the operations checklist in Chapter 6 to verify normal operations Prerequisites Complete the camera system installation for your application requirements See Chapters 3 and 4 Know your application specifications e g symbologies communications etc Assure your computer meets the system requireme...

Страница 64: ...r This will be used to establish a HOST network later 2 For the initial AV6010 setup you will connect via the SYNC network Use the special SYNC network adapter cable that is included with the AV6010 Setup Calibration Kit 3 Using Internet Explorer or Mozilla Firefox open a browser window 4 Enter the camera s IP address in the Address entry field 5 Save the IP address as a Favorite or Bookmark in yo...

Страница 65: ...eter settings are correct 8 Focus and Package Info Specify how the system is configured 9 Mounting RangeFinder and Camera s For first time setup use the AV6010 Install Wizard to auto calibrate the system Use these windows to make adjustments as necessary 10 Serial Port Setup 11 Networking Setup Image network VisionCapture IDS optional Host network 12 Symbologies and Messages 13 Special Tools Diagn...

Страница 66: ...lat head screwdriver turn the camera head shipping lock to the unlocked position Only turn 1 4 turn counter clockwise Do not force the shipping screw beyond the 1 4 turn You will feel it click into position 3 For multi camera tunnels also confirm the power switch is in the ON position for every camera in the system Close Up of Shipping Lock Location Location of Camera Head Shipping Lock ...

Страница 67: ...eed Mirror alignment tools 8 15 and 45 degrees 5 32 Allen Wrench The standard mirror angles are as follows Camera Position Mirror Orientation standards Front Back 45 degrees Top Read 15 degrees Side Read 15 degrees Bottom Read 15 degrees Quadrant 45 degrees NOTE In some applications the top read side read and bottom read camera mirror may be set for 8 degrees The mounting structure drawings provid...

Страница 68: ...e drawings provided with your system 3 Use the proper mirror alignment tool to set the mirror position 4 Tighten the mirror mounting screws that fix the mirror position in place 5 After tightening the hardware re check the mirror angle with the alignment tool 6 Remove the protective film from the mirror surface before attempting calibration Mirror Alignment for Front Top and Back Cameras IMPORTANT...

Страница 69: ...ture drawings provided with your system 3 Use the proper mirror alignment tool to set the mirror position 4 Tighten the mirror mounting screws that fix the mirror position in place 5 After tightening the hardware re check the mirror angle with the alignment tool 6 Remove the protective film from the mirror surface before attempting calibration Mirror Alignment for Side Read Cameras IMPORTANT Mirro...

Страница 70: ...r greater RangeFinder power must be ON during this procedure Confirm correct mounting location install drawings Chapter 3 Tools Required Socket Driver 1 2 5 32 Allen wrench To level the RangeFinder 1 Assure the mounting hardware is only finger tight 4 places 2 Check the five leveling LEDs on the RangeFinder The lit LED is like the bubble on a standard level If the center LED is lit no adjustment i...

Страница 71: ... right than where the codewords end Allow at least one inch 25 4 mm of additional codewords to extend beyond the usable belt width RangeFinder power must be ON to see the laser pattern on the belt RangeFinder must be level Tools Required Beam Blocker Kit PN 1000067401 ships with RangeFinder Socket Driver 1 2 Install and adjust the beam blockers 1 Mount the beam blockers to the structure 2 Attach l...

Страница 72: ...IG green and TACH amber At the same time the AV6010 illumination will turn on and remain on for approximately 30 seconds then turn off 5 The AV6010 automatically starts all application programs required during operations 6 After a few minutes the illumination flashes ON then OFF The system is ready for operation in approximately five minutes The STAT LED is solid green to indicate normal operation...

Страница 73: ...g arrays and tunnels use the Power Distribution Box PDB The RangeFinder and all cameras are electrically wired to the PDB 1 Assure the PDB AC power cord is properly wired to the power source 2 Make sure all AV6010 system components are connected to the PDB 3 Connect the PDB AC power cord to the PDB 4 After connecting power to the PDB the AV6010 cameras perform an initialization sequence as describ...

Страница 74: ... IP address of the AV6010 NOTE All AV6010 units ship as DHCP clients without any IP address When proper startup is complete and a camera connection is established via the SYNC network the DHCP controller camera will assume a static IP address of 192 168 0 50 Use this IP address for first time setup You will need to obtain the correct IP address that will be used within the building from the system...

Страница 75: ...ork Connections and click Network Connections 3 Click Local Area Connection 4 Click Internet Protocol 5 Click Properties 6 Veirfy the window appears as shown below Obtain an IP address automatically should be selected 7 Click OK NOTE There may be times when you need to use a static IP setting in this window for example upgrading AV6010 system software For details on setting a static IP see How to ...

Страница 76: ...onfiguration from the menu tree 2 Enter a Name for your system 3 Click the Blink button to confirm the camera connection and position This will cause the illumination to flash on then off again If your application uses multiple cameras each camera detected by the system will appear on the screen 4 Confirm the Position is properly set for the camera that is flashing it s illumination Change the pos...

Страница 77: ... necessary 3 When using an external tachometer be sure to a Enter a Resolution in the field in tach pulses per inch Typically set for either 16 or 20 Resolution must be set to 20 if using dimensioning b Enter a Scale Factor No change required Leave set as 1 Change may be required in dimensioning applications 4 Click Update to save any changes 5 Click Reset to return all parameters to the last valu...

Страница 78: ... from the menu tree The Focus and Detection window is displayed 2 Enter the Minimum Package Size dimensions length width and height 3 Enter the Maximum Package Size dimensions length width and height 4 Enter the Minimum Package Spacing i e the minimum distance between packages being conveyed through the scanning area 5 Confirm the Conveyor Width There is no need to enter the width here since it is...

Страница 79: ...e Prerequisites The AV6010 Install Wizard should be downloaded and installed on your computer Use the RangeFinder Wizard to auto calibrate these configuration settings To set the RangeFinder Mounting configuration 1 Select Setup Mounting RangeFinder from the menu tree Select the camera position that you want to configure e g front top back etc The window for the selected camera position is display...

Страница 80: ...these configuration settings To set the Camera Mounting configuration 1 Select Setup Mounting from the menu tree Select the camera position that you want to configure e g front top back etc The window for the selected camera position is displayed NOTE Only the camera positions applicable to your system and assigned in the System Configuration window will have a Camera Mounting window selectable fr...

Страница 81: ... Minimum maximum code lengths Filtering required Minimum maximum quantity of each code to be found NOTE The calibration boxes supplied with the system include Code 39 bar codes For first time setup you can add Code 39 to the list to confirm the camera reads the codes on the calibration boxes Adding a symbology 1 Assign a unique name for the symbology if required If no entry is made this defaults t...

Страница 82: ...he symbology to be deleted 2 Click Remove The selected symbology disappears from the Enabled Symbologies list 3 Click Update Modifying a symbology in the Selected Symbologies list 1 Position cursor in any data entry fields to be modified and double click 2 Enter the change 3 Repeat for other fields requiring changes 4 Click Update See also Setup Symbologies in Appendix B ...

Страница 83: ... NOTE In applications using the VisionCapture Image Depot Server IDS the transmit points for all cameras need to be greater than the Image Transfer transmit point The transmit point is always measured from the RangeFinder even in applications that also include a photoeye To set the Transmit Point 1 Select Setup Communications Camera Transmit Point from the menu tree The Transmit Point window is di...

Страница 84: ...ud rate stop bits parity data bits flow control transmit message type and keep alive message To set the serial communications 1 Select Setup Serial Communications from the menu tree The Serial Communications window is displayed 2 Select a Baud Rate 3 Select a Stop Bits 4 Select a Parity 5 Select a Data Bits 6 Select a Flow Control 7 Select a Transmit Message Type from the drop down list 8 Enter a ...

Страница 85: ... type Message format To set the Host Network 1 Select Setup Communications Camera Host Network from the menu tree The Host Network window is displayed 2 IP Address Assignment 3 Host Network Port 1 a Connection Type b Message Format c Port Number d Keep Alive Keep Alive Message 4 Repeat Step 3 for Host Network Ports 2 4 as required by your application 5 Click Update to save any changes 6 Click Rese...

Страница 86: ...he longest camera transmit point To set the Image Network 1 Select Setup Communications Camera Image Network from the menu tree The Image Network window is displayed 2 IP Address Assignment a Choose between Static IP and Dynamic IP 3 Static Network Settings a Set IP Address In multi camera systems each camera has a unique IP The VisionCapture IDS IP assignments for AV6010 are as follows Camera Pos...

Страница 87: ...akes the DPI at the far reading distance and enters it as the LPI to assure images do not appear elongated 3 Gain The options are Normal or Fixed Normal allows the camera to change the gain dynamically for variations in package sizes Fixed applies a fixed gain regardless of where in the DOF the package appears 4 Digital Zoom When selected Digital Zoom maintains the same DPI throughout the whole DO...

Страница 88: ...s the AV6010 is expected to read Prerequisites You will need to know the following Symbologies to be decoded Advanced decoder options required for the symbologies To set the advanced decoder options 1 Select Setup Advanced Decoder Options from the menu tree The Decoder Options window is displayed 2 Set the desired bar code options as needed for the symbologies defined in Setup Symbologies 3 In ord...

Страница 89: ...et the dimensioning functions You need to make settings adjustments in the following AV6010 user interface windows Symbologies Tachometer Camera Mounting Top only Imaging Top only Dimensioning Tachometer Settings for Dimensioning 1 Select Setup Tachometer from the menu tree The Tachometer window is displayed 2 Confirm the External Tachometer Resolution is set for 20 00 pulses inch 3 Set the Scale ...

Страница 90: ...lect Setup Symbologies from the menu tree The Symbologies window is displayed 2 Select ASI Diagnostics from the Code Type drop down list ASI_Diagnostics will appear as a Symbology under Enable Symbologies 3 Enter a name in the Name field for ASI Diagnostics e g ASIDIAG 4 Click Add 5 Select Dimensions from the Code Type drop down list Dimensions will appear as a Symbology under Enable Symbologies 6...

Страница 91: ...kage Length Width Options a Confidence Threshold to 50 b Accuracy to 0 2 inch 4 Set the Certified Package Size Options for Minimum Package Size Length Width and Height NOTE The minimums cannot be set less than 12 times the accuracy or 4 inches whichever is greater 5 Set the Certified Package Size Options for Maximum Package Size Length Width and Height NOTE The maximum length allowed is 72 inches ...

Страница 92: ...ve read either Calibration Success or Calibration Failure 5 If Calibration Success is displayed continue with Setting the Cert Mode 6 If Calibration Failure is displayed go to Diagnostics Top Camera Logging and look for the reason why the failure occurred For example If a line in the log indicates that the DPI factor failed then manually adjust the DPI Scale Factor on the Dimensioning screen and r...

Страница 93: ...gnostics Tools 2 Under Downloads select InstallWizard zip 3 In the File Download dialog box click Save 4 Define the location on the C drive where the wizard will be saved It is recommended that you create an Accu Sort folder in the Program Files folder on your C drive e g C Program Files Accu Sort 5 Click Save The ZIP file will take several seconds to download 6 Click Close when Download Complete ...

Страница 94: ...following Windows Support File utilities Windows Installer 3 0 Redistributable WindowsInstaller KB884016 v2 x86 exe http www microsoft com downloads details aspx familyid 5FBC5470 B259 4733 A914 A956122E08E8 displaylang en Microsoft NET Framework Version 2 0 Redistributable Package x86 dotnetfx exe http www microsoft com downloads details aspx FamilyID 0856EAC B 4362 4B0D 8EDD AAB15C5E04F5 display...

Страница 95: ...ra System Manual Chapter 5 95 05 AV6010_Setup_R10 doc Accu Sort Systems Inc To open the AV6010 Install Wizard 1 Locate the icon on your desktop 2 Double click the icon to open the wizard 3 The AV6010 Install Wizard screen is displayed ...

Страница 96: ... the RangeFinder Wizard button 2 Set the Mount Selector and click Next Normally left as Standard 3 Confirm the RangeFinder scan line is perpendicular to the conveyor s direction of travel using a calibration box 4 Learn the Region of Interest a Measure the conveyor width used by the application b Measure the usable conveyor from i Left edge to the left side RangeFinder spot ii Right edge to the ri...

Страница 97: ...ine on conveyor edges of usable belt shown Close up of the RangeFinder s scan line pattern code words RangeFinder Scan Line Measuring from edge of conveyor to the alignment dot Close up of measuring to the alignment dot Measuring to determine the Region of Interest Left side of conveyor Right side of conveyor Direction of Travel ...

Страница 98: ...ye 1 Click the Photoeye Wizard button 2 Measure the distance from the photoeye to the scan line of the focus source either RangeFinder or light curtain Enter this measurement in the D Photoeye to Focus Source Distance field 3 Enter the Photoeye Debounce Distance This distance should always be a positive value and less than the distance to scan line D It is recommended that the difference between t...

Страница 99: ...pe measure Laptop with Install Wizard connected to camera system To setup the light curtain 1 Click the Light Curtain Wizard button 2 Measure the offset between the light curtain s zero height reference point and the conveyor s surface Enter this measurement in the Light Curtain Height Offset field The height offset is a positive value when the light curtain s zero height reference point is locate...

Страница 100: ... Go to Diagnostics Tools and click the Utilities and Documentation link To auto calibrate the Top Camera Follow the camera wizard s instructions to perform the static auto calibration 1 Click the Top Read Wizard button 2 Set the Top Camera Angle Orientation Selector for either Top Front or Top Back Camera angle facing upstream is negative Top Front Camera angle facing downstream is positive Top Ba...

Страница 101: ...DIM and ASICAL boxes Laptop with Install Wizard connected to camera system To run the Dimensioning wizard 1 Click the Dimensioning Wizard button 2 Turn on the conveyor 3 Run the ASIDIM box through the system 4 If the ASIDIM box is properly dimensioned by the system calibration is not needed 5 If the ASIDIM box is not properly measured the system changes to a NOT READY mode 6 In order to correct th...

Страница 102: ...era Image Viewer should both be open on the laptop s desktop Tools Required Camera Image Viewer AV6010_Realtime_Viewer exe icon Available as a download on the Diagnostics Tools page Dynamic Focus Target attached to a calibration box Available as a download on the Diagnostics Tools page AV6010 User Interface IMPORTANT Dynamic camera setup should be performed by a trained and authorized Accu Sort te...

Страница 103: ...elt Speed is shown in FPM 8 Make sure the Dynamic Focus Target is on the side of the calibration box that faces the camera to be focused Run the box past the camera 9 On Diagnostics System Status confirm the Package Count is incremented by one 10 Go to Diagnostics Images Confirm that there is an image displayed 11 Go to the Camera Image Viewer to view the captured image of the box Reference the ex...

Страница 104: ... IMAGE network See Connecting to the IMAGE Network IMPORTANT Do NOT connect to the SYNC network 2 Select Setup Options Side by Side Settings from the menu tree The Side by Side window is displayed 3 Under Side by Side Licensing set Side by Side Camera to Top Currently only the top read camera can be licensed for SBS IMPORTANT The system can be licensed before or after setup and calibration is comp...

Страница 105: ...p down menu confirm that Enabled is checked and that Delete Image After Viewing is NOT checked This allows images to be saved to the laptop 6 Click the Enable VisionCapture button at the top right hand of the viewer 7 Go to the Tools drop down menu and enable Side by Side Detection 8 Confirm Down Sample is set to 16 9 On the viewer s Side by Side Setup tab click the Read Parameters from Camera but...

Страница 106: ... Viewer to set the Image Left Right Limits Set Maximum Left Pixels Set Maximum Right Pixels 7 After setting the transport type continue with Capture Images To set SBS to work with Tilt Tray Conveyors 1 Select the Setup tab in the Image Viewer 2 Select Light Colored Tilt Tray from the drop down menu 3 Select the Calibration tab 4 Confirm Use Step by Step Tutorial checked 5 Click the Enable Calibrat...

Страница 107: ...ple SBS test conditions 4 Run the sample SBS test conditions through the system if any 5 Once enough packages have run through the system click Disable VisionCapture to disable the image capture mode 6 Continue with Evaluate Images Evaluate Images 1 Go to the Image Viewer s SBS Detection tab 2 Confirm the first image filename listed in the viewer is selected 3 Click Label Images AUTO Mode button 4...

Страница 108: ...tage for the SBS Rate 7 Once the highest SBS Rate is set click the Process Images and Set Parameters button 8 A Time Warning dialog box is displayed This takes about three seconds per image Click Yes to allow the system to process images 9 A progress monitor is displayed A Best Settings dialog box is displayed when the process is complete 10 Click the Save Parameters to Camera button 11 Setup is c...

Страница 109: ...ress 1 Under Windows go to the Start menu 2 Select Control Panel Network Connections and click Network Connections 3 Click Local Area Connection 4 Click Internet Protocol 5 Click Properties 6 Verify the window appears as shown below Use the following IP address should be selected 7 Enter the following IP address 10 0 40 19 default IP for IMAGE network Subnet mask 255 255 255 0 8 Click OK 9 Connect...

Страница 110: ...le Load an XML parameter file to the camera system from a laptop computer Save a backup copy of the XML parameter file to a laptop computer S Set Passwords As part of the initial system setup it is recommended that you change the Setup and Monitor passwords from the Accu Sort defaults For details see Diagnostics Tools in Chapter 8 Update Software If it becomes necessary to update your AV6010 softw...

Страница 111: ...peration It also outlines how you can verify optimal performance through several methods Become more familiar with your application Step by step start up operations checklist Status Indicator LEDs AV6010 Camera RangeFinder Diagnostics monitoring to confirm normal operations After configuring your system using the AV6010 setup wizard and browser based setup application use the operations checklist ...

Страница 112: ...s and turns a steady green followed by TRIG green and TACH amber At the same time the AV6010 illumination will turn on and remain on for approximately 30 seconds then turn off 4 The AV6010 automatically starts all application programs required during operations 5 After a few minutes the illumination flashes ON then OFF The entire system is ready for operation in approximately five minutes 6 The ST...

Страница 113: ...ure 3 Connect a computer to your camera system 4 Use the Monitor user ID and password to enter the AV6010 user interface 5 Run product through the scanning area 6 Use Diagnostics System Status to check the operation of your system 7 Use the links in the Device column to individually check the RangeFinder and cameras identified by position NOTE See Chapter 5 of the manual for details on setup Detai...

Страница 114: ...G Indicates the camera system is receiving the TRIGGER signal This is regardless of trigger mode i e not just tied to a photoeye input It is active when the camera is acquiring images TACH Blinks when tachometer is active Rate is sub sampled from actual tach every 2000 pulses HOST Indicates TX and RX communications activity on HOST serial port FOCUS Indicates TX and RX communications activity Used...

Страница 115: ...AV6010_Operations_R10 doc Accu Sort Systems Inc LAN Communications Status Indicators 1 Gigabit LAN LED Status Indicators 1 Gigabit LED Color LED State Description Off LAN link is not established Left Green On LAN link is established Right Orange On Modulates with data ...

Страница 116: ...T LED will start blinking rapidly while the buttons are being held When it STOPS blinking about 5 seconds release the buttons and the AV6010 will set its parameters to default IMPORTANT Before you default the unit save a copy of the current XML parameters file Retrieve Press and hold for a few seconds STAT LED will start blinking rapidly while the button is being held When it stops blinking about ...

Страница 117: ...een LED blinking Standby condition indicates the conveyor has stopped or there is no tach input Fault Status of RangeFinder Warning Red LED blinking recoverable fault Error Red LED solid ON non recoverable fault During normal operation tach input with conveyor running these LEDs will ALL illuminate when a package is present under the RangeFinder During installation with no tach input these LEDs fu...

Страница 118: ...ed interface enables you to evaluate the operational performance of your AV6010 long range camera system by providing vital statistics via status indicators real time read quality monitoring and additional information Outgoing and incoming messages are also monitored Diagnostics Menu Tree of AV6010 Browser based Application Diagnostics Camera Status Screen ...

Страница 119: ...equires a box of known dimensions and the Dimensioning Wizard See Dimensioning Wizard procedure in Chapter 5 To view measurement data 1 Login as a Monitor user 2 Go to Diagnostics System Status 3 The measurement data is shown in the scrollable part of the screen Reference the Bar Code or Dimensions LxWxH column 4 This data can also be viewed in the Diagnostics Camera Status and Diagnostics Camera ...

Страница 120: ... Select Audit Trail Log and AATM Options Remember Times are GMT 4 Click Get Updated Log File 5 Log file is displayed in the scrollable section of the screen To view the Alibi Storage Log 6 Login as a Monitor user 7 Go to Diagnostics Top Logging 8 Select Alibi Storage Log and AATM Options Remember Times are GMT 9 Click Get Updated Log File 10 Log file is displayed in the scrollable section of the s...

Страница 121: ...nfigured for SBS package detection it can be monitored from the Diagnostics System Monitor Seasonal changes in product flow may require calibration of additional SBS conditions See the procedures in Chapter 5 for details on capturing images and evaluating optimizing new SBS conditions using the Camera Image Viewer See also Setup Options Side by Side and Camera Image Viewer in Appendix B ...

Страница 122: ...122 Operations AccuVision AV6010 Long Range Camera System Manual Accu Sort Systems Inc 06 AV6010_Operations_R10 doc Notes ...

Страница 123: ...ergent solution for cleaning the camera s exterior Cleaning solutions 70 denatured alcohol 30 de ionized water solution for cleaning the camera s illumination exit window Soft cotton swabs or lint free cloth Use to clean camera s illumination exit window Recommended Maintenance Frequency The AV6010 Long Range Camera System is designed for industrial environments The recommended frequency for perfo...

Страница 124: ...nance task Exterior Cleaning WARNING Shut down the AV6010 Camera System before performing this maintenance task CAUTION Do not use any chemical on the camera that is unsafe for plastics such as benzene acetone or similar products Do not use compressed air because it usually contains oil or water The exterior cleaning procedure may be performed without removing the device from the mounting structur...

Страница 125: ...it is noticed that the environment is dirty enough that deposits are appearing on the folding mirrors The exit window cleaning procedure should be performed without removing the camera from the mounting structure 1 Switch off the conveyor 2 Switch off the camera system 3 Follow the exterior cleaning procedure before cleaning the exit window 4 Check the exit window surface for any dust dirt or smud...

Страница 126: ...t is noticed that the environment is dirty enough that deposits are appearing on the folding mirrors The cleaning procedure should be performed without removing the mirror from the mounting structure 1 Switch off the conveyor 2 Switch off the camera system 3 Review the exterior cleaning procedure before cleaning the folding mirror 4 Check the folding mirror for any dust dirt or smudges If the mirr...

Страница 127: ...irty enough that deposits are appearing on the RangeFinder windows The cleaning procedure should be performed without removing the RangeFinder from the mounting structure 1 Switch off the conveyor 2 Switch off the camera system 3 Review the exterior cleaning procedure before cleaning the three windows 4 Check the windows for any dust dirt or smudges If the window needs to be cleaned proceed to Ste...

Страница 128: ...unted to the same structure 2 Check the mounting hardware of other devices Tighten as necessary Do not over tighten Checking Connections All wiring connections to the AV6010 Camera s and RangeFinder are made through the connector panels This is a safety check recommended for harsh environments where vibration may be a problem Reference Chapter 4 Electrical Installation 1 Check all wiring connectio...

Страница 129: ...ools and logs available for the system including System Monitor RangeFinder Monitor Camera Monitor one per camera in system Tools View Load Parameter File Downloads Set Passwords Update Software Logs Error Debug Audit Trail Alibi Storage CAUTION Because of the complexity of the AccuVision AV6010 Long Range Camera System it is recommended that training from Accu Sort be considered before attempting...

Страница 130: ...H Tachometer LED not blinking means the tachometer is not active If the conveyor is running the tach is either improperly connected or the tach has failed HOST Host Serial Communications TX and RX activity No LED activity means there is no data communications FOCUS Focus Serial Communications TX and RX activity No LED activity means there is no data communications PWR Power for Camera If this LED ...

Страница 131: ...RangeFinder with the ACCU SORT silk screen to the right Laser 1 DOE 1 Right Left side of conveyor Laser 2 DOE 2 Left Right side of conveyor During operations tach input present conveyor on these LEDs should ALL light when a package is under the RangeFinder If they do not light during the presence of a package troubleshoot the RangeFinder During installation no tach input conveyor off this is a lev...

Страница 132: ...ecific to the device Images Use the Images screen to view the images from each camera in the system For example if your AV6010 application uses three cameras to read the top and sides of products three image thumbnails will be displayed on this screen RangeFinder Status Use the RangeFinder Status screen to view diagnostics information related specifically to RangeFinder operations This information...

Страница 133: ...the file to identify the location e g Tunnel1_configuration xml Tunnel2_configuration xml etc To load a parameter file to a camera CAUTION Loading a parameter file to a camera will result in the camera using the most recently loaded file Be certain the file you load is the file you want to use and that you have a backup copy of the previously used parameter file in case you need to return to using...

Страница 134: ...eted successfully the AV6010 Install Wizard icon appears on your computer desktop For more information see AV6010 Install Wizard in Chapter 5 Setup To download and print the Camera Scan Line Target Note This is used with the Camera Install Wizards 1 Login to the AV6010 user interface 2 Select Diagnostics Tools in the menu tree 3 Click CameraScanLineTarget pdf The PDF opens in a new window 4 To sav...

Страница 135: ...r interface 2 Select Diagnostics Tools in the menu tree 3 Click DynamicFocusTarget pdf The PDF opens in a new window 4 To save a copy to your computer use File Save As 5 When printing the dynamic focus target make sure you set the scaling page scaling to None For more information see Dynamic Focus Calibration in Chapter 5 Setup To download the Diagnostics Tools 1 Click DiagTools zip 2 In the File ...

Страница 136: ...n is complete the camera will reboot automatically To load the complete software image 1 Login to the AV6010 user interface 2 Select Diagnostics Tools in the menu tree 3 Under the Update Software section of the screen click Load Image Accept the certificate if prompted to do so 4 In the Software Upload Utility click Select File 5 Select the new AV6010 image file to upload e g leapfrog_cflash tar g...

Страница 137: ...what the sensor is currently seeing It also displays any embedded data for diagnostic and set up purposes CAUTION The AV6010 Image Viewer is for setup and diagnostic purposes only It should not be allowed to remain running while a camera system is under normal operating conditions as it changes the line rate and turns on the illumination to capture the sensor data NOTE The AV6010 Image Viewer is n...

Страница 138: ...138 Troubleshooting AccuVision AV6010 Long Range Camera System Manual Accu Sort Systems Inc 08 AV6010_Troubleshooting_R10 doc RangeFinder Codewords Viewer Details not available at time of publication ...

Страница 139: ...AccuVision AV6010 Long Range Camera System Manual Chapter 8 139 08 AV6010_Troubleshooting_R10 doc Accu Sort Systems Inc RangerFinder O Scope Details not available at time of publication ...

Страница 140: ...s Status screens that can be used to determine possible problems These tables provide examples of using the error codes listed in Appendix F for PCS troubleshooting Technicians that complete the AV6010 troubleshooting and field replaceable unit FRU replacement training program should also reference the AV6010 Troubleshooting Matrix Reference Chapter 9 for the location of FRUs A guide is sent with ...

Страница 141: ...to transition board If connected but not running replace right hand fan module 3048 Error Left side fan disconnected or failed Confirm connection of fan module to transition board If connected but not running replace left hand fan module LED Board Failure 5016 Error Failure of LED Board 1 Check LED Board If all other LED board are lit LED Board 1 has failed Replace LED Board 1 Tachometer Failure 5...

Страница 142: ...142 Troubleshooting AccuVision AV6010 Long Range Camera System Manual Accu Sort Systems Inc 08 AV6010_Troubleshooting_R10 doc Notes ...

Страница 143: ...cedures as outlined in Chapter 2 Safety ESD CAUTION This symbol identifies a procedure that requires you take measures to prevent Electrostatic Discharge ESD e g use an ESD wrist strap Circuit boards are most at risk Please follow ESD procedures as outlined in Chapter 2 Safety External Devices To replace any external devices reference the installation procedures provided in Chapter 3 and Chapter 4...

Страница 144: ...ad Module 110 MM F 5 6 short range 1 2 1000065770 1000065959 Camera Head Module 140 MM F 4 0 1 2 1000065773 1000065964 Power Supply 28 VDC for Illumination 1 1 1 1000065776 1000065962 Power Supply 12 VDC for DCM Camera Head 1 1 1 1000065780 1000065969 Fuse 5 5 5 1000065981 1000065989 Transition Board 1000068420 Distributed Computing Module COM e 1 DCM with Decoding 1 1 2 1000069022 Distributed Com...

Страница 145: ...30 31 50 1000065965 Cooling Fan Left Module with power switch 1 1 2 1000065778 1000065966 Cooling Fan Right Module 1 1 2 1000065771 1000065960 Illumination Control Board Used in both 30 and 42 inch models 1 1 1 1000065961 LED Illumination Board Short use with 110 and 140mm lens 1000065772 1000065968 LED Illumination Board Tall use with 50 69 and 90mm lens NOTE The AV6010 FRU Guides and how to vide...

Страница 146: ... 3 1000068394 RangeFinder 0 1 Accuracy for Dimensioning 1 2 3 1000068395 RangeFinder 0 2 5mm 10mm Accuracy for Dimensioning 1 2 3 1000068396 RangeFinder 0 5 20 mm Accuracy for Dimensioning 1 2 3 1000065775 1000068832 RangeFinder OIML Certified 5mm 10mm Accuracy for Dimensioning 1 2 3 NOTE Mounting brackets power supply not included with RangeFinder FRUs RangeFinders include an accuracy label to th...

Страница 147: ...a High intensity red LEDs 635 nm RangeFinder Two visible red lasers 650 nm Power Requirements 115 230 VAC 50 60 Hz 85 110 Power Consumption 450 VA max for standard configuration 800 VA max with all options Visual Indicators 6 LEDs Camera STAT TRIG TACH HOST L C PWR RangeFinder 7 status LEDs Bar Code Types All standard 1D and 2D symbologies Connections Gigabit Ethernet TCP IP RJ45 Serial RS232 422 ...

Страница 148: ...y Extended Volt amps Qty Extended Volt amps AV6010 Camera System 42 107 cm 405 3 1215 4 1620 5 2025 6 2430 AV6010 RangeFinder 23 1 23 1 23 1 23 1 23 Network Switch 23 0 0 1 23 1 23 VisionCapture IDS 288 0 0 1 288 1 288 LCD Monitor 87 0 0 1 87 1 87 FAST Monitor 175 0 0 0 0 Total Power Consumption Volt amperes 1238 1643 2446 2851 Single phase current 115 VAC 10 8 14 3 21 3 24 8 230 VAC 5 4 7 1 10 6 ...

Страница 149: ... Appendix A 149 A1 AV6010_Specifications_R10 doc Accu Sort Systems Inc AV6010 Camera Dimensions Dimensions for the 30 inch camera shown The differences for the 42 inch camera are shown below Overall Length 45 25 1149 4 Mounting Footprint 40 44 1027 2 ...

Страница 150: ...110 mm F 5 6 42 45 deg 25 15 5 5 15 25 30 40 50 60 70 80 90 100 110 120 130 Range inches Field of View inches 8 mil 10 mil 13 mil 20 mil All customer applications are reviewed by Accu Sort applications engineers to assure the best camera solution is specified for the application s unique requirements including transport speed and symbologies being read Above is a sample read chart for the 110 lens...

Страница 151: ... 11 1999 Conducted Emissions Class A 2 Immunity EN 61000 6 2 2001 Electromagnetic Compatibility Generic Standards Immunity for industrial environments EN 61000 4 2 1995 Electromagnetic compatibility EMC Electrostatic discharge immunity test EN 61000 4 3 2001 EMC Part 4 Section 3 Radiated radio frequency electromagnetic field test EN 61000 4 4 2004 EMC Electrical fast transient burst immunity test ...

Страница 152: ...152 Specifications AccuVision AV6010 Long Range Camera System Manual Accu Sort Systems Inc A1 AV6010_Specifications_R10 doc Notes ...

Страница 153: ... Systems Inc B AV6010 User Interface This appendix provides tables of parameter definitions and descriptions for each screen provided in the AV6010 User Interface AV6010 User Interface Login Screen current version 6 0 AV6010 User Interface Homepage IMPORTANT Step by step procedures are provided in Chapter 5 ...

Страница 154: ...anual Accu Sort Systems Inc A2 AV6010_User Interface_R10 doc System Configuration Example from a single camera system with RangeFinder software version 5 0 Example AV6010 Components Not Detected Action drop down list Example from a multi camera system software version 3 x ...

Страница 155: ...ckbox tells the cameras to only retrieve software or a newer revision from another camera if the ID is the same This should normally be enabled This scenario this option prevents is one such as a DCM with a newer version of standard software being installed in a tunnel with custom software based on an older standard Without this option the tunnel would upgrade itself automatically to the newer sta...

Страница 156: ...election Definition Source drop down list External Uses an external hardware tachometer typically mounted under the conveyor belt Tachometer Internal Uses an internal software calculated tachometer Resolution Set the tachometer pulses per inch from to External Tachometer Scale Factor Do not change Only used in dimensioning systems Internal Tachometer Belt Speed feet minute ...

Страница 157: ...r Interface_R10 doc Accu Sort Systems Inc Focus and Detection Trigger by RangeFinder only RangeFinder Focus Options shown when Trigger by RangeFinder RangeFinder Focus Options shown when Trigger by Photoeye Trigger by RangeFinder using Photoeye additional Photoeye settings shown ...

Страница 158: ...option provides a front read camera with an offset in the front of the box so the focus does not start at the front corner Offset Back Focus for Skewed Box If a box is skewed this option provides a back read camera with an offset in the back of the box so the focus does not start at the front corner RangeFinder Focus Options when a photoeye is used for package detection PE Indicates Package is Pre...

Страница 159: ...AccuVision AV6010 Long Range Camera System Manual Appendix B 159 A2 AV6010_User Interface_R10 doc Accu Sort Systems Inc Mounting RangeFinder ...

Страница 160: ...Left Right Offset Y Compensates for the RangeFinder not being centered to the scanning surface Mounting Position Mounting Height Z Height that the RangeFinder is mounted off the scanning surface Left Identifies the usable area on left side of the RangeFinder This is referenced from the center of the RangeFinder Any codewords that are beyond the dimension set in this field will be ignored RangeFind...

Страница 161: ...AccuVision AV6010 Long Range Camera System Manual Appendix B 161 A2 AV6010_User Interface_R10 doc Accu Sort Systems Inc Mounting Camera Orientation ...

Страница 162: ...the image viewer Dist From Trigger X This is the distance from the RangeFinder or light curtain to the AV6010 read area Camera Offset Y This option aligns the package to the software cropping area Used with image cropping See Communications Camera Image Network Mounting Position Mounting Height Z Defines the farthest distance a package will be seen by the AV6010 Front Extends the trigger signal on...

Страница 163: ...2 AV6010_User Interface_R10 doc Accu Sort Systems Inc Symbologies Example with three codes enabled including filters Example ASI_Diagnostics and Dimensions should appear as enabled symbologies on dimensioning systems These are enabled from the Code Type drop down list ...

Страница 164: ...antity Minimum number of bar codes to be read from the selected symbology Max Quantity Maximum number of bar codes to be read from the selected symbology Remove button Use in combination with the selectable option to remove a code type from the active list of selected symbologies Add Symbology Name Define a specific name for the symbology Select the symbology from the drop list All commonly used 1...

Страница 165: ...unter reaches zero the host message is transmitted Tracking Mode drop down list Leading Edge Use the leading edge of packages to start a counter when it hits the trigger source When the counter reaches zero the host message is transmitted Distance to Transmit Point Distance from the trigger source to when the host message is transmitted This distance is set in inches Available for every camera con...

Страница 166: ...enabled Long Message STX00000 XXXX DATA QQ YYYLF STX Header 00000 Sequence number XXXX Box Length in tach pulses Data Bar code data qty of data fields are determined on the number of bar codes enabled QQ quality of reads YYY camera head identifier LF Trailer User Configured This option provides a configurable menu for the customer to construct the host message format Transmit Message Type Custom M...

Страница 167: ...st None Standard Message STX data LF qty of data fields are determined on the number of bar codes enabled Long Message STX00000 XXXX DATA QQ YYYLF STX Header 00000 Sequence number XXXX Box Length in tach pulses Data Bar code data qty of data fields are determined on the number of bar codes enabled QQ quality of reads YYY camera head identifier LF Trailer User Configured This option provides a conf...

Страница 168: ...defines the number of fields in the transmit message Bar Code Separator Define the separator to appear between bar codes Include QQ Includes the QQ which is the quality or number of times the AV6010 decoded the bar code during the trigger cycle Provides the QQ Delimiter field when checked Message Field 1 No Read Message Customer selectable character that will be transmitted when no bar code was re...

Страница 169: ...AccuVision AV6010 Long Range Camera System Manual Appendix B 169 A2 AV6010_User Interface_R10 doc Accu Sort Systems Inc Communications Camera Image Network ...

Страница 170: ... any images All Packages Transmit an image with every trigger cycle No Code Read Transmit the image if no bar codes were read No Dimensions Read Transmit the image if no dimensions were read Verifiy Bar Code Failed Transmit the image if the verification bar code failed Image Transfer Criteria drop down list Custom Custom defined condition for transmitting images Image Destination IP Destination of...

Страница 171: ...010 to dynamically adjust it gain depending on the package height and conveyor speed Fixed Gain Value This option is only used for testing It should be set to Normal for regular operation Gain Global Gain Offset This is adjusted when the overall image is too dark or light It will enhance the gain in the AV6010 to provide a greater contrast between the black and white elements in the bar code Digit...

Страница 172: ...User Interface AccuVision AV6010 Long Range Camera System Manual Accu Sort Systems Inc A2 AV6010_User Interface_R10 doc Advanced Decoder Options Use to set special parameters for the different bar code symbologies ...

Страница 173: ...ximum Module Size Orientation Data Matrix Rectangular Checksum I2 of 5 Small Lengths MSI Plessey Minimum Module Count Maximum Module Count Minimum Bar Size Maximum Bar Size Orientation Pharmacode Reverse Minimum Bar Count Maximum Bar Count Postal Orientation Straight 2 of 5 2SS Small Lengths Straight 2 of 5 3SS Small Lengths UPC EAN JAN Small Quiet Zone Supplemental Codes Use to enable extensions ...

Страница 174: ...174 AV6010 User Interface AccuVision AV6010 Long Range Camera System Manual Accu Sort Systems Inc A2 AV6010_User Interface_R10 doc Options Dimensioning ...

Страница 175: ...imensioning data in millimeters 10D Package Height Options Variation Threshold Set this to be double the height accuracy Example An 0 1 accuracy should have a variation threshold of 0 2 Accuracy drop down list Set for 0 1 0 2 or 0 5 5 10 20 mm based on the calibrated accuracy of the system s RangeFinder Package Length Width Options Confidence Threshold Enter as a percentage 0 100 Accuracy drop dow...

Страница 176: ...ttings IMPORTANT The Side by Side Settings are done during setup with the Camera Image Viewer Registration of a SBS enabled camera system must be performed by a trained and authorized Accu Sort technician before the system can perform SBS detection during normal operations See Chapter 5 for details on side by side product detection setup and calibration ...

Страница 177: ...AccuVision AV6010 Long Range Camera System Manual Appendix B 177 A2 AV6010_User Interface_R10 doc Accu Sort Systems Inc Options Side by Side Ignore Codes ...

Страница 178: ...reen for the device Status OK or NOT OK Belt Speed Identifies the conveyors current speed Package Count The number of packages that have traveled through the system since the last reset of the diagnostics screen Read Count Number of reads Mult Count Reset button Use to reset the diagnostics counters on this screen Sequence Number Shows the packages numbers in descending order Bar Code Indicates th...

Страница 179: ...m Manual Appendix B 179 A2 AV6010_User Interface_R10 doc Accu Sort Systems Inc Diagnostics Images Useful image not available at time of publication Diagnostics Images Screen Diagnostics Images Descriptions Not available at time of publication ...

Страница 180: ...ription See Appendix F for a list of error codes and their descriptions Status The RangeFinder status is either shown as OK Functioning normally NOT OK Check error codes for possible problem indicators Belt Speed The speed of the package conveyance in feet per minute Seq Number The sequence number assigned to packages that have passed through the RangeFinder s scanline Box Length The length of the...

Страница 181: ...nute Package Counts The total number of packages that ran through the system since the last reset Read Count The number of packages with decoded bar codes since the last reset Reset button Use to reset the diagnostics counters on this screen Seq Number The sequence number of the package scanned by the camera Bar Code or Dimensions LxWxH Displays the bar code data decoded from the package or the di...

Страница 182: ...g Displays the Debug Log in the Log File when selected Audit Trail Log Only available on the top read camera of a dimensioning system See Appendix G for more information Alibi Storage Log Only available on the top read camera of a dimensioning system See Appendix G for more information Get Updated Log File button After selecting a log from the option buttons click this button to update the data be...

Страница 183: ...age Camera Descriptions Selection Definition Seq Number The sequence number of the package scanned by the camera Bar Code or Dimensions LxWxH Displays the bar code data decoded from the package or the dimensioning data length x width x height for a TOP reading camera that is equipped with the Dimensioning COM e module Result Type Identifies the type of bar code that was decoded Camera Identifies t...

Страница 184: ...184 AV6010 User Interface AccuVision AV6010 Long Range Camera System Manual Accu Sort Systems Inc A2 AV6010_User Interface_R10 doc Diagnostics Camera Versions ...

Страница 185: ...AccuVision AV6010 Long Range Camera System Manual Appendix B 185 A2 AV6010_User Interface_R10 doc Accu Sort Systems Inc Diagnostics Tools ...

Страница 186: ... the Camera Scan Line Target PDF This target is used with the Install Wizard to determine the distance from the trigger source to camera scan line Static FocusTarget pdf Use to download the Static Focus Target PDF This target is used with the Install Wizard during calibration recalibration ImageViewer zip Use to download the Image Wizard tool Dynamic FocusTarget pdf Use to download the Dynamic Foc...

Страница 187: ...Systems Inc Camera Image Viewer Camera Image Viewer Screen The Camera Image Viewer is an installation and diagnostics tool It is used by trained and authorized Accu Sort technicians for the initial setup and calibration of camera systems It is also used for side by side package detection setup and calibration ...

Страница 188: ...d The Setup tab is used to retrieve parameters from the camera and set the transport type used with the SBS enabled system The Calibration tab changes based on the transport type selected belt or tilt tray The Detection tab is used to optimize the SBS conditions that the system uses for side by side package detection The image evaluation does not include SBS conditions detected by the RangeFinder ...

Страница 189: ...dition SBS Optimization Folders During image evaluation and optimization the viewer processes captured images and determines whether those images identify a side by side SBS condition It automatically creates these folders SBS_DetectedImages Correct SBS evaluation SBS_NotDectectedImages False negatives Images manually determined to be SBS but considered to be NOT SBS with the optimized parameter s...

Страница 190: ...terface AccuVision AV6010 Long Range Camera System Manual Accu Sort Systems Inc A2 AV6010_User Interface_R10 doc RangeFinder Codeword Viewer RangeFinder Codeword Viewer Screen Details not available at time of publication ...

Страница 191: ...V6010 Long Range Camera System Manual Appendix B 191 A2 AV6010_User Interface_R10 doc Accu Sort Systems Inc RangeFinder O Scope Viewer RangeFinder O Scope Viewer Screen Details not available at time of publication ...

Страница 192: ...10 Install Wizard to Auto calibrate the following system components RangeFinder Optional package induction e g photoeye light curtain Camera s Dynamically test system calibration Verify with actual product This appendix provides screens and useful reference information related to the AV6010 Install Wizard IMPORTANT Step by step procedures are provided in Chapter 5 ...

Страница 193: ...d to control camera focusing Top Camera Use with cameras that will only be reading codes on the top of products as the pass through the scanning area Calibrates key dimensions angle used to control camera focusing Back Camera Use with cameras that will only be reading codes on the back of products as the pass through the scanning area Calibrates key dimensions angle used to control camera focusing...

Страница 194: ...the front and left side of packages in a quadrant application Front Right Camera Use to setup camera that is reading codes on the front and right side of packages in a quadrant application Back Left Camera Use to setup camera that is reading codes on the back and left side of packages in a quadrant application Back Right Camera Use to setup camera that is reading codes on the back and right side o...

Страница 195: ...AccuVision AV6010 Long Range Camera System Manual Appendix B 195 A2 AV6010_User Interface_R10 doc Accu Sort Systems Inc This page intentionally left blank ...

Страница 196: ...196 AV6010 User Interface AccuVision AV6010 Long Range Camera System Manual Accu Sort Systems Inc A2 AV6010_User Interface_R10 doc Notes ...

Страница 197: ... Access images offline for review and analysis locally or remotely Quickly diagnose potential revenue recovery opportunities The VisionCapture system connects to the AV6010 s IMAGE network as outlined in Chapter 3 and Appendix I drawing 112753 sheet 3 VisionCapture Interface VisionCapture Icon VisionCapture a browser based user interface lets you easily setup or modify image file compression and s...

Страница 198: ...form the following view and analyze images sort images backup archive images MultiViewer supports compressed JPG and Portable Network Graphic PNG as well as uncompressed Bitmap BMP image formats Unlike regular BMP or PNG files image files saved in IDS contain additional information related to the captured images including an image ID number and start stop scan line time stamp The extra data is emb...

Страница 199: ...ted The AV6010 Camera System is fully compatible with the FAST Monitor Server and application Prerequisites FAST Monitor Server and software version 1 2 12 3 or later Internet connection RJ45 Ethernet cable To connect an AV6010 camera or tunnel to a FAST Monitor Server 1 Run an RJ45 Ethernet cable connection via a network switch from the HOST RJ45 port of the AV6010 Camera to the FAST Monitor Serv...

Страница 200: ...the FAST Monitor server to the next available Host Port in the Host Network Connection section of the Network window 5 Select Fast Monitor from the Host Port n drop down list 6 Type the IP address of the FAST Monitor server in the IP input field NOTE The default IP for the FAST Monitor server is 192 168 250 1 If this IP does not work contact Accu Sort support at 1 800 BAR CODE 7 Type 9899 in the P...

Страница 201: ... or 0 5 inch keep out zone surrounding the IQA target bar codes During initial system commissioning and as part of a periodic maintenance event pre or post sort a calibration box is conveyed through a tunnel scan point and each camera s quality metrics are measured The metrics include focus brightness contrast and noise The results of these measurements are sent to a FAST Monitor FM server where t...

Страница 202: ...ANT The IQA target bar codes supplied by Accu Sort have unique serialization and should not be reproduced Plywood calibration boxes are also available from Accu Sort For additional targets or plywood calibration boxes contact your Accu Sort sales or service representative at 1 800 BAR CODE To test a camera s image quality with IQA 1 Affix the 8 inch square targets supplied by Accu Sort to a 12 inc...

Страница 203: ...AccuVision AV6010 Long Range Camera System Manual Appendix E 203 A5 AV6010_Image_Quality_Analysis_R10 doc Accu Sort Systems Inc This page intentionally left blank ...

Страница 204: ...204 Image Quality Analysis IQA AccuVision AV6010 Long Range Camera System Manual Accu Sort Systems Inc A5 AV6010_Image_Quality_Analysis_R10 doc Notes ...

Страница 205: ...y 4 digit series numbers and are provided in the following tables 1000 Software Critical Errors 2000 Software Serious Errors 3000 System Errors 4000 COMe Errors 5000 Focus and Illumination Errors 6000 RangeFinder Errors The error code severity is identified as one of the following Info Warning Status LED blinking Error Status LED solid ON NOTE This appendix includes all error codes for version 8 x...

Страница 206: ... 2006 Info Unable to read from message queue 2007 Info Unable to stop FTP Server 2008 Info Unable to stop TFTP Server 2009 Info Unable to stop DHCP Server 2010 Info Unable to disable port of network switch 2011 Info Unable to create VLAN in network switch 2012 Info Unable to assign static IP to SYNC network 2013 Info Unable to assign static IP to IMAGE network 2014 Info Unable to assign static IP ...

Страница 207: ...iled 2028 Info Unlinking semaphore failed 2029 Info Invalid argument to mq Read Write 2030 Info Invalid argument to mq Read Write 2031 Info Read on FPGA device failed 2032 Info Write to FPGA device failed 2033 Info Could not TFTP file 2034 Info Error In validating config file 2035 Info Socket address cannot be reused 2036 Info Listen on socket failed 2037 Info Accept connection on socket failed 20...

Страница 208: ...allowed COMe modules detected Solid Red Error 3011 Camera Control Processor iMX31 failed to boot Solid Red Error 3012 Communication with Camera Control Processor iMX31 lost Solid Red Error 3013 Invalid packet received over serial Ethernet link Info 3014 Failure in configuration internal network switch Solid Red Error 3015 Unable to load and start the FPGA Solid Red Error 3016 Info Maximum bar code...

Страница 209: ...mera lost Blink Red Error 3037 Warning Communication with RangeFinder lost Blink Red Error 3038 Info Start Trigger from RangeFinder missed Info 3039 Info Start End Trigger from RangeFinder missed Info 3040 Info Start Trigger from Camera missed Info 3041 Warning No response Config param ack from RangeFinder Blink Red Warning 3042 Warning Failure in merging configuration files Blink Red Warning 3043...

Страница 210: ...mory Solid Red Error 4010 Unassigned 4011 Info COMe started dimensioning Info 4012 Info COMe restarted dimensioning software Info 4013 Info COMe received parameter update Info 4014 Info COMe started decoding software Info 4015 Info COMe restarted decoding software Info 4016 Error COMe Rangefinder Ver CRC Failure Solid Red Error 4017 Error COMe status monitor AATM failure Solid Red Error 4018 Error...

Страница 211: ...id Red Error 4303 Error COMe unable to create decode message queue Solid Red Error 4304 Error COMe unable to create decode message queue Solid Red Error 4305 Error COMe unable to verify decode engine version Solid Red Error 4306 Error COMe detected a problem while decoding Solid Red Error 4307 Error COMe detected an error with the image buffer Solid Red Error 4308 Error COMe unable to open the PCI...

Страница 212: ...d Warning 4329 Error ImgBuffHandler Ver CRC Failure Solid Red Error 4330 Error Dimension Lib Ver CRC Failure Solid Red Error 4331 Info CERT Mode Off Info 4332 Info RFU 1 Info 4333 Info RFU 2 Info 4334 Info RFU 3 Info 4335 Info RFU 4 Info 4336 Info RFU 5 Info 4337 Info COMe started Raw Image Export Info 4338 Info COMe restarted Raw Image Export Info COMe 3 Errors 4600 Error COMe unable to multicast...

Страница 213: ...rror COMe AATM Ver CRC mismatch Solid Red Error 4620 Error COMe Parameter CRC failure Solid Red Error 4621 Error COMe unable to retrieve parameters Solid Red Error 4622 Error COMe dimensioning token mismatch Solid Red Warning 4623 Error COMe unable to allocate buffer for image Solid Red Error 4624 Error COMe failed during app initialization Solid Red Error 4625 Info Dimensioning NOT Ready Info 462...

Страница 214: ...ED Board 2 near end of life Blink Red Warning 5012 Warning LED Board 3 near end of life Blink Red Warning 5013 Warning LED Board 4 near end of life Blink Red Warning 5014 Warning LED Board 5 near end of life Blink Red Warning 5015 Error Failure of LED Board 0 Solid Red Error 5016 Error Failure of LED Board 1 Solid Red Error 5017 Error Failure of LED Board 2 Solid Red Error 5018 Error Failure of LE...

Страница 215: ...read focus table Solid Red Error 5038 Error Unable to read gain correction table Solid Red Error 5039 Error Unable to read offset correction table Solid Red Error 5040 Info Invalid start of image valid detected Info 5041 Info Invalid end of image valid detected Info 5042 Info Invalid image valid state detected Info 5043 Error Sensor Board I2C communication failure Solid Red Error 5044 Info Attempt...

Страница 216: ...ture for laser 2 Solid Red Error 6009 Error Tach or Tach Sync problem invalid speed Solid Red Error 6010 Error Sensor or laser problem no codewords Solid Red Error 6011 Error CERT accuracy exceeds calibration Solid Red Error 6012 Error Dimensioning not supported Solid Red Error 6032 Warning Laser 1 is off or blocked no codewords Blinking Red Warning 6033 Warning Laser 2 is off or blocked no codewo...

Страница 217: ...perform set up parameter adjustments changes or FRU part replacement Special training is required for AV6010 dimensioning systems Training is available from Accu Sort Contact your sales representative or customer service for additional information Do not attempt to set up a dimensioning system without proper training or the assistance of Accu Sort technical support Overview The minimum requirement...

Страница 218: ...meras used in a certified dimensioning system must have the DCM and camera head compartments properly sealed with a wire certification seal running through the hole in the camera head back cover and DCM latch shown in Figure G 1 Additionally the correct specifications label must be applied to the bottom of the DCM Figure G 11 and G 13 Figure G 1 Top Read Camera with DCM and Camera Head Seal Hole ...

Страница 219: ...G 3 can be used to view system status camera status and various logs related to dimensioning Figure G 3 Remote Display for Certified Dimensioning Measurement Canada requires a dedicated remote display be located at every dimensioning location within a site and should be mounted for easy visibility Accu Sort includes a 2 line by 20 character vacuum fluorescent display for this purpose It is used to...

Страница 220: ...pabilities the Dimensioning screen is provided via the web browser interface After login go to Setup Advanced Dimensioning to view the screen Figure G 5 Dimensioning Screen Other screens that will require special setup for dimensioning include Tachometer Symbologies Top Camera Mounting Top Camera Imaging Dimensioning Setup and Calibration procedures are provided in Chapter 5 For details on the res...

Страница 221: ...reported by the top red camera After login as a Monitor user go to Diagnostics System Status Figure G 6 System Status Screen showing Dimensioning Data See also Audit Trail and Alibi Storage Logs Figures G 8 and G 9 Viewing Certified Dimensioning Software Versions To view the software versions of all legally relevant dimensioning applications along with their CRC values login as a Monitor user and ...

Страница 222: ...a System Manual Accu Sort Systems Inc A7 AV6010_Dimensioning_R13 doc Audit Trail and Alibi Storage Logs The Audit Trail and Alibi Storage Logs are only accessible from the top read camera of an AV6010 system with dimensioning Figure G 8 Audit Trail Log ...

Страница 223: ...e Log File section of the screen Results are scrollable Figure G 9 AATM Options Alibi and Audit Trail Manager Query First Record Displays the first record when selected Query Last Record Displays the last record when selected Query Storage Statistics Displays the storage spac e used and the remaining space available Query Time Range Select a Start Time and End Time by defining the Year Month Day H...

Страница 224: ...uired to have at least one remote display per site for inspection purposes This can either be a laptop computer or the optional Remote Display available from Accu Sort Figure G 4 The Remote Display is a 2 line by 20 character vacuum fluorescent display The display shows the dimensions for the most recent two boxes with the most recent box on the lower line The display will show B L L L W W W H H H...

Страница 225: ...n audit trail and the ability to detect a non zero condition i e movement of the conveyor with respect to the AV6010 As such it does not require any type of sealing Information about the audit trail is provided earlier in Appendix G pg G 6 The approval specifications for AV6010 with in camera dimensioning are shown on labels attached to the underside of the top read camera s DCM and also on the mo...

Страница 226: ... Sort Systems Inc A7 AV6010_Dimensioning_R13 doc Figure G 11 Location of Specification Label for Approved AV6010 Dimensioning System NTEP MC OIML Top Read Camera is sealed here See Figure G 1 Label applied to underside of the Top Read Camera s DCM See Figure G 12 and G 13 ...

Страница 227: ...AV6010 Long Range Camera System Manual Appendix G 227 A7 AV6010_Dimensioning_R13 doc Accu Sort Systems Inc Figure G 12 Specifications Label for NCWM NTEP and Measurement Canada Approved AV6010 Dimensioning System ...

Страница 228: ...228 Dimensioning AccuVision AV6010 Long Range Camera System Manual Accu Sort Systems Inc A7 AV6010_Dimensioning_R13 doc Figure G 13 Specifications Labels for OIML Approved AV6010 Dimensioning System ...

Страница 229: ...icians perform set up parameter adjustments changes or FRU part replacement Special training is required for AV6010 systems equipped with RIE Training is available from Accu Sort Contact your sales representative or customer service for additional information Do not attempt to set up a system for RIE without proper training or the assistance of Accu Sort technical support Prerequisites To utilize ...

Страница 230: ...d in the Distributed Computing Module DCM Raw Image Export RIE software a COM e module properly installed in DCM position 3 1GB Copper board in PCI slot RIEchk Test Application The RIEchk application is available for download from the AV6010 User Interface s downloads screen This Windows based application is useful in testing that the RIE module is at least minimally configured for the export of i...

Страница 231: ...e Drop list to select either enable or disable Currently a camera reboot is also required RIE Camera Name Allows a unique name to be assigned to the RIE COM e module of the camera so it can be identified by the RIE Destination Server This field is blank by default RIE Local Network Settings IP Address Enter the IP address for the RIE equipped camera Gateway Currently not used Net Mask Currently no...

Страница 232: ...232 Raw Image Export RIE AccuVision AV6010 Long Range Camera System Manual Accu Sort Systems Inc A8 AV6010_Raw_Image_Export_R10 doc Notes ...

Страница 233: ...rawings provided in this appendix AccuVision AV6010 Installation Drawings The drawings provided in this appendix are useful when mechanically and electrically installing the AV6010 Long Range Camera System Mechanical Installation Drawings AV6010 Mechanical Specification Drawing xxxxx Tachometer Anti Static Brush 102974 Photoeye Tach Generator Mounting Installation 112873 Electrical Installation Dr...

Страница 234: ...234 Installation Drawings AccuVision AV6010 Long Range Camera System Manual Accu Sort Systems Inc A9 AV6010_Installation_Drawings_R10 doc Notes ...

Страница 235: ...TAMPED CONTROLLED COPY IN RED THIS DOCUMENT IS PROVIDED FOR A SPECIFIC PURPOSE AND THE DISCLOSED INFORMATION REMAINS OUR PROPERTY IT MAY NOT BE DISCLOSED COPIED OR REPRODUCED EXCEPT FOR THE SPECIFIC PURPOSE WITHOUT ACCU SORT S PRIOR APPROVAL THIS NOTICE MUST APPEAR ON ANY COPY OR REPRODUCTION OF THIS DOCUMENT 2007 ACCU SORT SYSTEMS INC FT IN 1 FRACTIONS 1 4 UNLESS OTHERWISE SPECIFIED DIMENSIONS AR...

Страница 236: ...FRACTIONS 1 4 UNLESS OTHERWISE SPECIFIED DIMENSIONS ARE IN INCHES MILLIMETERS ALL ANGLES ARE 90 ALL C CINKS ARE 82 INCLUDED ANGLE ALL BEND RELIEFS TO SUIT TOLERANCES INCH X 1000 XX 0200 XXX 0050 XXXX 0005 METRIC X 2 500 X 0 500 XX 0 130 XXX 0 013 ANGULAR X 1 00 X 0 10 XX 0 01 0102974001 PART NO C STAMPED CONTROLLED COPY IN RED THIS IS NOT A CONTROLLED COPY UNLESS 2007 ACCU SORT SYSTEMS INC OF THIS...

Страница 237: ...PA 18969 USA ACCU SORT SYSTEMS inc D 1 C 2 B A 1 2 3 4 D C 3 B 4 A SHEET REMOVE SHARP EDGES AND BURRS FT IN 1 FRACTIONS 1 4 UNLESS OTHERWISE SPECIFIED DIMENSIONS ARE IN INCHES MILLIMETERS ALL ANGLES ARE 90 ALL C CINKS ARE 82 INCLUDED ANGLE ALL BEND RELIEFS TO SUIT TOLERANCES INCH X 1000 XX 0200 XXX 0050 XXXX 0005 METRIC X 2 500 X 0 500 XX 0 130 XXX 0 013 ANGULAR X 1 00 X 0 10 XX 0 01 0102974000 PA...

Страница 238: ...EPT CUSTOMER CONTRACT 01 21 10 XX XX XX 01 21 10 TELFORD PA 18969 USA ACCU SORT SYSTEMS inc 1 2 3 4 H G F E 5 6 7 D C B 8 A H G F E D C B A 1 2 3 4 5 6 7 8 0112873001 1 OF 1 ANGULAR X 1 00 X 0 10 XX 0 01 METRIC X 2 500 X 0 500 XX 0 130 XXX 0 013 INCH X 1000 XX 0200 XXX 0050 XXXX 0005 UNLESS OTHERWISE SPECIFIED DIMENSIONS ARE IN INCHES MILLIMETERS ALL ANGLES ARE 90 ALL C CINKS ARE 82 INCLUDED ANGLE...

Страница 239: ...ument 2003 ACCU SORT SYSTEMS inc CONNECTIONS AV6010 SINGLE CAMERA REVISIONS REV 1 Initial Release BY DATE MR 8 28 09 ACCU SORT SYSTEMS TELFORD PA 18969 U S A 112754 8 28 09 DATE ENGR MR DRAWN DATE MR CHKD MR DATE 8 28 09 8 28 09 DEPT APP ENG CUSTOMER CONTRACT This is not a controlled copy unless stamped controlled copy in red HOST FOCUS TRIGGER TACH HOST NET IMAGE NET SYNC OUT SYNC IN AV6010 POWER...

Страница 240: ...18969 U S A 112753 8 28 09 DATE ENGR MR DRAWN DATE MR CHKD MR DATE 8 28 09 8 28 09 DEPT APP ENG CUSTOMER CONTRACT This is not a controlled copy unless stamped controlled copy in red HOST FOCUS TRIGGER TACH HOST NET IMAGE NET SYNC OUT SYNC IN AV6010 POWER PHOTOEYE SIGNAL TACHOMETER TACH HOST FOCUS TRIGGER TACH HOST NET IMAGE NET SYNC OUT SYNC IN AV6010 POWER HOST FOCUS TRIGGER TACH HOST NET IMAGE N...

Страница 241: ... 28 09 DATE ENGR MR DRAWN DATE MR CHKD MR DATE 8 28 09 8 28 09 DEPT APP ENG CUSTOMER CONTRACT This is not a controlled copy unless stamped controlled copy in red HOST FOCUS TRIGGER TACH HOST NET IMAGE NET SYNC OUT SYNC IN AV6010 POWER HOST FOCUS TRIGGER TACH HOST NET IMAGE NET SYNC OUT SYNC IN AV6010 POWER HOST FOCUS TRIGGER TACH HOST NET IMAGE NET SYNC OUT SYNC IN AV6010 POWER HOST FOCUS TRIGGER ...

Страница 242: ...DATE 8 28 09 8 28 09 DEPT APP ENG CUSTOMER CONTRACT This is not a controlled copy unless stamped controlled copy in red HOST FOCUS TRIGGER TACH HOST NET IMAGE NET SYNC OUT SYNC IN AV6010 POWER HOST FOCUS TRIGGER TACH HOST NET IMAGE NET SYNC OUT SYNC IN AV6010 POWER HOST FOCUS TRIGGER TACH HOST NET IMAGE NET SYNC OUT SYNC IN AV6010 POWER HOST FOCUS TRIGGER TACH HOST NET IMAGE NET SYNC OUT SYNC IN A...

Страница 243: ...TE ENGR MR DRAWN DATE MR CHKD MR DATE 8 28 09 8 28 09 DEPT APP ENG CUSTOMER CONTRACT This is not a controlled copy unless stamped controlled copy in red HOST FOCUS TRIGGER TACH HOST NET IMAGE NET SYNC OUT SYNC IN AV6010 POWER HOST FOCUS TRIGGER TACH HOST NET IMAGE NET SYNC OUT SYNC IN AV6010 POWER HOST FOCUS TRIGGER TACH HOST NET IMAGE NET SYNC OUT SYNC IN AV6010 POWER HOST FOCUS TRIGGER TACH HOST...

Страница 244: ......

Страница 245: ......

Отзывы: