2.14.3
Installing The Add-On Expansion Module
Each add-on expansion module measures 15.5" wide x 9.4" high x 1.6" wide and weighs
approximately 4 pounds. The modules are designed so that you can attach them to the base unit
and connect them to it via cabling.
NOTE: If you plan to upgrade the system software at the same time that you add expansion
modules, be sure to add the expansion modules first by following steps 1 through 11.
After you have installed the expansion modules and programmed for the new stations
and line ports, you can then upgrade the software as described in the discussion
titled, Upgrading The System Software.
To install an expansion module to a base unit, follow the procedure detailed in steps 1–11.
CAUTION
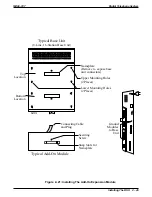
You must always connect the first module to the top location on the base unit.
1. Disconnect both AC power and external battery back-up power from the system.
2. Remove and set aside nameplate from base unit. This action exposes internal cable connector
on base unit circuit board.
3. Reach through opening in base unit and mate module cable plug with base unit circuit board
connectors.
4. Push excess cable inside base unit housing through connector opening.
5. Install expansion module in place on all four mounting holes. Be sure excess cable is not
pinched between add-on module and base unit.
6. Pull module down to latch in place.
7. Use flat-blade screw driver to tighten module securing screw into base unit threaded fastener.
8. Snap nameplate into slots on top of module housing.
9. Attach #10 or #12 insulated, solid copper wire between the frame ground stud on the
expansion module and the frame ground stud on the common equipment cabinet.
10. Reconnect the power to the system.
11. Refer to Chapter 3, and perform configuration programming for new station and line ports.
Digital Telephone System
IMI66–107
2 – 44 Installing The DSU
Содержание Air Impact DSU
Страница 2: ...Printed in U S A GCA47 157 ...
Страница 30: ......
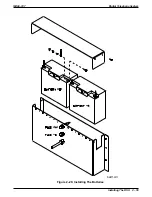
Страница 85: ...Figure 2 26 Installing The Batteries batt1 cdr IMI66 107 Digital Telephone System Installing The DSU 2 55 ...
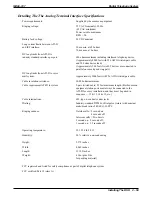
Страница 91: ...Figure 2 28 Detailing The ATI D Dimensions IMI66 107 Digital Telephone System Installing The DSU 2 61 ...
Страница 112: ......
Страница 192: ...Digital Telephone System IMI66 107 3 80 System Programming ...
Страница 283: ......
Страница 284: ......
Страница 285: ......
Страница 286: ......
Страница 287: ......
Страница 288: ......
Страница 289: ......
Страница 290: ......
Страница 291: ......
Страница 292: ......
Страница 293: ......
Страница 294: ......
Страница 295: ......
Страница 296: ......
Страница 297: ......
Страница 298: ......
Страница 299: ......
Страница 300: ......
Страница 301: ......
Страница 302: ......
Страница 303: ......
Страница 304: ......
Страница 305: ......
Страница 306: ......
Страница 307: ......
Страница 308: ......
Страница 309: ......
Страница 310: ......
Страница 311: ......
Страница 312: ......
Страница 313: ......
Страница 314: ......
Страница 315: ......
Страница 316: ......
Страница 317: ......
Страница 318: ......
Страница 319: ......
Страница 320: ......
Страница 321: ......
Страница 322: ......
Страница 323: ......
Страница 324: ......
Страница 325: ......
Страница 326: ......
Страница 327: ......
Страница 328: ......
Страница 329: ......
Страница 330: ......
Страница 331: ......
Страница 332: ......
Страница 333: ......
Страница 334: ......
Страница 335: ......
Страница 336: ......
Страница 337: ......
Страница 338: ......
Страница 339: ......
Страница 340: ......
Страница 431: ......
Страница 436: ......
Страница 437: ......
Страница 438: ......


