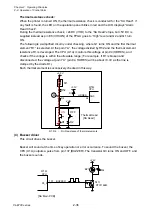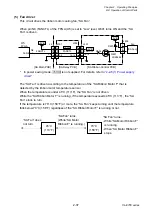
Chapter 2 Operating Principles
2-2.
Operation of Control Parts
CL-E700 series
2-38
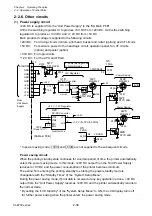
2-2-6. Other circuits
(1)
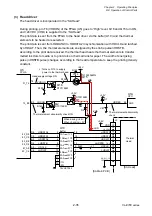
Power supply circuit
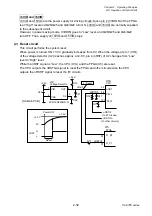
+24V DC is supplied from the “Unit Power Supply” to the “SA Main PCB”.
U19 is the switching regulator IC to p5V DC from +24V DC. U20 is the switching
regulator IC to p3.3V DC and +1.2V DC from +5V DC.
Each produced voltage is supplied to the following circuits.
+24V DC: For driving circuits (motors, print head, buzzer and cutter (option)) and I/F circuits
+5V DC: For sensors, power to the head logic circuit, operation panel, fan, I/F circuits
(option) and peeler (option)
+3.3V DC: For logic circuits
*1.2V DC: For the CPU and FPGA
* In power saving mode, +3VIO and +5VIO are not supplied to the subsequent circuits.
Power saving circuit:
When the printing standby state continues for a certain period of time, the printer automatically
enters the power saving mode. In this mode, +24V DC output from the “Unit Power Supply”
reduces to +9V DC and the power consumption of the printer becomes minimum.
The period from entering the printing standby to entering the power standby mode is
changeable with the “Standby Timer” of the “System Setup Menu”.
During the power saving mode, if print data is received or any key operation is done, +9V DC
output from the “Unit Power Supply” r24V DC and the printer automatically returns to
the normal mode.
* By setting the “LCD Standby” of the “System Setup Menu” to ON, the LCD display turns off
for further power saving when the printer enters the power saving mode.
3
4
1
5
2
J13
6
7
+24V
R148
[SA Main PCB]
Q17
DTC114EM
22-P2
P2
C147
C155
+
VIN SW
FB
3
5
2
U20
NR119E
EN1
EN2
LX1
LX2
8
7
PAM2306AYPKB
+5V Regulator
+3.3V / 1.2V Regulator
+5V
nPWRSAVE
8
9
L: Power Saving mode
H: Normal mode
VIN1
VIN2
1
6
12
2
STANDBY
+24V
+24V
+24V
+24V
GND
GND
GND
GND
R130
R134
DC-DC Converter
U19
Q21
MCH6342
Q23
DTA115TM
DC-DC Converter
Q24
DTC114EM
R150
Q22
MCH6342
22_N2
N2
V3CE
Q26
DTC114EM
V3IOON
Q25
MCH6342
FPGA
U5
+1.2V (To CPU & FPGA)
Power Saving
Power Saving
FPGA
U5
R143
R146
R149
+3.3V
R144
R147
R153
R154
(Fixed to "H")
From
Unit Power
Supply
+3VIO
+5VIO
Содержание CL-E700 Series
Страница 1: ...Technical Manual CL E700 series Thermal Transfer Printer...
Страница 5: ...Chapter 1 Specifications 1 1 CL E700 series CHAPTER 1 SPECIFICATIONS...
Страница 15: ...Chapter 2 Operating Principles 2 1 CL E700 series CHAPTER 2 OPERATING PRINCIPLES...
Страница 87: ...Chapter 3 Disassembly and Maintenance 3 1 CL E700 series CHAPTER 3 DISASSEMBLY AND MAINTENANCE...
Страница 151: ...Chapter 4 Troubleshooting 4 1 CL E700 series CHAPTER 4 TROUBLESHOOTING...
Страница 167: ...Chapter 5 Parts Lists CL E700 series CHAPTER 5 PARTS LISTS...
Страница 172: ...Chapter 5 Parts Lists CL E700 series 5 6 DRAWING NO 1 General Assembly Rev 0...
Страница 195: ...Chapter 5 Parts Lists 5 29 CL E700 series DRAWING NO 7 Unit Opepane Rev 0...
Страница 203: ...Chapter 5 Parts Lists 5 37 CL E700 series DRAWING NO 9 SA2 Ribbon Unit Fan Rev 0...
Страница 206: ...Chapter 5 Parts Lists CL E700 series 5 40 DRAWING NO 10 Accessories Rev 0 3 2 4 1 1 1 2 1 3...
Страница 208: ...Chapter 6 Circuit Diagrams 6 1 CL E700 series CHAPTER 6 CIRCUIT DIAGRAMS...
Страница 230: ...Appendices AP 1 CL E700 series APPENDICES...
Страница 232: ...Appendices A Mounting Diagrams AP 3 CL E700 series A Mounting Diagrams A 1 SA Main PCB 1 Parts side...
Страница 233: ...Appendices A Mounting Diagrams CL E700 series AP 4 2 Solder side...


