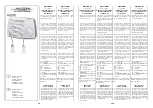
Commutazione Estate/Inverno:
Il comando è predisposto per il fun-
zionamento invernale; alimentando
con la fase (L=230V ~) il morsetto
IN2
del fan coil verrà azionato il se-
lettore elettronico che commuterà il
funzionamento in ciclo estivo.
1) selezionabile tramite il commuta-
tore del comando:
DIP6 = OFF
2) selezionabile con consenso re-
moto:
DIP6 = ON
(il commutato-
re estate/inverno non è attivo).
-
Con la manopola scegliere la
temperatura
desiderata.
-
Tramite l’interruttore (O - IAQ)
accendere
il
filtro
elettronico
(posizione
IAQ).
Nel caso di attacchi idraulici destri
il comando deve essere installato
a sinistra dell’apparecchio.
Dovendo spostare il lato degli
attacchi idraulici in cantiere (pos-
sibile solo per le versioni CRC con
motore centrifugo), il comando
andrà installato nella parte oppo-
sta al lato attacchi.
Le morsettiere, i cavi e il passa-
cavo vanno rifissati sul lato op-
posto, avendo cura di togliere il
pretranciato dal foro dove sarà
inserito il passacavo.
Summer/winter switching:
The control unit is set for winter
operation; supplying line voltage
(L = 230V~) to the terminal
IN2
of
the fan coil activates the electronic
selector to switch into summer mode.
1) can be selected using the control
switch:
DIP6 = OFF
2) can be selected by remote signal:
DIP6 = ON
(the summer/winter
switch is disabled).
-
Choose the right temperature
with the knob.
- Switch on the electronic filter
(position IAQ) by using the
switch
(0-IAQ).
In the case of right water connections,
the control must be installed on the
left of the Fan Coil.
Since we have to change the side
of the water connections in yard
(possible only for versions CRC
with centrifugal motor), the control
must be installed in the opposite
side of the connections.
The connecting terminals, the
cables and the fair-lead should
be fixed again on the opposite
side, taking care in removing the
pre-sheared from the hole where
should be inserted the fair-lead.
Commutation Eté/hiver:
La commande est prévue pour le
fonctionnement hiver; en alimentant la
borne du ventilocovecteur avec la phase
(L = 230V~), le sélecteur électronique sera
actionné et basculera le fonctionnement
sur le cycle été (
IN2
).
1) Sélectionnable à l’aide du commutateur
de
commande:
DIP6 = OFF
2) Sélectionnable avec activation à
distance:
DIP6 = ON
(le commutateur
été/hiver n’est pas actif).
- Par le bouton choisissez la
température
demandée.
-
Par l’interrupteur (0-IAQ) vouz
allumez le filtre electronique
(position
IAQ).
Dans la cas de raccordements
hydrauliques droits la commande doit
êntre installée à gauche de l’appareil.
S’il faut changer en chantier le coté
des raccordements hydrauliques
(cela est possible seulement pour
les versions CRC avec moteur
centrifuge), la commande doit êntre
installée dans la partie contraire
au coté des raccordements.
Les boîte à bornes, les câbles et
le chaumard doivent êntre refixés
sur le coté contraire, ayant soin
d’enlever le prétranché du trou
où il faut insérer le chaumard.
Sommer-/Winterumschaltung:
Die Steuerung ist für den Winterbetrieb
ausgelegt; indem die Klemme des fan
coil mit der Phase (L = 230V~) versorgt
wird, wird der elektronische Wähl-
schalter
IN2
betätigt, der den Betrieb
auf Sommer umschalter.
1) Über die Tastatur des Steuergeräts
anwählbar:
DIP6 = OFF
2) Mit Fern-Freigabe anwählbar:
DIP6 = ON
(Umschalter Sommer-/
Winterbetrieb nicht aktiv).
-
Mit dem Wählknopf die gewünschte
Temperatur einstellen.
-
Der elektronsche Filter über den
Schalter
(0-IAQ)
einschalten
(Position
IAQ).
Bei hydraulischen Anschlüssen auf
der rechten Seite muß der Antrieb
links vom Gerät installiert werden.
Da die Seite der Hydraulischen
Anschlüsse am Installationsort zu
verschieben ist (möglich nur für die
Versionen CRC mit Zentrifugalmotor),
wird der Antrieb auf der gegen-
überliegenden Seite, d.h. auf der
Anschlußseite montiert.
Die Klemmleisten, die Kabel und die
Kabelführung werden auf der gegen-
überliegenden Seite wieder befestigt,
wobei darauf zu achten ist, die Stanz-
rückstände vom Loch zu entfernen, in
das die Kabelführung eingefügt wurde.
Conmutación Verano/Invierno:
El control astá predispuesto para el
funcionamiento inver-nal, alimentando
con la fase (L = 230V~); será accio-
nado el borne del fan coil que con-
mutará el funcionamiento al ciclo
veraniego (
IN2
).
1) Se puede seleccionar con el conmu-
tador del mando:
DIP6 = OFF
2) Se puede seleccionar a distancia:
DIP6 = ON
(el conmutador verano/
invierno está desactivado).
- Con la mando seleccionar la
temperatura
deseada.
-
Mediante el interruptor (0-IAQ)
conectar el fltro electronico
(posición
IAQ).
En el caso de conexiones hidráuli-
cas a derecha, el mando debe
instalarse a la izquierda del aparato.
Si el cambio de lato de las cone-
xiones hidráulicas debe realizarse
a pie de obra (posible solo en la
versiòn CRC con motor centrífugo),
el mando se instalará en la parte
opuesta a la de las conexiones.
Las regletas de conexiones, los
cables y el pasamuros se montan
en el lado opuesto, debiendo ritirar
el disco preperforado que alojará
el
pasamuros.
Omschakeling Zomer/Winter:
De bediening is voor winterwerking
voorbereid; door met de fase (L = 230V~)
klem
IN2
van de ventilatorconvector
te voeden, wordt de elektronische
keuzeschakelaar be-diend die de
werking op de zomercyclus zal overzetten.
1) selectie met behulp van de knoppen
van de bediening:
DIP6 = OFF
2) te selecteren van op afstand:
DIP6 = ON
(de schakelaar zomer/
winter is niet actief).
-
Draai de knop op de gewenste
temperatuurwaarde.
-
Met
de
schakelaar
(0-IAQ)
schakelt u de elektronische
flter in (stand IAQ).
In het geval van rechtse hydraulische
aansluitingen, moet de bediening links
van het apparaat worden gemonteerd.
Aangezien de zijde van de hydraulische
aansluitingen ter plaatse moet worden
veranderd (alleen mogelijk voor de
versies CRC met centrifugemotor),
wordt de bediening gemonteerd aan
de zijde tegenover de aansluitingen.
Fixeer de klemmenborden, kabels
en kabelgoot opnieuw aan de
tegenoverliggende zijde, en haal de
bescherming uit de uitsparing waar
de kabelgoot moet komen.
Funzionamento NTC nel ciclo Invernale
NTC operation in the cooling cycle
Fonctionnement NTC en cycle hiver
Termostatazione
contemporanea delle valvole e del ventilatore
Simultaneous
thermostatic control on the valves and fan
Thermostatation
simultanée des vannes et du ventilateur
IAQ
Resistenza elettrica
quale elemento di integrazione
Electric
resistance coil as integration element
Fonctionnement avec
la résistance électrique comme élément d’intégration
T2 come resistenza II° gradino
T2 as resistance phase II
T2 comme résistance II° échelon
Commutazione Estate/Inverno locale
Local Summer/Winter switching
Commutation Été/Hiver locale
Funzionamento NTC nel ciclo Estivo/Invernale
NTC operation in the heating and cooling cycle
Fonctionnement NTC en cycle été et en cycle hiver
Termostatazione sulle valvole
e funzionamento continuo del ventilatore
Thermostatic control
on the valves and continuous fan operation
Thermostatation sur les vannes
et fonctionnement continu du ventilateur
Gestione Resistenze
Resistance-coils Management
Gestion des résistances
Resistenza elettrica
quale elemento di riscaldamento principale
Electric resistance coil
as main heating element
Fonctionnement avec résistance électrique
comme élément de chauffage principal
Gestione Resistenze con T2
Resistance-coils with T2
Gestions des résistance avec T2
Commutazione Estate/Inverno remota
Remote Summer/Winter switching
Commutation Été/Hiver à distance
1
2
3
4
5
OFF
OFF
OFF
OFF
OFF
6
OFF
ON
DIP
DEFAULT
OFF
Posizione / Position / Position
Betrieb NTC im Winterbetrieb
Funcionamiento NTC en el ciclo invierno
Werking NTC in de wintercyclus
Gleichzeitige
Temperaturregelung der Ventile und des Ventilators
Termostatación de las válvulas y los ventiladores
al mismo tiempo
Gelijktijdige
thermostaatinstelling kleppen en ventilator
IAQ
Zusätzlicher
elektrischer Heizwiderstand vorhanden
Presencia
de resistencia eléctrica complementaria
Functionering
met elektrische weerstand als integratie
T2 als Widerstand II
StufeT2 como resistencia II° nivel
T2 weerstand 2de fase
Commutation Été/Hiver locale
Conmutación Verano/Invierno local
Seizoensschakelaar van het apparaat
Betrieb NTC im Sommerbetrieb und Winterbetrieb
Funcionam. NTC en el ciclo verano y en el ciclo invierno
Werking NTC in de zomercyclus en in de wintercyclus
Temperaturregelung
der Ventile und Dauerbetrieb des Ventilator
Termostatación sobre las válvulas
y funcionamiento contínuo del ventilador
Thermostaatinstelling
kleppen en continue werking ventilator
Verwaltung der Widerstände
Gestión de Resistencias
Beheer Weerstanden
Zusätzlicher elektrischer Heizwiderstand
als Haupt- Heizelement vorhanden
Presencia de resistencia eléctrica
a utilizar como fuente de calor principal
Functionering met elektrische weerstand
als hoofdverwarmingselement
Widerstände mit T2
Gestión de Resistencias con T2
Beheer Weerstanden met T2
Commutation Été/Hiver à distance
Conmutación Verano/Invierno remota
Omschakeling Seizoenen van op afstand
1
2
3
4
5
OFF
OFF
OFF
OFF
OFF
6
OFF
ON
DIP
DEFAULT
OFF
Position / Posición / Positie
25
25A
IMPOSTAZIONE
DIP DI
CONFIGURAZIONE
SETTING THE
CONFIGURATION
DIPSWITCHES
PROGRAMACIÓN
DIP
DE CONFIGURACIÓN
INSTELLING
CONFIGURATIE-
SCHAKELAAR
PROGRAMMATION
DIPSWITCHES
EINSTELLUNG DER
KONFIGURATIONS-
DIP-SWITCHES
Prima di chiudere il comando, verifi-
care che la configurazione di default
dei Dip-Switch posti sulla scheda elet-
tronica (vedi “Configurazione di default
DIP-SWITCH”) soddisfi le proprie esi-
genze; in caso contrario programmare
il controllo in relazione alle funzioni
desiderate.
Before closing the control unit, check
that the default configuration of the
dip switches and the jumper on the
electronic board (see drawing “Default
configuration of the dip switches”) satisfies
the requirements of the installation. If not,
program the control unit in accordance
with the required functions.
Avant de fermer l’unité de commande
vérifier que la configuration par défaut
des Dip-Switch et du Jumper placés
sur la carte électronique (voir dessin
«Configuration par défaut DIP-SWITCH»)
répond aux exigences; si ce n’est pas le
cas programmer l’unité de contrôle
selon les fonctions désirées.
Bevor die Kontrolleinheit geschlossen
wird, muss kontrolliert werden, ob die
Default-Konfiguration der Dip-Switches
und des Jumpers an der Elektronikplatine
(siehe Zeichnung “Default-Konfiguration
DIP-SWITCH”) den Anforderungen entspricht;
andernfalls die Kontrolleinheit entsprechend
der gewünschten Funktionen programmieren.
Antes de cerrar el control, verificar que
la configuración por defecto de los
DipSwitch y del Jumper situados en la
ficha electrónica (ver dibujo Configuración
por defecto DIP-SWITCH) satisface las
propias exigencias, en caso contrario
programar el control en relación a las
funciones deseadas.
Vóór u de bediening afsluit, controleert
u of de standaardconfiguratie van de
dimschakelaars en de Jumper op
de elektronische fiche (zie schets
“Standaardconfiguratie dimschakelaars”)
overeenkomt met uw behoeften; zo
niet, programmeert u de bediening in
functie van de gewenste functies.
Содержание CRC-ECM
Страница 34: ...NOTES NOTES...


