background image

33

Sending Function

What You Can Do with This Machine 

(Address Book/Send Basic Features Screen)

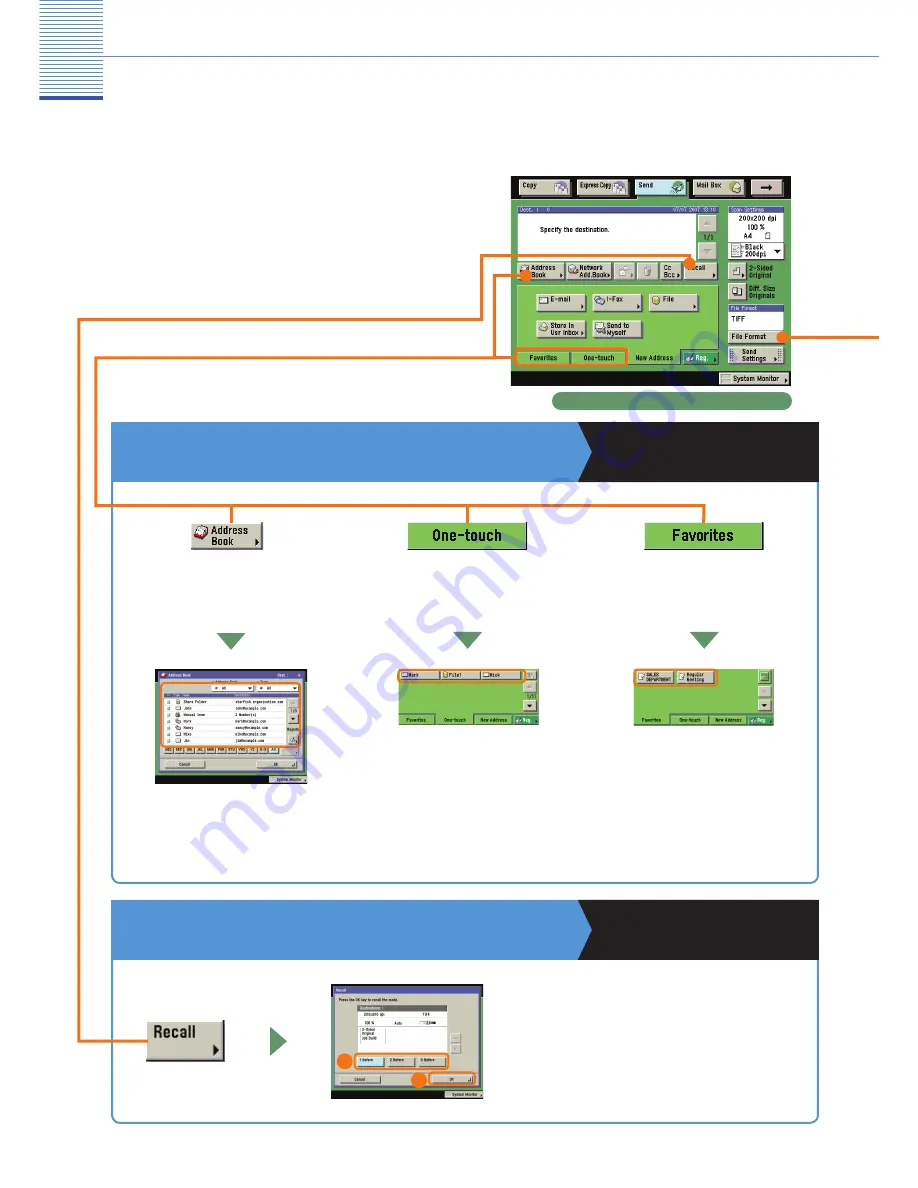
You can use the Send function to send handwritten 
documents to a destination. Documents can be sent by 
e-mail, and I-fax, in a variety of file formats.
The following is an introduction of the basic procedure 
for sending documents. For more information, see the 
references to the corresponding guides.

*  The numbers in the illustrations refer to operation steps.

To Register Commonly Used Destinations

Sending Guide Chapter 2

Send Basic Features screen

To Recall the Last Settings

Sending Guide Chapter 5

You can recall the last three addresses, scan 
settings, and send settings which have been set, 
and then send your documents.

1

Selecting from a Favorites button

2

Selecting from a One-touch 
button

Selecting from the Address Book

Содержание iR7086

Страница 1: ...us Copying Options 29 Sending Function Sending a Document E mail I fax File Server 31 What You Can Do with This Machine Address Book Send Basic Features Screen 33 What You Can Do with This Machine Scan Settings Screen 35 What You Can Do with This Machine Send Settings Screen 37 Overview of Sending Features 39 Mail Box Function Storing Originals in an Inbox 43 Printing Sending a Document Stored in ...

Страница 2: ...er Jam Read this manual to learn how to copy documents use the Mail Box function and the various copying scanning features Copying and Mail Box Guide Read this manual to learn how to send scanned documents to e mail or I fax destinations or save them on a file server Sending Guide Send Function Basic Sending Procedures Basic Scanning Procedures Useful Scanning Features Sending and Receiving Docume...

Страница 3: ...de Read this manual to learn how to edit the settings in order to use the machine as a printer Setting the Various Items in Settings Menu Setting the Various Items in Utility Menu Read these manuals to learn how to install the printer drivers in computers how to print and how to edit the printer settings Installing the Drivers How to Print Various Printer Features Displaying the Online Help Other ...

Страница 4: ...nables you to save costs with features such as printing a single sided document on both sides of the paper or printing two pages of a document on each sheet of paper Also with the Collate and Booklet modes the Copying function is perfect for creating materials for meetings Mail Box Function Enables you to save scanned documents documents received by I fax and data sent from a computer and then sen...

Страница 5: ...19 To Insert a Sheet Between Copies P 20 To Copy while Verifying Scanned Images P 21 To Copy Different Size Originals Together P 21 To Copy Multiple Originals onto One Sheet of Paper P 22 To Store Scanned Originals with Copy Settings P 22 To Make Copies with the Image Repeated P 23 To Embed Hidden Text in the Background P 23 To Add Page Numbers to Copies P 24 To Add a Watermark to Copies P 24 To R...

Страница 6: ...optional equipment enable you to use see the instruction manuals for the optional equipment The iR7105 iR7095 iR7086 can be connected to a vast array of optional equipment to suit your printing needs Booklet Trimmer C1 Enables you to trim the edge of saddle stitched copies for neat output Paper Folding Unit D1 This function automatically folds A3 size paper into A4 size Booklet Trimmer Finisher Pa...

Страница 7: ... the machine you have one additional source of paper which can be used for printing jobs Up to 3 500 sheets of paper 80 g m can be loaded into the paper deck Finisher V1 Saddle Finisher V2 Enables you to set finishing options for prints such as stapling and hole punching Attaching the optional Document Insertion Unit C1 enables you to add a preprinted cover and saddle stitch to the prints 1 High C...

Страница 8: ...or Screen Press System Monitor to display the screen on the left enabling you to confirm the job status and cancel print jobs You can also see the status of the machine such as the amount of remaining paper If the Processing Data Indicator or Error Indicator flashes or lights the status of the device is displayed on the System Monitor screen Example The paper drawer that is supplying paper or the ...

Страница 9: ...s the control panel power switch If nothing is displayed on the touch panel display even when the main power switch is ON follow the procedures below 1 2 When maintains a steady green light Press Press to clear entered values and characters Press to start an operation Press to stop a job in progress such as a scan job or copy job Press to turn the control panel ON or OFF Press to restore the stand...

Страница 10: ...displayed enter the Dept ID and Password press Log In Out on the touch panel Press Copy to switch to the Copy function If Department ID Management or MEAP authentication is set it is necessary to enter an ID and password If an optional card reader is attached insert a control card For more information see Chapter 1 Before You Start Using The Machine in the Reference Guide For more information on t...

Страница 11: ...ng When copying is complete remove your originals If the following screen is displayed follow the instructions on the screen and press once for each original When scanning of the originals is complete press Done Press If Department ID Management is set press Log In Out To cancel interrupt continue copying or confirm prints Press To cancel copying Press Interrupt See Interrupt Mode in the Copying a...

Страница 12: ...opy ratio automatically or you can specify the copy ratio manually Copy Exposure You can adjust the copy exposure Original Type Selection You can select the original type that is the best match for the quality of your originals You can set the Special Features of the machine You can make booklets add page numbers and set finishing modes for scanned images Front Cover Back Cover Paper Insertion Per...

Страница 13: ...ginals or make one sided copies from two sided originals Paper Selection You can set the machine to select the paper size This mode enables you to adjust the sharpness Sharpness This mode enables you to interrupt a reserved or current job to make priority copies Image Adjustment You can set other Special Features of the machine Job Block Combination Store In User Inbox Job Done Notice Select Devic...

Страница 14: ...or reducing an A3 original to A4 size Simply select the desired paper size from the displayed keys to automatically set the optimal zoom ratio To Staple Sets of Output Together Copying and Mail Box Guide Chapter 3 Select the Staple mode to collate copies as in the diagram on the right Collated copies are stapled in the position you set This is useful for distributing materials copied for a meeting...

Страница 15: ...h the front and back sides of paper can halve paper costs In the screen on the left if you press Option you can select to make the front and back sides of the copies have the same top bottom orientation This makes it easier to see when stapling copies like a calendar For more information on Special Features see p 15 to p 28 1 2 3 To Copy onto Irregular Sized Paper Copying and Mail Box Guide Chapte...

Страница 16: ...paper size larger than the original you can set the position to print the output image This is useful when you want to leave a space blank for writing down notes You can also press No Key Entry to set the shift direction for the front and back sides of the copy separately Special Features screen 1 3 To Shift the Original Image on the Front and Back Sides of Two Sided Copies You can shift the image...

Страница 17: ...il Box Guide Chapter 4 This enables you to scan originals when there are too many to be placed at once by dividing them into multiple batches Copies can be made after all of the originals have been scanned This is also useful when using both the feeder and platen glass to scan originals Original Copy After placing the next original press To Erase the Dark Border when Copying a Book Copying and Mai...

Страница 18: ...ing angle Press Insert Sheets if you want to insert chapter pages or sheet insertions The numbers in the illustrations refer to operation steps To Glue the Cover and Content Pages of a Document Together to Make a Booklet Copying and Mail Box Guide Chapter 4 You can glue together the cover and content pages when making a booklet 4 3 2 1 4 3 2 1 4 3 2 1 1 1 1 1 Original Front Cover Copy Glued If 3 w...

Страница 19: ...for Misalignment This mode enables you to compensate for the misalignment of the inner and outer pages of a booklet that occurs for each paper type Select Add Cover during step 3 press Next You cannot copy onto paper that is set in the sheet inserter Select whether to copy on the cover page 3 6 8 1 Select Creep Correction during step 5 Select the paper source for the cover What You Can Do with Thi...

Страница 20: ...achine Special Features Screen The numbers in the illustrations refer to operation steps Special Features screen 1 3 To Add a Cover Copying and Mail Box Guide Chapter 4 This enables you to set the machine to automatically add front and back covers sheet insertions chapter pages or tab paper using a different type of paper from that used for the main documents 1 Original 5 Copy 3 4 Printed Front Co...

Страница 21: ... you to divide your copy sets into different sections with a blank sheet You can also use different paper and paper sources 1 Original Copy 3 2 6 7 You can set the copy shift width of the image that will be printed on the tab paper For more information see Chapter 4 Special Copying and Mail Box Features in the Copying and Mail Box Guide For more information on how to register tab paper in a paper ...

Страница 22: ...pecial Features Screen The numbers in the illustrations refer to operation steps Special Features screen 1 3 Special Features screen 2 3 To Copy while Verifying Scanned Images Copying and Mail Box Guide Chapter 4 This mode enables you to confirm scanned images page by page while copying them when you scan originals in succession on the platen glass This is useful to prevent copying errors resultin...

Страница 23: ... while storing them in the User Inbox To Copy Multiple Originals onto One Sheet of Paper Copying and Mail Box Guide Chapter 4 This mode enables you to reduce multiple originals or two sided originals to fit onto one sheet of paper This is useful for arranging a variety of originals on one sheet of paper for easy viewing and for saving paper and space when storing printouts 3 4 3 2 1 4 3 1 2 1 4 3 ...

Страница 24: ...ls such as tickets and coupons repeatedly onto one sheet A4 Original A3 Copy A4x2 copy after cut in half To Embed Hidden Text in the Background Copying and Mail Box Guide Chapter 4 You can embed text such as CONFIDENTIAL the date and time or a department name The embedded text appears when the copies are copied 1 Copy A Secure Watermark Is Selected Original 3 Copy B Copy of Copy A 2 1 3 2 The embe...

Страница 25: ...1 Chapter numbers are automatically counted after each additional sheet chapter page and tab paper is inserted Set the starting number for the page and chapter Select Numbered Chapters in step 2 What You Can Do with This Machine Special Features Screen To Add a Watermark to Copies Copying and Mail Box Guide Chapter 4 This enables you to print a preset or user defined watermark on your copies CONFI...

Страница 26: ...screen allowing you to recall a combination of settings in one step You can store up to two Standard Keys For more information see Chapter 8 Customizing Settings in the Copying and Mail Box Guide To Recall Commonly Used Settings Copying and Mail Box Guide Chapter 5 Commonly used combinations of modes can be stored in Mode Memory to be recalled with the touch of a button You can also use Mode Memor...

Страница 27: ...O R T 1 2 3 4 Original Batch Copy 1st batch 2nd batch 3rd batch 4th batch 1st batch Shift 2nd batch 1 to 2 Sided 3rd batch 2 Sided Original 4th batch 4 in 1 2 You can also make a sample print of a selected batch of originals or the combined document You can erase unnecessary batch or page or preview images 7 8 6 4 5 Specify the settings for the combined document Specify the settings for each batch...

Страница 28: ...heet Insertion Press to add covers sheet insertions or chapter pages between specified pages 2 Press to copy facing pages of an opened book onto separate copy sheets 1 Special Features screen 2 3 Copying and Mail Box Guide Chapters 4 and 5 Image Creation Tab Paper Creation Secure Watermark Press to embed hidden text in the background of copies 4 Press to print onto tabs of tab paper 2 Press to rea...

Страница 29: ...ift the position of the original image on the copy sheet Shift 8 Press to store or recall copy modes Mode Memory 5 Press to store scanned originals in a User Inbox from the Regular Copy Basic Features screen Store In User Inbox 10 Press to recall previously set copy modes Recall 6 Press to include the watermark and date on copies Watermark Print Date 8 Pg Copy Set Numbering Press to include page a...

Страница 30: ...crements Original Frame Erase Width 1 mm to 50 mm Specify in 1 mm increments Binding Erase Width 2 0 mm to 20 0 mm Specify in 0 1 mm increments 1 mm to 20 mm Specify in 1 mm increments 50 mm to 50 mm Specify in 1 mm increments Auto Amount of Space between Repeated Images 1 0 mm to 50 0 mm Specify in 0 1 mm increments Book Frame Erase Width Center 1 mm to 50 mm Sides 0 mm to 50 mm Specify in 1 mm i...

Страница 31: ... increments Page Number Print Size 10 5 point 12 0 point 14 0 point Copy Set Number Size 12 0 pt 24 0 pt and 36 0 pt Position of Watermark Date Top left center top top right bottom left center bottom and bottom right Also adjustable 8 mm to 8 mm both vertically and horizontally Specify in 1 mm increments Watermark Print Size 36 0 point 54 0 point and 72 0 point Date Print Size 10 5 point 12 0 poin...

Страница 32: ...e You Start Using This Machine in the Reference Guide When placing originals on the platen glass make sure to close the feeder after placing your originals Place your originals Placed on the platen glass Registering Destinations In order to be able to select a destination using the address book one touch buttons or favorites buttons it is necessary to register the destination in advance Register d...

Страница 33: ...ress OK Start Sending When sending is complete remove your originals If the following screen is displayed follow the instructions on the screen press once for each original When scanning of the originals is complete press Done Press For information on specifying destinations see p 39 and p 40 For more information on the features you can set from the Scan Settings screen see p 39 and p 40 If Depart...

Страница 34: ...ding documents For more information see the references to the corresponding guides The numbers in the illustrations refer to operation steps To Register Commonly Used Destinations Sending Guide Chapter 2 Send Basic Features screen To Recall the Last Settings Sending Guide Chapter 5 You can recall the last three addresses scan settings and send settings which have been set and then send your docume...

Страница 35: ...arly by preventing security problems such as impersonation and unauthorized alteration of documents You can add the following two types of digital signatures Device Signature User Signature Depending on the type of signature digital signatures are available only when the following optional equipment is activated When sending an important document containing confidential information you can set a p...

Страница 36: ... selecting the original type from the Image Quality drop down list Photos can be scanned clearly If a shimmering wavy pattern the Moiré effect appears on your originals use the Sharpness setting in the Special Features screen to decrease it 1 Text Mode Text Photo Mode Photo mode 2 1 3 2 You can set the Scan Settings to change the appearance of the document to send The following is an explanation o...

Страница 37: ...to 300 x 300 dpi or 600 x 600 dpi 2 3 1 To Send Fine Text and Images Clearly Sending Guide Chapter 3 You can send fine text in documents more clearly by changing from a 200 x 200 dpi resolution to a high resolution of 300 x 300 dpi or 400 x 400 dpi Note however that the file size increases as you increase the resolution You can also select the resolution from the Scanning Mode drop down list This ...

Страница 38: ...end a document and the settings to use when sending and set to send notification when sending is complete The following is an explanation of the useful functions you can utilize when sending a document Depending on whether the sending method to be used is e mail or I fax you can also add a sending name or the subject to the name of the attached file You can confirm whether a certain send setting c...

Страница 39: ...he Job Done Notice feature to notify yourself if you want to confirm that a job is complete When sending is complete you will be notified via e mail 2 1 2 To Edit a Destination from a Computer You can edit addresses registered in the address book from a Web browser using the Remote UI of the machine This is convenient because you can copy and paste e mail addresses from your computer To Confirm a ...

Страница 40: ...ibed here see the Sending Guide Setting the Scan Settings Sending Guide Chapters 3 and 4 1 2 3 4 7 8 9 6 5 Details 4 Network Address Book Press to search for a destination from an LDAP server 3 Address Book see p 33 Press to select a destination from the address book 2 Destination List Displays a list of destinations A maximum of 256 destinations can be specified at the same time Out of the 256 de...

Страница 41: ... select a stored scan mode and resolution The scanning modes are set by default but you can edit these settings 16 Option see p 35 and p 36 Press to select a feature from the Scan Settings screen 15 Send Settings see p 37 and p 38 Press to select features on the Send Settings screen 13 Cc Bcc Press to set multiple e mail address destinations for the Cc and Bcc addresses 8 Favorites Buttons One tou...

Страница 42: ...cations Settings from the Additional Functions screen One touch button registration see p 10 in the Easy Operation Guide To Suit Your Needs Register in Address Book Settings from the Additional Functions screen Address book registration see p 10 in the Easy Operation Guide To Suit Your Needs Register in Address Book Settings from the Additional Functions screen Registration can also be performed f...

Страница 43: ...een an I fax destination is set 9 Press to erase a destination from the address book 3 Register New Address Press to register a destination in the address book 2 Where to Register the Destination see p 33 Select where to register the destination These buttons are links to the corresponding registration screen in the Additional Functions screen 1 9 Delayed Send see p 38 Press to send the document a...

Страница 44: ...e flow of the two basic storing operations is shown For more information see the corresponding section Stored documents are displayed with See p 48 Stored documents are displayed with See p 48 Inbox Select an Inbox If you select a User Inbox set with a password enter the password press OK Press Mail Box select a user inbox 1 2 For instructions on setting a password see Chapter 8 Customizing Settin...

Страница 45: ...4 Start Scanning Press The stored data will be automatically deleted after 3 days default setting This setting can be deactivated or changed to any time period see p 14 in the Easy Operation Guide To Suit Your Needs Select an Inbox Select Store select the inbox click OK 1 2 5 4 3 Start Storing Press OK For instructions on checking stored documents in inboxes using the Remote UI see p 48 When scann...

Страница 46: ...ion or documents stored in User Inboxes from the Copy Basic Features screen Send Basic Features screen or a computer can be sent You can also send I fax documents that are stored in the Memory RX Inbox You cannot send documents stored in Confidential Fax Inboxes Specify the User Inbox If there is a password set for the selected User Inbox enter the password press OK 1 2 For more information on Use...

Страница 47: ...res you can set from the Print screen and Change Pr Settings screen see p 55 and p 56 Press Start Print Specify Documents to Send Start Sending You can select the file format for the document to send from the File Format drop down list Specify the destinations press Start Send For more information on the Send function settings see the Sending Guide Print screen You can also use the Remote UI to se...

Страница 48: ...ial Features to access the Special Features screen The numbers in the illustrations refer to operation steps To Add a Name to a Document and Save It Copying and Mail Box Guide Chapter 2 Scan screen When you want to arrange documents so that you know what each is it is useful to give the documents names This also makes it easy to tell which document you are printing You can also change the name of ...

Страница 49: ...ing the Remote UI Preview of data stored in a User Inbox A document which was scanned from the Mail Box function s Scan screen or the Send Basic Features screen and stored in a User Inbox If you store print settings on the Change Pr Settings screen this icon changes to the Documents with Print Settings icon Documents without Print Settings A document which was stored in a User Inbox from a compute...

Страница 50: ... to operation steps To Print a Sample Print Copying and Mail Box Guide Chapter 2 Change Pr Settings screen When setting Sample Print to print a sample before printing multiple documents make sure to set Merge Documents After editing the settings press Done Press Start Print to print one set or specified pages To change the settings after checking the sample print press Change Settings To print ano...

Страница 51: ...nt data does not remain in the machine by automatically deleting it after it is printed To Print Multiple Documents Together Copying and Mail Box Guide Chapter 3 When distributing materials to multiple people for presentations etc you can set the machine to automatically output multiple page documents in sets You can also use the Staple mode to staple these sets together automatically The Staple m...

Страница 52: ...pter 2 Clear Selection Press to cancel your selection and select another document Changes to Select All Max 100 doc if you have not selected any documents 1 Print Press to print the selected document Use the Change Pr Settings screen to print onto both sides of the paper print a booklet change the layout or change finishing options 2 Move Duplicate Press to copy or move the selected document to an...

Страница 53: ...ess to cancel your selection and select another document Changes to Select All if you have not selected any documents Print Press to print the stored documents Printed documents are automatically erased 2 3 4 5 6 7 2 3 4 5 6 7 Confidential Fax Inbox Confidential Fax Inbox Document Selection Screen Copying and Mail Box Guide Chapter 6 When you have specified a Confidential Fax Inbox in the forwardi...

Страница 54: ...Selection screen 1 1 Press to return the copy ratio to 100 Copy Ratio Press to reduce or enlarge the copy size Document Size Select Press to select the size of the document to scan 1 2 3 Press to scan facing pages of an opened book onto separate sheets 2 Page Separation 1 Press to scan originals in such a way that when printing the scanned data the output paper can be made into a booklet Booklet S...

Страница 55: ...l see p 47 Document Name see p 47 Adjust Contrast Press to manually control the scan exposure Press A to select or cancel the automatic exposure control Press to add a name to a document to store Enter the document name using the touch panel display Press to scan two sided originals 4 5 6 Initial Settings Press to cancel all settings at once The machine returns to the Standard Scanning mode Specia...

Страница 56: ...front and back covers or job separator sheets to divide each document Displayed as Cover Sheet Insertion when only one document is selected 1 2 Booklet Press to make prints into a booklet If the saddle stitch option is attached the booklet can also be automatically stapled The Perfect Binding mode enables you to glue the cover and content pages of a document together Mail Box Function Mail Box Fun...

Страница 57: ...ng Press to include page and copy set numbering on prints 10 Press to store or recall print modes Form Composition Press to superimpose an image stored in memory onto the original image for printing 3 5 Press to create margins along the sides of a print 7 Mail Box Function Overview Print Screen Copying and Mail Box Guide Chapter 2 On the Print screen you can set the number of copies automatically ...

Страница 58: ...Department ID Management settings Network Settings and other system settings Press to make various timer related settings for the machine such as the time it takes for the machine to enter the Sleep mode Press to register or edit settings for the Address Book and one touch buttons For more information see the PS PCL UFR II Printer Guide Press to edit settings for the Mail Box function Press to reg...

Страница 59: ...ng Printing trouble When the exposure of a copy or print is different from the original When a print is dirty Communications trouble When you cannot send When you cannot receive When communications are slow Other trouble When the message contact your service representative with the error code below is displayed Reference 8 Service Call Messages Sending 12 When Problems Occur Sending 12 When Proble...

Страница 60: ...polis Tower 10 Metropolis Drive Hunghom Kowloon Hong Kong CANON INC 30 2 Shimomaruko 3 chome Ohta ku Tokyo 146 8501 Japan CANON U S A INC One Canon Plaza Lake Success NY 11042 U S A CANON CANADA INC 6390 Dixie Road Mississauga Ontario L5T 1P7 Canada CANON EUROPA N V Bovenkerkerweg 59 61 1185 XB Amstelveen The Netherlands See http www canon europe com for details on your regional dealer CANON AUSTR...

Отзывы: