Fax
6-13
Sending Fax Documents
Sending Fax Documents
This section describes the settings and procedures for sending fax documents.
Basic Methods for Sending Faxes
This section describes the flow of sending faxes.
If <RESTRICT NEW ADD.> is set to <ON>, you cannot specify fax
numbers using - , [numeric keys] and [Tone]. Make
sure that <RESTRICT NEW ADD.> is set to <OFF>. For details, see
“Restricting the New Address,” in the e-Manual.
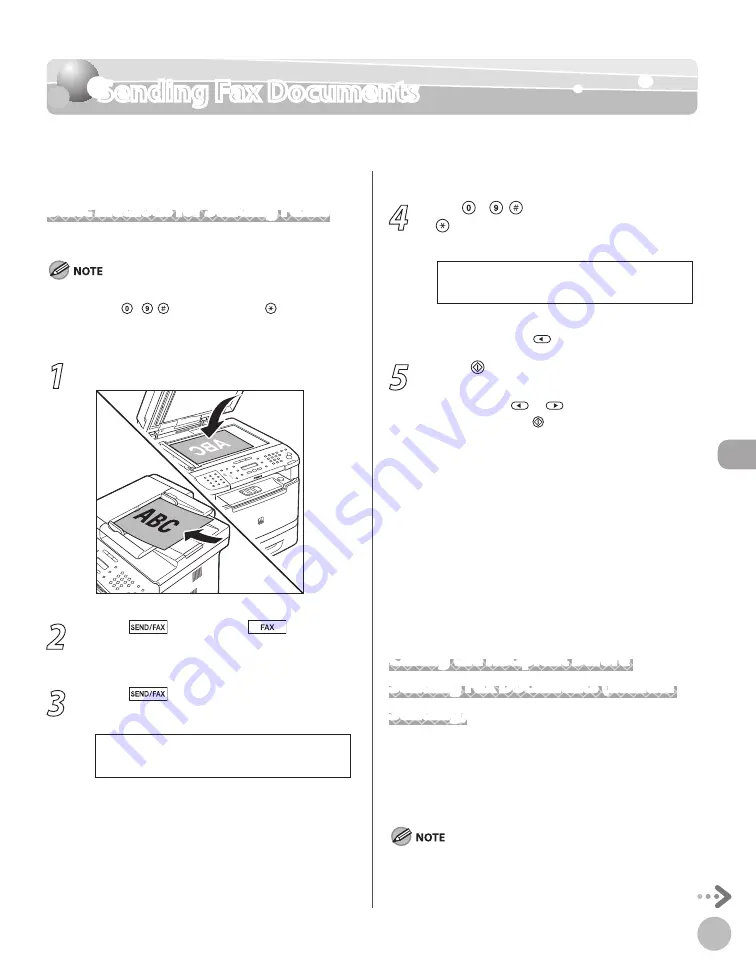
1
Place documents.
2
Press
[SEND/FAX]/
[FAX].
The SEND/FAX indicator lights up and the
machine enters the send standby mode.
3
Press
[SEND/FAX] repeatedly to
select <FAX>, then press [OK].
S E L E C T : O K
F A X
If the model of your machine is MF5850dn and
no USB memory is inserted in the USB memory
port, skip this step.
4
Use – , [numeric keys] and
[Tone] to specify the fax number.
T E L = 0 1 2 X X X X X X X
F A X N U M B E R
Ex.
If you enter a wrong number when specifying a
fax number, press
to delete the number.
5
Press [Start].
When you place the documents on the platen
glass, press
or
to select the document
size, then press [Start] for each document.
When scanning is complete, press [OK] to
start sending.
You can also adjust the following scan
settings as necessary, using the keys on the
operation panel, after specifying the
destination in step 4.
Density: See “Adjusting Density,” on p. 6-29.
Image Quality: See “Selecting Image Quality,”
on p. 6-30.
2-Sided: See “2-Sided Documents,” on p. 6-31.
Scanning starts, and the scanned data is sent to
the specified fax number.
Calling the Recipient before
Sending Fax Documents (Manual
Sending)
Use manual sending when you want to talk to the
recipient before sending a document, or if the
recipient does not have a fax machine that can
receive automatically.
You cannot use the platen glass for manual sending.
You cannot use group addresses for manual sending.
You cannot use 2-Sided scanning mode for manual sending.
–
–
•
•
•
–
–
–
Содержание imageCLASS MF5850dn
Страница 34: ...Before Using the Machine 1 9 Operation Panel Send Operation Panel MF5880dn MF5850dn ...
Страница 68: ...Copying 3 3 Overview of Copy Functions p 3 17 p 3 25 p 3 22 ...
Страница 99: ...Copying 3 34 ...
Страница 102: ...Printing 4 3 Overview of the Print Functions p 4 9 ...
Страница 134: ...Fax 6 3 Overview of Fax Functions p 6 19 p 6 59 p 6 55 ...
Страница 198: ...E Mail MF5880dn only 7 3 Overview of E Mail Functions ...
Страница 203: ...E Mail MF5880dn only 7 8 ...
Страница 206: ...Scanning 8 3 Overview of the Scanner Functions ...
Страница 217: ...Scanning 8 14 ...
Страница 233: ...11 6 Maintenance Cleaning the Machine 7 Close the ADF 8 Reconnect the power cord and turn ON the main power switch ...


