


Chapter 2
2-14
F-2-41
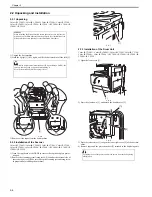
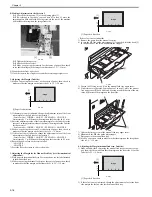
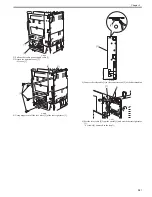
2.2.8 Fixing the Machine in Place
0013-8269
Color iR C3380G / Color iR C2880G / Color iR C3380i / Color iR C3380 /
Color iR C2880i / Color iR C2880 / iR C3480 / iR C3480i / iR C3080 / iR
C3080i / iR C2550
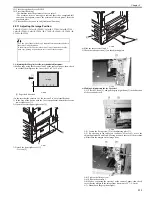
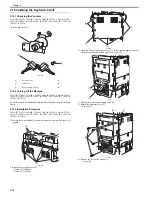
<If a Cassette Pedestal Is Used>
1) Move the host machine to its permanent position, and fix it in place using
the 4 adjusters [1] of the cassette pedestal.
F-2-42
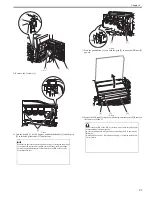
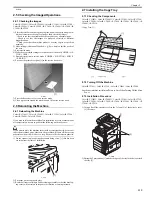
2.2.9 Setting Up the Cassette
0013-8272
Color iR C3380G / Color iR C2880G / Color iR C3380i / Color iR C3380 /
Color iR C2880i / Color iR C2880 / iR C3480 / iR C3480i / iR C3080 / iR
C3080i / iR C2550
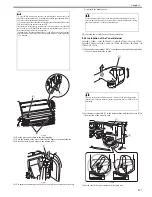
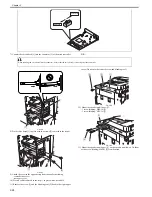
1) Press the cassette release button, and slide out the cassette to the front.
2) Check the type of paper that the user uses, check to see that the size con-
figuration switch [1] of the cassette is set to the paper size. As necessary,
change the switch position.
3) Set the paper size dial [2] to suit the size of the paper in question.
F-2-43
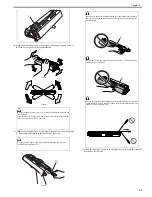
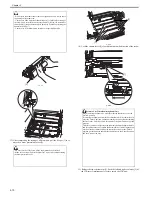
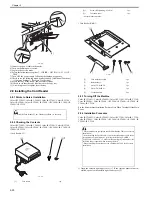
4) Pick the lever [1] of the side guide plate, and move the side guide plate to
the desired position.
5) Shift down the rear guide plate [2] to the right to detach. Adjust the rear
guide plate to suit the appropriate size indicated on the base of the cas-
sette.
F-2-44
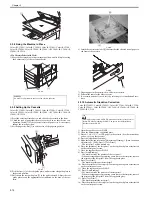
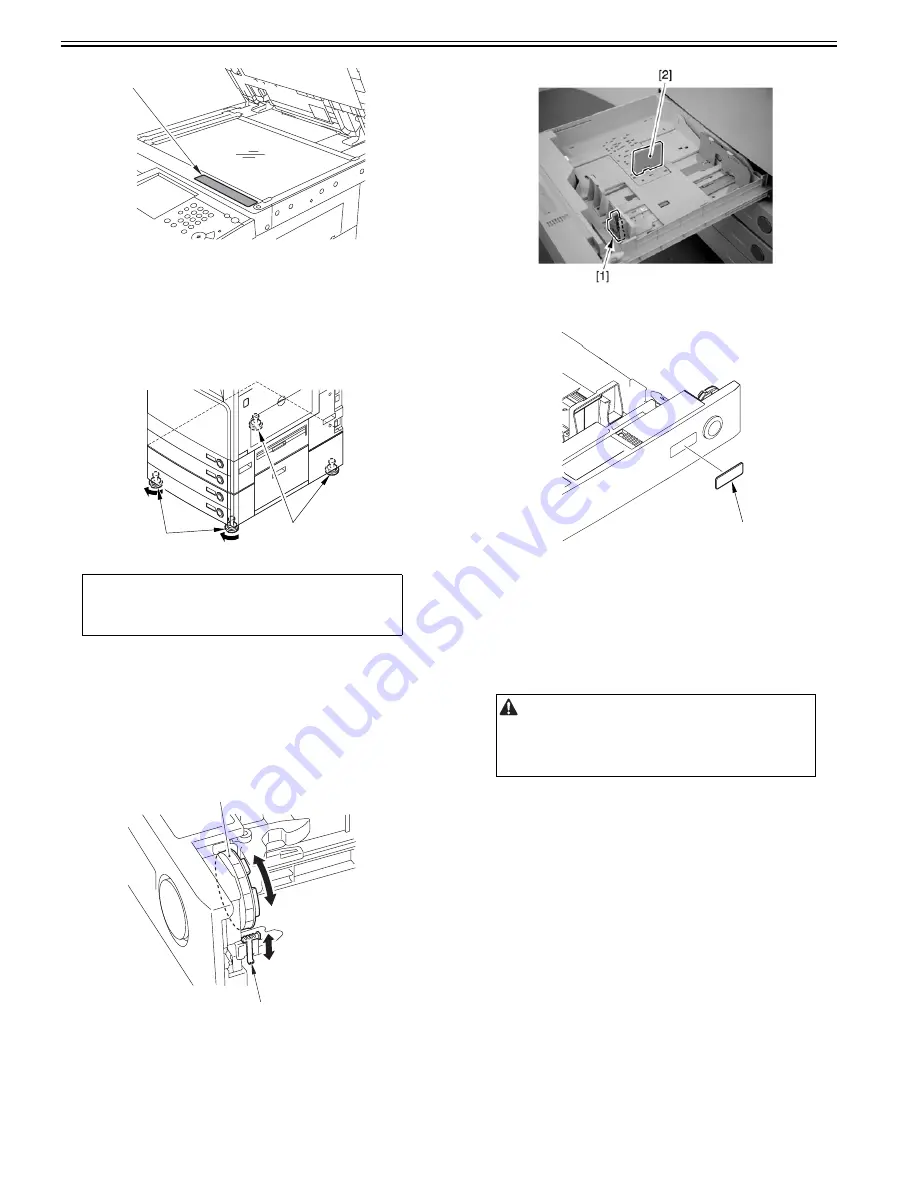
6) Attach the cassette size label [1] that matches the selected size of paper to
the front of the cassette.
F-2-45
7) Deposit paper in the cassette; then, slide in the cassette.
8) Perform the same for the other cassette.
9) If a cassette pedestal is used, set it by referring to its Installation Proce-
dure.
2.2.10 Automatic Gradation Correction
0013-8274
Color iR C3380G / Color iR C2880G / Color iR C3380i / Color iR C3380 /
Color iR C2880i / Color iR C2880 / iR C3480 / iR C3480i / iR C3080 / iR
C3080i / iR C2550
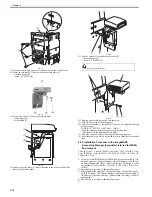
1) Open the copyboard cover/DADF.
2) Clean the host machine copyboard glass.
3) Place A3, A4, 11X17, or LTR paper in the cassette. (See the instructions
on how to set up the cassette.)
4) Press the [Additional Function].
5) Make the following selections: [Adjustment/Cleaning] > [Auto Gradation
Adjustment] > [Full Adjust] > [Test Print 1]
- The test print 1 will be printed out.
6) Place the printout of the test print 1 on the copyboard glass as instructed
on the control panel screen.
7) Close the copyboard cover/DADF.
8) Press [Start Reading].
- The machine reads the printout of the test print 1.
- When a message appears prompting you to remove the test print, remove
the printout of the test print 1 from the copyboard glass.
9) Press [Test Print 2].
- The machine prints out the test print 2.
10) Place the printout of the test print 2 on the copyboard glass as instructed
on the control panel scan.
11) Close the copyboard cover/DADF.
12) Press [Start Reading].
- The machine reads the print out of the test print 2.
- When a message appears promoting you to remove the test print, remove
the printout of the test print 2 from the copyboard glass.
13) Press [Test Print 3].
- The machine prints the test print 3.
14) Place the printout of the test print 3 on the copyboard glass as instructed
on the control panel screen.
MEMO:
No need for adjustment in the case of no cassette pedestal.
[1]
[1]
[1]
[1]
[2]
For models except ones with DADF, mount the accessory platen cover or
the DADF. When mounting the DADF, be sure to see the installation
procedure for the DADF.
[1]
Содержание CiRC2550
Страница 2: ......
Страница 27: ...Chapter 1 Introduction ...
Страница 28: ......
Страница 47: ...Chapter 1 1 18 F 1 14 ON OFF ON OFF ...
Страница 70: ...Chapter 1 1 41 5 Turn on the main power switch ...
Страница 79: ...Chapter 2 Installation ...
Страница 80: ......
Страница 85: ...Chapter 2 2 3 Not available in some regions ...
Страница 134: ...Chapter 3 Basic Operation ...
Страница 135: ......
Страница 137: ......
Страница 143: ...Chapter 4 Main Controller ...
Страница 144: ......
Страница 152: ...Chapter 4 4 6 F 4 6 CPU HDD ROM access to the program at time of execution ...
Страница 171: ...Chapter 5 Original Exposure System ...
Страница 172: ......
Страница 203: ...Chapter 6 Laser Exposure ...
Страница 204: ......
Страница 206: ......
Страница 220: ...Chapter 7 Image Formation ...
Страница 221: ......
Страница 277: ...Chapter 8 Pickup Feeding System ...
Страница 278: ......
Страница 282: ......
Страница 336: ...Chapter 9 Fixing System ...
Страница 337: ......
Страница 339: ......
Страница 357: ...Chapter 10 Externals and Controls ...
Страница 358: ......
Страница 362: ......
Страница 366: ...Chapter 10 10 4 F 10 2 F 10 3 FM1 FM2 FM5 FM8 FM11 FM4 FM3 FM6 FM7 FM9 FM10 ...
Страница 375: ...Chapter 10 10 13 F 10 10 2 Remove the check mark from SNMP Status Enabled ...
Страница 376: ...Chapter 10 10 14 F 10 11 ...
Страница 402: ...Chapter 11 MEAP ...
Страница 403: ......
Страница 405: ......
Страница 452: ...Chapter 12 RDS ...
Страница 453: ......
Страница 455: ......
Страница 464: ...Chapter 13 Maintenance and Inspection ...
Страница 465: ......
Страница 467: ......
Страница 469: ...Chapter 13 13 2 F 13 1 8 9 1 2 3 3 5 6 7 10 11 12 13 14 4 ...
Страница 474: ...Chapter 14 Standards and Adjustments ...
Страница 475: ......
Страница 477: ......
Страница 485: ......
Страница 486: ...Chapter 15 Correcting Faulty Images ...
Страница 487: ......
Страница 495: ...Chapter 15 15 4 F 15 2 COLOR M 1 COLOR Y C K 0 ...
Страница 569: ...Chapter 15 15 78 F 15 82 J102 J107 J103 J108 J101 J109 J106 J112 J115 J113 J114 J104 J105 ...
Страница 570: ...Chapter 16 Self Diagnosis ...
Страница 571: ......
Страница 573: ......
Страница 600: ...Chapter 17 Service Mode ...
Страница 601: ......
Страница 603: ......
Страница 712: ...Chapter 18 Upgrading ...
Страница 713: ......
Страница 715: ......
Страница 746: ...Chapter 19 Service Tools ...
Страница 747: ......
Страница 748: ...Contents Contents 19 1 Service Tools 19 1 19 1 1 Special Tools 19 1 19 1 2 Solvents and Oils 19 2 ...
Страница 749: ......
Страница 752: ...APPENDIX ...
Страница 774: ......


