


Chapter 2
2-19
action.
2.5 Checking the Images/Operations
2.5.1 Checking the Images
0013-8320
Color iR C3380G / Color iR C2880G / Color iR C3380i / Color iR C3380 /
Color iR C2880i / Color iR C2880 / iR C3480 / iR C3480i / iR C3080 / iR
C3080i / iR C2550
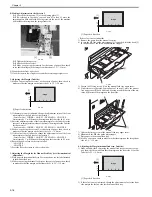
1) Place the test chart on the copyboard glass, and make copies using the in-
dividual cassettes as the source of paper. then, check the images.
- Check to see that the machine does not produce any abnormal noise.
- Check to see that the images are produced correctly at different
magnifications.
- Check to see that the machine produces as many copies as specified
normally.
2) Make settings (Additional Function ; e.g., date, time) to suit the needs of
the user.
3) Start service mode.
4) Make the user-related settings to suit the needs of the user (COPIER > OP-
TION > USER).
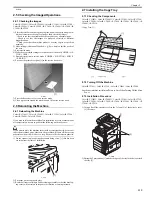
5) Print out test prints in service mode (COPIER > FUNCTION > MISC-P
> P-PRINT).
6) Put away the printed test print [1] in the service book case.
F-2-61
7) Press the Reset key twice to end service mode.
8) Clean up the area around the machine, and fill out the service book.
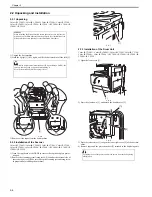
2.6 Relocating the Machine
2.6.1 Relocating the Machine
0013-8321
Color iR C3380G / Color iR C2880G / Color iR C3380i / Color iR C3380 /
Color iR C2880i / Color iR C2880
If you need to relocate the machine after installation by truck or other means
of transportation, be sure to perform the following work in advance:
If you want to move the machine intact with its cassette pedestal, be sure not
to use the machine's grips; otherwise, the machine will come off the cassette
pedestal as when it is moved over a step. Be sure to lift the cassette pedestal.
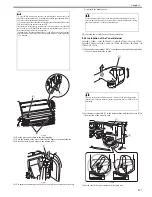
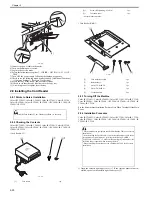
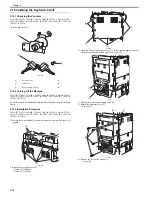
1) Fix the scanner in place using the scanner fixing screw [1] that has been
set aside from the time of installation.
F-2-62
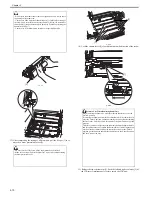
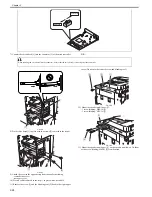
2) Put paper on the copyboard glass.
3) Remove all toner cartridges and developing assembly so that the develop-
ing rotary will not rotate in response to vibration occurring in transit.
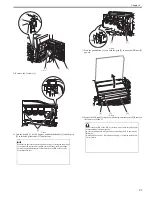
2.7 Installing the Copy Tray
2.7.1 Checking the Components
0013-9951
Color iR C3380G / Color iR C2880G / Color iR C3380i / Color iR C3380 /
Color iR C2880i / Color iR C2880 / iR C3480 / iR C3480i / iR C3080 / iR
C3080i / iR C2550
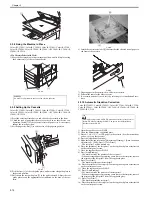
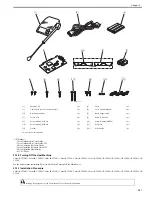
<Copy Tray-J1>
F-2-63
2.7.2 Turning Off the Machine
0013-9956
Color iR C3380i / Color iR C3380 / Color iR C2880i / Color iR C2880
See the host machine installation 'Points to Note When Turning Off the Main
Power'.
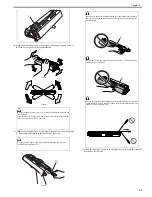
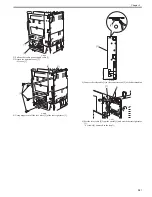
2.7.3 Installation Procedure
0013-9957
Color iR C3380G / Color iR C2880G / Color iR C3380i / Color iR C3380 /
Color iR C2880i / Color iR C2880 / iR C3480 / iR C3480i / iR C3080 / iR
C3080i / iR C2550
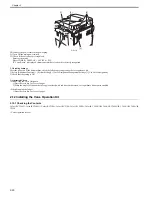
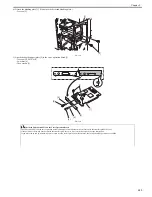
1) Using a flat-blade screwdriver, free the 2 claws [2] of the delivery cover
[1] to remove.
F-2-64
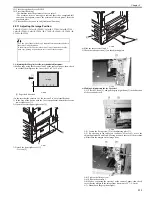
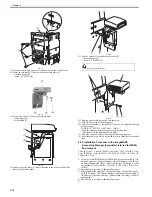
2) Fitting the 2 protrusions [1] at the both edges of the tray to the holes, attach
the tray [2].
[1]
[1]
Copy Tray
1 pc.
[1]
[1]
[2]
Содержание CiRC2550
Страница 2: ......
Страница 27: ...Chapter 1 Introduction ...
Страница 28: ......
Страница 47: ...Chapter 1 1 18 F 1 14 ON OFF ON OFF ...
Страница 70: ...Chapter 1 1 41 5 Turn on the main power switch ...
Страница 79: ...Chapter 2 Installation ...
Страница 80: ......
Страница 85: ...Chapter 2 2 3 Not available in some regions ...
Страница 134: ...Chapter 3 Basic Operation ...
Страница 135: ......
Страница 137: ......
Страница 143: ...Chapter 4 Main Controller ...
Страница 144: ......
Страница 152: ...Chapter 4 4 6 F 4 6 CPU HDD ROM access to the program at time of execution ...
Страница 171: ...Chapter 5 Original Exposure System ...
Страница 172: ......
Страница 203: ...Chapter 6 Laser Exposure ...
Страница 204: ......
Страница 206: ......
Страница 220: ...Chapter 7 Image Formation ...
Страница 221: ......
Страница 277: ...Chapter 8 Pickup Feeding System ...
Страница 278: ......
Страница 282: ......
Страница 336: ...Chapter 9 Fixing System ...
Страница 337: ......
Страница 339: ......
Страница 357: ...Chapter 10 Externals and Controls ...
Страница 358: ......
Страница 362: ......
Страница 366: ...Chapter 10 10 4 F 10 2 F 10 3 FM1 FM2 FM5 FM8 FM11 FM4 FM3 FM6 FM7 FM9 FM10 ...
Страница 375: ...Chapter 10 10 13 F 10 10 2 Remove the check mark from SNMP Status Enabled ...
Страница 376: ...Chapter 10 10 14 F 10 11 ...
Страница 402: ...Chapter 11 MEAP ...
Страница 403: ......
Страница 405: ......
Страница 452: ...Chapter 12 RDS ...
Страница 453: ......
Страница 455: ......
Страница 464: ...Chapter 13 Maintenance and Inspection ...
Страница 465: ......
Страница 467: ......
Страница 469: ...Chapter 13 13 2 F 13 1 8 9 1 2 3 3 5 6 7 10 11 12 13 14 4 ...
Страница 474: ...Chapter 14 Standards and Adjustments ...
Страница 475: ......
Страница 477: ......
Страница 485: ......
Страница 486: ...Chapter 15 Correcting Faulty Images ...
Страница 487: ......
Страница 495: ...Chapter 15 15 4 F 15 2 COLOR M 1 COLOR Y C K 0 ...
Страница 569: ...Chapter 15 15 78 F 15 82 J102 J107 J103 J108 J101 J109 J106 J112 J115 J113 J114 J104 J105 ...
Страница 570: ...Chapter 16 Self Diagnosis ...
Страница 571: ......
Страница 573: ......
Страница 600: ...Chapter 17 Service Mode ...
Страница 601: ......
Страница 603: ......
Страница 712: ...Chapter 18 Upgrading ...
Страница 713: ......
Страница 715: ......
Страница 746: ...Chapter 19 Service Tools ...
Страница 747: ......
Страница 748: ...Contents Contents 19 1 Service Tools 19 1 19 1 1 Special Tools 19 1 19 1 2 Solvents and Oils 19 2 ...
Страница 749: ......
Страница 752: ...APPENDIX ...
Страница 774: ......