


Chapter 2
2-42
F-2-146
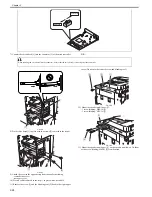
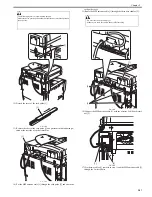
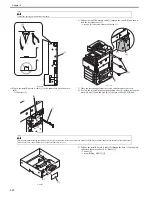
18) Connect the power cable to the power plug.
19) Turn ON the main power switch.
22) Check if the wireless LAN board is recognized.
Enter service mode.
Select COPIER > DISPLAY > ACC-STS > PCI.
If "Wireless LAN Board" is displayed, that means that the wireless LAN
board is correctly recognized.
2. Output the user data list
Output the user data list in order to check that the wireless LAN has been rec-
ognised.
1) Select: [Additional Functions] > [Report Settings] > [Extension Card] in
the Print List > [User Data List].
2) After a message is displayed, select 'Yes' to output the user data list.
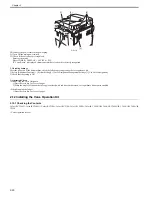
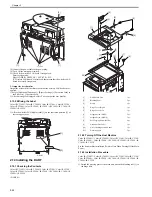
2.13.5 Affixing the Label
0018-6184
Color iR C3380G / Color iR C2880G / Color iR C3380i / Color iR C3380 /
Color iR C2880i / Color iR C2880 / iR C3480 / iR C3480i / iR C3080 / iR
C3080i / iR C2550
1) Affix the wireless LAN display label [2] on the indicated position [1] of
the rear upper cover.
F-2-147
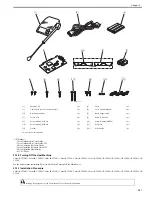
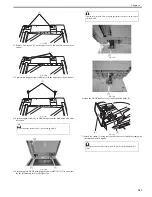
2.14 Installing the DADF
2.14.1 Checking the Contents
0014-1041
Color iR C3380G / Color iR C2880G / Color iR C3380i / Color iR C3380 /
Color iR C2880i / Color iR C2880 / iR C3480 / iR C3480i / iR C3080 / iR
C3080i / iR C2550
<DADF-L1>
F-2-148
2.14.2 Turning Off the Host Machine
0014-1284
Color iR C3380G / Color iR C2880G / Color iR C3380i / Color iR C3380 /
Color iR C2880i / Color iR C2880 / iR C3480 / iR C3480i / iR C3080 / iR
C3080i / iR C2550
See the host machine installation 'Points to Note When Turning Off the Main
Power'.
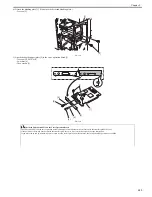
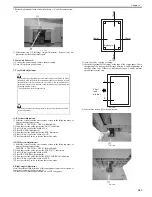
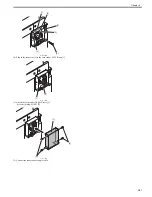
2.14.3 Installation Procedure
0014-1044
Color iR C3380G / Color iR C2880G / Color iR C3380i / Color iR C3380 /
Color iR C2880i / Color iR C2880 / iR C3480 / iR C3480i / iR C3080 / iR
C3080i / iR C2550
1) Detach the pressing plate of the main unit, attach the blanking seal [1] to
the hinge hole.
[3]
[2]
[1]
[1]
[2]
[1]
[1]
DADF Main Unit
1pc.
[2]
Blanking Seal
2pc.
[3]
Stamp
1pc.
[4]
Hinge Cover (Right)
1pc.
[5]
Hinge Cover (Left)
1pc.
[6]
Stepped Screw (M5X6)
2pc.
[7]
Stepped Screw (M4X10)
3pc.
[8]
Self-Tapping Screw (M3X8)
4pc.
[9]
Document Size Label
1pc.
[10]
Glass Cleaning Position Label
1pc.
[11]
Warning Label
1pc.
[2]
[2]
[5]
[3]
[9]
[1]
[4]
[8]
[6]
[6]
[7]
[7]
[10]
[11]
Содержание CiRC2550
Страница 2: ......
Страница 27: ...Chapter 1 Introduction ...
Страница 28: ......
Страница 47: ...Chapter 1 1 18 F 1 14 ON OFF ON OFF ...
Страница 70: ...Chapter 1 1 41 5 Turn on the main power switch ...
Страница 79: ...Chapter 2 Installation ...
Страница 80: ......
Страница 85: ...Chapter 2 2 3 Not available in some regions ...
Страница 134: ...Chapter 3 Basic Operation ...
Страница 135: ......
Страница 137: ......
Страница 143: ...Chapter 4 Main Controller ...
Страница 144: ......
Страница 152: ...Chapter 4 4 6 F 4 6 CPU HDD ROM access to the program at time of execution ...
Страница 171: ...Chapter 5 Original Exposure System ...
Страница 172: ......
Страница 203: ...Chapter 6 Laser Exposure ...
Страница 204: ......
Страница 206: ......
Страница 220: ...Chapter 7 Image Formation ...
Страница 221: ......
Страница 277: ...Chapter 8 Pickup Feeding System ...
Страница 278: ......
Страница 282: ......
Страница 336: ...Chapter 9 Fixing System ...
Страница 337: ......
Страница 339: ......
Страница 357: ...Chapter 10 Externals and Controls ...
Страница 358: ......
Страница 362: ......
Страница 366: ...Chapter 10 10 4 F 10 2 F 10 3 FM1 FM2 FM5 FM8 FM11 FM4 FM3 FM6 FM7 FM9 FM10 ...
Страница 375: ...Chapter 10 10 13 F 10 10 2 Remove the check mark from SNMP Status Enabled ...
Страница 376: ...Chapter 10 10 14 F 10 11 ...
Страница 402: ...Chapter 11 MEAP ...
Страница 403: ......
Страница 405: ......
Страница 452: ...Chapter 12 RDS ...
Страница 453: ......
Страница 455: ......
Страница 464: ...Chapter 13 Maintenance and Inspection ...
Страница 465: ......
Страница 467: ......
Страница 469: ...Chapter 13 13 2 F 13 1 8 9 1 2 3 3 5 6 7 10 11 12 13 14 4 ...
Страница 474: ...Chapter 14 Standards and Adjustments ...
Страница 475: ......
Страница 477: ......
Страница 485: ......
Страница 486: ...Chapter 15 Correcting Faulty Images ...
Страница 487: ......
Страница 495: ...Chapter 15 15 4 F 15 2 COLOR M 1 COLOR Y C K 0 ...
Страница 569: ...Chapter 15 15 78 F 15 82 J102 J107 J103 J108 J101 J109 J106 J112 J115 J113 J114 J104 J105 ...
Страница 570: ...Chapter 16 Self Diagnosis ...
Страница 571: ......
Страница 573: ......
Страница 600: ...Chapter 17 Service Mode ...
Страница 601: ......
Страница 603: ......
Страница 712: ...Chapter 18 Upgrading ...
Страница 713: ......
Страница 715: ......
Страница 746: ...Chapter 19 Service Tools ...
Страница 747: ......
Страница 748: ...Contents Contents 19 1 Service Tools 19 1 19 1 1 Special Tools 19 1 19 1 2 Solvents and Oils 19 2 ...
Страница 749: ......
Страница 752: ...APPENDIX ...
Страница 774: ......


