


Chapter 15
15-1
15.1 Making lnitial Checks
15.1.1 Checking the Site Environment
0014-3011
Color iR C3380G / Color iR C2880G / Color iR C3380i / Color iR C3380 / Color iR C2880i / Color iR C2880 / iR C3480 / iR C3480i / iR C3080i / iR C2550
- The voltage of the source of power must be as indicated (+/-10%).
- The temperature and humidity of the site must be as indicated, and the site must be away from a water faucet, water boiler, humidifier; moreover, the machine
must not be near a fire or subjected to dust.
- The site must be free of ammonium gas.
- The machine must not be subjected to the direct rays of the sun. As necessary, curtains must be furnished.
- The site must be well ventilated, and its floor must keep the machine level.
- The machine must remain connected to the wall outlet at all times.
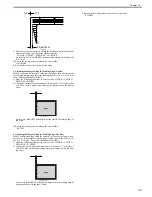
15.1.2 Checking the Paper
0014-3012
Color iR C3380G / Color iR C2880G / Color iR C3380i / Color iR C3380 / Color iR C2880i / Color iR C2880 / iR C3480 / iR C3480i / iR C3080i / iR C2550
- Check if the paper is dry. If moist, try paper fresh out of package.
- Check that the amount of paper placed in the cassette and the manual feed tray is as indicated.
- If transparencies are used, check to see if they are placed in the correct orientation.
15.1.3 Checking the Durables
0014-3014
Color iR C3380G / Color iR C2880G / Color iR C3380i / Color iR C3380 / Color iR C2880i / Color iR C2880 / iR C3480 / iR C3480i / iR C3080i / iR C2550
- Check the Durables Table, and replace those parts that have reached the end of the indicated lifetimes.
15.1.4 Checking the Units and Functional Blocks
0014-3017
Color iR C3380G / Color iR C2880G / Color iR C3380i / Color iR C3380 / Color iR C2880i / Color iR C2880 / iR C3480 / iR C3480i / iR C3080i / iR C2550
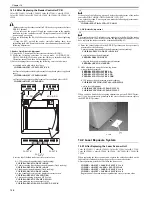
1. Reader Unit
- Check the optical system (contact sensor, white plate, copyboard glass, reading glass) for a scar, dirt, and foreign matter.
- Check the contact sensor unit to see if it moves smoothly. Check its rail for dirt.
- Check the contact sensor for flickering.
- Check the scanner for condensation.
2. Process
- Check the drum unit to see if it is attached properly.
- Check the photosensitive drum for a scar and dirt.
- Check the patch image read sensor window for dirt.
3. Transfer
- Check the secondary transfer outside roller for wear, scar, dirt, and deformation.
- Check the blade of the cleaning unit for a tear, warping, deformation, and stray toner.
4. Fixing
- Check the fixing film/ pressure roller for wear, scar, dirt, and deformation.
- Check the fixing thermistor for an open circuit.
- Check the thermal switch for electrical continuity.
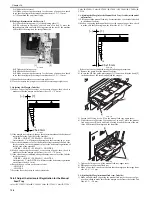
5. Paper Movement
- Check if there is foreign matter such as paper lint.
- Check the pickup/feed/separation roller for a buildup of paper powder, wear, scar, dirt, and deformation.
- Check the registration roller (middle, outside)/paper path roller for wear, scar, dirt, and deformation.
- Check the feed guide for wear, scar, dirt, and deformation.
- Check the paper for a bent leading edge, curling, waving, and moisture.
- As necessary, try transparencies of a type recommended by Canon to see if the problem, if any, is corrected.
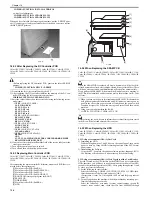
6. Machine
- Check if an excess load is imposed on the drive system.
- Check the gears for wear and chipping.
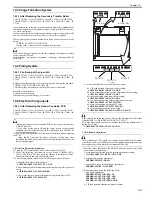
7. Cassette
- Check if the cassettes are fitted properly. Check also to see that the dial is set an appropriate paper size . As necessary, try a normal cassette if the problem, if
any, stops.
- Check the movement of the cassette holding plate is smooth. Check also to see that the holding plate is free of deformation.
- Check if the side guide plate/trailing edge plate inside the cassette are set correctly.
8. Service Mode
- Check that the various CCD adjustment values are as indicated on the service label.
(COPIER>ADJUST>CCD>all items)
- Check if registration adjustment is correct.
(COPIER>ADJUST>FEED-ADJ>REGIST)
- Check if the machine inside temperature/humidity is the correct reading.
(COPIER>DISPLAY>ANALOG>TEMP/ABS-HUM)
- Check the image read position adjustment is correct.
(COPIER>ADJUST>ADJ-XY>ADJ-X/ADJ-Y)
- Check if the value for ADJUST/OPTION is as indicated on the service label.
- Check if error initialization has been executed.
(COPIER>FUNCTION>CLEAR>ERR)
9. General
- Check the power plug is connected properly.
- Check there is the rated AC voltage at the power outlet.
- Check the sensors, clutches, motors, and solenoids operate normally. Check the connectors for poor contact.
(Be sure to check with the General Timing Chart for reference to power/signal routes.)
- Check the leakage breaker/circuit breaker operates normally.
Содержание CiRC2550
Страница 2: ......
Страница 27: ...Chapter 1 Introduction ...
Страница 28: ......
Страница 47: ...Chapter 1 1 18 F 1 14 ON OFF ON OFF ...
Страница 70: ...Chapter 1 1 41 5 Turn on the main power switch ...
Страница 79: ...Chapter 2 Installation ...
Страница 80: ......
Страница 85: ...Chapter 2 2 3 Not available in some regions ...
Страница 134: ...Chapter 3 Basic Operation ...
Страница 135: ......
Страница 137: ......
Страница 143: ...Chapter 4 Main Controller ...
Страница 144: ......
Страница 152: ...Chapter 4 4 6 F 4 6 CPU HDD ROM access to the program at time of execution ...
Страница 171: ...Chapter 5 Original Exposure System ...
Страница 172: ......
Страница 203: ...Chapter 6 Laser Exposure ...
Страница 204: ......
Страница 206: ......
Страница 220: ...Chapter 7 Image Formation ...
Страница 221: ......
Страница 277: ...Chapter 8 Pickup Feeding System ...
Страница 278: ......
Страница 282: ......
Страница 336: ...Chapter 9 Fixing System ...
Страница 337: ......
Страница 339: ......
Страница 357: ...Chapter 10 Externals and Controls ...
Страница 358: ......
Страница 362: ......
Страница 366: ...Chapter 10 10 4 F 10 2 F 10 3 FM1 FM2 FM5 FM8 FM11 FM4 FM3 FM6 FM7 FM9 FM10 ...
Страница 375: ...Chapter 10 10 13 F 10 10 2 Remove the check mark from SNMP Status Enabled ...
Страница 376: ...Chapter 10 10 14 F 10 11 ...
Страница 402: ...Chapter 11 MEAP ...
Страница 403: ......
Страница 405: ......
Страница 452: ...Chapter 12 RDS ...
Страница 453: ......
Страница 455: ......
Страница 464: ...Chapter 13 Maintenance and Inspection ...
Страница 465: ......
Страница 467: ......
Страница 469: ...Chapter 13 13 2 F 13 1 8 9 1 2 3 3 5 6 7 10 11 12 13 14 4 ...
Страница 474: ...Chapter 14 Standards and Adjustments ...
Страница 475: ......
Страница 477: ......
Страница 485: ......
Страница 486: ...Chapter 15 Correcting Faulty Images ...
Страница 487: ......
Страница 495: ...Chapter 15 15 4 F 15 2 COLOR M 1 COLOR Y C K 0 ...
Страница 569: ...Chapter 15 15 78 F 15 82 J102 J107 J103 J108 J101 J109 J106 J112 J115 J113 J114 J104 J105 ...
Страница 570: ...Chapter 16 Self Diagnosis ...
Страница 571: ......
Страница 573: ......
Страница 600: ...Chapter 17 Service Mode ...
Страница 601: ......
Страница 603: ......
Страница 712: ...Chapter 18 Upgrading ...
Страница 713: ......
Страница 715: ......
Страница 746: ...Chapter 19 Service Tools ...
Страница 747: ......
Страница 748: ...Contents Contents 19 1 Service Tools 19 1 19 1 1 Special Tools 19 1 19 1 2 Solvents and Oils 19 2 ...
Страница 749: ......
Страница 752: ...APPENDIX ...
Страница 774: ......