


Chapter 17
17-70
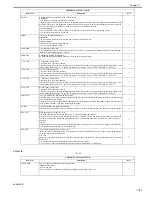
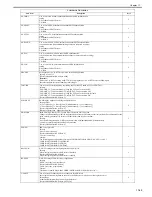
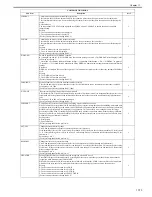
U-PASWD
Use it to set a password of the user required to connect to the SSH server.
Sets a password of the login user required to connect to the SSH server.
Setting range
8 characters maximum (English one byte characters)
[Factory default/After RAM clear: Vs8DuwJ]
The password is left hidden on the screen.
2
DA-PORT
Setting port for communication with DA
Settings
0: Close
1: Open
[Factory default/After RAM clear:0]
Caution!
The following modes also become ON when COPIER>OPTION>BODY>DA-CNCT is set to '1'.
COPIER>OPTION>BODY>STS-PORT
COPIER>OPTION>BODY>CMD-PORT
COPIER>OPTION>BODY>SSH-SW
COPIER>OPTION>BODY>DA-PORT
2
DA-CNCT
Setting for connection with DA
Settings
1: DA is used.
0: DA is not used.
[Factory setting/value after clearing RAM: 0]
Note:
The items listed below are also set to ON when this item COPIER>OPTION>BODY>DA-CNCT is set to "1."
- COPIER>OPTION>BODY>STS-PORT
- COPIER>OPTION>BODY>CMD-PORT
- COPIER>OPTION>BODY>SSH-SW
- COPIER>OPTION>BODY>DA-PORT
MEMO:
This is used on machines marketed in Japan only. It is not used on overseas machines.
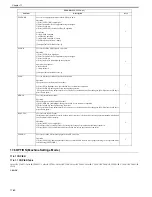
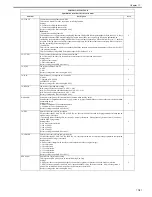
Fixer replacement message ON/OFF
This sets to ON or OFF the "Get ready to replace the fixer" message that appears on the user operation screen after the
fixed counter has reached the count which represents the end of the fixer's service life.
Settings
0: The message is not displayed.
1: The message is displayed.
[Factory setting/value after clearing RAM: 1]
2
FXMSG-SW
Fixing unit replacement message ON/OFF
This sets to ON or OFF the "Get ready to replace the fixing unit" message that appears on the user operation screen after
the fixing unit counter has reached the count which represents the end of the fixing unit's service life.
Settings
0: The message is not displayed.
1: The message is displayed.
[Factory setting/value after clearing RAM: 1]
Do not use it in service usually.
MEMO:
- When FXMSG-SW is set to "1" (default "0") and COPIER>OPTION>BODY>FXWRNLVL are only "1" (default "0"),
the machine tries to detect fixing unit life. And when it reaches the established machine longevity, the exchange message
is displayed.
- The content of the established machine exchange message is as follows.
"Prepare a new fixing roller. Call service representative."
Do to the following treatment when this message is displayed.
1) After power OFF, exchange the fixing unit(fixing film unit + pressure roller, or fixing unit).
2) After power ON, select COPIER>FUNCTION>CLEAR>CNT-DCON, and push the OK key.
3) Turn OFF/ON the power.
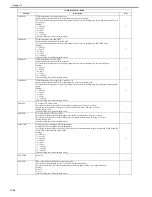
2
CHNG-STS
Setting of T.O.T (TUIF over TCP/IP) status connection port number
This sets the number of the port used for the status connection in T.O.T. It is used when changing the port number with
service NAVI.
Setting range: 1 to 65535
[Factory setting/value after clearing RAM: 20010]
MEMO:
T.O.T (TUIF over TCP)
A communication protocol (unique to Canon) for the presentation of built-in applications (UI) and for communicating
between applications inside the machine such as COPY, SEND and BOX.
2
CHNG-CMD
Setting of T.O.T (TUIF over TCP/IP) command connection port number
This sets the number of the port used for the command connection in T.O.T. It is used when changing the port number
with service NAVI.
Setting range: 1 to 65535
[Factory setting/value after clearing RAM: 20000]
MEMO:
T.O.T (TUIF over TCP)
A communication protocol (unique to Canon) for the presentation of built-in applications (UI) and for communicating
between applications inside the machine such as COPY, SEND and BOX.
2
MEAP-DSP
Prohibition against switching from MEAP screen to standard screen (copy, send or box screen, etc.)
Settings
0: Transfer to standard screen enabled.
1: Transfer to standard screen disabled.
[Factory setting/value after clearing RAM: 0]
MEMO:
Even when this item is set to "1," the display is transferred to the standard screen when an error, jam or alarm has
occurred.
2
COPIER>OPTION>BODY
Sub item
Description
level.
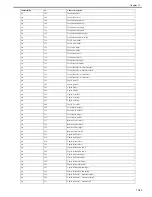
Содержание CiRC2550
Страница 2: ......
Страница 27: ...Chapter 1 Introduction ...
Страница 28: ......
Страница 47: ...Chapter 1 1 18 F 1 14 ON OFF ON OFF ...
Страница 70: ...Chapter 1 1 41 5 Turn on the main power switch ...
Страница 79: ...Chapter 2 Installation ...
Страница 80: ......
Страница 85: ...Chapter 2 2 3 Not available in some regions ...
Страница 134: ...Chapter 3 Basic Operation ...
Страница 135: ......
Страница 137: ......
Страница 143: ...Chapter 4 Main Controller ...
Страница 144: ......
Страница 152: ...Chapter 4 4 6 F 4 6 CPU HDD ROM access to the program at time of execution ...
Страница 171: ...Chapter 5 Original Exposure System ...
Страница 172: ......
Страница 203: ...Chapter 6 Laser Exposure ...
Страница 204: ......
Страница 206: ......
Страница 220: ...Chapter 7 Image Formation ...
Страница 221: ......
Страница 277: ...Chapter 8 Pickup Feeding System ...
Страница 278: ......
Страница 282: ......
Страница 336: ...Chapter 9 Fixing System ...
Страница 337: ......
Страница 339: ......
Страница 357: ...Chapter 10 Externals and Controls ...
Страница 358: ......
Страница 362: ......
Страница 366: ...Chapter 10 10 4 F 10 2 F 10 3 FM1 FM2 FM5 FM8 FM11 FM4 FM3 FM6 FM7 FM9 FM10 ...
Страница 375: ...Chapter 10 10 13 F 10 10 2 Remove the check mark from SNMP Status Enabled ...
Страница 376: ...Chapter 10 10 14 F 10 11 ...
Страница 402: ...Chapter 11 MEAP ...
Страница 403: ......
Страница 405: ......
Страница 452: ...Chapter 12 RDS ...
Страница 453: ......
Страница 455: ......
Страница 464: ...Chapter 13 Maintenance and Inspection ...
Страница 465: ......
Страница 467: ......
Страница 469: ...Chapter 13 13 2 F 13 1 8 9 1 2 3 3 5 6 7 10 11 12 13 14 4 ...
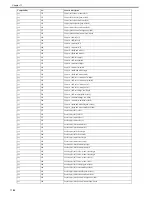
Страница 474: ...Chapter 14 Standards and Adjustments ...
Страница 475: ......
Страница 477: ......
Страница 485: ......
Страница 486: ...Chapter 15 Correcting Faulty Images ...
Страница 487: ......
Страница 495: ...Chapter 15 15 4 F 15 2 COLOR M 1 COLOR Y C K 0 ...
Страница 569: ...Chapter 15 15 78 F 15 82 J102 J107 J103 J108 J101 J109 J106 J112 J115 J113 J114 J104 J105 ...
Страница 570: ...Chapter 16 Self Diagnosis ...
Страница 571: ......
Страница 573: ......
Страница 600: ...Chapter 17 Service Mode ...
Страница 601: ......
Страница 603: ......
Страница 712: ...Chapter 18 Upgrading ...
Страница 713: ......
Страница 715: ......
Страница 746: ...Chapter 19 Service Tools ...
Страница 747: ......
Страница 748: ...Contents Contents 19 1 Service Tools 19 1 19 1 1 Special Tools 19 1 19 1 2 Solvents and Oils 19 2 ...
Страница 749: ......
Страница 752: ...APPENDIX ...
Страница 774: ......


