


8
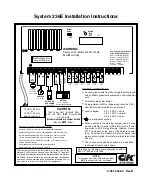
System 236E Installation Instructions
NOTE:
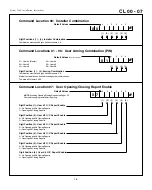
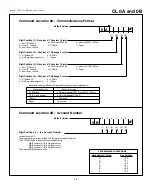
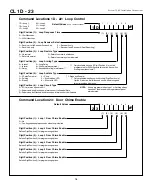
Command Location A0 must be addressed directly.
To program Command Location A0 with an LED keypad,
remember to enter the Command Location, followed by the
program data, then press the [#] key.
Warning:
If you enter a Command Location and then press
the [#] key without entering any data, the keypad will beep
5 times, indicating an error. To correct this problem, simply
re-enter the Command Location and Data, then press the [#]
key.
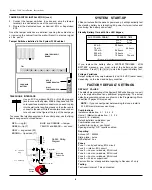
System 236E LED Keypad Layout
**
**
Keypad Activated Pager is only available on System
236E and later.
Programming with the Alpha Plus Keypad
Entering program data with an Alpha keypad is a two-step
process. First, key in the two-digit address (Command Location)
to be programmed and press the [#] key. The Alpha keypad
displays the CommandLocation and the data previously stored.
Enter the new data you wish stored and press the [#] key to write
the data. You can also scroll through the Command Locations in
numerical order by alternately pressing and releasing the [#] key.
NOTE:
Command Location A0 must be addressed directly.
When programming this Command Location with an Alpha
keypad, the previously stored data is not displayed. To pro-
gram this location, enter the Command Location followed by the
[#] key. Then enter the data to be stored and again press the
[#] key.
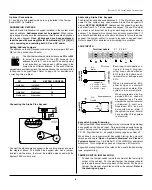
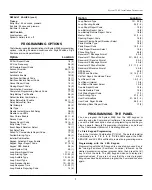
PROGRAMMING CONVERSIONS
Hexadecimal Value
Key Strokes
A
B
C
D
E
F
0
1
2
3
4
5
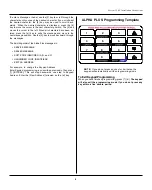
Programming Hexadecimal Numbers
The Alpha keypad may be used to program the control panel. The
cursor is moved to the right using the Emergency (E) key and to the
left using the Police (P) key. The Fire (F) key enters a blank space
and moves the cursor one position to the right.
Data is programmed into the panel using the hexadecimal number
system, which consists of the digits 0 - 9 and the letters A - F. The digits
0 - 9 are entered directly from the keypad. The chart below shows
how to enter the hexadecimal digits A through F.
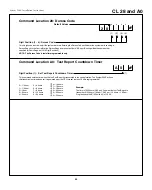
End of Programming Segment
The last two Command Locations are CL 28 and CL A0. When you
press the [#] key at these locations, the program will advance to
CL 29 or CL A1. These locations are not used in the System 236E.
If you enter CL 29 or CL A1, press [*][#] to exit programming,
or press the Command Location followed by the [#] key for the
desired programming location.
To Exit Panel Programming
When you have finished programming, press [*][#].
The panel
will also exit the programming mode if you do not press any
key within a five minute period.
The same procedure is used with both the LED and the Alpha
keypads.
PROGRAMMING the ALPHA Plus KEYPAD
Keypad Message Programming
The Alpha keypad programming template is used to allow the in-
staller to program messages and zone descriptions into the Alpha
keypads. The template shown below should be used when pro-
gramming the keypad.
To activate the keypad programming mode, enter the [Installer's
Code] [*] [0] [1] [#]. Information may be entered into the key-
pad in the form of letters (upper and lower case), numbers (0 -
9), and 22 special symbols. All characters are displayed in the
order listed above, i.e. upper and lower case letters, numbers,
and special symbols. The [Space] character precedes the letter
A.
In order to program the Alpha Plus keypad, you must have it wired to
the SYSTEM 236E/236EC, have power applied to the panel, and have
the keypad properly addressed.
You can only program when the
panel is disarmed.
NOTE:
Programming the Keypad is NOT the same as Keypad
Programming. (Keypad programming is used to program the
control panel.)
The Alpha Keypad
You can program the Alpha Plus keypads for special messages,
each of the 6 zone labels, and the keypad address.
Zone Labels
display during the walk-test and when the [#] key is pressed during
alarm memory or faults. The programmable
Service Message
is
displayed during AC failure, fuse failure, communication failure, or
low battery. The
Dealer Message
displays when the system is
disarmed. The keypad address is initially displayed only during
system start up (see page 5, Addressing Alpha Plus Keypads).
These messages can be programmed directly from the Alpha
keypad or remotely using the Commander II/Monitor II software
package. For more detailed information about remote program-
ming, refer to the Commander II/Monitor II Operating Manual.