


6
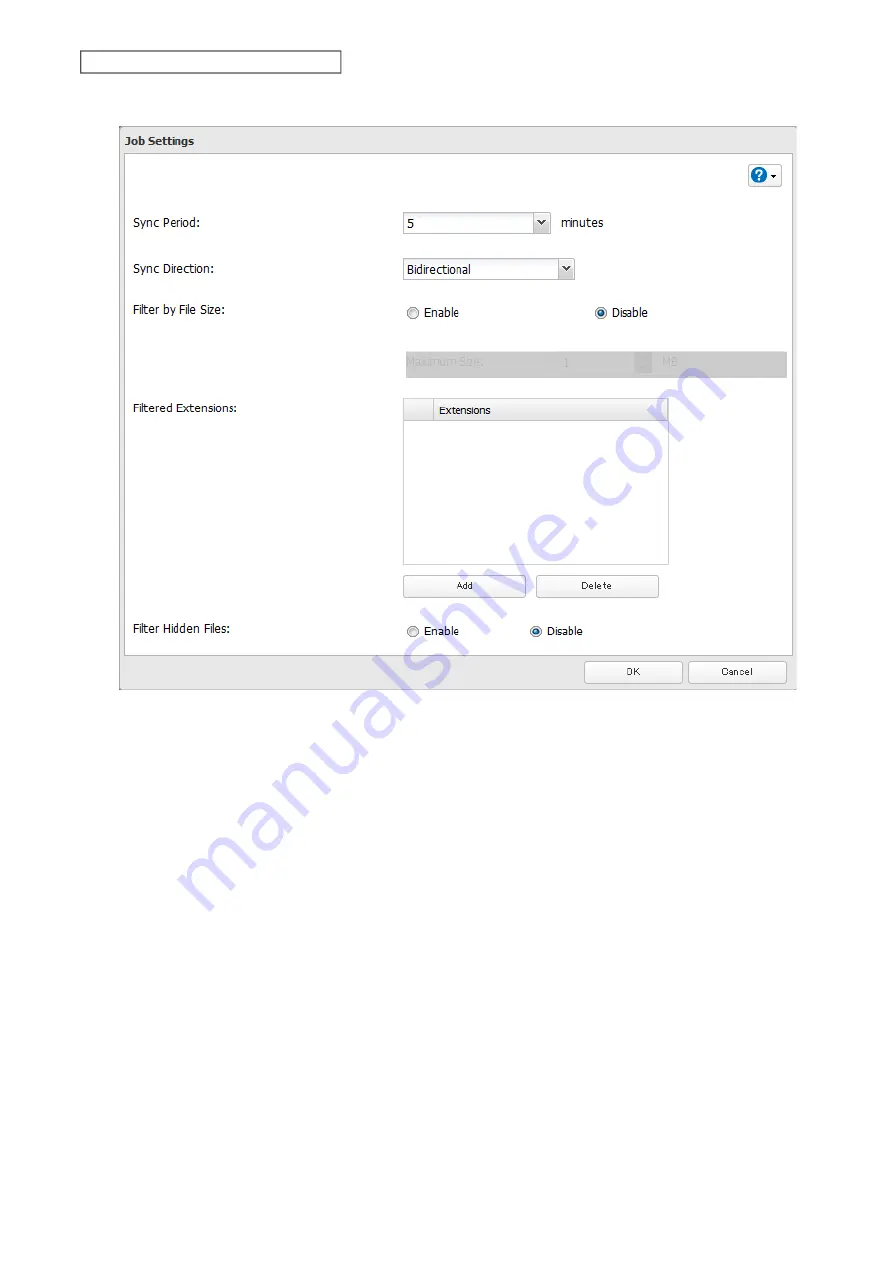
Configure the desired settings and click
OK
.
Notes:
• When specific settings are changed, the changes will not be applied and the files on Dropbox may not be
synchronized to the LinkStation. In such a case, delete the target files to be synchronized and upload them to
Dropbox again or delete the job and recreate it again. The following are the specific circumstances for when files
may not be synchronized:
◦
Uploading or downloading fails.
◦
File extensions are removed from filtering.
◦
The sync direction is changed.
• If using Dropbox through a proxy server, click
Proxy Settings
. From the displayed page, you can select whether
to use the configured settings or configure an identical proxy server. If using the identical proxy server, select
“New settings” and enter the proxy server name, port number, username, and password. Consult your network
administrator for detailed proxy server settings.
• Regardless of whether file filtering was configured, the following files will not be uploaded to Dropbox:
◦
desktop.ini
◦
thumbs.db
◦
Files whose filename contains the symbols / \ > < : " | ? *
◦
Files whose filename ends with either a space or period
◦
Files whose filename starts with either ~$ or .~
◦
Files whose filename starts with ~ and have the file extension .tmp
93
Chapter 5 Cloud Services and Remote Access
Содержание Link Station LS710D
Страница 24: ...3 Click Create Folder 23 Chapter 2 File Sharing...
Страница 26: ...2 Tap Create Folder 3 Enter the desired folder name and tap OK 4 Tap OK when finished 25 Chapter 2 File Sharing...
Страница 31: ...2 Tap Create User 30 Chapter 2 File Sharing...
Страница 34: ...3 Click Add Group 33 Chapter 2 File Sharing...
Страница 73: ...5 Click Add 72 Chapter 4 Backup...
Страница 79: ...3 Click Edit 4 Click Browse 5 Select the shared folder and click OK 78 Chapter 4 Backup...
Страница 81: ...2 Click Time Machine 80 Chapter 4 Backup...
Страница 82: ...3 Click Select Backup Disk 4 Select the shared folder then click Use Disk 81 Chapter 4 Backup...
Страница 93: ...4 Click the Options tab 5 Click Edit 92 Chapter 5 Cloud Services and Remote Access...
Страница 97: ...7 Enter the desired job name and click Next 96 Chapter 5 Cloud Services and Remote Access...
Страница 98: ...8 Select Backup and click Next 97 Chapter 5 Cloud Services and Remote Access...
Страница 100: ...10Specify the sync period and click Next 99 Chapter 5 Cloud Services and Remote Access...
Страница 106: ...7 Enter the desired job name and click Next 105 Chapter 5 Cloud Services and Remote Access...
Страница 107: ...8 Select Restore and click Next 106 Chapter 5 Cloud Services and Remote Access...
Страница 112: ...6 Enter the desired job name and click Next 111 Chapter 5 Cloud Services and Remote Access...
Страница 115: ...9 Specify the sync period and click Next 114 Chapter 5 Cloud Services and Remote Access...
Страница 122: ...4 Click the Options tab 5 Click Edit 121 Chapter 5 Cloud Services and Remote Access...
Страница 127: ...3 Tap NAS Setup 126 Chapter 5 Cloud Services and Remote Access...
Страница 130: ...129 Chapter 5 Cloud Services and Remote Access...
Страница 147: ...6 Select a file to move and click Action 7 Click Move 146 Chapter 6 Multimedia...
Страница 152: ...7 Click Delete 8 Click Delete again 151 Chapter 6 Multimedia...
Страница 184: ...5 Configure your settings then click OK 6 Click OK when finished 183 Chapter 9 Advanced Features...


