


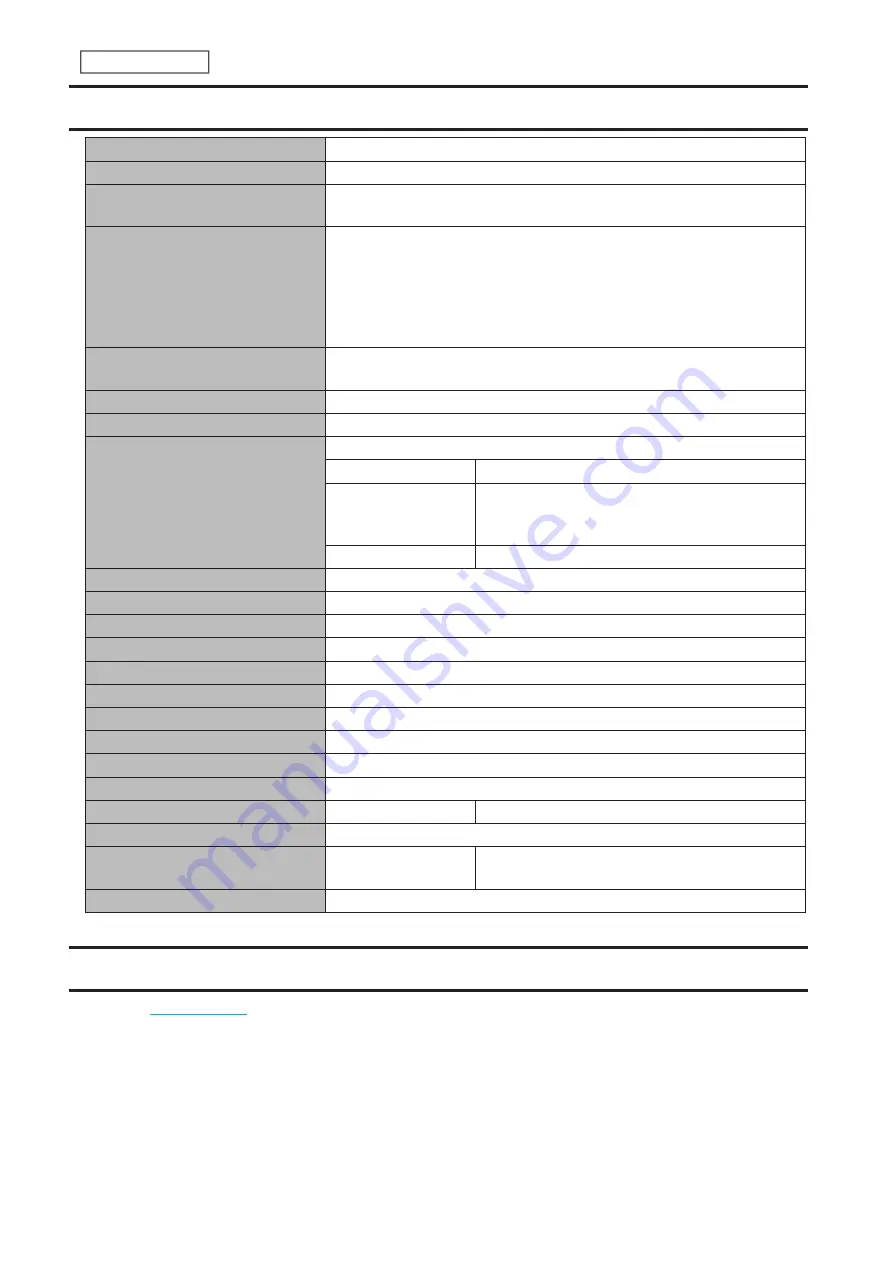
Default Settings
Administrator’s Name
admin
Password
password
Shared Folders
“share” for both Windows and macOS computers.
Note:
The recycle bin is enabled by default.
IP Address
The LinkStation will get its IP address automatically from a DHCP server
on the network. If no DHCP server is available, then an IP address will be
assigned as follows:
IP Address: 169.254.
xxx.xxx
(“xxx” is a number randomly assigned when
booting the LinkStation.)
Subnet Mask: 255.255.0.0
Registered Groups
“hdusers”, “admin”, and “guest”
You cannot edit or delete these default groups.
Microsoft Network Group Settings
WORKGROUP
MTU Size
1,500 bytes
SMB
Enabled
SMB Protocol
Auto
Recycle Bin
Permissions: All users
macOS Temp Files: Keep when original file is
deleted
User Settings
Log in as guest
FTP
Disabled
WebAccess
Disabled
RAID Scanning
Disabled
Dropbox Sync
Disabled
Microsoft Azure Storage Sync
Disabled
Microsoft OneDrive Sync
Disabled
DLNA Server
Disabled
SNMP
Disabled
Time Machine
Disabled
Direct Copy
Disabled
Name/Time/Language
NTP
Enabled
Email Notification
Disabled
Initialize
Init Button Settings
Restore admin username and password to factory
defaults
RAID Mode
LS720D: RAID 1
Specifications
for the latest product information and specifications.
202
Chapter 11 Appendix
Содержание Link Station LS710D
Страница 24: ...3 Click Create Folder 23 Chapter 2 File Sharing...
Страница 26: ...2 Tap Create Folder 3 Enter the desired folder name and tap OK 4 Tap OK when finished 25 Chapter 2 File Sharing...
Страница 31: ...2 Tap Create User 30 Chapter 2 File Sharing...
Страница 34: ...3 Click Add Group 33 Chapter 2 File Sharing...
Страница 73: ...5 Click Add 72 Chapter 4 Backup...
Страница 79: ...3 Click Edit 4 Click Browse 5 Select the shared folder and click OK 78 Chapter 4 Backup...
Страница 81: ...2 Click Time Machine 80 Chapter 4 Backup...
Страница 82: ...3 Click Select Backup Disk 4 Select the shared folder then click Use Disk 81 Chapter 4 Backup...
Страница 93: ...4 Click the Options tab 5 Click Edit 92 Chapter 5 Cloud Services and Remote Access...
Страница 97: ...7 Enter the desired job name and click Next 96 Chapter 5 Cloud Services and Remote Access...
Страница 98: ...8 Select Backup and click Next 97 Chapter 5 Cloud Services and Remote Access...
Страница 100: ...10Specify the sync period and click Next 99 Chapter 5 Cloud Services and Remote Access...
Страница 106: ...7 Enter the desired job name and click Next 105 Chapter 5 Cloud Services and Remote Access...
Страница 107: ...8 Select Restore and click Next 106 Chapter 5 Cloud Services and Remote Access...
Страница 112: ...6 Enter the desired job name and click Next 111 Chapter 5 Cloud Services and Remote Access...
Страница 115: ...9 Specify the sync period and click Next 114 Chapter 5 Cloud Services and Remote Access...
Страница 122: ...4 Click the Options tab 5 Click Edit 121 Chapter 5 Cloud Services and Remote Access...
Страница 127: ...3 Tap NAS Setup 126 Chapter 5 Cloud Services and Remote Access...
Страница 130: ...129 Chapter 5 Cloud Services and Remote Access...
Страница 147: ...6 Select a file to move and click Action 7 Click Move 146 Chapter 6 Multimedia...
Страница 152: ...7 Click Delete 8 Click Delete again 151 Chapter 6 Multimedia...
Страница 184: ...5 Configure your settings then click OK 6 Click OK when finished 183 Chapter 9 Advanced Features...


