


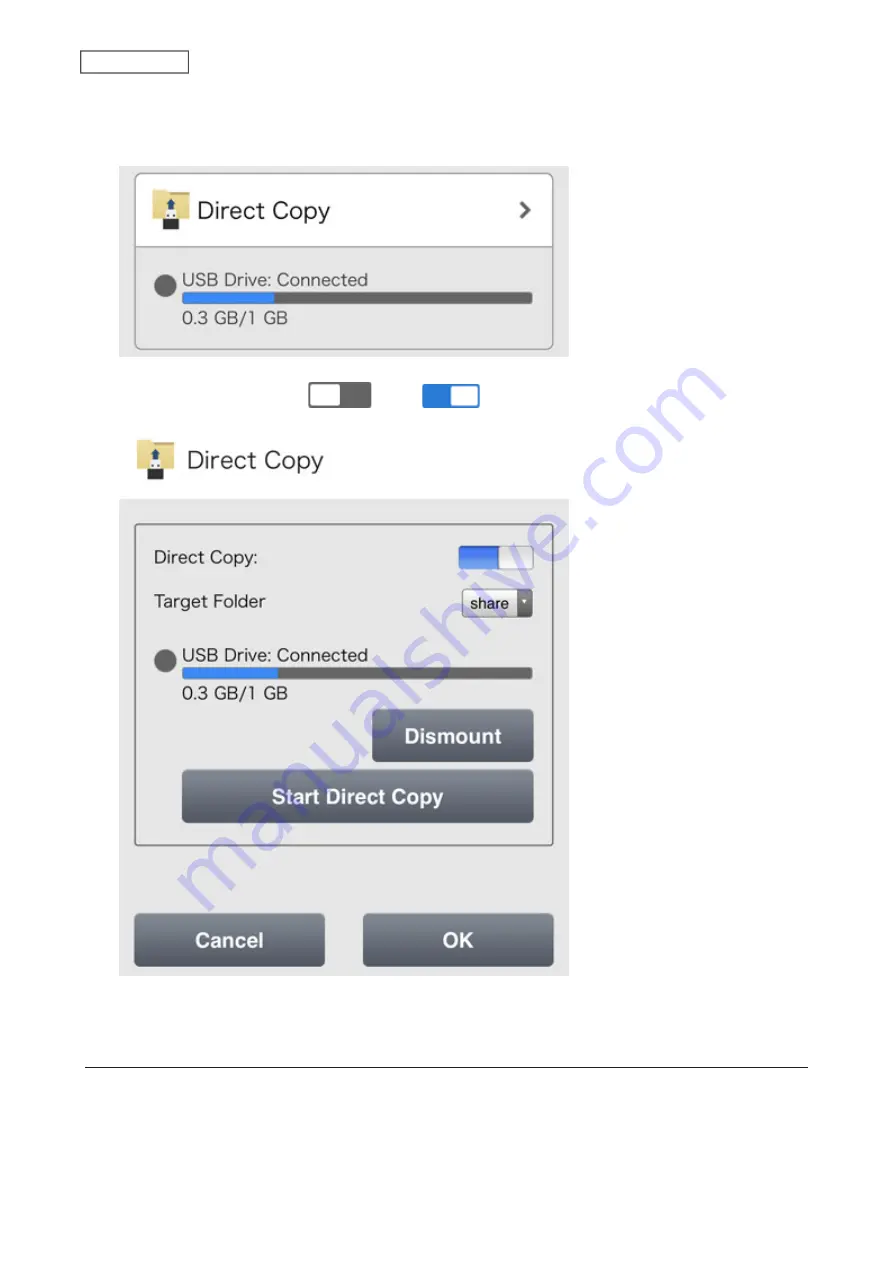
Using a Mobile Device
1
From Settings, tap
Direct Copy
.
2
Move the Direct Copy switch (
) to the
position to enable Direct Copy.
3
Select the Direct Copy target folder and tap
OK
.
Starting Direct Copy
Using the Function Button
1
Connect the USB device to the USB 3.2 Gen 1 port on the front. When it mounts (about 10 seconds), the
function LED will light up.
85
Chapter 4 Backup
Содержание Link Station LS710D
Страница 24: ...3 Click Create Folder 23 Chapter 2 File Sharing...
Страница 26: ...2 Tap Create Folder 3 Enter the desired folder name and tap OK 4 Tap OK when finished 25 Chapter 2 File Sharing...
Страница 31: ...2 Tap Create User 30 Chapter 2 File Sharing...
Страница 34: ...3 Click Add Group 33 Chapter 2 File Sharing...
Страница 73: ...5 Click Add 72 Chapter 4 Backup...
Страница 79: ...3 Click Edit 4 Click Browse 5 Select the shared folder and click OK 78 Chapter 4 Backup...
Страница 81: ...2 Click Time Machine 80 Chapter 4 Backup...
Страница 82: ...3 Click Select Backup Disk 4 Select the shared folder then click Use Disk 81 Chapter 4 Backup...
Страница 93: ...4 Click the Options tab 5 Click Edit 92 Chapter 5 Cloud Services and Remote Access...
Страница 97: ...7 Enter the desired job name and click Next 96 Chapter 5 Cloud Services and Remote Access...
Страница 98: ...8 Select Backup and click Next 97 Chapter 5 Cloud Services and Remote Access...
Страница 100: ...10Specify the sync period and click Next 99 Chapter 5 Cloud Services and Remote Access...
Страница 106: ...7 Enter the desired job name and click Next 105 Chapter 5 Cloud Services and Remote Access...
Страница 107: ...8 Select Restore and click Next 106 Chapter 5 Cloud Services and Remote Access...
Страница 112: ...6 Enter the desired job name and click Next 111 Chapter 5 Cloud Services and Remote Access...
Страница 115: ...9 Specify the sync period and click Next 114 Chapter 5 Cloud Services and Remote Access...
Страница 122: ...4 Click the Options tab 5 Click Edit 121 Chapter 5 Cloud Services and Remote Access...
Страница 127: ...3 Tap NAS Setup 126 Chapter 5 Cloud Services and Remote Access...
Страница 130: ...129 Chapter 5 Cloud Services and Remote Access...
Страница 147: ...6 Select a file to move and click Action 7 Click Move 146 Chapter 6 Multimedia...
Страница 152: ...7 Click Delete 8 Click Delete again 151 Chapter 6 Multimedia...
Страница 184: ...5 Configure your settings then click OK 6 Click OK when finished 183 Chapter 9 Advanced Features...


