30
Maintenance and Service
4.6.3 Forming the Air Piston
To form the air piston:
1. Roll the new air piston seal lip on a flat surface so the piston will seat properly in the piston
insertion tool. The piston seal lip must be formed so that the lip hangs down toward the film
coater.
2. Coat the seal area of the piston insertion tool with Parker O-ring lubricant or an equivalent
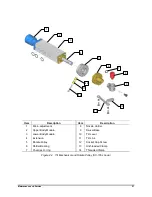
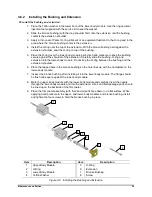
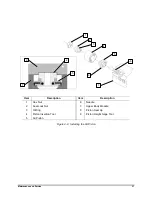
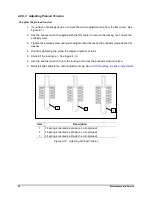
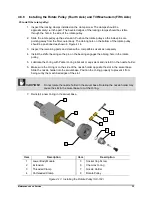
lubricant. Position the piston assembly as shown in Figure 4-9, and then install it into the
piston insertion tool. Make sure the entire assembly fits into the tool.
3. Check that the air piston seal is round. No gaps or folds should be present between the
piston insertion tool bore and the lip of the piston seal. Replace the piston seal if necessary.
4.6.4 Installing the Air Piston
To install the air piston:
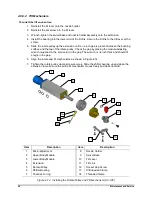
1. Invert the piston insertion tool (piston side down) and place it on a flat surface.
2. Lubricate a new Viton O-ring with Parker O-ring lubricant or an equivalent lubricant. Install the
O-ring in the groove of the chamfered end of the seal lock nut.
3. Lubricate the air piston bore (in the upper-body module) with Parker O-ring lubricant or an
equivalent lubricant. Press the seal lock nut into the top of the piston insertion tool and into
the piston. You must apply pressure to insert the seal lock nut and make it secure.
4. Invert the film coater and carefully press the needle down against a flat surface until it
bottoms out against the seat at the end of the extension.
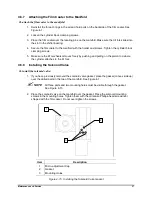
5. Place the piston insertion tool (with air piston and seal lock nut installed) onto the top of the
needle. Turn the piston insertion tool clockwise. Thread the seal lock nut onto the needle until
the lip of the tool seats in the chamfer on top of the upper-body module.
6. Continue winding the piston into the bore until the tool disengages from the seal lock nut. The
top of the seal lock nut should be between 0.010 and 0.080-inch above the top of the upper-
body module.
NOTE
The piston height gage tool can be used to set the piston height. The tool should
touch both the seal lock nut and the upper body module.
7. Release the needle approximately
1/8
-inch Do not pull the air piston out of the bore.
8. Place the hex nut on the needle, over the seal lock nut. Place one of the module-adjusting
wrenches (supplied in the service kit) on the seal lock nut. Place the other wrench on the hex
nut. Use one wrench to hold the seal lock nut stationary; use the other to tighten the hex nut.
9. Seat the needle again (refer to Step 7).

