3-28
Chapter 3: BIOS setup
Chapter 3
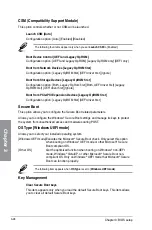
CSM (Compatibility Support Module)
This option controls whether or not CSM will be launched.
Launch CSM [Auto]
Configuration option: [Auto] [Enabled] [Disabled]
The following four items appear only when you set
Launch CSM
to [Enabled].
Boot Device Control [UEFI and Legacy OpROM]
Configuration option: [UEFI and Legacy OpROM] [Legacy OpROM only] [UEFI only]
Boot from Network Devices [Legacy OpROM first]
Configuration option: [Legacy OpROM first] [UEFI driver first] [Ignore]
Boot from Storage Devices [Legacy OpROM first]
Configuration option: [Both, Legacy OpRom first] [Both, UEFI driver first] [Legacy
OpROM first] [UEFI driver first] [Ignore]
Boot from PCIe/PCI Expansion Devices [Legacy OpROM first]
Configuration option: [Legacy OpROM first] [UEFI driver first]
Secure Boot
This option allows you to configure the Secure Boot related parameters.
Allows you to configure the Windows
®
Secure Boot settings and manage its keys to protect
the system from unauthorized access and malwares during POST.
OS Type [Windows UEFI mode]
Allows you to select your installed operating system.
[Windows UEFI mode] Executes the Microsoft
®
Secure Boot check. Only select this option
when booting on Windows
®
UEFI mode or other Microsoft
®
Secure
Boot compliant OS.
[Other OS]
Get the optimized function when booting on Windows
®
non-UEFI
mode, Windows
®
Vista/XP, or other Microsoft
®
Secure Boot non-
compliant OS. Only on Windows
®
UEFI mode that Microsoft
®
Secure
Boot can function properly.
The following item appears when
OS Type
is set to [
Windows UEFI mode
].
Key Management
Clear Secure Boot keys
This item appears only when you load the default Secure Boot keys. This item allows
you to clear all default Secure Boot keys.
Содержание A88X PRO
Страница 1: ...Motherboard A88X PRO ...
Страница 20: ...1 8 Chapter 1 Product Introduction Chapter 1 ...
Страница 60: ...2 40 Chapter 2 Hardware information Chapter 2 To uninstall the APU heatsink and fan assembly 5 3 1 4 2 ...
Страница 61: ...ASUS A88X PRO 2 41 Chapter 2 1 2 3 To remove a DIMM 2 3 4 DIMM installation B A A ...
Страница 63: ...ASUS A88X PRO 2 43 Chapter 2 DO NOT overtighten the screws Doing so can damage the motherboard A88X PRO 3 ...
Страница 64: ...2 44 Chapter 2 Hardware information Chapter 2 2 3 6 ATX Power connection 1 2 OR ...
Страница 65: ...ASUS A88X PRO 2 45 Chapter 2 2 3 7 SATA device connection OR 1 2 ...


