background image

Configuring the Communication

23

NXA-WAP200G Wireless Access Point

7.

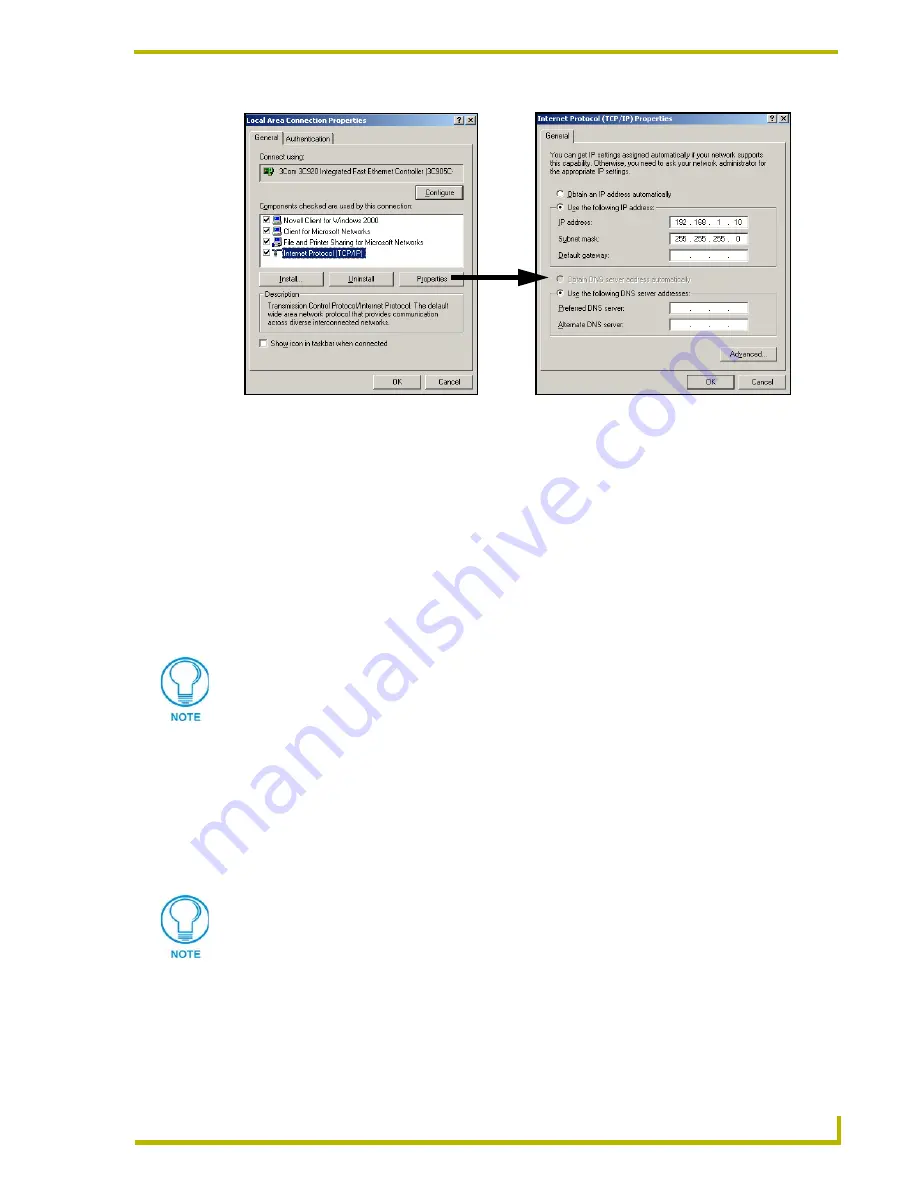
Enter any un-assigned IP Address into the 

IP Address

 field. The range must be from 

192.168.1.1 ~ 192.168.1.XX (

where XX is a value from 2 - 254, excluding 192.168.1.240 

which is being used by the WAP

).


Our example uses 192.168.1.10 for the IP Address.

8.

Enter the value of 

255

.

255

.

255

.

0

 into the 

Subnet mask

 field. 

9.

Click 

OK

 to return to the Local Area Connection Properties screen.

10.

Click 

OK

/

Close

 to accept these changes and alter the IP Connection properties of the 

computer. 

After accepting these modifications, you will loose your connection to your network 

until your original Local Area Connection settings are restored.

Connecting to the WAP200G (wirelessly)

Installation procedures may vary. 

1.

Provide power to the unit through either a direct AC or PoE connection.

2.

With the wireless PCI or PCMCIA card previously installed, 

turn On your wireless card 

prior to configuring the communication. 

Refer to your individual wireless card’s 

manufacturer for detailed setup and configuration information.

3.

Right mouse-click the 

Wireless Network Connection

 icon from the lower-right taskbar.

4.

Select the 

View Available Networks

 option from the listing.

5.

From the 

Wireless Network Connection

 screen, press the 

Advanced

 button.

FIG. 18  

Local Area Connection Properties and Internet Protocol Properties pages

Windows

®

 98/ME users should reboot their machine to properly complete the IP 

connection changes.

For increased security, turn Off the wireless radio in order to prevent any external 
connection to your computer.

Содержание Modero NXA-WAP200G

Страница 1: ...instruction manual Touch Panels and Accessories NXA WAP200G Modero Wireless Access Point and External Antennas ...

Страница 2: ...e RMA is cancelled will be refused AMX is not responsible for products returned without a valid RMA number AMX Corporation is not liable for any damages caused by its products or for the failure of its products to perform This includes any lost profits lost savings incidental damages or consequential damages AMX Corporation is not liable for any claim made by a third party or by an AMX Dealer for ...

Страница 3: ...owever there is no guarantee that interference will not occur in a particular installation If this equipment does cause harmful interference to radio or television reception which can be determined by turning the equipment off and on the user is encouraged to try to correct the interference by one or more of the following measures Reorient or relocate the receiving antenna Increase the separation ...

Страница 4: ......

Страница 5: ...tion 21 Programming the Network Configuration 21 Connecting to the WAP200G cable connection 22 Connecting to the WAP200G wirelessly 23 Wireless Device Communication Setup 27 Logging into the WAP200G within Access Point Mode 27 WAP200G and Modero Unsecured Communication Setup 28 Preparing the WAP for unsecured communication 28 Configuring the Modero panel for unsecured access 30 Configuring the WAP...

Страница 6: ...ngs Page 58 Configuration of a WEP security protocol 59 WPA Configuration 59 802 1X Configuration 59 IP Address Configuration Page 60 Administration Page 61 Help Page 62 Bridge Mode Configuration Utility Pages 63 Status Page Bridge Mode 63 Basic Wireless Configuration Page Bridge Mode 65 Security and Encryption Settings Page Bridge Mode 67 Advanced Wireless Configuration Bridge Mode 68 Administrat...

Страница 7: ...ee modes to increase its deployment to those locations where it could prove difficult to wire CAT5 Ethernet cables Access Point Mode In this mode the WAP200G is connected to the LAN through a CAT5 Ethernet cable and enables all of AMX s G4 Modero Wireless Touch Panels to connect to the network wirelessly AP Repeater Mode When trying to install the WAP200G in a location that has electricity but doe...

Страница 8: ...edia Access protocol IEEE802 11 Frequency 2 412 2 484 GHz Industrial Scientific Medical Band Operating channels 11b Mode 11 Channels USA Canada 13 Channels Europe 14 Channels Japan 4 Channels France 11g Mode 11 Channels USA Canada 13 Channels Europe Japan 4 Channels France Wireless Restrictions In R TTE countries such as France the 802 11g frequency band is restricted to 2454 2483 5 MHz 2 454 2 48...

Страница 9: ... Wireless Access Point or as a Bridge Single AP BRIDGE toggle switch When configured as a Wireless Access Point it allows multiple computers to connect to the LAN wirelessly When configured as a Bridge it allows devices with a 10 100 port but without wireless capability to be connected to the wireless LAN such devices include desktop computers printers X Boxes PlayStation2s PVRs Stereos etc When t...

Страница 10: ...Antenna FG2255 20 NXA WAP2405A 5 5 dBi Rack Ceiling Mount Antenna FG2255 21 NXA WAP2410A 10 dBi Directional Yagi Antenna FG2255 23 NXA WAP2413A 13 dBi Indoor Outdoor Directional Panel Antenna FG2255 22 FIG 1 NXA WAP200G rear view Device LED Descriptions LED Status Description PWR power Blue On Power is supplied to the device Blue Off Power is disconnected from the device WLAN Link Activity Blue On...

Страница 11: ... designed for applications that require a frequency coverage from 2 4 GHz to 2 5 GHz FIG 2 NXA WAP2403A Omnidirectional Ceiling Mount Antenna Specifications for NXA WAP2403A Dimensions HWD 5 00 x 10 0 x 0 12 127 0 mm x 254 0 mm x 3 05 mm Description 3 dBi Ceiling Mount Omni directional Antenna 2 4 GHz Features 3 dBi antenna provides true omni directional performance 3 foot 0 915 m UL910 Plenum cab...

Страница 12: ...10 32 stud mount Nominal Impedance 50 Ohms Polarization Vertical linear Cable 3 foot 0 915 m Plenum RG58 U Connector Type Reverse polarity SMA Operating Temperature 40 C to 70 C Certifications FCC United States CE Europe Included Accessories 3 dBi Omni directional antenna 3 foot 0 915 m UL910 Plenum cable Optional Accessories NXA WAP10C 10 RG 58 Plenum Antenna Extension Cable FG2255 26 FIG 3 NXA W...

Страница 13: ...k Ceiling Mount Antenna This antenna is designed to cover frequencies from 2400 to 2485 MHz with a VSWR of less than 1 5 1 The NXA WAP2405A antenna FIG 5 design focuses energy where it is needed while reducing extraneous transmissions FIG 4 NXA WAP2403A Azimuth cut FIG 5 NXA WAP2405A Omnidirectional Rack Ceiling Mount Antenna ...

Страница 14: ...8 coax cable and UL94 V0 radome meet the strictest safety specifications Weight 0 5 lbs 0 23 kg Wind Survival 125 mph 201 17 kph Max Power 5 Watts Frequency Range 2400 2485 MHz Nominal Gain 5 5 dBi Horizontal Bandwidth 360 Vertical Bandwidth 32 VSWR 1 5 1 Mounting Method 1 4 20 insert for clipping to a ceiling tile rail Nominal Impedance 50 Ohm Polarization Vertical linear Cable 12 30 5 cm RG58 Co...

Страница 15: ...G Accessories 9 NXA WAP200G Wireless Access Point FIG 6 represents the NXA WAP2405A Elevation cut FIG 7 represents the NXA WAP2403A Azimuth cut FIG 6 NXA WAP2405A Elevation cut FIG 7 NXA WAP2405A Azimuth cut ...

Страница 16: ...unting flexibility at installation sites where space is limited Attractive weather proof radome is constructed of UV resistant material This construction provides robust and trouble free use in harsh outdoor environments Field adjustability allows for both vertical or horizontal polarity This feature eliminates co channel interference from neighboring radiators Includes a robust mast mount bracket...

Страница 17: ... Yagi mounting bracket MYK18 adjustable wall pipe mount Stacking harnesses Nominal Impedance 50 Ohms Polarization Vertical or horizontal linear user adjustable Cable 3 foot 914 4 mm Connector Type Reverse polarity SMA Operating Temperature 30 C to 75 C Certifications FCC United States CE Europe Included Accessories Heavy duty Yagi mounting bracket permits mast mounting on masts up to 2 O D Optiona...

Страница 18: ... Accessories 12 NXA WAP200G Wireless Access Point FIG 9 represents the NXA WAP2410A Elevation cut FIG 10 represents the NXA WAP2410A Azimuth cut FIG 9 NXA WAP2410A Elevation cut FIG 10 NXA WAP2410A Azimuth cut ...

Страница 19: ...ive low profile housing Permits the unit to be mounted in either vertical or horizontal polarity Blends well with indoor and outdoor environments where aesthetic considerations are important Corner exit RG58 pigtail design permits the panel to be mounted in vertical or horizontal polarity with a wide variety of connector options Utilizes UL94 V0 materials and PC board that provide the UL s highest...

Страница 20: ...luded Accessories Adjustable mounting brackets for indoor installation Optional Accessories Indoor corner mounting bracket and heavy duty outdoor mounting brackets are also available These provide maximum flexibility for both indoor or outdoor installations NXA WAP10C 10 RG 58 Plenum Antenna Extension Cable FG2255 26 NXA WAP2413AMB Mounting Bracket for the NXA WAP2413A FG2255 24 NXA WAP2413ACMB Co...

Страница 21: ...WAP200G Accessories 15 NXA WAP200G Wireless Access Point FIG 13 represents the NXA WAP2413A Azimuth cut FIG 13 NXA WAP2413A Azimuth cut ...

Страница 22: ...WAP200G Accessories 16 NXA WAP200G Wireless Access Point ...

Страница 23: ...ither a CAT5 or CAT6 cable from a centralized PoE supply equipment to the terminal WAP that separates the power and data A CAT5 cable is used for 10 100 Mbps transfers and a CAT6 cable is used for Gigabit transfers WAP Refers to the NXA WAP200G Wireless Access Point WEP Short for Wired Equivalent Privacy is a security protocol for wireless networks that authenticate users encrypt transmitted data ...

Страница 24: ...b PC The WAP is now connected to your LAN Set the AP BRIDGE Slide Switch The NXA WAP200G can operate as a Wireless Access Point or as a Bridge between APs When configured as a Wireless Access Point it allows multiple wireless computers to connect to the LAN When configured as a Bridge it allows devices with a 10 100 port but without wireless capability to be connected to a wireless LAN If the NXA ...

Страница 25: ...net cable into the RJ 45 jack of the WAP and plug the other end of the CAT5 cable into a PoE supply equipment this unit must be 802 3af compliant The ability to choose a power supply option increases the availability of deployment locations In addition the NXA WAP200G makes installation into areas previously without power much easier since it is no longer necessary to run new electrical wires to t...

Страница 26: ...Installation 20 NXA WAP200G Wireless Access Point ...

Страница 27: ...in the same IP Address pool The default IP Address of the NXA WAP200G is http 192 168 1 240 FIG 16 As a result your PC s IP Address should be between 192 168 1 1 thru 192 168 1 254 An example would be at a LAN IP Address such as 192 168 1 2 192 168 1 3 etc You can connect to the browser based Configuration Utility screens from any of the following three communication options 1 Connect wirelessly t...

Страница 28: ...WAP200G via an Ethernet connection by a Using Ethernet cable connect the WAP200G to your computer b From the rear of the WAP200G move the LAN PC switch to the BRIDGE position c Cycle power to the unit before continuing with the setup procedures 1 Click Start Settings Control Panel from the taskbar FIG 17 2 Double click the Network Connections on XP or Network and Dial Up Connections icon 3 Right c...

Страница 29: ...ored Connecting to the WAP200G wirelessly Installation procedures may vary 1 Provide power to the unit through either a direct AC or PoE connection 2 With the wireless PCI or PCMCIA card previously installed turn On your wireless card prior to configuring the communication Refer to your individual wireless card s manufacturer for detailed setup and configuration information 3 Right mouse click the...

Страница 30: ... taskbar click Start Settings Control Panel FIG 17 11 Double click the Network Connection on XP or Network and Dial Up Connections icon 12 Right click the Wireless Network Connection icon and select Properties from the popup options list 13 Select Internet Protocol TCP IP from the Wireless Network Connection Properties screen 14 Click Properties to open the Internet Protocol TCP IP Properties scre...

Страница 31: ...ing the Communication 25 NXA WAP200G Wireless Access Point FIG 20 Internet Protocol TCP IP Properties page If you are switching communication from Wired to Wireless and vice versa you must reboot your computer ...

Страница 32: ...Configuring the Communication 26 NXA WAP200G Wireless Access Point ...

Страница 33: ...ge 61 for more information After converting from one mode of communication to another it is recommended that you cycle power to the WAP200G Logging into the WAP200G within Access Point Mode 1 Open a TCP IP network configured web browser 2 Verify the computer and the WAP200G are on the same LAN within the same IP Address pool If you are having trouble communicating with your WAP200G refer to the Tr...

Страница 34: ... Configuration Utility pages By default wireless Modero panels are configured for unsecured communication to a Wireless Access Point Preparing the WAP for unsecured communication 1 Click the Connected tab from the top row of the Configuration Utility to open the Connected Devices page and see if any wireless devices are connected Initially this page is blank and displays Not Found to indicate ther...

Страница 35: ...hannel 3 Leave the Enabled radio button selected This allows the WAP200G to broadcast the SSID name used to connect to the device and alert all wireless clients of its presence in the area 4 Enter the desired SSID into the Wireless Network Name SSID field The alpha numeric string is AMX by default but can be changed to any 32 character entry This string must be FIG 23 Default WAP200G Status page F...

Страница 36: ...r is installed within the panel before the unit is power cycled 2 Power up the touch panel containing the wireless card 3 Press and hold the grey Front Setup Access button or the two lower buttons on both sides of the MVP display for 3 seconds to open the Setup page FIG 25 4 Press the Protected Setup button located on the lower left of the panel page to open the Protected Setup page and display an...

Страница 37: ... the WAP comes confugred with AMX as the assigned SSID value One of the most common problems associated with connection to the WAP arises because the SSID was not entered properly You must maintain the same case when entering the SSID information ABC is not the same as Abc 10 Toggle the Authentication field to an Open System Open System Authentication allows any device to join the network if the p...

Страница 38: ...in the WAP s web browser Basic Wireless Configuration page Configuring the Modero panel for secured access 1 Verify the proper installation of a wireless card within your target panels When configuring touch panels for wireless communication verify that no Ethernet connector is installed within the panel before the unit is power cycled 2 Power up the touch panel containing the wireless card 3 Pres...

Страница 39: ...able WAP One of the most common problems associated with connection to the WAP arises because the SSID was not entered properly You must maintain the same case when entering the SSID information ABC is not the same as Abc The alpha numeric string is AMX by default but can be changed to any 32 character entry This string must be duplicated within the Network Name SSID field on the WAP As an example...

Страница 40: ... encryption key which should be entered into the WAP and onto other communicating Modero panels by using the WEP Key dialog FIG 29 15 Write down these characters for later entry into the WAP s WEP Key field without colons and into other panel s Current Key fields FIG 28 16 Before rebooting the panel write down the panel s MAC Address value found as the last field within the IP Settings section Thi...

Страница 41: ...Wireless Configuration page FIG 30 The most important aspect to note when configuring the WAP200G for secured communication is the SSID Broadcast status and the SSID name 2 Click on the Disabled radio button This option prohibits the WAP200G from broadcasting its SSID information This makes connection by the wireless clients much more difficult as they must now know what the SSID string is and whe...

Страница 42: ...ation and ignore the request to reboot 8 Click the Security tab from the bottom row of the Configuration Utility to open the Security and Encryption Settings page FIG 31 9 Place a checkmark within the Enable WEP checkbox field to enable WEP encryption used by the Modero touch panels To implement this type of encryption you must have the Current Key value previously generated by the target Modero p...

Страница 43: ...THOUT COLONS 13 Place a checkmark within the Deny Unencrypted Data checkbox field to deny any unencrypted users from being able to access the newly secured WAP200G 14 Select the type of Authentication by selecting the desired radio button from within the Authentication field Open allows any wireless device using the correct SSID to communicate to the WAP200G Shared requires that only those wireles...

Страница 44: ... to be converted into a series of hexidecimal digits and duplicated exactly among any G4 panel using wireless communication Because of this fact if multiple Modero panels are being configured for wireless communication to a single WAP200G it is easier to take the Current key generated by the panel and manually enter that value into the WEP Key field on the WAP200G 1 For each communicating touch pa...

Страница 45: ...the settings of the communicating Modero panels If the panels are set to WEP 128 this value must be 128 bit 26 hex digits 6 From the WAP s Default WEP Key to use field FIG 31 use the drop down arrow to choose the same value as assigned to the panel from 1 4 This WEP Key identifier value must match for all devices 7 Enter the Current Key string value displayed within the Current Key field of the pa...

Страница 46: ...to be displayed within the web browser until the TCP IP properties of the computer are reset and the new IP of the WAP200G is used 7 Click Start Settings Control Panel from the taskbar FIG 34 8 Double click the Network Connections on XP or Network and Dial Up Connections icon 9 Right click the Local Area Connection icon and select Properties from the popup options list 10 Select Internet Protocol ...

Страница 47: ...P200G to BRIDGE 7 Cycle power to the unit before continuing with the setup procedures 8 Manually cycle power to the WAP200G by disconnecting and re connecting the power connector from the rear power port on the WAP200G 9 Open a TCP IP network configured web browser 10 Verify the computer and the WAP200G are on the same LAN within the same IP Address pool If you are having trouble communicating wit...

Страница 48: ...get WAP with which this bridged WAP200G will be communicating with 2 Press the right drop down arrow and choose a network type from the Wireless Network Type field listing This selection determines the communication target of this WAP200G Infrastructure default allows the WAP200G to a target Wireless Access Point With this selection a radio channel is not necessary Ad hoc allows the WAP200G to con...

Страница 49: ...d choose a radio channel from the Channel field listing This selection is used when the WAP200G is both working and using an ad hoc wireless network type 6 Leave the Transmission rate at its default setting of Best automatic unless a specific transmission speed is necessary 7 Press the right drop down arrow and choose a wireless network selection from the Wireless Mode field listing This selection...

Страница 50: ...s or 13 characters into the following WEP Key field 13 Click on the right drop down arrow and choose an encryption key size and length from the WEP Key Length field listing The available choices are 64 bit 10 hex digits 128 bit 26 hex digits 64 bit 5 ASCII chars and 128 bit 13 ASCII chars FIG 37 Bridge Mode Security and Encryption page WEP Configuration WPA Configuration For the purposes of these ...

Страница 51: ...AP200G Wait a few seconds for the Status page to reappear within the web browser The Current Wireless Settings section should now display that the WAP200G has now been WEP Enabled 21 Press the IP Address tab from the Configuration Utility to open the IP Address Configuration page FIG 38 It is best to have a Static IP Address assigned to the WAP200G so if the Configuration Utility needs to be acces...

Страница 52: ...he same LAN within the same IP Address pool If you are having trouble communicating with your WAP200G refer to the Troubleshooting section on page 71 3 Enter the previously assigned Static IP Address into the browser s Address field or the URL field at the top of the browser window This is the same location where you type in the resolvable web address such as http www amx com 4 Press the Enter key...

Страница 53: ...ding and incorporating the new firmware component to the target WAP200G 15 Press the OK button from the new upload confirmation popup dialog The web browser download indicator bargraphs notifies you about the progress of the download After a few seconds into the upload process the Administration page is replaced with a Firmware Upload Success page This page notifies you that a successful upload of...

Страница 54: ...Wireless Device Communication Setup 48 NXA WAP200G Wireless Access Point ...

Страница 55: ...l connection to the WAP This page provides a read only overview of the various WAP200G communication settings and parameters set within other Configuration Utility pages To display the current status information click the Refresh button on your web browser The fields on the Status page FIG 39 are all read only and are described in the table below If you are using the WAP200G within a country locat...

Страница 56: ...eless These values are configured through the Basic Wireless Configuration Page section on page 51 Wireless Mode Displays the wireless operation mode for the WAP Wireless Network Name SSID Displays the SSID for the WAP200G Channel Indicates which wireless channel is currently being used WEP Displays the current setting for WEP as either enabled or disabled Default is Disabled WPA Displays the curr...

Страница 57: ...ted Devices page You may need to refresh this page using the Refresh button on your web browser to view the current settings Basic Wireless Configuration Page Information SSID Broadcast The SSID broadcast can be either Enabled The WAP alerts all wireless clients of its presence and broadcasts its SSID information providing wireless clients in the area the necessary SSID information needed in order...

Страница 58: ...uired to only use a specific set of channels frequencies As each region is selected the corresponding available channel listing is then revised to display only those channels frequencies that are allowed for use Refer to the Country Frequency Selection table below for a detailed listing of the channels available per domain region Note If you are using the WAP200G within a country located outside t...

Страница 59: ...ing Modero panels and other network devices This page is used as a means to restrict network access and increase security Only the MAC Addresses of authorized devices entered on this page have access to the network Country Channel Frequency Selections Channel Number Frequency North America Europe Spain France Japan 1 2 412 X X X 2 2 417 X X X 3 2 422 X X X 4 2 427 X X X 5 2 432 X X X 6 2 437 X X X...

Страница 60: ...es disables the ability for only those addresses entered into the remaining MAC Address fields to have access to the network through the WAP200G MAC Address 1 8 Unique MAC Addresses for those communicating devices seeking access to the network through the WAP200G such as Modero panels Note You can cut and paste the MAC Addresses from the Connected Devices page into the MAC Address boxes These chan...

Страница 61: ...n FIG 43 This means you do not have to run an Ethernet cable to each WAP in order for it to be connected on the network DO NOT CREATE A LOOP configuration This feature enables you to locate the WAP200G in areas where running an Ethernet cable would be difficult Through the WDS links traffic stemming from this WAP is routed to other WAPs which are connected to the wired network You can specify up t...

Страница 62: ...ddress 7 MAC Address 2 MAC Address 3 MAC Address 4 Star Configuration M A C A d d r e s s 1 M A C A d d r e s s 2 M A C A d d r e s s 3 M A C A d d r e s s 1 M A C A d d r e s s 2 M A C A d d r e s s 3 Chain Configuration Each repeater specified on this page must also be configured to this WAP in order to have two way communications In addition the repeater functionality is incompatible with WPA a...

Страница 63: ...ed If the value increases RTS Request To Send and CTS Clear To Send protocols will be implemented This is used in order to maintain performance in noisy wireless networks and prevent hidden nodes from degrading performance Default value is 2432 Beacon Period SSID SSID beacons are sent out periodically This is the number of milliseconds between each beacon Default value is 100 DTIM Interval Number ...

Страница 64: ... Page This page FIG 46 can be accessed by pressing the Security tab from the bottom row of the Configuration Utility This is the main area for wireless security configuration FIG 45 Advanced Wireless Configuration page FIG 46 Security and Encryption page WEP Configuration WPA Configuration 802 1x Configuration ...

Страница 65: ...ric Leave this field blank if the Pass Phrase will be supplied by an authentication server 3 Select TKIP for WPA Multicast Cipher TKIP Temporal Key Integrity Protocol changes the temporal key every 10 000 packets 4 Select TKIP for WPA Pairwise Cipher Type 802 1X Configuration When 802 1X authentication is enabled the AP will authenticate clients via a remote RADIUS server This feature is currently...

Страница 66: ...hin a network using static LAN settings Providing a constant address for connecting to the WAP s configuration utility while DHCP is being used within LAN Note The IP Address must be unique within your LAN in order to avoid routing conflicts When multiple WAP s are deployed within a LAN it is recommended to change the IP Address of each WAP even if DHCP is used The IP Address is used to access the...

Страница 67: ...ation Security User Name This is the User Name that must be entered when logging into the configuration utility pages To change the User Name simply type in a new User Name Administrator Password This is the password that must be entered when logging into the configuration utility pages To change the password simply type in a new password Then type it again in the second field to confirm Press the...

Страница 68: ... not be displayed After connection is re established the title 802 11g Bridge appears below the browser s Address field For more information on setup and communication through the Bridge Mode refer to the following Bridge Mode Configuration Utility Pages section on page 63 Upgrade Firmware This section of the Administration page focuses on locating any recently downloaded firmware and upload it to...

Страница 69: ...atic IP Address If the WAP200G was previously configured within the Access Point Mode press the rear RESET button to return the unit to its default settings values and follow the procedures below to prepare the source computer for communication to the target WAP200G Status Page Bridge Mode After you have logged into the Configuration Utility for the NXA WAP200G you will note that the WAP200G has b...

Страница 70: ...s is NOT the same as the SSID Number of Bridged Clients Displays the number of wireless devices that are communicating with the Bridged WAP200G IP Address Displays the IP Address of the bridged WAP200G read only MAC Address Displays the MAC Address of the bridged WAP200G read only 802 11g Firmware Version Displays the version of the latest installed firmware version Bridge Firmware Version Display...

Страница 71: ...asis with another bridge or wireless client Peer to Peer Enables you to create a tunnel with another P2P bridge Peer MAC Address The MAC Address of the peer WLAN bridge Wireless Network Name SSID This functions the same as in the Access Point Mode This is the SSID for the wireless access point or client which this device will connect with must be the same Note Leave this field blank to associate w...

Страница 72: ...ess the Save button to incorporate the new information to the WAP200G Press the Cancel button to terminate the process and return the fields to their default values Country Channel Frequency Selections Channel Number Frequency North America Europe Spain France Japan 1 2 412 X X X 2 2 417 X X X 3 2 422 X X X 4 2 427 X X X 5 2 432 X X X 6 2 437 X X X 7 2 442 X X X 8 2 447 X X X 9 2 452 X X X 10 2 45...

Страница 73: ...these terms This page FIG 52 can be accessed by pressing the Security tab from the Configuration Utility Commonly Used Terms WAP Refers to the NXA WAP200G Wireless Access Point WEP Short for Wired Equivalent Privacy is a security protocol for wireless networks that authenticate users encrypt transmitted data and protect the integrity of the data being transferred WPA Short for Wi Fi Protected Acce...

Страница 74: ...mentation threshold Sets the upper fragmentation limit of the transmitted wireless data packets Transmitted wireless data packets larger than this size will be fragmented to maintain performance in noisy wireless networks Default value is 2346 RTS threshold Sets the upper RTS CTS protocol limit of the transmitted wireless data packets Transmitted wireless data packets larger than this size will us...

Страница 75: ...dge Mode Administration Page BM Information Device name Name the bridge uses to identify itself to external configurations and IP Address locator programs Note This is NOT the same as the SSID IP settings IP Address Mode Provides the user with two options Select Static to manually enter the IP settings Select DHCP to get the IP settings from the DHCP server on your network Default IP Address IP Ad...

Страница 76: ...essing the Reset button restores the WAP to its original factory default settings Note All settings you entered for the SSID WAP User Name Password etc will be erased and you will need to reconfigure the unit to your settings Upgrade Firmware This section of the Administration page focuses on locating any recently downloaded firmware and upload it to the target WAP200G The latest NXA WAP200G Firmw...

Страница 77: ...hat the access point and all wireless control panels and or computers are using the same SSID 2 Ensure that the encryption settings are the same for all wireless control panels and or computers 3 Re position the NXA WAP200G If you have a consistent problem with many or all wireless devices on your network you should consider using a different wireless channel for your network operations If you are...

Страница 78: ...Bridge Mode Configuration Utility Pages 72 NXA WAP200G Wireless Access Point ...

Страница 79: ...operates in the 2 4 GHz frequency range 2 4 GHz to 2 4835 GHz and provides a throughput of up to 11 Mbps This is a very commonly used frequency Microwave ovens cordless phones medical and scientific equipment as well as Bluetooth devices all work within the 2 4 GHz frequency band 802 11g Similar to 802 11b but this standard provides a throughput of up to 54 Mbps It also operates in the 2 4 GHz fre...

Страница 80: ...ble or DSL modem ISP Internet Service Provider An ISP is a business that provides connectivity to the Internet for individuals and other businesses or organizations LAN Local Area Network A LAN is a group of computers and devices connected together in a relatively small area such as a house or an office Your home network is considered a LAN MAC Every wireless 802 11 device has its own specific MAC...

Страница 81: ...a hub may also be a switch But they are all involved in making sure data is transferred from one location to another A bridge connects devices that all use the same kind of protocol A router can connect networks that use differing protocols It also reads the addresses included in the packets and routes them to the appropriate computer station working with any other routers in the network to choose...

Страница 82: ...IA BELGIUM BRAZIL CANADA CHINA ENGLAND FRANCE GERMANY GREECE HONG KONG INDIA INDONESIA ITALY JAPAN LEBANON MALAYSIA MEXICO NETHERLANDS NEW ZEALAND PHILIPPINES PORTUGAL RUSSIA SINGAPORE SPAIN SWITZERLAND THAILAND TURKEY USA ATLANTA BOSTON CHICAGO CLEVELAND DALLAS DENVER INDIANAPOLIS LOS ANGELES MINNEAPOLIS PHILADELPHIA PHOENIX PORTLAND SPOKANE TAMPA 3000 RESEARCH DRIVE RICHARDSON TX 75082 USA 800 2...

Отзывы: