CV7 Touch Panel Accessories
21
7" Modero Touch Panels
Step 3: Install the new 802.11g CF Card and Antenna
1.
Discharge any static electricity from your body by touching a grounded metal object and then locate the
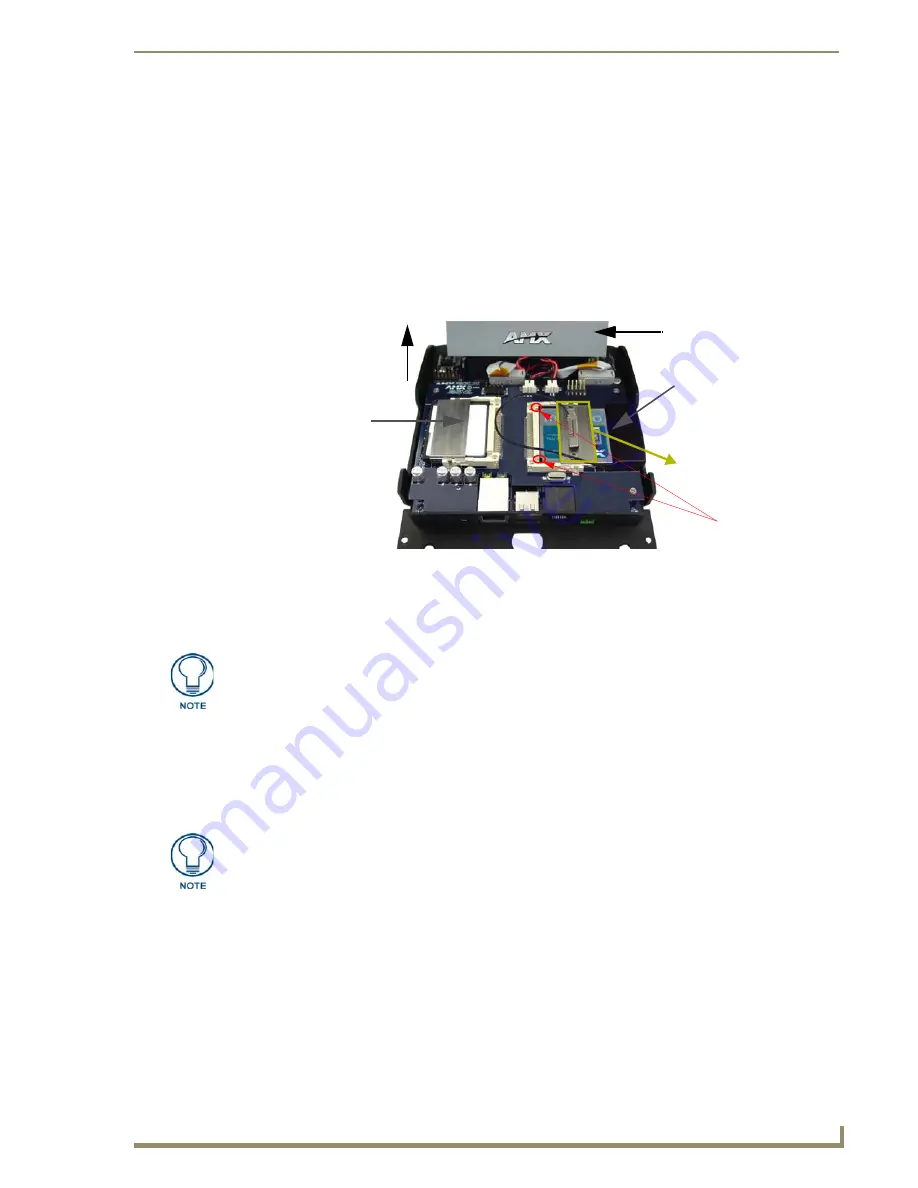
wireless card slot on the main board (FIG. 21).
2.
Insert the tip of a grounded flat-head screwdriver into one of the card removal grooves (located on either
side of the existing card), and gently pry the card out of the slot (FIG. 21). Repeat this process on the
opposite card removal groove.
This alternating action causes the card to "wiggle" away from the on-
board connector pins.
3.
Grip the old card by its sides and then carefully pull it out of the slot.
4.
Remove one of the included alcohol pads and use it to thoroughly clean both the CF metal cover
(FIG. 21) and the metal plate on the underside of the terminal antenna. These surfaces must be properly
cleaned to provide good adhesion for the later installation of the wireless antenna.
5.
Remove the new NXA-WC80211G CF card from it’s anti-static bag.
6.
Grip the sides of the new wireless card and insert it firmly into the slot opening until the contact pins are
completely inside the card and securely attached to the pin sockets.
7.
Carefully peel-off one side of the included double-sided tape and adhere the adhesive side to the surface
of the antenna’s metal plate.
8.
Grip the antenna by its sides and carefully peel-off the remaining protective film on the
double-sided tape.
9.
Align the antenna atop the CF metal cover plate and press down firmly to securely adhere it.
10.
To complete the upgrade process, close and resecure the panel enclosure using the procedures in the
following step.
Step 4: Close and Resecure the NXT Panel Enclosure
1.
In a single motion
, gently slide the rear Tilt Bracket cover plate back over the tilt mechanism (
located
below the LCD
) and (
while angling the housing downwards
) slide the outer housing below the Tilt
Bracket and towards the LCD (at a downward angle).
2.
Locate the two screw holes at either sides of the front speaker grill and then use a grounded Phillips-head
screwdriver to both insert and secure the two Tilt Bracket Screws (FIG. 17). This procedure resecures the
rear Tilt Bracket cover plate (
with the AMX logo and Hinge brackets
).
FIG. 21
Location and orientation of the card slots (both CV7/CV10 panels)
Compact Flash
Memory Card (Slot 1)
Wireless CF Card
(Slot 2)
Front of panel
Tilt Bracket cover plate
CF metal plate
(with antenna
shown installed)
Card Removal
Grooves
You must precisely align the double-sided tape to the surface of the antenna’s metal
plate in order to properly secure the antenna within to the CF metal cover plate.
If the CF metal cover plate is not present over the wireless card slot, you can use the
adhesive tape to secure the terminal antenna to the surface of the new card (atop the
product label).
Содержание Modero CV7
Страница 1: ...Operation Reference Guide Touch Panels NXD T CV7 7 Modero Touch Panel Last Revised 10 19 2011...
Страница 42: ...CV7 Touch Panel Accessories 30 7 Modero Touch Panels...
Страница 58: ...Installation 46 7 Modero Touch Panels...
Страница 194: ...Programming 182 7 Modero Touch Panels...
Страница 200: ...Appendix A 188 7 Modero Touch Panels...
Страница 211: ...Appendix B Wireless Technology 199 7 Modero Touch Panels...
Страница 212: ...Appendix B Wireless Technology 200 7 Modero Touch Panels...
Страница 218: ...Troubleshooting 206 7 Modero Touch Panels...
Страница 219: ...Troubleshooting 207 7 Modero Touch Panels...


