Black/White LCD Mini-Touch Panels
Replacing the Lithium Batteries
121
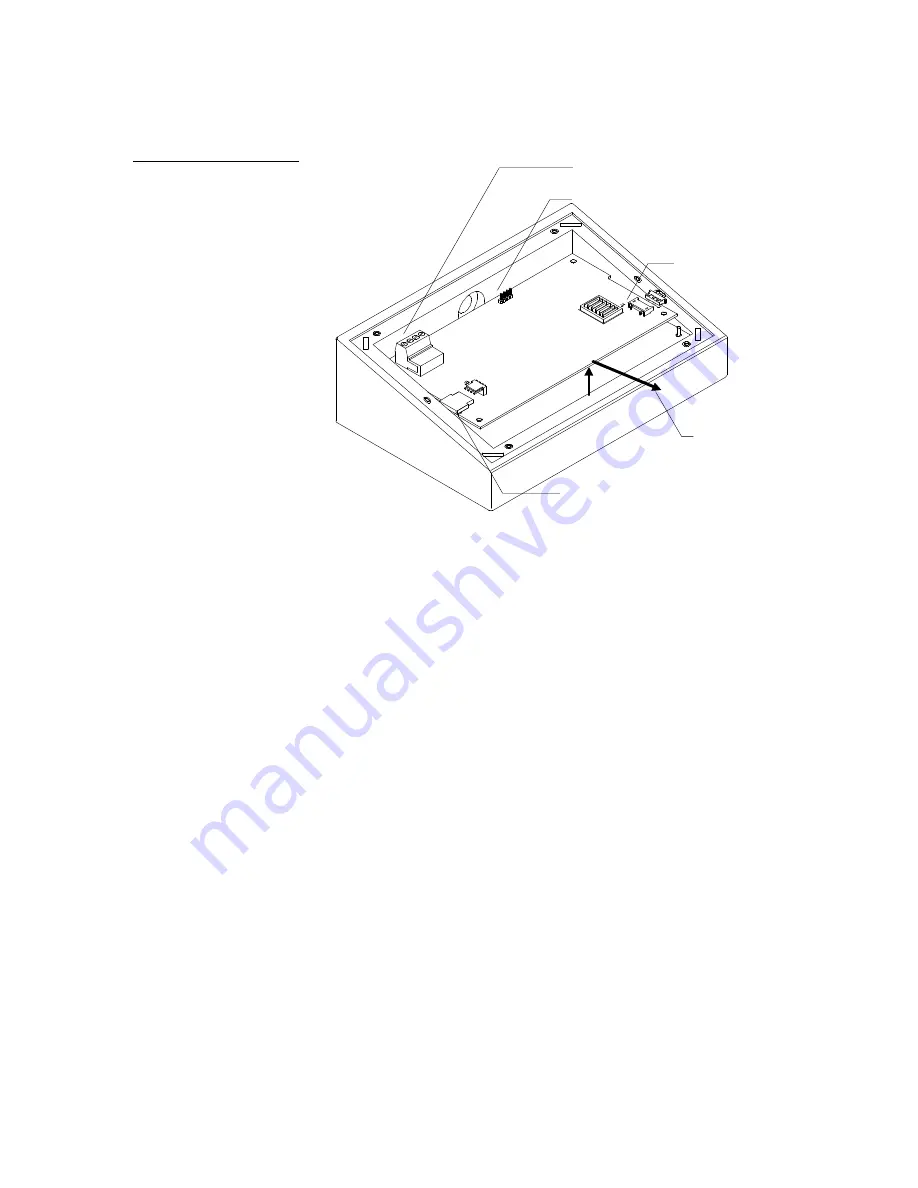
Backlight connector
4-pin AXlink connector
Touch overlay
ribbon cable
4-pin header connector
Lift circuit card up
and out as shown
7.
Gently rotate the circuit card backward until you can lay it down flat with the
batteries exposed.
8.
Carefully pry the old battery out of its socket and insert a new battery.
9.
Rotate the circuit card back to the original position inside the wood enclosure
10.
Connect the touch overlay's ribbon cable connector, backlight connector, and 4-
pin AXlink connector to the circuit card.
11.
Connect the mini-XLR connector to the AXW-MLC (/PB) for approximately 1
minute. Then, disconnect the mini-XLR connector.
12.
Disconnect the touch overlay's ribbon cable connector, backlight connector, and
AXlink connector from the circuit card.
13.
Repeat steps 6 through 10 for the second battery. Then, go to step 14.
14.
Insert the four mounting screws into the circuit card and tighten.
15.
Place the bottom panel onto the AXW-MLC (/PB) and insert the six mounting
screws and tighten.
16.
Connect the mini-XLR connector to the AXW-MLC (/PB).
Figure 172
Bottom view of AXW-MLC
(/PB) connectors and circuit
card removal example
Содержание AXM-MLC
Страница 8: ...vi Table of Contents Black White LCD Mini Touch Panels ...
Страница 36: ...28 Mini Touch Panel Basics Black White LCD Mini Touch Panels ...
Страница 114: ...106 Mini Touch Panel Program Reference Black White LCD Mini Touch Panels ...
Страница 130: ...122 Replacing the Lithium Batteries Black White LCD Mini Touch Panels ...
Страница 140: ...132 Technical Support Black White LCD Mini Touch Panels ...


