Sony KDL-32XBR950 - 32" Flat Panel Lcd Wega™ Xbr Television, Operating Instructions Manual
The Sony KDL-32XBR950 - 32" Flat Panel LCD Wega™ XBR Television is a high-performance entertainment centerpiece for your home. With stunning picture quality and immersive sound, this TV offers an unparalleled viewing experience. Easily access the comprehensive Service Manual, available for free download from manualshive.com, to fully harness the capabilities of this exceptional product.
Share
Download


Reviews:
No comments
Related manuals for KDL-32XBR950 - 32" Flat Panel Lcd Wega™ Xbr Television

LN19B650 - 19" LCD TV
Brand: Samsung Pages: 26

FP-T5094W
Brand: Samsung Pages: 80

TPS-4500IMPC
Brand: Crestron Pages: 16

AFL3-W10A
Brand: IEI Technology Pages: 142

AFL2-17A-H61-i5/R-R12
Brand: IEI Technology Pages: 277

PCM-3335
Brand: Advantech Pages: 59

NFC Code Touch Air
Brand: LOXONE Pages: 2

26PFL3405H
Brand: Philips Pages: 3

26FW5220
Brand: Philips Pages: 150

DP-2L Series
Brand: Kingdy Pages: 30

272557
Brand: Moeller Pages: 51

21825
Brand: Monoprice Pages: 29

TD-1070
Brand: Qbic Technology Pages: 2

AlertGuard 20F671T
Brand: RCA Pages: 2

HD52W55
Brand: RCA Pages: 2

PPC-090T-APL Series
Brand: Icop Pages: 50

P703
Brand: NEC Pages: 2
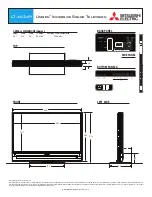
Unisen LT-46249
Brand: Mitsubishi Electric Pages: 2


