61
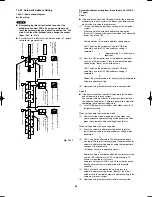
Automatic address setting using the remote controller
Case 3
●
If the power can be turned ON separately for the indoor and
outdoor units in each system (indoor unit addresses can be
set without running the compressor):
Individual system automatic address setting: Display item code
“A1”.
(1) Press the remote controller timer time
button and
button simultaneously.
(Hold for 4 seconds or longer.)
↓
(2) Then press either the temperature setting
or
button.
(Confirm that the item code is “A1”.)
↓
(3) Use
either
the
or
button to select the
outdoor unit to perform automatic address setting for. Then
press the
button.
(“R.C.1” is displayed, and automatic address setting is
performed for refrigerant system 1.)
When automatic address setting for system 1 is completed,
the units return to normal stopped status.
<Approximately 4 – 5 minutes are required.>
During automatic address setting, “SETTING” blinks on the
remote controller display. This display disappears when
address setting is completed.
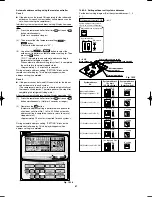
Case 4
●
If the power cannot be turned ON separately for the indoor
and outdoor units in each system:
(The compressors must be run in order to automatically set
the indoor unit addresses. Therefore perform this step after
completing the refrigerant tubing work.)
All-systems automatic address setting: Display item code “AA”.
(1) Press the remote controller timer time
button and
button simultaneously. (Hold for 4 seconds or longer.)
↓
(2) Next
press
the
button.
(Automatic address setting is performed in sequence for
all outdoor units from No. 1 to No. 30. When automatic
address setting is completed, the units return to normal
stopped status.)
<Approximately 15 minutes is required for each system.>
↓
During automatic address setting, “SETTING” blinks on the
remote controller display. This display disappears when
address setting is completed.
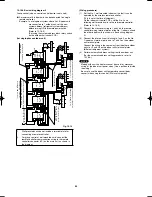
Fig. 10-18
10-22-2. Setting outdoor unit system addresses
For the basic wiring diagram (Set the system addresses: 1, 2,
3...)
ON
1
2
0
Outdoor unit control PCB
DIP switch
System address
System address rotary switch
(Set to “0” at time of shipment)
System address rotary switch
10s
20s
ON
OFF
3 – 6 HP
Fig. 10-19
System address
No.
System address
10s digit
(2P DIP switch)
System address
1s place
(Rotary switch)
0 Automatic address
(Setting at shipment = “0”)
Both OFF
ON
1
2
ON
OFF
“0” setting
1 (If outdoor unit is No. 1)
Both OFF
ON
1
2
ON
OFF
“1” setting
2 (If outdoor unit is No. 2)
Both OFF
ON
1
2
ON
OFF
“2” setting
11 (If outdoor unit is No. 11)
10s digit ON
ON
1
2
ON
OFF
“1” setting
21 (If outdoor unit is No. 21)
20s digit ON
ON
1
2
ON
OFF
“1” setting
30 (If outdoor unit is No. 30)
10s digit and 20s
digit ON
ON
OFF
ON
1
2
“0” setting
System address rotary switch
System address 10s digit and 20s digit
DIP switch
Automatic address
button (black)
Terminal plug (black)
Mode change pin
3 – 6 HP
System address rotary switch
System address 10s digit and 20s digit
DIP switch
Automatic address
button (black)
Terminal plug (black)
Mode change pin
3 – 6 HP
Airwell̲PAC-i̲eng.indb 61
Airwell̲PAC-i̲eng.indb 61
2009/07/09 16:13:42
2009/07/09 16:13:42
Содержание OU-PSINV-25HR
Страница 75: ...75 ...


