


Getting Started
1
E4418B Power Meter User’s Guide
9
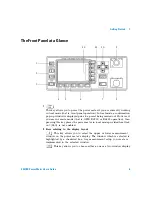
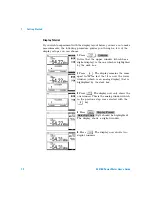
When two windows are displayed and this key is pressed, the single window
displayed is the one which was previously highlighted with the shadowed
box. On the two window display, the measurement setup menus work on the
window which is shadowed.
3
This is the measurement result field.
4
This field displays the units of measurement either dBm, dB, Watts, or %.
5
This window is configured to show an analog meter which displays the
measurement result and the meter scaling.
6
This field displays the number of pages in the current softkey menu. For
example, “1 of 2” indicates that there are two pages of softkeys and you are
on the first page. Pressing
moves you to page “2 of 2”.
7
Any softkeys available are displayed in these four fields.
8
This field displays the title of the menu. For example, when the power
meter is initially switched on, the “Contrast” menu is displayed and if you
press
“Zero/Cal” is displayed.
9
This field indicates if the measurement result is out of the upper or lower
limits set. If the measurement is within the limits, this field is empty. If the
measurement result is less than the minimum limit set, “Undr Lmt” is
displayed. If the measurement result is more than the maximum limit set,
“Over Lmt” is displayed. Refer to
page 70 for further information.
10
This field displays “Rel” if relative mode is on. Refer to
on page 61 for further information.
11
This field displays “Ofs” if an offset is set. Refer to
page 63 for further information.
12
This field displays “Rng Hld” if a range is selected. Refer to
on page 79 for further information.
13
This field displays “Dty Cyc” if a duty cycle is set. This allows you to
measure the power of a pulsed signal. Refer to
on page 68 for further information.
14
The information in this field is displayed on two lines and depends on the
combination of sensor type, sensor calibration table and frequency
dependent offset table that are currently selected.
shows all
the possible combinations for the two lines of the display. Find the
table entry which matches your display and use the reference number
in the left- hand column to look up
sensor type and correction being applied to the current measurement.
Содержание E4418B
Страница 1: ...Agilent Technologies Agilent E4418B Power Meter User s Guide ...
Страница 14: ...xiv E4418B Power Meter User s Guide THIS PAGE HAS BEEN INTENTIONALLY LEFT BLANK ...
Страница 20: ...xx E4418B Power Meter User s Guide THIS PAGE HAS BEEN INTENTIONALLY LEFT BLANK ...
Страница 22: ...xxii E4418B Power Meter User s Guide THIS PAGE HAS BEEN INTENTIONALLY LEFT BLANK ...
Страница 24: ...xxiv E4418B Power Meter User s Guide THIS PAGE HAS BEEN INTENTIONALLY LEFT BLANK ...
Страница 47: ...Power Meter Operation 2 E4418B Power Meter User s Guide 23 Contacting Agilent Technologies on page 103 ...
Страница 113: ...Power Meter Operation 2 E4418B Power Meter User s Guide 89 Figure 2 21 Save Recall Screen ...
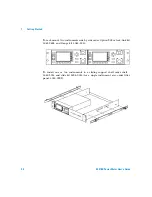
Страница 126: ...2 Power Meter Operation 102 E4418B Power Meter User s Guide Figure 2 23 Replacing the fuse In line fuse Spare fuse ...
Страница 168: ...3 Menu Reference 144 E4418B Power Meter User s Guide THIS PAGE HAS BEEN INTENTIONALLY LEFT BLANK ...
Страница 169: ...145 E4418B Power Meter User s Guide Agilent Technologies 4 Error Messages Introduction 146 Error Messages 148 ...


