


Power Meter Operation
2
E4418B Power Meter User’s Guide
57
There are ten frequency dependent offset tables named CUSTOM_A
through CUSTOM_J which do not contain any data when the power meter
is shipped from the factory.
You cannot delete any of the 10 existing frequency dependent offset tables
or create any additional tables. However, you can edit the 10 existing
tables. Each frequency dependent offset table can contain a maximum of
80 frequency points.
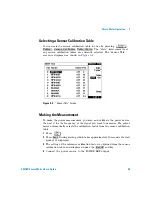
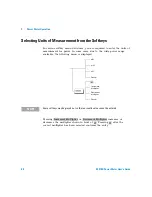
To edit a table:
1
Select one using the
or
keys to scroll through the displayed
tables. When the table you want to edit is highlighted, press
.
The “Edit Offset” screen is displayed as shown in
. In this screen, you can modify, add, and remove frequencies
and offset and also edit the table name. Use the
,
,
, and
keys to move between the table name and its frequencies and
offsets.
A frequency in the range of 0.001 MHz to 999.999 GHz can be entered.
An offset in the range of 1% to 150% can be entered.
•
The following rules apply to naming frequency dependent offset tables:
•
The name must consist of no more than 12 characters.
•
All characters must be upper or lower case alphabetic characters or
numeric (0- 9) or an underscore (_).
•
No other characters are allowed.
•
No spaces are allowed in the name.
2
To edit the parameter you currently have selected, press
. The
power meter displays the data in a pop- up window. Modify this data (see
below) as desired.
•
Use
or
to modify the character on which the cursor is
currently positioned.
•
Use
or
to move to other characters.
3
To confirm your choice, press the appropriate softkey.
4
To add a new frequency dependent offset table entry, press
. You are
prompted for the frequency and offset. The entry is sorted by frequency.
5
To remove a frequency dependent offset table entry, use the
,
,
, and
keys to select the entry, press
. If you delete the
frequency, the equivalent offset is also removed and vice versa.
Edit Table
Change
Insert
Delete
Содержание E4418B
Страница 1: ...Agilent Technologies Agilent E4418B Power Meter User s Guide ...
Страница 14: ...xiv E4418B Power Meter User s Guide THIS PAGE HAS BEEN INTENTIONALLY LEFT BLANK ...
Страница 20: ...xx E4418B Power Meter User s Guide THIS PAGE HAS BEEN INTENTIONALLY LEFT BLANK ...
Страница 22: ...xxii E4418B Power Meter User s Guide THIS PAGE HAS BEEN INTENTIONALLY LEFT BLANK ...
Страница 24: ...xxiv E4418B Power Meter User s Guide THIS PAGE HAS BEEN INTENTIONALLY LEFT BLANK ...
Страница 47: ...Power Meter Operation 2 E4418B Power Meter User s Guide 23 Contacting Agilent Technologies on page 103 ...
Страница 113: ...Power Meter Operation 2 E4418B Power Meter User s Guide 89 Figure 2 21 Save Recall Screen ...
Страница 126: ...2 Power Meter Operation 102 E4418B Power Meter User s Guide Figure 2 23 Replacing the fuse In line fuse Spare fuse ...
Страница 168: ...3 Menu Reference 144 E4418B Power Meter User s Guide THIS PAGE HAS BEEN INTENTIONALLY LEFT BLANK ...
Страница 169: ...145 E4418B Power Meter User s Guide Agilent Technologies 4 Error Messages Introduction 146 Error Messages 148 ...


