


Project:
LV Energy Storage Inverters ESI
Issued by:
Commissioning report
Date:
Page 2 of 7
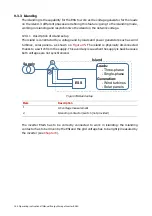
Manual Power Quality Inverter ESI-S
Commissioning instructions 173
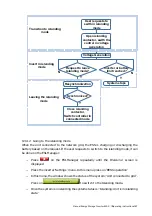
8.11.2 Inspection on site – verification of the inverter after installation
Ambient conditions
OK/NOK
•
Check the ambient temperature (< 40°C/104°F) (if > 40°C/104°F, derating is required)
•
Check the installation altitude (< 1000m/3300ft) (if > 1000m/3300ft, derating is
required)
•
Check the ventilation (room and enclosure)
•
Ensure that no sources of conductive dust are present
Upstream cabling and protection
•
Upstream protection installed
•
Check cross-section of power supply cables (L1-L2-L3) and neutral (if connected)
•
Check cross-section of protective conductors (PE) (
/
16 mm²) connected to each
enclosure.
•
Earth interconnection between the different units installed
•
Check cross-section of DC power supply cables
•
Check the setting and operation of the protective apparatus
•
ESI-S neutral current can be up to 3 times the ESI-S phase current!
•
Check rated current of the power supply cable fuses (if applicable)
•
Check tightness of conductor fixations
•
The material of busbars, terminals and conductors must be compatible (corrosion)
Internal connections
(a)
•
Disconnect the inverter from the supply (disconnection recommended by upstream
protection)
•
If inverter connected to the supply before, wait for 25 minutes to discharge DC
capacitors
•
Remove the right side of the protective cover of the inverter. Ensure that the left side
of the protective cover is in place. Disconnect ESI-Manager if required.
•
Open auxiliary circuit fuse protection box
•
DC capacitor voltage low enough to operate safely (DC voltage measurement)
•
Change auxiliary transformer primary tap setting to correspond to network nominal
voltage rating
(b)
•
Wiring of main and auxiliary circuit
•
Tightness of all electrical connections
•
Connectors properly plugged in
•
Fixation of components
•
Remove anti-corrosion capsules installed at the inside bottom of the inverter (if still
present)
•
Clearances
•
Address of each inverter unit in a multi-unit system set to a different value and ‘main’
master has the lowest address
(c)
•
CAN bus terminated properly on each unit of a multi-unit system
(c)
•
CAN bus communication cable between the different units properly installed
(c)
Installation
(a)
•
Check the cabling of the digital I/O (if present)
•
Check the voltage in accordance with the specification
•
Check the phase rotation order (with inverter auxiliaries off) (clockwise)
(b)
•
Check the polarity of the DC cables
•
For multi-unit system, check that the same phases are connected to the same inverter
power terminals for the individual units


