35
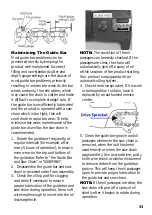
6. Check the guide bar 'rail' for wear:
Hold a ruler (straight edge) against the
side of the guide bar and 'cutter side
plates'. If there is a gap between the
ruler and guide bar the guide bar 'rail'
is normal. If there is no gap (ruler flush
against the side of the guide bar) the
guide bar 'rail' is worn and needs to be
replaced with a new one of the same
type.
7. Turn the guide bar 180° to allow
even wear, thereby extending the life
span of the guide bar.
8. Check the saw chain for possible
wear and damages. Replace it with a
new one if required. Experienced user
can sharpen a dull saw chain (see
section Saw chain sharpening” below).
9. Refit the saw chain and the guide
bar as described under Assembly”.3.
Use a small, soft wire to remove any
debris from the chain oil discharge
hole.
10. Frequently check the guide bar for
damage. Feathering and burring of the
guide bar rails (the ridges on either
side of the bar groove) is a normal
process of guide bar wear. Such faults
should be smoothed with a file as
soon as they occur. A guide bar with
the following faults should be
replaced:
Wear inside the guide bar rails that
permits the chain to lay sideways
Bent guide bar
Cracked or broken rails
Spread rails
Refer to “Installing the Guide Bar and
Saw Chain”.
n
POLE HEDGE TRIMMER
WARNING:
Before
inspecting, cleaning, or
servicing the machine,
disconnect the plug from
power source and wait for all moving
parts to stop. Failure to follow these
instructions can result in serious
personal injury or property damage.
NEVER perform maintenance or repairs
while the unit is running.
WARNING:
When servicing,
use only identical replacement parts.
Use of any other parts may create a
hazard or cause product damage.
Do not modify the product or the
cutting elements, An inadequate use of
these elements can cause SEVERE
PERSONAL DAMAGES OR DEATH.
WARNING:
Always wear
safety goggles or safety glasses with
side shields that comply with ANSI
Z87.1 during product operation. If


