24
3D Systems, Inc.
10
PROJET 5500X STARTUP AND DEMO BUILD
The purpose of this section is to execute the following:
•
Power the 3D printer system on.
•
Load support and part material cartridges into the material delivery modules.
•
Install a print platform.
•
Perform a successful Demo build.
• Remove
the
fi nished parts from the 3D printer system.
•
Empty the waste drawers.
•
Switch the 3D printer system off.
Completion of this process will familiarize you with all of the “basic” 3D printer system operations needed to build parts on the ProJet 5500X
and provides a functional “shakedown” for a new installation. It is strongly recommenced that you complete this section before moving on to
larger more sophisticated builds.
POWER THE 3D PRINTER SYSTEM ON
.
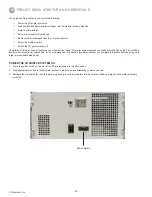
1. Place the power switch on the rear of the 3D printer system to the ON position.
2. Wait approximately 2 hours for 3D printer system to warm up before attempting to start a print job.
3. Because the materials also require a warm up period, proceed immediately to the next step of adding material to the material delivery
modules.
Power Switch


