background image

Cabling 16-Port Asynchronous Modules

2-9

Cabling 16-Port 
Asynchronous 
Modules

This section describes how to cable 16-port asynchronous modules to a 
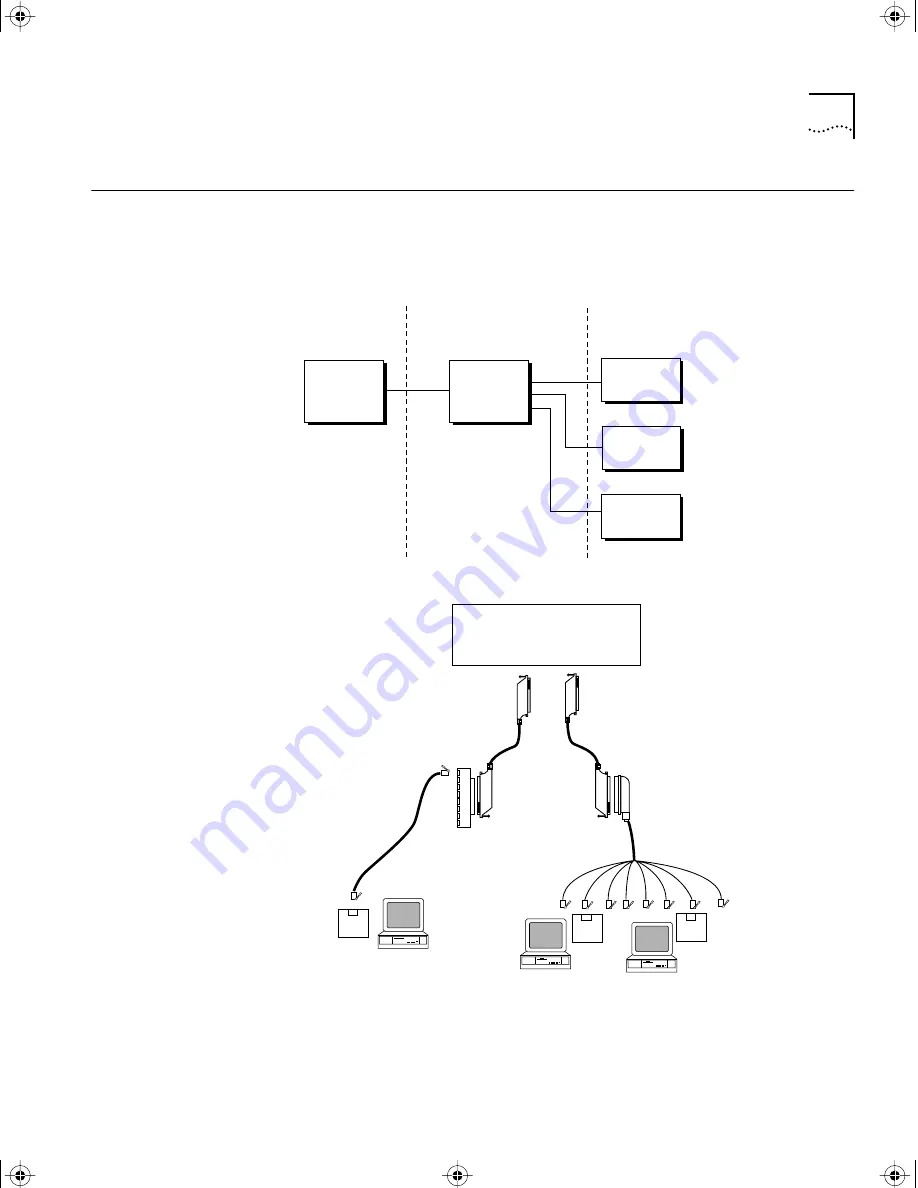
host, terminal, modem, or other serial equipment. Figure 2-5 provides an 
overview of the cabling and distribution options and who supplies them, 
while Figure 2-6 shows typical cabling applications.

Figure 2-5   

Cabling Overview

Figure 2-6   

Typical Cabling Applications

3Com supplies      3Com or customer supplies       Customer supplies

•  Extension cables
•  Octopus (hydra)

 cables

•  Patch panels
•  6-wire modular cables,

 D-type adapters

CS/3000

Series

servers

Distribution

method

Terminal

Modem

Hosts

 CS/3000 Series server

with 16-port asynchronous

modules installed

Extension cable

Extension cable

6-wire or 8-wire
modular cable

Harmonica box
(patch panel)

Octopus (hydra) cable

RJ-12 connectors

D-type adapter

RJ-12 or RJ-45
connector

D-type adapter

CS3000BookFile  Page 9  Tuesday, October 15, 1996  5:12 PM

Содержание CS/3000

Страница 1: ... CS 3000 SERIES COMMUNICATIONS SERVER INSTALLATION GUIDE Part No 09 0389 001 Published March 1996 CS3000BookFile Page i Tuesday October 15 1996 5 12 PM ...

Страница 2: ...he United States and may or may not be registered in other countries 3Com is a registered trademark of 3Com Corporation 3ComFacts and Ask3Com are service marks of 3Com Corporation CompuServe is a registered trademark of CompuServe Inc UNIX is a registered trademark in the United States and other countries licensed exclusively through X Open Company Ltd Inmac is a registered trademark of Inmac Corp...

Страница 3: ...otice This digital apparatus does not exceed the Class A limits for radio noise emissions from digital apparatus set out in the interference causing equipment standard entitled Digital Apparatus ICES 003 of the Department of Communications Avis Canadien Cet appareil numérique respecte les limites bruits radioélectriques applicables aux appareils numériques de Classe A prescrites dans la norme sur ...

Страница 4: ... Communications Server Reference Guide If the information in the release notes shipped with your product differs from the information in this guide follow the release notes Audience This guide is intended for network administrators who have experience in planning maintaining and troubleshooting local area networks and who will be responsible for configuring and managing communications servers Conv...

Страница 5: ... 0 IP NETaddr 0 0 0 0 This guide uses upper and lowercase letters to distinguish the full form of commands and command syntax from the abbreviated form You can enter a command in abbreviated form by typing only the uppercase portion It does not matter whether you type the command in upper or lowercase letters Text represented as screen display This typeface represents displays that appear on your ...

Страница 6: ... ports in 16 port increments to a maximum of 48 serial ports Refer to Configurations for information on configurations available at purchase Support for parallel printers with Centronics interfaces Optional Ethernet interface modules Both models support optional single port AUI 10BASE5 and RJ 45 10BASE T Ethernet interface modules You must buy and install these modules separately 6 MB of memory 2 ...

Страница 7: ...rnal diskette drive Configurations CS 3000 series servers can be purchased in the following configurations Three 16 port asynchronous modules 48 ports No 16 port asynchronous modules The no module configuration allows you to install one two or three 16 port asynchronous modules for 16 32 or 48 ports now or as your networking needs expand For instructions on installing and cabling a 16 port asynchr...

Страница 8: ...ules and a single port AUI module installed but not cabled Figure 1 1 Front and Rear Views of Model CS 3100 The following sections describe the basic and optional components of the CS 3000 series servers in detail Power supply 16 port asynchronous modules AUI module Console port Auxiliary port Parallel printer port 3 5 diskette drive Model CS 3100 only CS 3100 LEDs Reset switch AUI PORT J1 PARALLE...

Страница 9: ...terrupt switch Figure 1 2 shows the location of these components in a Model CS 3100 with its cover removed Model CS 3000 is identical except that it does not have a diskette drive Figure 1 2 Model CS 3100 with Cover Removed Back panel Ethernet interface module installed Auxiliary processor board Power supply Motherboard Front panel Diskette drive CS3000BookFile Page 4 Tuesday October 15 1996 5 12 ...

Страница 10: ...ormation used by the Ethernet controller This arrangement provides better performance than single memory based servers Parallel printer connector Provides the connection between the server and a parallel printer Console connector Provides the connection between the server and a console Auxiliary connector Reserved for internal 3Com use and not currently operational Ethernet interface module connec...

Страница 11: ...tion on memory dumps refer to Memory Dump Procedures WARNING Use only a nonconductive object such as a plastic stylus to press the hardware interrupt switch Do not use the tip of a pencil Graphite particles can cause electrical shock to the operator and can damage components on the server s circuit boards Cover The inverted U shaped cover is secured by three screws on the bottom edge of each side ...

Страница 12: ... Indicators LED Name Normal State Function Power On On when server is on and the power supply generates voltage on its 5 V DC output Self Test Off On for approximately two minutes following power on or reset Stays on if diagnostic tests fail Flashes during operation to indicate no boot source or software failure Boot State Off On during software boot turns off if boot is successful Lights cyclical...

Страница 13: ...following components Four slots Three for 16 port asynchronous modules One for an Ethernet interface module Console port Auxiliary port Parallel printer port Power supply module Figure 1 4 Back Panel of CS 3000 Series The following sections describe these components Slots CS 3000 series servers have four slots in the back panel three for 16 port asynchronous modules and one for an Ethernet interfa...

Страница 14: ...on on attaching a console refer to Attaching a Console The auxiliary port is reserved for internal 3Com use and is not operational The console and auxiliary ports are horizontally mounted male DB 9 RS 232 connectors The RS 232 connector associated with these ports is based on the 9 pin IBM PC AT standard and is configured as data terminal equipment DTE To connect a terminal or other DTE device use...

Страница 15: ... RS 232 RS 423 signals Each serial connector contains 8 ports for a total of 16 ports per module or 48 ports for a com munications server with the full complement of three modules The ports are configured as DCE for attachment to DTE devices such as terminals The connectors adhere to the MOD TAP USOC 6 wiring standard Figure 1 5 shows the 16 port asynchronous module components Figure 1 5 16 Port A...

Страница 16: ...mechanisms Figure 1 6 Strain Relief Mechanisms For information on installing the cable strain relief refer to Chapter 2 Installation Optional Ethernet Interface Modules The following optional Ethernet interface modules are available for the CS 3000 series server Single port AUI module 10BASE5 3Com part number 3C5622 Single port RJ 45 10BASE T 3Com part number 3C5623 You must install one of these o...

Страница 17: ...UI Module Figure 1 7 also shows a connector mounted directly on the board This connector mates with a connector on the motherboard For information on installing and cabling the single port AUI module refer to Chapter 2 Installation Single Port RJ 45 Module The single port RJ 45 module connects directly to a twisted pair network It consists of a board and a panel containing an RJ 45 connector and t...

Страница 18: ...tch is off ACTIVITY LINK POLARITY 10BaseT Board LEDs RJ45 port Connector Table 1 4 Single Port RJ 45 Module LEDs and Their Functions LED Name Normal State Function Activity On continuously or flashing On continuously or flashes when port is receiving or transmitting data When traffic on the network segment is heavy the LED is on continuously when traffic is light the LED flashes when there is no t...

Страница 19: ...prongs with chassis ground on the middle prong All servers are shipped with power cords If your power cord does not match your requirements contact your network supplier Optional Rack Mount Kit An optional rack mount kit is available for CS 3000 series servers 3Com part number 3C759 This kit allows you to mount the server in a two or four pole 19 inch rack For information on how to install the ser...

Страница 20: ...without user switching Maximum current consumption 1 7 A at 115 V AC 0 83 A at 230 V AC Fuse 3 A 250 V fast blow 5 mm x 20 mm Output power 86 W Maximum power dissipation 105 W continued Maximum power consumption 191 W Maximum heat dissipation 360 BTU h Hold up time 12 ms after removal of nominal line voltage at full load Table 1 7 Environmental Requirements Parameter Minimum Maximum Temperature Op...

Страница 21: ...the 16 port asynchronous and Ethernet interface modules in their antistatic shielded bags until you are ready to install them Refer to step 7 for additional ESD guidelines Table 2 1 Installation Steps Step Status Preparation Mandatory Installing 16 port asynchronous modules Mandatory if none are installed otherwise optional Installing an Ethernet interface module Mandatory Mounting the server Mand...

Страница 22: ...abel 6 Collect the tools you need You need a 1 and a 2 Phillips screwdriver and a small slotted screwdriver 7 Observe the following ESD guidelines when installing 16 port asynchronous modules and Ethernet interface modules a Do not touch pins leads or solder connections on the board b Handle the board by the edges only c Observe proper grounding techniques including using a foot strap and grounded...

Страница 23: ... steps WARNING Before removing the cover be sure the unit is turned off and the power cable is either unplugged from the unit or from the wall socket 1 Remove the cover a Using the 1 Phillips screwdriver remove the three black screws from each side of the cover b Grasp both sides of the cover and carefully lift it off 2 Remove the upper portion of the back panel Using the 2 Phillips screwdriver re...

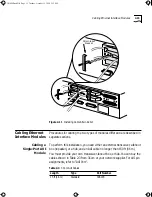
Страница 24: ...is void if this occurs Loosen the two screws that secure the blanking plate and remove the plate 4 Fasten each 16 port asynchronous module to the upper portion of the back panel as shown in Figure 2 2 Two screws are provided for each module If you are installing fewer than three modules install the first module in the slot closest to the power supply and the second module in the center slot Figure...

Страница 25: ...he 16 port asynchronous modules to a host terminal modem or other serial equipment refer to Cabling 16 Port Asynchronous Modules Installing Ethernet Interface Modules This section describes the procedure for installing an Ethernet interface module Instructions for cabling the modules are provided in Cabling Ethernet Interface Modules WARNING Be sure the unit is turned off and the power cable is ei...

Страница 26: ...n a tabletop in a two or four pole 19 inch rack or vertically in a wall mount It is usually easier to mount the server before attaching cables Mounting on a Tabletop To mount your server on a tabletop use the following procedure 1 Place the server on a firm flat surface Do not mount the server at an angle greater than 15 degrees from the horizontal or vertical 2 Make sure that the air intake and f...

Страница 27: ...ve the two outer screws from the sides of the server with the 1 Phillips screwdriver Using the 4 40 screws provided fasten a bracket to each side of the server as shown in Figure 2 4 Tighten each screw securely CAUTION If you use fewer than four screws two on each side to fasten the rack mount brackets to the sides of the server the server can fall and sustain damage This voids the warranty 2 Slip...

Страница 28: ... in the vertical stand with the rear panel pointing to one side Be sure that the side with the exhaust openings points up When you view the front panel in this position the reset switch is closest to the floor If you are mounting a CS 3100 make sure the diskette drive is accessible brackets 4 40 screws CS 3100 3Com Install server in rack CS 3100 3Com Install brackets CS3000BookFile Page 8 Tuesday ...

Страница 29: ...Overview Figure 2 6 Typical Cabling Applications 3Com supplies 3Com or customer supplies Customer supplies Extension cables Octopus hydra cables Patch panels 6 wire modular cables D type adapters CS 3000 Series servers Distribution method Terminal Modem Hosts CS 3000 Series server with 16 port asynchronous modules installed Extension cable Extension cable 6 wire or 8 wire modular cable Harmonica b...

Страница 30: ... DCE device such as a modem use a null modem cable For more information on 16 port asynchronous modules refer to 16 Port Asynchronous Modules You can connect an extension or octopus cable to the serial connectors Fasten these cables to the serial connectors with the screw and strain relief provided For information on the cable strain relief mechanism refer to Cable Strain Relief For pin assignment...

Страница 31: ...able also known as a hydra cable that fans out the 50 pin Telco connector to eight RJ 12 connectors The other end of this cable terminates in a 50 pin bottom entry male connector Figure 2 8 shows the octopus cable Figure 2 8 Octopus Hydra Cable You can buy this cable directly from 3Com or your network supplier 2 ft 0 6 m octopus hydra cable 3Com part number 3C6102 3Com also recommends the followin...

Страница 32: ...orts through RJ 12 jacks The panel has three groups of eight ports as shown in Figure 2 9 and Figure 2 10 Each group of eight ports is called a harmonica box Three harmonica boxes compose one patch panel Figure 2 9 shows pin assignments for attachment to a modem or other data communi cations equipment DCE Figure 2 10 shows pin assignments for attachment to a terminal host printer or other data ter...

Страница 33: ...rt number 3C6106 3Com also recommends the following vendors and part numbers 24 channel patch panel MOD TAP part number 27 6E 249 B002G 48 channel patch panel MOD TAP part number 27 6E 489 B002G Cabling from a Patch Panel to Your Device 3Com recommends the following equipment to cable from a patch panel to your host terminal modem or other serial equipment 6 wire modular cable 25 ft 7 6 m MOD TAP ...

Страница 34: ... to use to connect your hosts terminals modems or other serial equipment to each serial connector for example an extension cable octopus cable and D type adapter or an extension cable patch panel 6 wire cable and D type adapter 2 Assemble the cables patch panels and adapters 3 Cable hosts terminals modems or other serial equipment to each serial connector 4 Install a cable strain relief mechanism ...

Страница 35: ...is installation you need either an external transceiver a fanout box repeater or a hub and an AUI cable no longer than 150 ft 46 m You must provide your own transceiver fanout box or hub You can buy the cables shown in Table 2 3 from 3Com or your network supplier For AUI pin assignments refer to AUI Port Strain relief bracket Table 2 3 3Com AUI Cables Length Type Part Number 15 ft 4 6 m Standard 3...

Страница 36: ... 536888 or equivalent and have connectors with metallic backshells Cable shields should be connected to backshells 3 Slide the latch on the AUI port into the closed position as shown 30 ft 9 m Standard 3C6194 50 ft 15 m Standard 3C6195 75 ft 23 m Standard 3C6196 100 ft 30 m Standard 3C6197 150 ft 46 m Standard 3C6198 6 ft 2 m PVC 3C110 002 16 ft 5 m PVC 3C110 005 32 ft 10 m PVC 3C110 010 49 ft 15 ...

Страница 37: ... VDE 0871 or CISPR22 EN55022 for Class A devices the twisted pair cable should be shielded and have connectors with metallic backshells Cable shields should be connected to backshells 3Com recommends the following cables for all other customers including those in the U S and Canada Unshielded twisted pair cable 100 ohms Level 3 LAN and high speed data cable for example Anixter CM 00424BAG 3 Belden...

Страница 38: ...c backshells Cable shields should be connected to backshells Attaching a Console You may need to attach a console to perform the following tasks Modify firmware parameters as described in Appendix C Monitor Utility Copy communications server software as described in Copying and Formatting Diskettes Configure the communications server software as described in the Multiprotocol Communications Server...

Страница 39: ...s To attach a console follow these steps 1 Attach one end of the cable to the console port on the back panel of the communications server and the other end to the modem port on the back of a terminal see Figure 2 13 If you are using a PC with emulator software attach the other end to the PC s serial port Figure 2 13 Attaching Terminal to Console Port 2 Verify that the terminal s configurable param...

Страница 40: ...er source The AC power source must meet the requirements outlined in Specifications The server must be connected to its AC power source with a grounded line cord to meet safety requirements Modifying the Firmware Configuration The CS 3000 series server s firmware is preset at the factory for basic installations in most cases you do not need to reconfigure it If you want to customize your server s ...

Страница 41: ...er For more information refer to Chapter 4 Configuration If you plan to use a console to access the server monitor make sure the console is configured correctly Refer to Attaching a Console Booting from the Network The CS 3000 which has no diskette drive can boot only from the network The CS 3100 can boot either from the network or from a local diskette To boot a CS 3100 from the network you must ...

Страница 42: ...nsceiver connect a transceiver cable between the server and transceiver Make sure the transceiver is connected to the network 3 Configure the RBCS server to support boot of the communications server 4 Turn on the communications server All LEDs on the front panel light briefly when the server is turned on The Power and Self Test LEDs should remain on after the others turn off If the Power and Self ...

Страница 43: ...copy the distribution diskette store it in a safe place and use only the copy as the working diskette If you are upgrading from earlier software you may be able to copy configuration information from your old working diskette onto the new one Refer to the software release notes for instructions You may want to make a backup copy of your working diskette every time you change the values of the soft...

Страница 44: ...ecause the boot source is not present it displays the following message Do you want to enter monitor Y N 5 Type Y at the prompt The following message appears 3Com Corporation CS 3000 Series Monitor You are now in monitor mode 6 To copy a diskette enter the copy command co The following message appears Copy diskettes must be formatted Type f to format your diskettes now Any other key to continue wi...

Страница 45: ...eturn to continue 11 Remove the master diskette 12 Insert the formatted copy destination diskette the diskette you are copying to into the diskette drive and press the Return key A message similar to the following appears during and after copying Writing verifying OK Copy another disk y n If you want to copy another diskette type y If you do not want to copy another diskette type n 13 When the cop...

Страница 46: ...nections and copied the software distribution diskette you are ready to boot your communications server 1 Insert the working diskette in the drive label side up 2 If the server is off turn it on by pressing the I side of the power switch located on the back panel If it is on press the reset switch All LEDs on the front panel light briefly when the server is turned on The Power and Self Test LEDs s...

Страница 47: ...sor card installed 128K ram installed Diagnostic Upload Completed Auxiliary Proccesor card diagnostics Passed Booting from Floppy The server s Ethernet address and firmware version are displayed along with other startup messages For more information on startup messages refer to Appendix B Startup Messages If the LEDs or console messages indicate an error refer to Chapter 6 Troubleshooting If you s...

Страница 48: ...tion Guide and Multiprotocol Communications Server Software Reference Guide for information on this command 2 Disconnect all active sessions Refer to the Multiprotocol Communications Server Operation Guide and Multiprotocol Communications Server Software Reference Guide 3 To shut down a CS 3000 turn the power off On a CS 3100 wait until the disk drive LED goes out then turn the power off If the di...

Страница 49: ...ing and Formatting Diskettes Entering the Firmware Monitor To use the Firmware Configuration Utility you must place the communications server in monitor mode This mode suspends normal operation and allows interaction only with the monitor command interface After using the monitor you must usually reboot the communications server to resume operation For a complete description of commands available ...

Страница 50: ...the server is in the boot database of an RBCS server refer to the Remote Boot and Configuration Services User s Guide 4 Turn on the unit or if it is already on press the reset switch on the front panel to reboot The server tries to boot The booting process takes a few minutes Because the boot source is not present it displays the following message Do you want to enter monitor Y N 5 Type Y at the p...

Страница 51: ... descriptions of each parameter follow this table Current Parameters Interface address 08000203A89A J1 baud rate 9600 J2 baud rate 9600 Continuous self test Disabled Auto reboot Reboot only Initial boot source Floppy Number of reboots 00 Network boot string _cs30 Boot retries Try Forever Boot protocol SLP Change IP TFTP parameters Memory Test By pass Disabled esc Return to previous menu Current Pa...

Страница 52: ...te 1 110 2 300 3 1200 4 2400 5 9600 6 19200 7 38400 2 J2 baud rate 1 110 2 300 3 1200 4 2400 5 9600 6 19200 7 38400 3 Continuous self test d Disable e Enable 4 Auto reboot m Boot monitor r Reboot only u Upload then reboot 5 Initial boot source a Auto f Floppy m Monitor n Network 6 Number of reboots r Reset 7 Network boot string _cs30 8 Boot retries O Try One Time F Try Forever 9 Boot protocol B BT...

Страница 53: ...tting takes effect when errors or the software ReBoot command require the server to be rebooted Boot monitor puts the server into monitor mode so it can be rebooted by the user This setting prevents the communications server from rebooting after a crash and allows the network manager to perform a memory dump or debugging procedures You can perform memory dumps from a CS 3000 to an RBCS or TFTP FTP...

Страница 54: ...ifies the filename of the image to be downloaded from an RBCS or TFTP FTP server and executed This string can be up to 128 characters long The default is _cs30 without the quotation marks If your boot protocol is System Load Protocol SLP do not modify the default network boot string If your boot protocol is TFTP and your Address Discovery Protocol is Local Information you must change the default n...

Страница 55: ...n If you change the Boot Protocol parameter from TFTP to SLP and back to TFTP check the Change IP TFTP Parameters menu s Address Discovery Protocol field Changing from TFTP to SLP and back to TFTP results in Address Discovery Protocol reverting from your configured setting to its default setting BOOTP then RARP Change IP TFTP Parameters Because TFTP is a file transfer protocol it must work in conj...

Страница 56: ...filename to download is obtained from the BOOTP server If RARP or Local Inform ation is used the server attempts a TFTP download of the file named in the Network Boot String parameter Table 4 2 lists Address Discovery Protocol parameter options and their meaning If you select a value that includes BOOTP you must add a corresponding entry to the bootptab file on the boot server This file is usually...

Страница 57: ...munications server boots from BOOTP requests are sent to this address If this address is not specified BOOTP requests are sent to the broadcast address Gateway IP address If the communications server boots from an RBCS or TFTP FTP server on another network enter the IP address of the gateway If booting across a gateway you must specify both client and server IP address parameters Subnet mask value...

Страница 58: ...ronmental requirements listed in Table 1 7 on page 1 15 Temperatures outside the recommended range can impair reliability and cause diskette access errors Keep the area around the server clean Avoid accumulated dust especially around the air intake slots If you need to handle the motherboard auxiliary processor board 16 port asynchronous modules or Ethernet interface module observe electrostatic d...

Страница 59: ...l damage the heads Use only alcohol based solvents 2 Immediately insert the cleaning diskette in the drive 3 Press the reset switch and wait until the Boot State light and the activity light on the diskette drive go out 4 Press the reset switch three more times each time waiting until the activity light on the diskette drive goes out Replacing the Fuse The server s fuse is located inside the power...

Страница 60: ...lear of the fuseholder cartridge pry the spent fuse from the fuse clip with the screwdriver 6 Replace the old fuse with a new fuse of the same type size and rating Use a 3 A 250 V fast blow fuse 5 mm by 20 mm WARNING For continued protection against fire hazard replace the fuse only with a fuse having the same type and rating ATTENTION Pour éviter le risque d incendie ne remplacer que par des fusi...

Страница 61: ...o not touch pins leads or solder connections on the board Handle the board by the edges only Observe proper grounding techniques including using a foot strap and grounded mat or wearing a grounded static discharge wrist strap You need a 1 Phillips screwdriver and a small slotted screwdriver To replace an Ethernet interface module follow this procedure WARNING To avoid possible electrical shock the...

Страница 62: ... of the module and the chassis Gently pry the module out of the slot You may feel some resistance as the connectors on the module board pull free of the motherboard 5 Insert the Ethernet interface module into the slot a Hold the module with the component side up and the connector mounted on the edge of the board away from you b Slowly slide the module into the slot being careful to align the board...

Страница 63: ...are aware of hazards they are exposed to and of methods to minimize the danger to themselves and others Follow the instructions in this section carefully If any problems occur contact 3Com or your authorized service representative immediately If the information in release notes shipped with an upgrade kit differs from the information in this guide follow the release notes WARNING Do not open the p...

Страница 64: ...s been running communications server software For instructions on installing a 16 port asynchronous module in a server that has never been turned on refer to Installing 16 Port Asynchronous Modules This procedure requires you to handle a 16 port asynchronous module Whenever you handle one of these modules adhere to the following ESD guidelines Keep the new module in its antistatic bag until you ar...

Страница 65: ... 16 port asynchronous modules d Remove the screws holding the upper portion of the back panel Using the 2 Phillips screwdriver remove the two screws located toward the outer edges of the panel as shown in Figure 5 4 Figure 5 4 Removing Upper Portion of Back Panel e Carefully remove each module from its auxiliary processor board connector Grasp the edge of each board and gently pull it up f Careful...

Страница 66: ... panel using the two screws Figure 5 5 shows the correct placement of these screws Again be careful not to loosen the EMI clips Figure 5 5 Replacing or Adding an 16 Port Asynchronous Module b Position the panel in place then position the connector on the edge of each module over the corresponding connector on the auxiliary processor board and press down firmly To position the panel in place latch ...

Страница 67: ...e ribbon cable and power wiring harness from the connectors on the rear of the diskette drive Fold the cables so they are out of the way Figure 5 6 shows the location of the ribbon cable and power wiring harness connectors Note the orientation of the ribbon cable Figure 5 6 Location of Ribbon Cable and Power Wiring Harness Connectors Back panel Power supply Front panel Cable clamp Screw Power wiri...

Страница 68: ...lide the old drive out of the bracket c Slide the new drive into the bracket d Replace the four screws 7 Replace the bracket in the chassis a Slip the keyhole slots on the bottom of the bracket over the standoffs on the bottom of the chassis b Slide the bracket toward the front of the chassis until the front panel of the diskette drive is flush with the opening in the front panel of the chassis c ...

Страница 69: ...oid possible electrical shock the server s power cord must be disconnected from the power source before accessing its internal components You need a 1 and a 2 Phillips screwdriver Follow this procedure 1 Make sure server power is off and the power cord is unplugged 2 Remove the cover as described in Removing the Cover 3 Disconnect the cable that connects the power supply to the connector on the au...

Страница 70: ...e power supply has two keyhole slots that fit over standoffs located on the bottom of the chassis You must slide the power supply far enough forward to lift it off the standoffs c Disconnect the cable that connects the power supply to the connector on the motherboard as shown in Figure 5 7 Back panel Power supply Front panel Auxiliary processor board connector Power wiring harness connector Disket...

Страница 71: ...is Slide the power supply module toward the rear of the chassis d Fasten the module in place with the screw 6 Reconnect the power supply cable to the connector on the auxiliary processor board Make sure you keep the connector keys aligned 7 Replace the cover as described in Replacing the Cover Replacing Private Memory Chips If you ever need to replace memory chips on the motherboard follow this pr...

Страница 72: ...from the front of the server 4 Remove a new memory chip from its antistatic foam shipping pad If the pins have been bent carefully straighten them Orient the chip with the beveled corner closest to the right of the communications server All memory chips must have the same orientation CAUTION Failure to place the memory chips correctly will cause the self test diagnostics to fail and possible serve...

Страница 73: ...chips 7 Replace the cover as described in Replacing the Cover Replacing the EPROM To replace the EPROM on the motherboard follow this procedure 1 Make sure server power is off and the power cord is unplugged 2 Remove the cover as described in Removing the Cover The EPROM is located in slot U19 as shown in Figure 5 9 Figure 5 9 Location of EPROM on Motherboard Back panel Power supply Diskette drive...

Страница 74: ... fit easily into the sockets Orient the new EPROM in the same way as the old EPROM CAUTION Failure to orient the EPROM correctly will destroy it when the server is powered on 6 Being careful to line up the pins with the socket firmly push the new EPROM into its socket until it snaps into place CAUTION Be sure that no pins are bent under the body of the EPROM Each pin must be inserted properly into...

Страница 75: ...ll three screws 4 Recable any connectors whose cables have been removed 5 Reinstall any strain reliefs that have been removed Figure 2 11 on page 2 15 shows how the strain relief mechanism is installed 6 If your server was mounted in a rack replace the rack mounting brackets on the sides of the server and remount the server in the rack Refer to Figure 2 4 on page 2 8 to see how the server is mount...

Страница 76: ...anel LEDs or by error messages on the console Symptom At initial power on or during a reset Power and Self Test LEDs fail to light Meaning There is no power to the server Action Turn off the server by pressing the O side of the power switch then 1 Verify that the power cord is plugged securely into the power supply module 2 Verify that the power cord is connected to an outlet 3 Ensure that power i...

Страница 77: ...rminal to the console port Enter bt to boot from diskette Model CS 3100 only or bs to boot from the network Symptom Boot fails and the monitor prompt appears on the console Action Take the following action 1 If you are booting from a network make sure that your network is operational and that the communications server is configured to use the network boot source 2 When you are prompted to enter th...

Страница 78: ...ch is located on the server s left side viewed from the front of the server close to the front as shown in Figure 1 1 on page 1 3 The switch is recessed to protect it from being pressed unintentionally WARNING Use only a nonconductive object such as a plastic stylus to press the hardware interrupt switch Do not use the tip of a pencil Graphite particles can cause electrical shock to the operator a...

Страница 79: ...s from the network Action Take the following action 1 Reset the server by pressing the reset switch on the front panel 2 If resetting the server does not resolve the problem check the cable transceiver and any other devices associated with connecting the Ethernet interface module to the network Replace any faulty component If you do not find any faulty network connection components or if you repla...

Страница 80: ...k LED on the single port RJ 45 module fails to light Meaning There is no connection between the module s port and the workstation hub or repeater Action Take the following action 1 Make sure the cable is properly wired Refer to Wiring Considerations If the cable is improperly wired replace it 2 Make sure that all network connections are secure 3 If these steps do not solve your problem replace you...

Страница 81: ... the boot protocol to TFTP and establish a safepath on the RBCS server The default safepath is to the data DUMP directory If this directory is not already present on the RBCS server you must create it for the memory dump If you specify a different path for the TFTP Upload Path parameter the memory dump uses that path For more information on the RBCS safepath function refer to the Remote Boot and C...

Страница 82: ...ps 1 Enter monitor mode as explained in Entering the Firmware Monitor In some instances a crash may leave the disk drive unusable because some monitor parameters were overwritten In this case the server may respond with an error message To recover enter the soft reset command k 2 From the console enter the dump command du The server prompts you with the following Enter the density of the dump disk...

Страница 83: ...ong with the diskettes The date and time at which the crash occurred and any information available about the network traffic load at that time The state of each front panel LED indicator at the time of the crash The version numbers of your communications server software and firmware You can obtain this information after completing the memory dump To find the version numbers boot the software and e...

Страница 84: ...e step successfully The frequency of the problem You may also be asked to send a copy of the working diskette Model CS 3100 only or a copy of the communications server software loaded on the hard disk of your RBCS or TFTP FTP server To make a copy of the working diskette follow the procedure in Copying and Formatting Diskettes Restarting To reboot the server after a memory dump enter bt to boot fr...

Страница 85: ...e up to 48 serial ports depending on the number of 16 port asynchronous modules installed Each module provides two 50 pin serial connectors each connector provides eight ports You can install up to three modules SW 3000 software refers to these ports as port numbers 0 through 47 Table A 1 shows the mapping of ports to 50 pin connectors Table A 1 Connector Port Mapping Connector Ports J10 0 7 J11 8...

Страница 86: ...ports DCD and CTS share pin 28 on port 0 and also pins 31 34 37 40 43 46 and 49 on the other ports This hardware configuration is called single input In the default software configuration pin 1 functions as DTR to signal the communications server to disconnect and pin 28 functions as DCD to signal when a hangup has occurred This configuration is referred to as session control Flow control if neede...

Страница 87: ...circuit assignments in Table A 2 still hold Table A 2 Serial Connector Pin Assignments Software Version 6 0 Port Pin Signal Direction Pin Signal Direction 0 1 DTR0 RTS0 In 26 TXD0 In 0 2 SG0 27 RXD0 Out 0 3 Not used 28 DCD0 CTS0 Out 1 4 DTR1 RTS1 In 29 TXD1 In 1 5 SG1 30 RXD1 Out 1 6 Not used 31 DCD1 CTS1 Out 2 7 DTR2 RTS2 In 32 TXD2 In 2 8 SG2 33 RXD2 Out 2 9 Not used 34 DCD2 CTS2 Out 3 10 DTR3 R...

Страница 88: ...A 3 Serial Connector Pin Assignments Software Version 6 1 Port Pin Signal Direction Pin Signal Direction 0 1 RTS0 In 26 TXD0 In 0 2 SG0 27 RXD0 Out 0 3 DTR 28 DCD0 CTS0 Out 1 4 RTS1 In 29 TXD1 In 1 5 SG1 30 RXD1 Out 1 6 DTR 31 DCD1 CTS1 Out 2 7 RTS2 In 32 TXD2 In 2 8 SG2 33 RXD2 Out 2 9 DTR 34 DCD2 CTS2 Out 3 10 RTS3 In 35 TXD3 In 3 11 SG3 36 RXD3 Out 3 12 DTR 37 DCD3 CTS3 Out 4 13 RTS4 In 38 TXD4...

Страница 89: ...he AUI port This connector is an industry standard derived from IEEE Standard 802 3 Table A 4 Telco to RJ 12 Pin Assignments Port Pin RJ 45 Pin Patch Panel RJ 12 Pin Hydra Cable Pin RJ 45 Pin Patch Panel RJ 12 Pin Hydra Cable 0 1 4 3 26 5 4 0 2 6 5 27 3 2 0 3 7 6 28 2 1 1 4 4 3 29 5 4 1 5 6 5 30 3 2 1 6 7 6 31 2 1 2 7 4 3 32 5 4 2 8 6 5 33 3 2 2 9 7 6 34 2 1 3 10 4 3 35 5 4 3 11 6 5 36 3 2 3 12 7 ...

Страница 90: ...in Assignments Pin Number Function Signal 1 Signal ground SG 2 Carrier detect plus DCD 3 Transmit plus TXD 4 Signal ground SG 5 Receive plus RXD 6 Signal ground SG 7 Control out plus CTL OUT 8 Signal ground SG 9 Carrier detect minus DCD 10 Transmit plus TXD 11 Signal ground SG 12 Receive minus RXD 13 12V 12V 14 Signal ground SG 15 Control out minus CTL OUT 1 2 3 4 5 6 7 8 9 10 11 12 13 14 15 1 2 3...

Страница 91: ... DCE use a modem cable Figure A 4 Console Port Pin Numbers Table A 6 RJ 45 Port Pin Assignments Pin Number Function Signal 1 Transmit data plus TXD 2 Transmit data minus TXD 3 Receive data plus RXD 4 5 Not connected NC 6 Receive data minus RXD 7 8 Not connected NC Table A 7 Console Port Pin Assignments Pin Number Function Signal 1 Carrier detect DCD 2 Receive data RXD 3 Transmit data TXD 4 Data te...

Страница 92: ...umber Printer Interface Signal Source Description 1 1 Strobe Server 2 2 Data1 Server Data Bit 0 3 3 Data2 Server Data Bit 1 4 4 Data3 Server Data Bit 2 5 5 Data4 Server Data Bit 3 6 6 Data5 Server Data Bit 4 7 7 Data6 Server Data Bit 5 8 8 Data7 Server Data Bit 6 9 9 Data8 Server Data Bit 7 10 10 Acknowledge Printer 11 11 Busy Printer 12 12 Out of paper Printer 13 13 SLCT Printer 14 14 Unassigned ...

Страница 93: ... modem Table A 11 shows pin assignments for the DTE adapters used for attachment to a terminal host or printer These pin assignments apply only when the adapters are used in conjunction with the following octopus hydra cables 2 ft 0 6 m octopus hydra cable 3Com part number 3C6102 4 ft 1 2 m octopus hydra cable MOD TAP part number 24 466 10 6 ft 1 8 m octopus hydra cable MOD TAP part number 24 666 ...

Страница 94: ...these adapters Behavior of the control output RJ 12 pin 1 is determined by the TERM FlowCtrlFrom and UseDCDout software parameters while interpretation of the control inputs RJ 12 pins 3 and 6 is determined by FlowCtrlTo and UseDTRin Table A 10 D Type Adapter Pin Assignments for Attachment to DCE Session Control RTS CTS Flow Control RJ 12 Pin CS Signal RS 232 Signal RS 232 Pin RJ 12 Pin CS Signal ...

Страница 95: ...ial In Bidirectional Flow Control DCE Attachment DTE Attachment RJ 12 Pin CS Signal RS 232 Signal RS 232 Pin RJ 12 Pin CS Signal RS 232 Signal RS 232 Pin 1 CTS out RTS in 4 1 CTS out CTS in 5 2 RXD out TXD in 2 2 RXD out RXD in 3 3 RTS in CTS out 5 3 RTS in RTS out 4 4 TXD in RXD out 3 4 TXD in TXD out 2 5 SG SG 7 5 SG SG 7 6 DTR in DCD out 8 6 DTR in DTR out 20 DSR DTR 6 20 DSR DCD DTR 6 8 20 Tab...

Страница 96: ...ly from 3Com or your network supplier 2 ft 0 6 m CS 1 to CS 3x000 conversion cable 3Com part number 3C6100 The conversion cable terminates in two 50 pin male connectors J1 and J2 Connect J2 to the CS 3000 series server and J1 to the existing CS 1 cabling as shown in Figure A 6 Table A 15 shows pin assignments of these two connectors D type adapters D type adapters Octopus hydra cable Extension cab...

Страница 97: ... RXD2 7 8 8 SG2 33 32 TXD2 9 Not used 34 34 DTR2 12 10 DCD3 35 36 RXD3 10 11 11 SG3 36 35 TXD3 12 Not used 37 37 DTR3 15 13 DCD4 38 39 RXD4 13 14 14 SG4 39 38 TXD4 15 Not used 40 40 DTR4 18 16 DCD5 41 42 RXD5 16 17 17 SG5 42 41 TXD5 18 Not used 43 43 DTR5 21 19 DCD6 44 45 RXD6 19 20 20 SG6 45 44 TXD6 21 Not used 46 46 DTR6 24 22 DCD7 47 48 RXD7 22 23 23 SG7 48 47 TXD7 24 Not used 49 49 DTR7 25 Not...

Страница 98: ...report a failure on the console for example CPU failure If you receive an error message refer to Chapter 6 Troubleshooting If you still receive an error message contact 3Com or your network supplier Refer to Appendix D Technical Support for technical support information Normal Messages The following messages indicate normal startup 128K ram installed Meaning Indicates the size of memory on the aux...

Страница 99: ... tests have begun Diagnostic Upload Completed Meaning The auxiliary processor board s diagnostics have been copied to RAM and self tests are ready to begin Do you want to enter monitor Y N Meaning The server cannot find the boot source specified by the Initial Boot Source parameter For information on this parameter refer to Initial Boot Source Action Enter Y to enter the monitor utility and boot m...

Страница 100: ...ress 080002089BB5 Auxiliary Processor Board Installed 128K ram installed Diagnostic Upload Completed Aux Processor Board diagnostics Passed Booting from Network Motherboard Error Messages The following error messages indicate that the motherboard has failed a self test Shared Memory test name Failed Address xxxxxxxx Expected yyyy Read zzzz Meaning test name identifies the shared memory test that f...

Страница 101: ...ng executed at the time of failure PRVT private or SHRD shared test name identifies the test that failed wwwwwwww is the hexadecimal data pattern returned from the memory location being tested eeeeeeee is the expected hexadecimal data pattern and xxxxxxxx is the hexadecimal address being tested For example the error message PRVT Data Bus Ripple Failed was 0x1000ff expected 0x100000 at Address 0x10...

Страница 102: ...ocess Control Register Test Failed Expected xxxx Read yyyy Meaning The control register test failed xxxx is the hexadecimal data that was written to the register yyyy is the hexadecimal data that was read back NMI Test Failed Meaning The auxiliary processor board s nonmaskable interrupt NMI did not occur Ram test name Failed Address xxxxxxxx Expected yyyy Read zzzz Meaning test name identifies the...

Страница 103: ... bit is not set Status Register Failed TIC Interrupt Bit Not Set Meaning The status register s TIC interrupt bit is not set TIC Interrupt Test Failed Meaning The TIC interrupt did not occur Timer x Test Failed Meaning One of the 8254 timer s counters 1 or 2 failed its test 16 Port Asynchronous Module Error Message The following error message indicates that a 16 port asynchronous module has failed ...

Страница 104: ...e operation of your server Procedures for displaying and modifying firmware parameters appear in greater detail in Chapter 4 Configuration After using the monitor you must reboot the communications server to resume normal operation Entering the Monitor To access the monitor utility you must attach a terminal to the console port located on the CS 3000 series server s back panel Configure the termin...

Страница 105: ...etwork boot source an RBCS or TFTP FTP server If a diskette is in the disk drive remove it If the communications server is configured to use a network boot source disconnect it from the network or make sure that it is not listed in the boot database of an RBCS or TFTP FTP server To determine whether the server is in the boot database of an RBCS server refer to the Remote Boot and Configuration Ser...

Страница 106: ...l 1 Set the Auto reboot parameter to Boot monitor For instructions on how to modify firmware parameters refer to Changing the Configuration 2 Reset the server by pressing the reset switch on the front panel The server performs the self tests and boot process determined by the Continuous Self Test and Initial Boot Source parameters If an error occurs while the server is running its software the ser...

Страница 107: ...a soft reset which resets the monitor s stack and internal variables and the Ethernet and serial controllers At this point 3Com or your network supplier may ask you to perform a memory dump For information on memory dumps refer to Memory Dump Procedures Using the MONitor Command If you have Network Manager privilege you can access the monitor by entering the MONitor software command from the local...

Страница 108: ... from the source specified in the Network Boot String parameter BT Boots from a specified source overriding the source specified in Initial Boot Source parameter CO Copies the contents of one diskette inserted in the disk drive to another diskette DE Deletes the specified file from the diskette DF Displays files on the diskette DU Dumps the server s memory to a set of diskettes FC Enters the Firmw...

Страница 109: ...ntax CO Description Copies the contents of a diskette to one or more diskettes Model CS 3100 only For a description of the procedure refer to Copying and Formatting Diskettes DE Syntax DE filenumber Description Deletes the specified file from the diskette Model CS 3100 only Valid entries are 0 through 9 For example enter de 2 to delete file 2 from the diskette DF Syntax DF Description Lists files ...

Страница 110: ...nd their syntax Commands in the list that are not documented in this guide are for 3Com internal use only K Syntax K Description Resets the monitor s stack and internal variables called a soft reset It also resets the Ethernet and serial controllers RS Syntax RS Description Resets the server has the same effect as pressing the reset switch or powering the server off and on During reset the server ...

Страница 111: ...s to the diagnostic commands menu which lists all available commands The undocumented commands in the diagnostic menu are for 3Com internal use only UP Syntax UP Description Dumps the server s memory to the hard disk of an RBCS or TFTP FTP server on the network as specified in the Network Boot String parameter Syntax Description Repeats the previous command CS3000BookFile Page 8 Tuesday October 15...

Страница 112: ...les This service is available via modem or ISDN seven days a week 24 hours a day Access by Modem To reach the service by modem set your modem to 8 data bits no parity and 1 stop bit Call the telephone number nearest you Country Data Rate Telephone Number Australia up to 14400 bps 61 2 9955 2073 France up to 14400 bps 33 1 69 86 69 54 Germany up to 9600 bps 49 89 627 32 188 49 89 627 32 189 Hong Ko...

Страница 113: ...ompuServe 3ComForum is a CompuServe based service containing patches software drivers and technical articles about all 3Com products as well as a messaging section for peer support To use 3ComForum you need a CompuServe account To use 3ComForum 1 Log on to CompuServe 2 Enter go threecom 3 Press Return to see the 3ComForum main menu 3ComFacts Automated Fax Service 3Com Corporation s interactive fax...

Страница 114: ... section on how to contact 3Com Support from 3Com If you are unable to receive support from your network supplier technical support contracts are available from 3Com In the U S and Canada call 800 876 3266 for customer service If you are outside the U S and Canada contact your local 3Com sales office to find your authorized service provider Country Telephone Number Country Telephone Number Austral...

Страница 115: ...64 Singapore 65 538 9368 Denmark 800 17309 South Africa 27 11 803 7404 Finland 0800 113153 Spain 900 983125 France 05 917959 Sweden 020 795482 Germany 0130 821502 Taiwan 886 2 577 4352 Hong Kong 852 2501 1111 United Arab Emirates 971 4 349049 Ireland 1 800 553117 U K 0800 966197 Italy 1678 79489 U S 1 408 492 1790 Country Telephone Number Country Telephone Number Country Telephone Number Fax Numbe...

Страница 116: ...ry processor board description 1 5 error messages B 4 B back panel 1 8 baud rate auxiliary port 4 5 console port 2 19 4 2 4 5 blanking plates 1 9 2 4 Boot monitor setting 4 5 Boot Protocol parameter 4 7 Boot Retries parameter 4 7 Boot State LED 1 7 3 2 3 6 booting Boot Protocol parameter 4 7 Boot Retries parameter 4 7 BS command C 5 BT command C 5 from diskette 3 3 3 6 from network 3 1 from RBCS s...

Страница 117: ...1 7 DE command C 6 deleting file from diskette C 6 DF command C 6 diagnostic messages B 1 diagnostics See troubleshooting dimensions 1 14 diskette backup copy 4 1 booting from 3 3 3 6 copying 3 3 C 6 deleting file C 6 dumping memory to 6 6 C 6 formatting 3 3 3 6 C 7 listing files C 6 working copy 4 1 diskette drive cleaning 5 2 description 1 8 LED indicator 3 8 replacing 5 10 D type adapters 2 13 ...

Страница 118: ...15 hydra cable 2 11 I Initial Boot Source parameter 4 5 installation 16 port asynchronous module 2 2 to 2 5 console 2 18 Ethernet interface module 2 5 to 2 6 extension cable 2 10 hydra cable 2 11 mounting 2 6 to 2 8 octopus cable 2 11 patch panel 2 12 2 13 preparation 2 1 to 2 2 printer 2 18 strain relief 2 14 See also cabling Interface Address parameter 4 5 internal disk drive See diskette drive ...

Страница 119: ...et Received LED 1 7 3 2 parallel printer port See printer port parameters firmware See Firmware Configuration Utility or parameter name patch panel cabling 2 13 description 2 12 physical dimensions 1 14 pin assignments 16 port asynchronous module A 2 AUI port A 6 console port A 7 D type adapters A 9 dual input configuration A 3 A 10 printer port A 8 RJ 45 port A 6 serial ports A 2 single input con...

Страница 120: ...dule cabling 2 15 description 1 12 pin assignments A 6 problems 6 4 to 6 5 replacing 5 4 single port RJ 45 module cabling 2 17 description 1 12 pin assignments A 6 problems 6 4 to 6 5 replacing 5 4 slots back panel 1 8 SLP 4 7 soft reset C 7 software configuration 4 1 parameter values 4 1 specifications 1 14 startup entering monitor C 3 from diskette 3 3 3 6 from network 3 1 from RBCS server 3 2 f...

Страница 121: ...and C 8 upgrades adding 16 port asynchronous module 5 7 removing cover 5 7 replacing 16 port asynchronous module 5 7 cover 5 17 diskette drive 5 10 EPROM 5 16 power supply module 5 11 private memory chips 5 14 V vents 1 14 version firmware 3 7 W wall mount 2 8 wiring information See pin assignments CS3000BookFile Page 6 Tuesday October 15 1996 5 12 PM ...

Страница 122: ...tandard warranty service for software products may be obtained by telephoning 3Com s Corporate Service Center or an Authorized 3Com Service Center within the warranty period Products returned to 3Com s Corporate Service Center must be pre authorized by 3Com with a Return Material Authorization RMA number marked on the outside of the package and sent prepaid insured and packaged appropriately for s...

Отзывы: