69
eircom D10
00 modem User’s Guide
Chapter 5 Wireless LAN
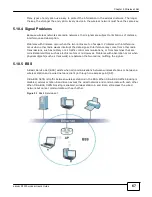
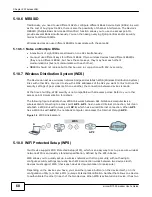
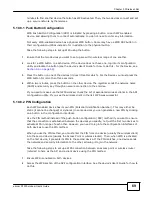
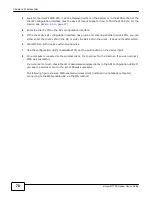
minutes to find another device that also has WPS activated. Then, the two devices connect and set
up a secure network by themselves.
5.10.8.1 Push Button Configuration
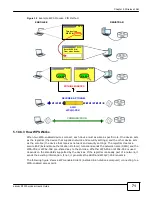
WPS Push Button Configuration (PBC) is initiated by pressing a button on each WPS-enabled
device, and allowing them to connect automatically. You do not need to enter any information.
Not every WPS-enabled device has a physical WPS button. Some may have a WPS PBC button in
their configuration utilities instead of or in addition to the physical button.
Take the following steps to set up WPS using the button.
1
Ensure that the two devices you want to set up are within wireless range of one another.
2
Look for a WPS button on each device. If the device does not have one, log into its configuration
utility and locate the button (see the device’s User’s Guide for how to do this - for the Device, see
Section 5.6 on page 59
).
3
Press the button on one of the devices (it doesn’t matter which). For the Device you must press the
WPS button for more than three seconds.
4
Within two minutes, press the button on the other device. The registrar sends the network name
(SSID) and security key through an secure connection to the enrollee.
If you need to make sure that WPS worked, check the list of associated wireless clients in the AP’s
configuration utility. If you see the wireless client in the list, WPS was successful.
5.10.8.2 PIN Configuration
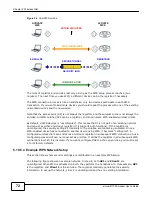
Each WPS-enabled device has its own PIN (Personal Identification Number). This may either be
static (it cannot be changed) or dynamic (in some devices you can generate a new PIN by clicking
on a button in the configuration interface).
Use the PIN method instead of the push-button configuration (PBC) method if you want to ensure
that the connection is established between the devices you specify, not just the first two devices to
activate WPS in range of each other. However, you need to log into the configuration interfaces of
both devices to use the PIN method.
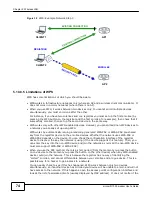
When you use the PIN method, you must enter the PIN from one device (usually the wireless client)
into the second device (usually the Access Point or wireless router). Then, when WPS is activated
on the first device, it presents its PIN to the second device. If the PIN matches, one device sends
the network and security information to the other, allowing it to join the network.
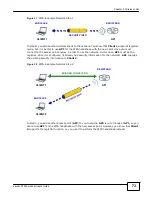
Take the following steps to set up a WPS connection between an access point or wireless router
(referred to here as the AP) and a client device using the PIN method.
1
Ensure WPS is enabled on both devices.
2
Access the WPS section of the AP’s configuration interface. See the device’s User’s Guide for how to
do this.
Summary of Contents for eircom D1000
Page 2: ...Copyright 2013 ZyXEL Communications Corporation...
Page 3: ......
Page 12: ...10 eircom D1000 modem User s Guide...
Page 13: ...PART I User s Guide 11...
Page 14: ...12...
Page 18: ...16 eircom D1000 modem User s Guide...
Page 26: ...Chapter 2 Introducing the Web Configurator 24 eircom D1000 modem User s Guide...
Page 27: ...PART II Technical Reference 25...
Page 28: ...26...
Page 78: ...76 eircom D1000 modem User s Guide Chapter 5 Wireless LAN...
Page 110: ...10 8 eircom D1000 modem User s Guide Chapter 6 Home Networking...
Page 126: ...Chapter 8 Quality of Service QoS 124 eircom D1000 modem User s Guide...
Page 136: ...134 eircom D1000 modem User s Guide Chapter 9 Network Address Translation NAT...
Page 148: ...146 eircom D1000 modem User s Guide Chapter 12 Filter...
Page 168: ...Chapter 14 Parental Control 166 eircom D1000 modem User s Guide...
Page 174: ...Chapter 15 Certificates 172 eircom D1000 modem User s Guide...
Page 180: ...178 eircom D1000 modem User s Guide Chapter 17 Traffic Status...
Page 182: ...180 eircom D1000 modem User s Guide Chapter 18 User Account...
Page 184: ...182 eircom D1000 modem User s Guide Chapter 19 System Setting...
Page 187: ...185 eircom D1000 modem User s Guide Chapter 20 Time Setting...
Page 188: ...Chapter 20 Time Setting 186 eircom D1000 modem User s Guide...
Page 196: ...Chapter 23 Backup Restore 194 eircom D1000 modem User s Guide...
Page 210: ...Chapter 25 Diagnostic 208 eircom D1000 modem User s Guide...
Page 216: ...214 eircom D1000 modem User s Guide Chapter 27 LED Descriptions...

