ENGINE
3-8
6. Install:
• Fuel tank
Refer to “FUEL TANK” on page 6-1.
7. Adjust:
• Throttle body synchronization
▼▼▼
▼
▼
▼▼▼
▼
▼
▼▼▼
▼
▼
▼▼▼
▼
▼
▼▼▼
▼
▼
▼▼▼
▼
▼▼▼
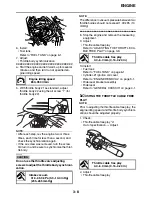
a. Start the engine and let it warm up for several
minutes, and then let it run at specified en-
gine idling speed.
b. With throttle body #1 as standard, adjust
throttle body #2 using the air screw “1” (for
throttle body #2).
NOTE:
• After each step, rev the engine two or three
times, each time for less than a second, and
check the synchronization again.
• If the air screw was removed, turn the screw
3/4 turn in and be sure to synchronize the throt-
tle body.
CAUTION:
ECA14900
Do not use the throttle valve adjusting
screws to adjust the throttle body synchroni-
zation.
NOTE:
The difference in vacuum pressure between two
throttle bodies should not exceed 1.33 kPa (10
mmHg).
▲▲▲
▲
▲
▲▲▲
▲
▲
▲▲▲
▲
▲
▲▲▲
▲
▲
▲▲▲
▲
▲
▲▲▲
▲
▲▲▲
8. Stop the engine and remove the measuring
equipment.
9. Adjust:
• Throttle cable free play
Refer to “ADJUSTING THE THROTTLE CA-
BLE FREE PLAY” on page 3-8.
10.Install:
• Fuel tank
Refer to “FUEL TANK” on page 6-1.
• Cylinder-#1 ignition coil cover
Refer to “ENGINE REMOVAL” on page 5-1.
• Rider seat bracket assembly
• Rider seat
Refer to “GENERAL CHASSIS” on page 4-1.
EAS20630
ADJUSTING THE THROTTLE CABLE FREE
PLAY
NOTE:
Prior to adjusting the throttle cable free play, the
engine idling speed and throttle body synchroni-
zation should be adjusted properly.
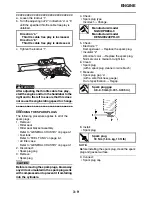
1. Check:
• Throttle cable free play “a”
Out of specification
→
Adjust.
2. Adjust:
• Throttle cable free play
Engine idling speed
850–950 r/min
Intake vacuum
31.3–35.3 kPa (9.3–10.4 inHg)
(235–265 mmHg)
1
4
6
2
1
3
5
2
1
Throttle cable free play
4.0–6.0 mm (0.16–0.24 in)
Throttle cable free play
4.0–6.0 mm (0.16–0.24 in)
a
Summary of Contents for XV19SW 2006
Page 6: ......
Page 8: ......
Page 24: ...SPECIAL TOOLS 1 15...
Page 55: ...LUBRICATION POINTS AND LUBRICANT TYPES 2 30...
Page 60: ...LUBRICATION SYSTEM CHART AND DIAGRAMS 2 35 D D B B D D C C A A B C C B 3 2 1 3 4 6 7 6 7 5...
Page 62: ...LUBRICATION SYSTEM CHART AND DIAGRAMS 2 37 A A A A 1 3 2 4...
Page 64: ...LUBRICATION SYSTEM CHART AND DIAGRAMS 2 39 A 1 2 3 4...
Page 66: ...LUBRICATION SYSTEM CHART AND DIAGRAMS 2 41 A A A 1 5 5 1 3 2 4 B B B B...
Page 68: ...LUBRICATION SYSTEM CHART AND DIAGRAMS 2 43 1 2...
Page 69: ...LUBRICATION SYSTEM CHART AND DIAGRAMS 2 44 1 Transfer gear oil pump 2 Middle driven shaft...
Page 78: ...CABLE ROUTING 2 53...
Page 86: ...CABLE ROUTING 2 61...
Page 89: ......
Page 122: ...ELECTRICAL SYSTEM 3 33 a b 1...
Page 125: ......


