background image

S

CANNING


AND

 C

ONFIGURING

 O

NE

T

OUCH

7

8.

Click on 

OK

 to save the changes.

9.

Place an item in the scanner and click the OneTouch button to start scanning.

The scanner scans and sends the image to the selected destination, with the file format and scan 
configuration you specified.

Properties button

—Displays a window for selecting properties for a destination. This button is disabled if 

the selected destination application does not have global configuration properties.

Refresh button

—Updates the links between all your computer’s Destination Applications and OneTouch. 

If you install new software that can be used as a Destination Application, click the 

Refresh

 button to link 

the new software to OneTouch.

New/Copy/Edit/Delete buttons

—Click 

New

 or 

Copy

 to add new scan configurations to the list. Click 

Edit

 or 

Delete

 to change or remove them. 

OK/Cancel/Apply buttons

OK

 accepts any changes and closes the window. 

Apply

 accepts any changes 

but leaves the window open so you can continue making additional changes. 

Cancel

 closes the window 

without accepting any changes.

S

ELECTING

 O

PTIONS


FOR

 O

NE

T

OUCH

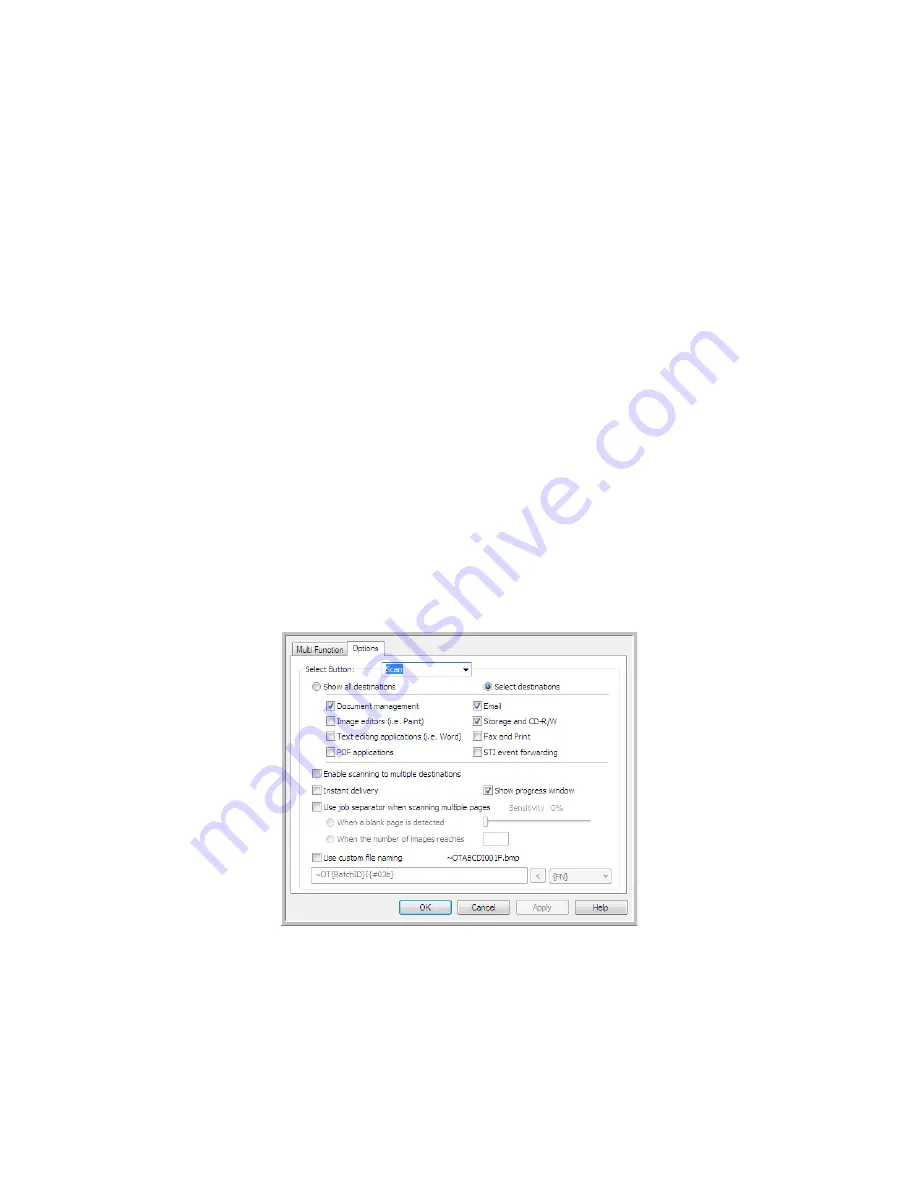
Use the Options Tab to configure how OneTouch works with the selected button, such as which 
destinations are available, or what the file name should be. 

Select Button

—Click the down arrow and select the button for which you want to modify the settings 

from the list. The options you choose in this window only apply to the button you select in this list.

Show All Destinations

—This option selects all of the Destination Application categories. The list of 

Destination Applications available for the selected button will include all the applications on your 
computer that fall into these categories. 

Summary of Contents for ONETOUCH - FOR WINDOWS

Page 1: ...for Windows Visioneer OneTouch User s Guide...

Page 2: ...ered by one or more of the following patents 6 480 304 5 818 976 5 499 108 5 517 332 Microsoft is a U S registered trademark of Microsoft Corporation Windows is a trademark and SharePoint is a registe...

Page 3: ...nd to comply with the limits for the class B digital device pursuant to part 15 of the FCC Rules These limits are designed to provide reasonable protection against interference in a residential instal...

Page 4: ...Configure Before Scan 23 To Scan Using Configure Before Scan 24 Open Scanned Document s 26 Transfer to Storage 27 Setting the Folder and Options from OneTouch 27 Setting the Folder from Windows 28 Sca...

Page 5: ...ge Client 55 Image Editors 57 Image Documents Properties 58 Adding Image Editor Applications to OneTouch 59 PDF Applications 60 Send to Application 63 Scanning to Multiple Destinations 66 Scanning wit...

Page 6: ...ch them to a new email message in your default email program The email application will default to the email program specified in the internet options of Internet Explorer A folder icon for a button m...

Page 7: ...tination list If you select a word processing program such as Microsoft WordPad or Microsoft Word that can be used for OCR such as TXT or RTF the text in scanned images is automatically converted to w...

Page 8: ...Copy to add new scan configurations to the list Click Edit or Delete to change or remove them OK Cancel Apply buttons OK accepts any changes and closes the window Apply accepts any changes but leaves...

Page 9: ...ontinue scanning Enable scanning to multiple destinations select this option to allow for multiple destinations to be selected in the destination list on the OneTouch configuration tab This feature al...

Page 10: ...1 03b inserts a 3 digit image number in the scan batch 001 D inserts the numeric day of the month without a zero added to single digit days 4 DD inserts the numeric day of the month with a zero added...

Page 11: ...ect the scanning resolution brightness mode color black white or grayscale and a number of other settings To see a selected scan configuration s settings click its icon Click the icon again to close t...

Page 12: ...tings tabs please refer to the appropriate section as listed below for instructions on configuring these destination specific options Use the Storage Options tab to choose the storage folder for scans...

Page 13: ...the brightness makes the scanned image lighter or darker Contrast The difference between the lighter and darker portions of the image Increasing the contrast emphasizes the difference between the ligh...

Page 14: ...s and when the scanner supports this feature Straighten image Select this option to let the scanner automatically determine if a page is skewed then straighten its image This option is only available...

Page 15: ...nk originals are discarded before the images are counted For example if you scan 3 pages in duplex mode each side of the page is counted as an image and the total number of images is 6 When Skip Blank...

Page 16: ...or hue the color your eyes see as reflected from the image This option is only available when the selected scan mode is Color Gamma is the tone curve and the starting point for image enhancement As yo...

Page 17: ...ove the specified redaction area from the list Side Click once on the word Front to show the Side option list If you are using a simplex one sided scanner only the Front option will be available If yo...

Page 18: ...Input the upper left corner start position measured from the top of the page Width Input the width of the area to be removed Height Input the height of the area to be removed Color This color field sh...

Page 19: ...of measurement When you click back on the Redaction Settings tab the lower right corner displays the Paper size in the units of measurement you selected Make sure the page size selected on the Page Se...

Page 20: ...tes the file type extension for the scanned file CREATE SINGLE IMAGE FILES The TIFF and PDF formats as well as the text file formats support multiple page documents in a single file If you are scannin...

Page 21: ...t in the medium and large images looking grainy or pixilated PNG The png portable network graphics format is another common image format for web site graphics Like GIF the PNG compression greatly redu...

Page 22: ...ession for better image quality at smaller file sizes Please refer to the official JPEG website at www jpeg org for more information about this file format and a list of applications that can view and...

Page 23: ...r scanning Therefore when you scan a document with the text format selected the text portions of the document are automatically converted to editable text Select a text format for documents with text...

Page 24: ...gure Before Scan simply opens either the TWAIN or WIA scanning interface when you press a button You can then use the interface to change the Resolution Scan Mode and other settings When you scan the...

Page 25: ...on you set up to use Configure Before Scan 2 The TWAIN Interface opens 3 Choose your scan settings such as the Picture Type of Color Grayscale or Black White Resolution in DPI and Page Size 4 Click th...

Page 26: ...type before scanning No Scanning stops but all pages scanned in this batch up to this point are not deleted and the TWAIN interface remains open You can place a new page in the scanner adjust the TWA...

Page 27: ...able in the destination list you must select Document management on the Options tab in the OneTouch Properties window Technical Note If there is no application installed for the file format you select...

Page 28: ...ansfer to Storage as the Destination Application for scanning Click the Properties button to open the OneTouch Link Properties for Transfer to Storage From this window you can change the global defaul...

Page 29: ...e a location directly into the input field You can select a local folder or a folder on a server or mapped drive Open storage folder when scan is complete Select this option to have the folder specifi...

Page 30: ...n to the Transfer to Storage destination Select the button you want updated to use this location This option modifies only the scan configuration that is assigned to the button you select If you have...

Page 31: ...lect Transfer to Storage as the Destination Application 4 Click the New button The Scan Configuration Properties dialog box opens 5 To help you remember which folder it is give the new configuration a...

Page 32: ...ow be set as the Storage Location such as Business Receipts 11 Click OK The new configuration is now listed as a Transfer to Storage configuration 12 Repeat the process to create additional new config...

Page 33: ...Scan to multiple storage folders 1 Insert the document you want to scan to storage 2 Start scanning with the first button that you set to scan documents and transfer to storage 3 When scanning is comp...

Page 34: ...e available when OCR is installed Destination type The Burn to CD ROM destination is classified as a Storage Link To make it available in the destination list you must select Storage and CD R W on the...

Page 35: ...window select Burn to CD and then click the Properties button 7 Make sure a blank CD is in the CD burner 8 Click the Burn to CD button The CD burner begins and your scanned documents are written to t...

Page 36: ...as only uncompressed data can be send to these devices Destination type Printers and Faxes are classified as Device Links To make them available in the destination list you must select Fax and Print o...

Page 37: ...ship of the image s dimensions Select this option so the image s relative proportions remain constant AutoRotate image for best fit If the image is a Landscape format and the device is printing in the...

Page 38: ...r PaperPort From this window you can change the default folder location and options On initial installation of OneTouch all scan configurations send the scanned document to the folder selected in this...

Page 39: ...re must be open before scanning for the scans to be sent to the selected folder in the PaperPort folder pane If PaperPort is not open this option is ignored and the scanned file is sent to the folder...

Page 40: ...Storage and CD R W on the Options tab in the OneTouch Properties window All configuration of the SharePoint server is done using the SharePoint settings tab in the Scan Configuration Properties windo...

Page 41: ...ntains prefix Input the name or value you want as the prefix in the final file name Because the destination configuration is done through the scan configuration you can set each configuration to scan...

Page 42: ...open the Log Viewer from the SharePoint OneTouch Link Properties window There are no global configuration properties for the SharePoint destination application all configuration is done using the Sca...

Page 43: ...you must select Storage and CD R W on the Options tab in the OneTouch Properties window All configuration of the FTP server is done using the FTP Settings tab in the Scan Configuration Properties win...

Page 44: ...ent FTP server destination folder and so on This is the same process used as when scanning to different folders using the Transfer to Storage destination as described in detail starting on page 29 FTP...

Page 45: ...ton to open the Log Viewer from the FTP OneTouch Link Properties window There are no global configuration properties for the FTP destination application all configuration is done using the Scan Config...

Page 46: ...must select Email on the Options tab in the OneTouch Properties window All configuration of the SMTP server is done using the SMTP Settings tab in the Scan Configuration Properties window 1 Open the S...

Page 47: ...nt SMTP server send messages to different email addresses using different user credentials and so on This is the same process used as when scanning to different folders using the Transfer to Storage d...

Page 48: ...ton to open the Log Viewer from the SMTP OneTouch Link Properties window There are no global configuration properties for the SMTP destination application all configuration is done using the Scan Conf...

Page 49: ...count is outside the scope of this document Supported file types All image and text file formats except HTML are available when scanning to an email application Note that text file formats are only av...

Page 50: ...Programs tab and choose a new email client from the program list These are the standard Windows Internet Explorer options Please see your Windows documentation for more information about the Internet...

Page 51: ...ntain a text icon and there will be no text editor applications in the Select destination list Destination type This destination type is classified as a Text Based Link To make it available in the des...

Page 52: ...he OneTouch destination list You can only delete an application that you have added the destinations that are linked when OneTouch is installed cannot be deleted Click in the OCR settings boxes for th...

Page 53: ...Based Link dialog box opens 2 Click Browse to find the application you want to add to the list When you select the application using the Browse button steps 1 and 2 on the dialog box are automatically...

Page 54: ...editing application Most text editing applications will accept plain text txt files Adobe PDF format Select this option if you are adding a PDF viewing or editing application to the list This PDF form...

Page 55: ...s contain images that you want posted to your website with the HTML text 4 Click OK 5 Start scanning using the button you selected for scanning with the HTML format When scanning is finished the docum...

Page 56: ...ard Link To make it available in the destination list you must select STI event forwarding on the Options tab in the OneTouch Properties Window Please note that if you are have turned on the option to...

Page 57: ...l Panel is in Category View Windows XP or Home View Windows Vista and 7 the Scanners and Cameras group will be located under either of the following main groups Windows XP Printers and Other Hardware...

Page 58: ...ake it available in the destination list you must select Image editors i e Paint on the Options tab in the OneTouch Properties window If the image editing application you are using does not appear in...

Page 59: ...stalled cannot be deleted Color document handling Click in the Color document handling settings boxes for the options you want These options will apply to all the applications in the group Convert Bit...

Page 60: ...e has not been compressed Tagged Information File Select this option if your application supports TIF image files The TIF file format supports multiple pages in a single file JPEG Compressed File This...

Page 61: ...tures in the scanned image are isolated from the text the text on the page is recognized and turned into editable text and the pictures are placed back into the document in the same flow as the origin...

Page 62: ...tion button The Add Text Based Link dialog box opens 6 Click Browse to find the application you want to add to the list When you select the application using the Browse button steps 1 and 2 on the dia...

Page 63: ...the PDF image format with a hidden searchable text layer You will not be able to edit the text the file The application you are adding must be able to open pdf files The options you select at step 4...

Page 64: ...file formats that are available when OCR is installed Destination type This destination type is classified as Document Management Link To make it available in the destination list you must select Docu...

Page 65: ...canning you do not need to adjust any of the other settings in this window The default settings will work with most applications The advanced settings are described below 7 Select a file format and sc...

Page 66: ...ill selected then WordPad will open 1 time for each image transferred Command line arguments Input the options that are to be used when the application is launched These values are application specifi...

Page 67: ...each OneTouch button 1 Open the OneTouch Properties window and click on the Options tab 2 Select Enable scanning to multiple destinations then click back on the configuration tab 3 Click each destina...

Page 68: ...uctions as described in the previous section s for configuring destination specific options Click on OK when you are done making changes in this window 5 Select the file format you want for the scanne...

Page 69: ...n instructions as described in the previous section s for configuring destination specific options Click on OK when you are done making changes in this window 7 Click on OK on the OneTouch Properties...

Page 70: ...rent file based on your selected job separator 1 Open the OneTouch Properties window 2 Select the Destination Application File Format and Scan Configuration applicable to your scanning batch Make sure...

Page 71: ...tions selected you might get varying results Changing the sensitivity level allows you to fine tune the accuracy of the blank page detection When the number of images reaches input the maximum number...

Page 72: ...ank page discarded deselect the job separation feature on the Options tab Note that when scanning Duplex both sides of the page must be blank for the job separation to occur If both sides of a scanned...

Page 73: ...VISIONEER ONETOUCH USER S GUIDE 72...

Page 74: ...ge application properties 58 Microsoft Explorer HTML 54 OCR 6 Text application properties 51 Text file format 22 Transfer to Storage properties 34 Document Management 8 Dots per inch dpi 12 23 Duplex...

Page 75: ...e format 6 S Saturation 15 Scan configuration 5 29 Edit or Delete 11 Lock or unlock 12 New 10 Scan Settings Tab 11 Scan to Folder 27 Multiple folders 29 Scanning mode 10 11 23 Screen Resolution 49 58...

Page 76: ...INDEX 75...

Page 77: ...INDEX 76...

Page 78: ...Copyright 2010 Visioneer Inc VC 000 visioneer...

Reviews: