


Upon
first detection
of a given ID, a
grey
tile will appear in the appropriate section (HR or PPM).
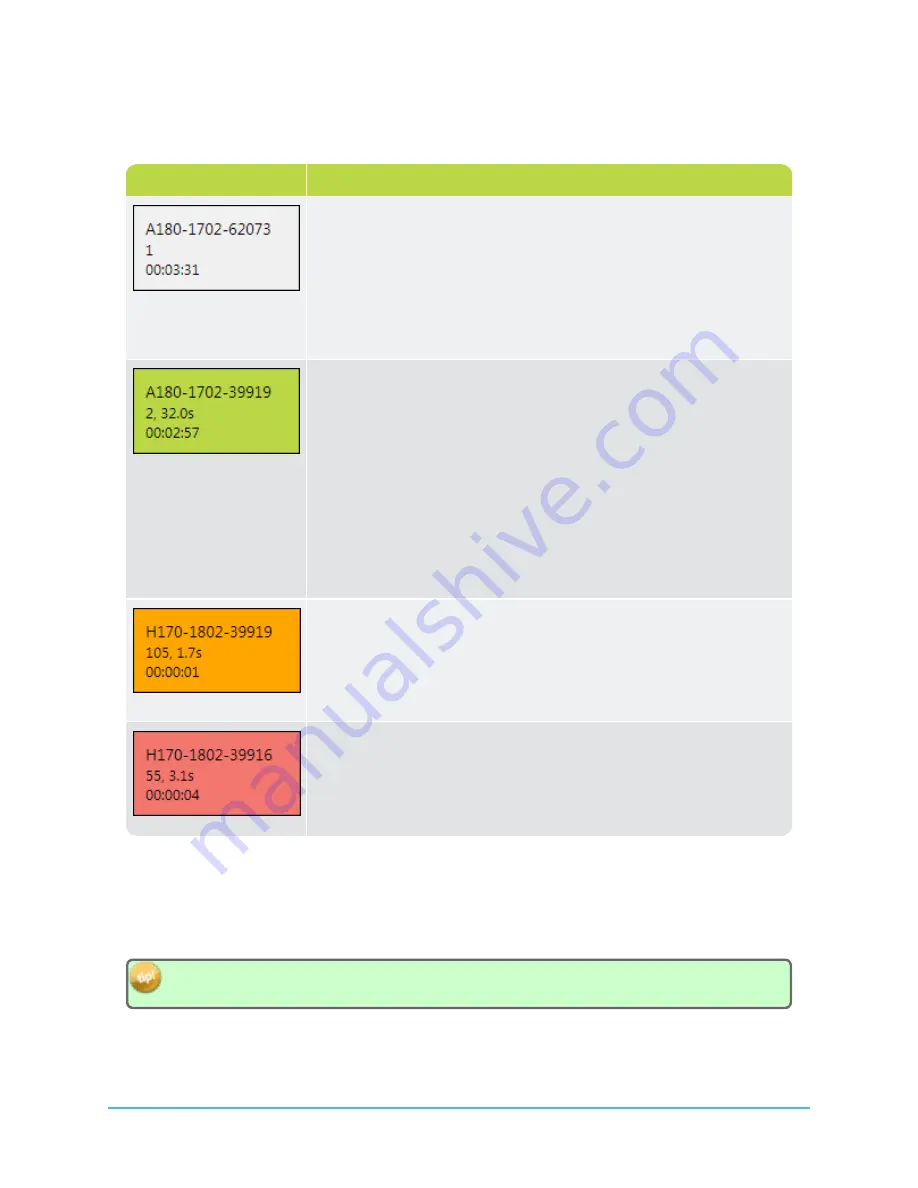
The tiles are
automatically colour-coded
, according to the following set of rules:
Tile colour example
Rule description
Grey - First/initial detection
(HR detection example), needs a
second detection to be validated.
A tile will remain
grey
until a
second
detection of the same ID
occurs. The second detection must be logged
within
the time threshold
specified under
Tile Settings
(see
"Live Tiles Display Settings",
), or the detection will be considered
false
and the tile will
disappear.
Green - Second detection
(HR detection example), detection is val-
idated.
If a
second detection
of the ID
does
occur within the specified time
threshold, the tile will turn
green
to indicate that detections of that ID
are coming in at the expected rate.
Once a tile has turned
green
, it will remain in the display window
until the tile is closed (by clicking on the
red "X"
in the top right
corner of the tile) or the
Clear Tiles
button is clicked.
A tile will remain
green
as long as detections of that ID continue to
come in
within
the time threshold specified under
Tile Settings
.
Orange -
Detection (PPM detection example)
exceeding
the time
threshold limit.
If the time threshold is reached without a new detection coming in,
the tile will turn
orange
to indicate that the detection rate of the ID is
lower than expected.
Red - Subsequent detections
(PPM detection example)
exceeding
the time threshold limit.
If the detection frequency continues to miss the time threshold, the tile
will turn
red
.
3.3.2 Live Tiles Display Settings
The
Live Tiles
display can be filtered to limit clutter on the screen in situations where many tags are
within detection range at once. You may therefore want to focus exclusively on a
subset
of tags.
The time thresholds of the display can also be configured to suit the programming of your particular tags.
To view only HR detections or only PPM detections, collapse the section that you are not interested in
by clicking on the
up/down arrow
to the left of the HR or PPM section header.
40
HR2 Receiver User Guide
Summary of Contents for HR2
Page 1: ......
Page 7: ...vi This page intentionally left blank to ensure new chapters start on right odd number pages...
Page 9: ...viii This page intentionally left blank to ensure new chapters start on right odd number pages...
Page 23: ...14 This page intentionally left blank to ensure new chapters start on right odd number pages...
Page 41: ...32 This page intentionally left blank to ensure new chapters start on right odd number pages...
Page 83: ...74 This page intentionally left blank to ensure new chapters start on right odd number pages...
Page 91: ...82 This page intentionally left blank to ensure new chapters start on right odd number pages...
Page 151: ...142 This page intentionally left blank to ensure new chapters start on right odd number pages...
Page 179: ...170 This page intentionally left blank to ensure new chapters start on right odd number pages...
Page 187: ...178 This page intentionally left blank to ensure new chapters start on right odd number pages...
Page 188: ...179 Appendices Appendices...
Page 189: ...180 This page intentionally left blank to ensure new chapters start on right odd number pages...
Page 191: ...182 This page intentionally left blank to ensure new chapters start on right odd number pages...
Page 193: ...184 This page intentionally left blank to ensure new chapters start on right odd number pages...
Page 195: ...186 This page intentionally left blank to ensure new chapters start on right odd number pages...
Page 197: ...188 This page intentionally left blank to ensure new chapters start on right odd number pages...
Page 203: ...194 This page intentionally left blank to ensure new chapters start on right odd number pages...
Page 207: ...198 This page intentionally left blank to ensure new chapters start on right odd number pages...


