background image

6. HORN  

Type…………………………………………………………..trumpetless, 20.3721000-01 
Sound pressure at the distance of 20 meters at 12V, dB…….. 105-125  
Voltage, V……………………………………………………..11-15 
Current drain at 12 V. A  ………………………………..…….less than 3  
Frequency at 12 V, Hz ………………………………….……..350-450  
 
Mostly the failure of the horn is caused by dirt on the horn diaphragm or by defective push 
button. 

Replace if defective.


The sound level is adjusted by  the 
adjusting screw located on the rear of the horn housing.  
 

7. WIRING  

The motorcycle uses low-voltage wires having the cross section of 1 square mm of PGVA type. 
The high voltage wires are of PVL type.  
See color coding on the diagram (Fig. 119).  


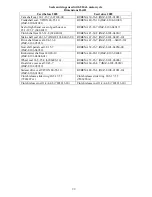
BEARINGS USED ON MOTORCYCLE 

Part # 


Description 


Location 


Qty 


205 
 

Single-row radial ball 
bearing 

Gearbox clutch shaft, 
camshaft 

1/1 
 

208  

Same  

On crankshaft journal 

208 

Same 

In hub of final drive driven 
ring gear 

304 
 

Same 

Gearbox main shaft  

180206  

Same  

Sidecar drive  

180207  

Same  

Sidecar drive  

3056204  

Double-row radial ball 
bearing  

Sidecar drive  

7000111 


Single-row radial 
ball bearing 
 

Sidecar drive  


1000822 

Single-row radial 
ball bearing 

Sidecar drive  

7204 
 

Taper roller bearing 
 

Wheel hub 


12204 

Roller radial 

Gearbox clutch shaft  

778707K 


Radial thrust ball bearing  
 

Steering column 


864708ÄÌ 

Roller radial  
Cage  
Rollers  

Connecting rod big end  

874901 

Needle bearing  

Final drive pinion  

904700 

Needle bearing  

Drive shaft U-joint  

904902  

Needle bearing 

Sidecar drive U-joint  

948066 

Ringless radial ball bearing  Clutch release mechanism   1 

3086304L 

Radial thrust ball bearing   Final drive pinion  


97

Summary of Contents for 750cc Series

Page 1: ...Repair Manual 750cc All Models www imz ural com ...

Page 2: ......

Page 3: ...GEARBOX 58 FINAL DRIVE AND DRIVE SHAFT REPAIR 69 DISASSEMBLY AND REASSEMBLY OF THE FINAL DRIVE AND SIDECAR DRIVE 74 REPAIRING THE WHEELS 81 REPAIRING THE FRONT FORKS 85 INSPECTION AND REPAIR OF THE MOTORCYCLE FRAME 86 SUSPENSION SERVICE AND REPAIR 86 HANDLE BARS AND CONTROL CABLES 87 FUEL SYSTEM 87 REPAIRING THE INTAKE AND EXHAUST 88 SIDECAR REPAIR 88 ELECTRICAL EQUIPMENT 88 BEARING LIST 97 SEAL A...

Page 4: ... for use by qualified service technicians mechanics and engineers During service repair always check positive and negative clearances between mating sufaces to determine if they are within factory tolerences specified in each chapter of this manual Always replace components that are beyond the service limit outlined in each section Always use quality measurement instruments Instruction for disasse...

Page 5: ...parate units changes in the course of prolonged service Quite a number of troubles especially in the engine may remain unnoticed for a considerable time and are usually due to wear of major parts As the major and even less important parts get worn out the engine loses power while the fuel and oil consumption rises Intensified noises in separate units appear while running In the course of operation...

Page 6: ...r of the wheel hub bearings Axle play and radial run out of the wheel rim and tire The wheel spokes for intactness and uniform tension 8 Determine the condition of the front fork by checking Play in the steering column Play of the fork legs in the fork cross piece also play in the bridge and in the fork bottom tips Smooth performance with motorcycle running Any hard knocks while running Springs fo...

Page 7: ... shock absorbers Condition of the sidecar mudguard sidecar body its frame the cushion and seat back the cover and the windshield 15 Determine the condition of the electrical equipment by checking Operations of the ignition lock light switch turn indicators emergency ignition switch day night switch Performance of the ignition system the horn the pilot lights Condition of the wiring and plug and so...

Page 8: ...e to match the color marking of connecting rod small end Piston pin to piston boss Same Same Same Knocking is less clear and becomes louder once engine heats up Same Piston to cylinder Cold Idle speed Same Brittle metallic clink which increases with spe ed variation and becomes less audible when engine is warmed up Similar knocks are audible when piston pin gets seized in connecting rod small end ...

Page 9: ...speeding up irrespective of engine load Motorcycle operation is possible Readjust clearance Grind in valves when repairing Clutch discs Any Clutch engaged Clutch cavity Clear metallic clink Operation can be continued Inspect clutch when repairing engine Flywheel to crankshaft Any Idle running clutch released Rear end of engine Dull loud knocking which disappears once clutch is fully engaged Discon...

Page 10: ...ound and check for sparking between electrodes c if there is no spark when checking as described in Point 6 ignition coil is out of order d remove front cover switch on the ignition close distributor contacts bring a screwdriver to core of ignition coil If low voltage circuit is intact screwdriver will be attracted to core If screwdriver is not attracted to core there is breakdown in circuit a cha...

Page 11: ...el of floating chamber clogged 2 Faulty spark plugs 3 Poor contact of battery terminals 4 Poor sparking 5 Mixture too rich due to float chamber flood a float needle valve either dirty or leaky b float is leaky c carburetor jet loose 6 Carburetor missadjusted 7 Piston rings sticking or damaged 8 Valves not tight in seats due to carbon deposit 1 Backfire in carburetor Check timing or loose rotor 2 S...

Page 12: ...ngine 2 Determine by listening engine running 3 Check clearance with f eeler It should be 0 1 0 15 mm when the engine 1 Power increases once ignition is advanced 2 Lack of compression 3 Lack of compression engine smoking spark plugs fouled with oil 4 Verify them by measuring in repair shop 1 Engine fails to develop speed when running idle a check whether gasoline flows out of float chamber chamber...

Page 13: ...t fails to turn Kick starter pedal fails to return in top returns slowly 1 Clutch fails to engage fully due to misadjusted controls 2 Driven disks oily Misadjusted clutch gear lever excessive play 1 Pawl pawl pin or teeth of kick starter ratchet are either worn or damaged Clutch slips 2 Pawl spring is damaged or weak Kick starter return spring weak or broken or spring pin sheared 1 Check whether c...

Page 14: ...ngs worn Backlash between teeth of gears too small or too great 0 1 to 0 3 mm being tolerated 1 Wear or damage of parts Readjust brakes 2 Play of brake pedal misadjusted Operating the pedal does not results in reaching the position where the gear engages Gear shifting is faultless but foot pedal fails to return after being depressed 1 Knocks when gear shifting Remove final drive and send to repair...

Page 15: ...ings by hand 2 Set motorcycle up on rear stand raise front wheel If excessive play is evident when moving legs up and down this is a sign of front fork being damaged 1 Oil stains on fork leg tips Check condition of seals 2 Check tightening of nuts or seals 1 Cocking of cover Dismantle shock absorber and check condition of parts 2 Same 1 Check condition of spring 2 Dismantle shock absorber check fo...

Page 16: ...d and turning the wheel by pressing the wrench lightly to spokes determine by sound if spokes are tensioned uniformly or not 1 Check by visual inspection 2 First make sure that the cause of trouble is not as described in p 1 and 2 Without removing the wheel check for wobble 3 With motorcycle set on stand rotate the wheel Check run out which should be within1 5 mm on wheel rim 1 Oil leaks from unde...

Page 17: ...ition by outside inspection check for seizing of cable in the sheath 1 Trouble is remedied as soon as adjusting screw is tightened up 2 Tightening of adjusting screw does not remedy trouble 1 Readjust and try out rear brake action 2 After readjustment as instructed in p 1 brake shoes are slipping 3 After readjustment as in structed in p 1 brake shoes are slipping 1 Same as for rear wheel 1 Loosen ...

Page 18: ...d when horn button is depressed 1 Kill switch Off 2 Lamp is blown 3 No contact on term inals of pilot lamp socket 4 Safety fuse of ignition system is blown 5 No contact a on battery terminals b on terminals of ground c on battery terminal c on alternator d on terminals 2 and 3 of master switch e on positive and ground terminals of voltage regulator f on ground terminal of engine g on safety fuse t...

Page 19: ...amp bulbs is blown 2 Break in wire past front lamp 1 No contact on terminal of alternator 2 Alternator is faulty 1 Poor contact on terminals of alternator 1 Fuse blown in fuse box 2 Some internal fault of turn relay 1 Turn indicator lamp bulb blown 2 No contact in wire terminals 3 No contact between indicator housing and ground 1 Check contacts for cleanliness and tightness check that wiring is in...

Page 20: ...ng them from side to side The wheels should rotate freely without noticeable play seizing clicks etc The tolerated run out and play of the rim is as follows radial run out 1 5 mm axle play 1 5 mm the run out of tire radial and axle 3 mm The uniform tensioning of spokes shall be determined by sound when slightly striking against them Determine the condition of the front fork the rear suspension tha...

Page 21: ... see subsection 4 the storage batteries see subsection 13 Disconnect the wires leading to the horn and the ignition coil Remove the housing of electronic ignition unit Remove spark plugs be sure no contaminates enter the plug holes Put the high voltage wires with lugs under the alternator Undo the cover fastening screws of carburetor throttle valves and remove the valves Reinstall the throttle val...

Page 22: ...IDECAR To detach the side car Set up the motorcycle on the stand Disconnect the plug and socket connector leading to the sidecar lamps Undo the nuts of upper bolts fastening the side car frame tie rods to the motorcycle and extract the bolts Undo the bolts of bottom clamping holders which fasten the side car frame to the motorcycle and loosen them approximately by 12 to 15 mm Remove the sidecar wh...

Page 23: ...ssembly loosen mufflers nuts Take out the ends of header pipes from the cylinder heads and adaptors Take apart the header pipes from the adaptors Moving the muffler to the rear take it out of the in assembly with adaptor Reinstall the exhaust system in the reverse order 5 REMOVING AND REINSTALLING THE FUEL SYSTEM In order to remove the gasoline tank Drain gasoline out of the tank Remove the hoses ...

Page 24: ...rive together with the propeller shaft proceed as follows Set the motorcycle on the stand and remove the rear wheel see subsection 6 Remove the wing nut of the rear brake tie rod the nuts of studs fastening the final drive to the swinging fork arm Detach the final drive from the swinging fork arm and remove it from the rear Take the flexible joint flange off the propeller shaft to facilitate its p...

Page 25: ...he thrust ball bearings are in place and intact Lubricate the balls in the bearing with grease Litol 24 Tighten up the bearing nut so as to ensure unobstructed rotation of the fork in the bearings without seizing and noticeable play tighten it to the limit then loosen 1 6 1 8 of a turn The tightening torque of the steering column stem nut should be 49 61 Nm 10 REMOVING AND REINSTALLING THE SWING O...

Page 26: ... battery fastening band and remove the storage battery To remove the alternator Disconnect the wires from the output terminals Undo the air box and take it out Remove the nuts fastening the alternator and remove the alternator by shifting it to the rear To reinstall the alternator reverse the sequence of the operations Make sure to set a proper clearance in the mesh of drive gears Reinstall the al...

Page 27: ... rocking arms and the push rods so as not to mix them up when reassembling Having removed the heads remove deposits from them wash and inspect To check the valves for proper seating flood the intake and exhaust ducts of the cylinder head in turn with kerosene Absence of leaks is ample proof of proper seating of the valve If neces sary remove the valves take measurements and repair refer to Repairi...

Page 28: ...linder and move the cylinder into the distance bar until it stops Remove distance bar 346 697 undo the nut of device 346 692 and remove it Make sure that the sealing caps of the push rod tubes are correctly positioned the arrow marked on the sealing cap should be in top position and tightly fitted in place Removing and Reinstalling the Piston and Piston Rings The engine may be left on the motorcyc...

Page 29: ...unt piston rings Fig 3 Pressing out the piston pin Fig 2 Compression of piston rings to insert them into the cylinder Fig 1 Crank handle 345 316 3 to crank the engine crankshaft 346 697 346 692 345 439 3 346 320 Fig 5 Piston pin mounting 29 ...

Page 30: ...e oil filter from the distributor box cover unscrew the filter plug and take off the filter together with the by pass valve arranged therein and take the filter from the plug end Then wash the parts inspect them and change the oil filter if required Reassemble the filter in the reverse sequence of the operations having preliminarily soaked the filter in oil and inserted a rubber packing bushing Wh...

Page 31: ...Removing and Reinstalling the Camshaft with the timing covers both cylinders and tappets removed Required tools are backlash indicator 450 182 for measuring the backlash between the teeth of timing drive gearing device 450 212 for measuring the face runout of timing drive gearing mandrel 345 327 3 for removing the camshaft mandrel 345 341 3 for pressing in the camshaft Before removing the camshaft...

Page 32: ... of removed guide of the left cylinder intake valve By bringing close the camshaft cam press out the camshaft with a turn of the mandrel Fig 10 Having removed the shaft wash the parts inspect and make necessary measurements To change worn out parts refer to Repairing the Valve Timing Mechanism To reinstall the shaft reverse the sequence of the operations Prior to pressing in lubricate the camshaft...

Page 33: ...observing the given sequence the clutch driven plate the intermediate plate the clutch driven plate and the thrust plate Fit the splined mandrel of the tool having matched the holes in the driven plates and the clutch pressure plates Fit the tool 345 429 3 and by driving in the screw of the tool compress the springs Fig 12 Having matched the holes in the thrust plate with the flywheel pin holes tu...

Page 34: ...ng the engine sump remove the sump together with the gasket Uncotter and take off the pump filter Turn off two bolts fastening the pump and remove the oil pump together with the bar assy Wash and inspect the pump If necessary dismantle it change worn out parts reassemble and check its performance At a speed of 670 rpm the oil pump should develop a pressure of at least 0 4 MPa Use spindle oil grade...

Page 35: ...onary press for pressing in the crankshaft into the front bearing To remove the crankshaft Unbend the lock washer of the bolt fastening the timing drive gear turn off the bolt remove the drive gear with the help of puller 345 339 3 and remove the drive gear key Fig 14 and 15 Remove the seal from the rear bearing housing Remove the lock rings from the rear bearing housing and crankshaft journal mak...

Page 36: ...0 Removing and reinstalling of the crankshaft Use puller 346 693 Fig 21 to remove the bearing from the front journal of the crankshaft The cage of the bearing must be broken and balls displaced to position the device between internal and external cages of the bearing Remove the safety wires from the bolts fastening the front bearing housing and undo the bolts Making use of device set 346 720 Fig 2...

Page 37: ...nce of operations Press in the front housing with bearing into the crankcase using hand press and tool kit 346 720 Fig 24 to 29 Screw in four bolts and lock them with wire When positioning the crankshaft in relation to the engine crankcases as shown in Fig 20 see to it that the keyway in the crankshaft is located on top enter the connecting rods into the crankcase guiding them into the holes provi...

Page 38: ...ankcase with varnish apply gasket on the rear housing and press in the rear bearing housing into the crankcase 33 35 Having coated the half of thread of bolts with enamel ML 12 fasten the housing When the bolts are reused remove the old coating first and degrease Tighten the bolts in a criss cross manner the tightening torque being the same as for the front housing 38 ...

Page 39: ...ticular those of the journals on which the main bearings are fitted To determine the condition and fitness of the crankshaft for further service measure the following Wear of the connecting rod small end bushes Radial play in the connecting rod big ends Axial play in the connecting rod big ends Run out of crankshaft main journals relative to each other Turning of the crankpins Alignment of the con...

Page 40: ...77 930 77 940 78 020 78 030 0 080 0 100 B B 77 920 77 930 78 010 78 020 0 080 0 100 À A 0 080 0 100 77 910 77 920 78 000 78 010 Group index is stamped on piston head and on top end face of cylinder 21 0 010 21 0 065 0 0035 66 01238 01 Piston pin outer diameter 66 01237 Piston hole in boss White White 21 0000 20 9975 20 9930 20 9905 0 0040 0 0090 Black Black 20 9975 20 9950 20 9905 20 9880 0 0040 0...

Page 41: ...ite 21 0095 21 0070 0 007 0 012 Black 20 9975 20 9950 Red 20 9950 20 9925 Black 21 0070 21 0045 Red 21 0045 21 0020 0 007 0 007 0 012 0 012 Green 20 9925 20 9900 Green 21 0020 20 9995 0 007 0 012 Color indexes are marked on bore of one of pin end faces and on connecting rod stem at small end Hastings Compression ring ring height 1 5 0 03 IIMZ 8 128 01237 30 Piston groove width 1 5 0 02 0 01 0 07 H...

Page 42: ...ge width 17 0 17 IMZ 8 106 01233 Connecting rod width of big end 17 2 0 035 0 165 0 370 6601207 Cage 49 7 0 100 IMZ 8 106 01027 Connecting rod assembly 50 0 018 0 300 0 418 IMZ 8 106 01201 211 Crank journal IMZ 8 106 01201 Crank front journal 40 0 010 0 006 40 0 02 0 003 6601208 Cage 5208 Ball bearing 42 0 17 40 0 008 1 990 2 176 0 028 0 003 IMZ 8 106 01211 Crank journal 40 0 02 0 003 5208 Ball be...

Page 43: ...ousing IMZ 8 106 01136 Front bearing housing 80 0 0012 0 026 80 0 005 0 024 0 004 0 003 0 028 0 024 IMZ 8 123 01401 Camshaft 22 0 062 0 039 62 01424 Oil pump drive camshaft gear 22 0 023 0 016 0 062 IMZ 8 123 01401 01 Camshaft 22 0 062 0 039 72 01406 01 Camshaft gear 22 0 023 0 016 0 062 IMZ 8 123 01401 01 Camshaft 22 0 014 72 01107 Camshaft bushing 22 0 105 0 080 0 080 0 119 72 01107 Camshaft bus...

Page 44: ...2 0 059 ÈÌÇ 8 101 01058 Right hand rocking arm 15 0 027 0 032 0 086 IMZ 8 106 01507 Valve seat 38 2 0 l19 0 080 ÈÌÇ 8 101 01502 503 Cylinder head 38 0 050 0 230 0 319 IMZ 8 106 01524 Intake valve seat 44 2 0 119 0 080 ÈÌÇ 8 101 01502 503 Cylinder head 44 0 050 0 230 0 319 62 01505 Valve guide 14 0 080 0 06Ç ÈÌÇ 8 101 01502 503 Cylinder head 14 0 035 0 028 0 080 IMZ 8 106 01050 Exhaust valve 8 0 02...

Page 45: ...ank Mechanism of subsection 2 Cylinder to piston 0 200 Measure piston in plane square to pin axis at point 5 mm from the piston lower edge Piston pin 0 015 Hole in piston to fit pin 0 020 Piston to piston pin 0 010 Connecting rod small end bush 0 025 Piston pin to connecting rod small end bush 0 030 Compression ring height 0 050 Piston groove to piston ring 0 150 by depth Piston groove to oil cont...

Page 46: ... each other in centers using an indicator The run out shall be within 0 05 mm Fig 37 Should the actual run out exceed this value the crankshaft has to be straightened out The pointers of both indicators should deviate in the same sense i e positive or negative Fig 37 2 and 3 If the indicator pointers read different values Fig 37 1 change the crankshaft If the pointers of indicators read the same n...

Page 47: ... inside caliper in five different sections points spaced 9 16 64 74 and 84 mm from the cylinder top plane Take measurements in two different planes in the plane of connecting rod travel and in the plane square to the former If the cylinder face is out of round in excess of 0 07 mm while the taper or wear exceeds 0 15 mm the cylinder must be replaced The damaged push rod tubes and the cylinder head...

Page 48: ...le in piston ring grooves as well as in case of scratches on the piston skirt replace the piston When changing the piston for the first time and when the cylinder is but highly worn out and does not require reboring or refacing select the piston of the normal size to match the actual size of the cylinder refer to Table 4 In selecting the size of the piston consider its mass as well for it will inf...

Page 49: ...es valve guide springs valve seats and to take the necessary measurements to determine wear remove the valves To remove the valves Fasten the cylinder head on the tool 345 553 fit the lever on the stud securing the cylinder head cover and secure the lever Turning the lever compress the valve springs and remove the slide blocks Fig 40 Turn the lever round the stud and remove the side blocks from th...

Page 50: ...Fig 40 Removing the valve springs Fig 41 Measuring the side play between the valve and bush guide 50 ...

Page 51: ...32 with mandrel 345 558 for grinding the valve seats When cutting take off the minimum amount of metal necessary for removing all the defects on the valve seat chamfer With misalignment of the seat chamfer check the width and layout of the latter relative to the valve head chamfer surface To this end coat the valve seat chamfer with a thin layer of paint Berlin blue and fit a respective valve turn...

Page 52: ...the data given in Table 6 Having completed the checks measurements and repair reinstall the valves by reversing the sequence of operations use graphite grease to lubricate the valve stems prior to fitting them in place Valve drive rocking arms Required tools are Micrometer up to 25 mm Inside caliper with indicator measuring range 10 18 mm and 0 01 mm scale division Mark the rocking arms the rocksh...

Page 53: ...ket Reassemble the left hand rocking arm in the same manner as described above but position the brackets as indicated in Fig 43 If the adjusting bolt has been turned out of the rocking arm reinstall it and drive in to the limit then fit a lock nut Push rods Remove the push rods inspect and check its ends to reveal wear possible damage see whether the rod is straight If the ends are worn out substi...

Page 54: ...the gear faces electrographically When inspecting the gears both used and new ones pay special attention to the condition of their teeth faces as even slight burrs and dents on a tooth will lead to noisy performance of the gearing Remedy by filing the burrs and dents properly Information for removing the crankshaft gear is given in the Removing and Reinstalling the Crankshaft To remove the camshaf...

Page 55: ...s burrs etc from the gaskets formerly installed grit on the planes of joints Worn out spots on fitting planes especially in the points where the bearing is fitted Loose studs stripped thread Untightness of flaring or pressing in of pipes Wear of the camshaft rear bearing bushing Scores of the oil pump drive bushing Wear and scores in the holes for the breather on the gearbox cover Eliminate the de...

Page 56: ...o run in the engine reinstall the gearbox set the engine on the stand and perform all the necessary connections header pipes gasoline feeding pipes ignition wiring etc Prime the engine and the gearbox before running in Table 8 Running in Schedule Schedule Rotational speed Min 1 Running time min Gear engaged Load kg Cold running from an external prime mover 850 15 IV Hot running 600 750 2500 5 25 I...

Page 57: ...s With the throttle valves fully lowered there should be a clearance within 2 3 mm between the cable sheaths and the sheath guides almost the same for the right and left hand carburetors Having adjusted the carburetors for in step operation lock the guides in place Adjustment of the mixture composition under partial load duties is performed by shifting of the throttle metering needle in relation t...

Page 58: ...t it in place Fit home the clutch release slider exercising care not to damage the slider rubber ring against the edge of the gear case Fit the clutch release arm and lock it with a cotter pin Fig 44 Removing the Clutch Release Mechanism Removing and Reinstalling the Speedometer Drive Remove the speedometer drive as follows Undo the bolt of the drive bushing and remove the thrust bushing Fig 45 Po...

Page 59: ...nd the cover projections to force the shafts together with the cover out of the gear case Having unbent the lock washer undo the bolt fastening the reverse gear shift fork remove the fork Take the axle and bracket with an intermediate gear out of the cover Take the kick starter shaft together with the gear out of the cover Remove the forks shaft shafts Press out the clutch and main shafts from the...

Page 60: ...het bracket with bolts and lock them with wires Screw in the return spring stop the cylindrical end of the stop should locate between spring ends Screw in the adjusting screws Set the spring onto the reverse gear quadrant Insert the quadrant shaft into the gear case cover hole Set the reverse gear shift lever onto the shaft splines and fix it Fig 48 Gear case cover To reinstall the gearbox shafts ...

Page 61: ...equired for reassembly are mandrel 346 298 for pressing the gear case on the cover with shafts and spanner 36Õ41 For reassembly Install the cover with shafts with the joint face upwards Coat the joint faces with Locktite Set the shims into the blind hole in the crankcase and grease them Fig 55 Set the pin of mandrel 346 298 in the clutch shaft seal Place the gear case on the clutch shaft bearing t...

Page 62: ...wards and check the shafts for ease of rotation Fails the clutch shaft rotate easily jump it into the hole for the slider same with the main shaft on the flexible coupling plate using mandrels Fig 58 and 59 Check operation of starter mechanism and its spring The tolerable axial movement of the starter shaft is 1 0 mm Press the plate onto the splines using device 345 943 fasten and splint Fig 60 Se...

Page 63: ...e quadrant shaft for soundness of locking of the roller in the flute of the quadrant using 10 mm wrench When it is not locked properly the stop is maladjusted Pos 7 and 8 Fig 63 Note The gearshift mechanism is factory adjusted This operation requires skills and should be proceeded only when major repair or replacements of parts of gear shift mechanism Should a gear disengage spontaneously the stop...

Page 64: ...aring 20 0 003 0 013 0 001 0 030 ÈÌÇ 8 103 04326 Main shaft rear bearing 20 0 007 0 020 304 Ball bearing 20 0 003 0 013 0 023 0 006 205 Ball bearing 52 0 004 0 017 ÈÌÇ 8 103 04101 Gear case 52 0 008 0 023 0 025 0 027 304 Ball bearing 52 0 004 0 017 ÈÌÇ 8 103 04101 Gear case 52 0 008 0 023 0 025 0 027 12204 Roller bearing 47 0 003 0 014 ÈÌÇ 8 103 04110 Gear case cover 47 0 020 0 047 0 006 0 050 IMZ...

Page 65: ... 0 046 0 093 IMZ 8 103 04401 Kick starter shaft 18 0 016 0 033 IMZ 8 103 04119 10 Kick starter shaft front bushing 18 0 035 0 016 0 068 IMZ 8 103 04401 Kick starter shaft 20 0 041 IMZ 8 103 04110 Gear case cover 20 0 085 0 025 0 045 0 126 IMZ 8 103 04 236 10 Main shaft 23 4 0 040 0 070 IMZ 8 103 04062 Gear 1 assy 23 4 0 033 0 040 0 103 IMZ 8 103 04304 I and II gear shift fork 5 0 160 0 240 IMZ 8 1...

Page 66: ...e parts Repairing the Speedometer Drive Proceed with repairs when wear of teeth becomes obvious the speedometer fails to operate though the flexible shaft is intact or in case of dismantling the gearbox in general When repairing change worn out parts paying attention to ease of rotation of the gearing and proper backlash in the toothing with the flexible coupling flange stopped in any position the...

Page 67: ... Required tools and fixtures are Puller 345 330 3 for removing the roller bearing cone from the clutch shaft Puller 345 441 3 for pressing out the clutch roller bearing cup Having removed the clutch shaft from the gearbox wash it and inspect thoroughly Check condition of bearings gear teeth wear scores pitting the tightness of the IV gear fit and condition of splines If any defects are revealed di...

Page 68: ...h the pawl axle at both sides in two opposite points Insert the shaft bushing pin with its thin end on the opposite side of the pawl and press it flush with the bushing Make sure that once the shaft is reassembled the gear turns freely on the shaft The pawl tooth should fit tightly with its working edge into the gear ratchet tooth Repairing the Gear Case Required tools and fixtures are Mandrel 345...

Page 69: ...r to the shank end face Insert the wedge from the side of the boss with the shear facing the shank end With the nut tightened up the wedge bolt head should not sink in the boss This is achieved by using shims of different thickness to be placed between the splined fork end face and the double row radial thrust ball bearing The tightening torque of the wedge bolt should be 6 86 8 82 Nm To dismantle...

Page 70: ... holding the hub by hand knock slightly against the axle end to press the cover from the bearing Fig 66 Pos 4 Press the ball bearing from the driven gear hub through the holes in the gear using a drift for the purpose Unscrew the nut fastening the pinion gear bearing by turning it clockwise left hand thread and remove the sealing ring Take care to keep the bearing from cocking when removing Fig 66...

Page 71: ...1 2 3 4 5 6 7 8 Fig 66 Final drive 71 ...

Page 72: ... pinion 13 0 019 0 007 72052 1 Needle bearing 13 0 010 0 007 0 029 72051 1 Needle bearing 32 0 011 ÈÌÇ 8 101 05101 Final drive casing 32 0 007 0 035 0 004 0 035 72 05104 01 Final drive casing bush 54 0 065 0 045 ÈÌÇ 8 101 05101 10 Final drive casing 54 0 030 0 015 0 065 207 Ball bearing 72 0 004 0 017 IMZ 8 103 05229 Final drive ring gear hub 72 0 008 0 040 0 009 0 044 ÈÌÇ 8 101 05121 Final drive ...

Page 73: ...he bevel gear pair which should be within 0 10 to 0 30 mm By visual inspection determine the condition of Oil seals Casing bushing that serves as outer race for the roller bearing of the driven gear hub Side surfaces of the distance bushing Race of the roller bearing and the teeth of the driven gear hub meshing with the wheel hub Ball bearings Bevel gearing teeth wear pitting crumbling of the work...

Page 74: ...7 Pos 10 using an appropriate tool Press off the collar from the final drive case using a mandrel Fig 67 Pos 11 Press off the external cage of the roller bearing of the hub using an appropriate tool Fig 67 Pos 12 Remove shims from the final drive cover Remove distance rings and adjustment ring from the final drive hub Using an appropriate tool remove hub in assembly with the driven bevel gear from...

Page 75: ...1 2 3 4 5 6 7 8 9 10 11 12 13 14 15 16 17 18 Fig 67 Final drive with disengageable sidecar drive 75 ...

Page 76: ...the final drive Using a mandrel press the driving bevel gear with bearings until it stops into the final drive gear case Fig 69 Oil the internal diameter of the nut fastening the bearing of the driving bevel gear and the circumference with the with transmission oil fill the space between the edges of the collar with grease and press the collar into the nut using a mandrel Put rubber packing ring o...

Page 77: ...the splined hub jump it until the lock ring gets into the groove With the groove inside the final drive cover set the drive shift sleeve onto the splined hub Set two keys into the shifting fork install the fork with the key into the drive shifting sleeve having faced the longer part of the fork to the threaded hole of the lock Fig 79 Oil the fork shaft with transmission oil Fig 79 Installing the s...

Page 78: ...ls of the driven gear hub with transmission oil Set the driven gear hub into the support Set the distance bushing into the driven gear hub Fig 83 Oil the circumferences of seal 24 35 7 with transmission oil pack the cavity between the collar lips with grease and press the collar into the driven gear hub Oil the seat for bearing 1000822 in the driven gear hub with transmission oil Put the final dri...

Page 79: ...r case as well as with adjustment rings on the driven gear hub Set the mandrel on the splined end of the driven gear Oil the circumference of collar 45 60 8 with transmission oil pack the cavity between c0llar lips with grease and press the collar into the final drive case using the mandrel Fig 90 Install brake shoes into the final drive matching marks made before Fig 91 Install shims onto the spl...

Page 80: ...the shaft Fig 93 Pos 2 3 Undo two bolts fastening the sidecar wheel shaft to the sidecar chassis Remove the wheel shaft from the sidecar chassis Remove the distance ring from the splined bushing Remove bearing 180206 from the sidecar wheel shaft Fig 93 Pos 3 Take out the distance bushing Fig 93 Pos 4 Using the mandrel remove the splined bushing in assembly with bearing 180207 from the wheel shaft ...

Page 81: ...e center of rim well and use tire irons inserting them from the opposite side of the rim to catch the tire bead and twist it outside through the rim shoulder Smear the tire iron ends with liquid soap to facilitate inserting By moving both irons along the rim and pressing the tire beads into the rim well from the opposite side gradually remove the whole tire bead When removing make sure that the ir...

Page 82: ... roller bearing and the right hand distance bushing out of the wheel hub Using mandrel 345 324 3 presses out the thrust washer and the roller bearing cup Wash and inspect the dismantled parts Change all the defective parts Reassemble the wheel hub as follows Fit the thrust washer and the right hand distance bushing into the hub inserting the shoulder of the latter into the thrust washer groove Pre...

Page 83: ...ube Repairing the Wheel Hub Repair the wheel hub when The brake drum working surface is worn out The hub splines are worn out The taper roller bearings and spacers are worn out Other signs of damage are evident which make the wheel service impossible In case of wear of the brake drum working surface wear of bearings and other damages change the faulty parts for new ones Repairing the wheel brake d...

Page 84: ...rim holes arranged between the nipples of intersecting short spokes slide the spoke heads into the holes on the hub smaller flange from the outside the head of installed spoke should lie on the inside of the flange facing the drum and drive the nipples to about 3 4 of the thread length Drive the nipples on the ten remaining long spokes inserting them into the unoccupied holes and sliding the spoke...

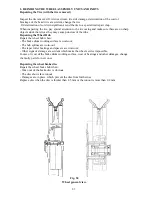
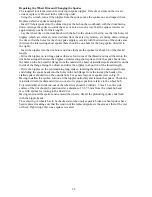
Page 85: ...e the fork leg For easier operation do the nut into the front fork tube for 4 5 turns hammer out the tube from the crosspiece cone using a rubber hammer Reverse the sequence of operations to reassemble the front fork Whilst tightening the nut to provide the tight sit of the cone in the fork crosspiece loosen the nut of the coupling bolt first and tighten it after the tightening of the clamp nut Di...

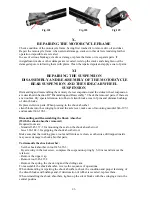
Page 86: ...blocks Replace defective parts When pressing in the shock absorber silent blocks into the swinging fork and the axle lever make use of mounting mandrel 346 197 3 and mandrel 346 198 3 Dismantling and Reassembling the Shock Absorber With the shock absorber removed Required tools are Mandrel 345 337 3 for mounting the seal on the shock absorber rod Jaws 366 144 3 for gripping the shock absorber rod ...

Page 87: ...joint of the control cable and its tip is disturbed the tip slips off the cable solder a new tip on spreading the cable end wires apart prior to soldering to ensure proper tightness of the Joint The handlebar control levers should be screwed on to the seats clips so as to ensure their free pivoting around their axes and preclude at the same time any play of the levers in the clips When inspecting ...

Page 88: ...cement some straps may be welded on the inside of the cracked spots After welding straightening out and trimming touch up the damaged spots with a coat of paint or repaint the whole body Originally grade ÌË 12 enamel is used at the Manufacturing Works for painting followed by hot drying Repairing the sidecar frame Repair the sidecar frame at the time when the motorcycle is dismantled for repaintin...

Page 89: ... storage battery side Examine the battery for damage cracks in the cells dependable connection of the battery terminals to binding posts and possible electrolyte leaks Estimate the battery discharge by measuring the density of electrolyte provided that initial density of the fully charged battery is known and no electrolyte was added in service guiding by Table 14 Table 14 Battery Discharge Estima...

Page 90: ...f the storage battery Start the engine Whilst starting the voltage should drop to 9 5 V Engine speed of 3500 4000 rpm should produce voltage of 13 5 15 5 VDC When so the alternator and voltage regulator are intact Precautions To prevent the alternator from damage all required precautions should be followed Disassemble and repair the alternator only with shops having specialized equipment In the ev...

Page 91: ...nd distance ring from the drive casing Remove the drive seal Remove the rubber damper from the casing Making use of wrench 346 709 undo the damper casing from the alternator shaft Remove the distance bushing from the alternator Replace worn out or damaged parts preventing the alternator from further use Fig 107 Alternator with drive general view Fig 108 Removing the alternator gear To assemble the...

Page 92: ... to the torque of 50 60 N m Splint the nut Fig 112 Pressing the drive shaft in Fig 113 Pressing the key in Fig 114 Pressing the gear on Set the distance bushing onto the drive shaft Do the damper housing to the torque of 30 50 N m using wrench 346 709 Fig 115 Pos 1 Install three rubber dampers into the damper housing Fig 115 Pos 2 Match the holes with the alternator studs the way that the lobe of ...

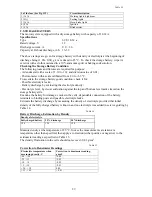
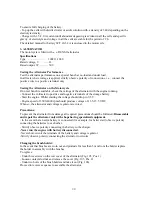
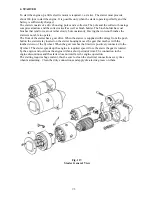
Page 93: ...e front of the starter has a gear drive When the starter is supplied with voltage from the push button the starter relay located on the starter housing moves the gear that meshes with the toothed crown of the flywheel When the gear reaches the limit it is positively connected to the flywheel The starter speeds up the engine to required speed Once the starts the gear is rotated by the engine and ov...

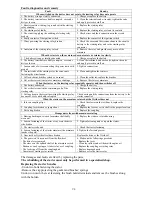
Page 94: ...en switches off 1 The battery exhausted 1 Charge the battery 2 Cut or short circuit in the restraining coil of the starting relay 2 Replace the starting relay 3 Voltage drop in the circuit powering the starting relay because of wire ends badly corrupted Check wiring and the connections from the battery to the starter connector When the starter on the armature rotates but the flywheel does not 1 Id...

Page 95: ... ignition coil and fasten the unti with two M5x10 screws Connect leads K3 and black and red correspondingly of the microprocessor unit to terminals of ignition coil see Wiring Diagram Connect wire 12 connecting the ignition lock and ignition coil terminal see Wiring Diagram Ignition timing Set the crankshaft of the engine into position corresponding the initial advance angle in accordance with the...

Page 96: ...2 1 2202 3803 28 High beam A12 1 2 1 2202 3803 57 Gearbox neutral indication A12 1 2 1 Side car front light 0033 003712 Front side lamp right hand Front right hand indicator A 12 8 A12 21 3 8 2 25 0 Side car tail light 0065 003716 Rear side lamp right hand filament 6 W and stop light on side car filament 25 W Rear direction indicator right hand A12 21 5 A12 21 3 25 6 25 0 Motorcycle tail light 006...

Page 97: ...row radial ball bearing Gearbox clutch shaft camshaft 1 1 208 Same On crankshaft journal 2 208 Same In hub of final drive driven ring gear 1 304 Same Gearbox main shaft 1 180206 Same Sidecar drive 1 180207 Same Sidecar drive 1 3056204 Double row radial ball bearing Sidecar drive 1 7000111 Single row radial ball bearing Sidecar drive 1 1000822 Single row radial ball bearing Sidecar drive 1 7204 Tap...

Page 98: ...Fig 11 iring Diagram 9 W 98 ...

Page 99: ... 04015 10 Drive shaft fork seal 49 4 33 8 IMZ 8 101 05033 RUBENA 47 36 7 IMZ 8 103 04015 10 Gear shift pedal seal 32 15 7 IMZ 8 103 04050 RUBENA 32 15 7 IMZ 8 103 04050 01 Kick starter shaft seal 40 20 10 IMZ 8 101 04048 01 RUBENA 40 20 10 IMZ 8 103 04048 Wheel seal 36 5 25 8 6206006 10 RUBENA 35 25 7 IMZ 8 103 06006 Final drive case seal 59 45 7 IMZ 8 101 05039 RUBENA 60 45 8 7 IMZ 8 103 05039 Si...

Reviews: