

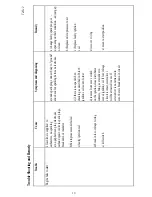


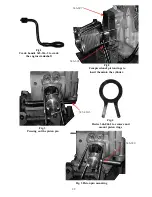


2. REMOVING AND REINSTALLING THE GEARBOX
To take off the gearbox without removing the engine from the motorcycle:
- Remove the air cleaner, the storage battery;
- Disconnect the adjusting bolt of the clutch control cable from the clutch engaging lever at the
gearbox;
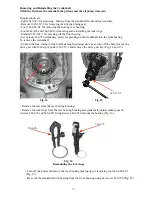
- Undo the bolt of speedometer drive bushing,
take out the
speedometer drive and shift aside,
then reinstall the
bolt;
- Disconnect the wire from the contact (switch)
of the neutral;
- Remove the rear wheel, the final drive, the flexible coupling joint
driven
flange with the
flexible coupling joint driving flange of the gearbox.
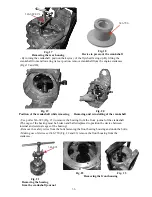
- Undo three nuts and a fastening bolt located under the right-hand cylinder which fastens the
gearbox to the engine crankcase;
- Shift the gearbox to the rear.
- Shift the clutch release rod to the rear until it stops and take the gearbox out of the frame.
Reinstall the gearbox on the engine in the reverse order. Before reinstalling the gearbox attend to
the following:
- Check
alignment
of hub splines in the clutch driven disks making use of crank handle 345-
316-3 or the splined end of tool 345-429-3 and, if necessary, adjust the hubs position so that the
handle or the splined tool end enters easily the splined holes of both hubs:
- By turning the shaft, arrange the splines of the gearbox primary shaft to mate those of the
clutch driven disks. When reinstalling the gearbox:
- Move the clutch release rod somewhat ahead;
- Insert it into the square hole of the clutch pressure plate;
- By pushing the gearbox nearer, insert the primary shaft into the splined holes of the clutch
driven disks.
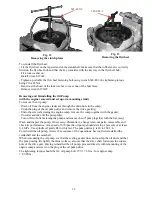
3. DETACHING AND ATTACHING THE SIDECAR
To detach the side-car:
- Set up the motorcycle on the stand;
- Disconnect the plug-and-socket connector leading to the sidecar lamps;
- Undo the nuts of upper bolts fastening the side-car frame tie-rods to the motorcycle and extract
the bolts;
- Undo the bolts of bottom clamping holders which fasten the side-car frame to the motorcycle
and
loosen
them approximately by 12 to 15 mm;
- Remove the sidecar wheel if your rig has a sidecar drive
- Disconnect in turn the front clamping holder, then the rear clamping holder by shifting them off
the ball pin of the motorcycle frame;
- Put the sidecar aside.
Mount the sidecar onto the motorcycle as follows:
- Setting up the motorcycle on the stand, smear the ball pins of the clamping holder slightly with
grease;
- Bring the sidecar to the motorcycle and place it so that the clamping holders fall directly under
the ball pins of the motorcycle frame;
- Move the front clamping holders away from the seat as far as possible, raise the front end of the
sidecar frame to fit the clamping holder on the front ball pin and loosely assemble them, without
tightening the clamping holder;
- Proceed in the similar manner when joining the rear clamping' holder. Should the latter fail to
coincide with the ball pin on the motorcycle frame, slacken off the fastening bolt nut of the
holder and, turning it in one or the other sense, make the clamping holders coincide with the ball
pin, tighten clamping holders and the bolt nut of the bracket;
- Bolt the tie-rods fastening the sidecar frame
to the motorcycle frame and lock the bolts with
nuts.
- Mount the sidecar drive.
If the holes in the tie-rod forks fail to coincide with the holes in the brackets of the motorcycle
frame, undo the forks and by turning them in or out of the tie-rods adjust the proper length of the
latter.
22
Summary of Contents for 750cc Series
Page 1: ...Repair Manual 750cc All Models www imz ural com ...
Page 2: ......
Page 71: ...1 2 3 4 5 6 7 8 Fig 66 Final drive 71 ...
Page 98: ...Fig 11 iring Diagram 9 W 98 ...


