


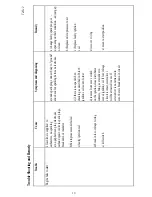


III.
DISASSEMBLY
AND REASSEMBLY
If the technical condition of the motorcycle, as determined by checking, requires partial or
complete dismantling of separate assembly units, sets or the motorcycle proper in order to repair
or change parts, try and reduce to min
imize
the dismantling operations. Certain units can be
partially dismantled without removing them off the motorcycle.
Before commencing the partial or complete dis
assembly
, clean the motorcycle to remove oil, dirt
and grit; this will protect the friction parts of units to be dismantled from contamination.
Having cleaned the parts of carbon, remnants of bakelite varnish, etc., wash them properly and
check their condition by visual inspection and measurements to evaluate the degree of their wear.
The repair shop or motorcycle servicing station should have a complete set of tools required to
dismantle and reassemble the assembly units (nut wrenches, screwdrivers, pliers, etc.). The cor-
responding Sections of this Manual specify the use of tools or fixtures.
Remove the sidecar when performing
repairs
, which require partial dismantling of the units
mounted on the motorcycle or their removal, as this will facilitate the access to the units and
make the repair easier.
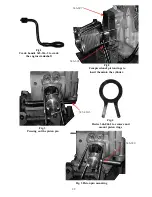
1. REMOVING AND REINSTALLING THE ENGINE WITH GEARBOX
To remove the engine together with the gearbox, proceed as follows:
- Set the motorcycle on the stand;
- Disconnect the side-car (see subsection 3); remove the gasoline tank (see subsection 5), the
silencers and header pipes, the footrests, the air cleaner (see subsection 4), the storage batteries
(see subsection 13);
- Disconnect the wires leading to the horn and the ignition-coil;
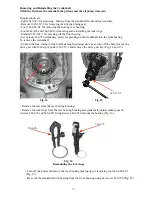
- Remove the housing of electronic ignition unit
-
Remove spark plugs, be sure no contaminates enter the plug holes
. Put the high- voltage
wires with lugs under the alternator;
- Undo the cover fastening screws of carburetor throttle valves and remove the valves.
Reinstall the throttle valve in the carburetor housing with the throttle valve cutout facing the inlet
union. Tighten up the cover fastening screws;
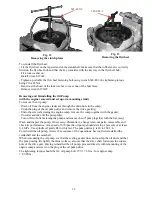
- Disconnect the adjusting bolts of the clutch control cable from the clutch control lever at the
gearbox and from the clutch cable sheath stop;
-
Loosen
the bolt fastening the speedometer drive bushing, remove the drive and shift it
aside, then reinstall the bolt;
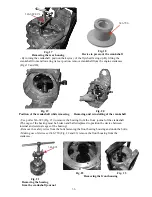
- Disconnect the wire from the contact (switch) of the neutral;
-
Loosen
the engine upper fastening nuts and those of the-stand bracket, remove the bracket
and the engine fastening plate;
-
Loosen
the nuts of engine bottom fastening studs;
- Remove the spring of the rear brake lever;
- Place a support under the engine sump and remove the engine fastening studs;
-
Move the engine together with the gearbox forward, disengage the flexible joint flange from
the rubber coupling or the propeller shaft;
- Remove the support from under the engine sump and tilt the engine to the left so that the
alternator is positioned to the left of the frame tube, then lift the engine out through the left- hand
side of the frame.
It is advisable that two persons take the engine with gearbox out of the frame
. Having
removed the assembly put the engine on a bench.
Reverse the sequence of operations when reinstalling the engine and gearbox on the motorcycle
frame.
21
Summary of Contents for 750cc Series
Page 1: ...Repair Manual 750cc All Models www imz ural com ...
Page 2: ......
Page 71: ...1 2 3 4 5 6 7 8 Fig 66 Final drive 71 ...
Page 98: ...Fig 11 iring Diagram 9 W 98 ...


