background image

VIDEO EDITOR: CHAPTER TWO

151

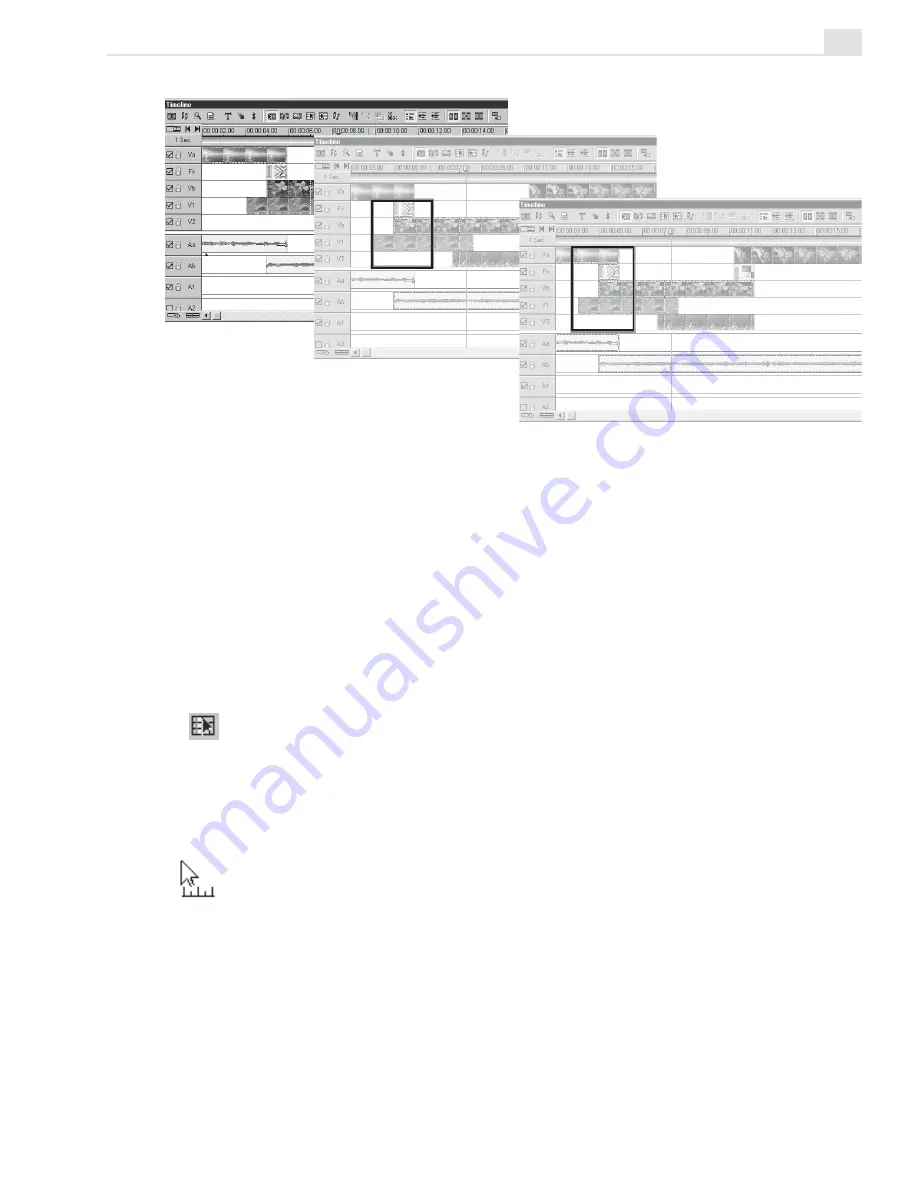
This is the original
Timeline.

The selection area is
shaded above. It was
created while holding the
[

CTRL

+

SHIFT

]


keys and

extends across Fx, Vb,
and V1-V2. Note that the
audio clip in Aa is not
selected.

The shaded selection area in this example
includes Va and therefore includes the
audio in Aa. Also note that if part of the clip
is included in the selection area, the entire
clip is selected.

Once you have selected the clips, you can group them together so that they
remain as a unit (see page 153).

Using the Time Selection tool

The Time Selection tool allows you to select a period of time, including any

clips (or portions of clips) that occur within that time period.

To perform a time selection:

1. Select the Time Selection tool. The pointer now has a Timeline icon

under it when placed over the Timeline.

2. Drag your mouse over the area of the Timeline you want to select.

If you need to select a period of time more precisely, you can manually enter

the exact location by selecting the Time Selection tool, and then clicking
Edit: Time Selection. Choosing this command opens the Time Selection

Summary of Contents for MEDIASTUDIO PRO 7

Page 1: ...User Guide Ulead Systems Inc January 2003 ...

Page 2: ...e registered trademarks and or trade marks of Ulead Systems Inc All other product names and any registered and unregistered trademarks mentioned in this manual are used for identification purposes only and remain the exclusive property of their respective owners Sample files Files provided as samples on the program CD can be used for personal demonstrations productions and presentations No rights ...

Page 3: ...Audio enhancement and mixing control 19 Realtime output 20 Rich title feature 20 Video capture enhancement 20 16 9 Widescreen format 20 Scene detection enhancement 20 Support Dolby AC 3 encoding and decoding 21 Improved integration 21 Sony MICROMV support 21 Support for Pentium 4 and dual CPUs 21 Enhanced navigation 22 DVD VCD authoring 22 Tutorials Tutorial 1 Video Capture 25 Setting up the DV de...

Page 4: ...4 Creating your first project 44 Working with images in an edit window 45 Customizing your brushes 46 Working over multiple frames 47 Common techniques 49 Applying a video filter 49 Cloning an image 50 Creating a video matte 51 Advanced techniques 52 Performing an erase effect 52 Performing an advanced power duplication 53 Creating background sets 54 Retouching images 56 Advanced macros Creating a...

Page 5: ...ur display 79 Adjusting color with your video capture board 82 Customizing Video Capture 83 The chapter in review 84 Chapter 2 Capturing video 85 Tips for capturing good video and audio 86 Getting the right hardware 86 Using compression 87 Techniques for improving your video captures 87 Techniques for improving your audio captures 88 Capturing videos and images 88 Customizing your capture options ...

Page 6: ... Working with video projects 118 Creating a new video project 118 Customizing a video project 119 Project settings 120 4 3 and 16 9 display management 121 Saving a project as a template 121 Saving a video project 122 Packaging a video project 122 Smart Relink 122 Saving the layout 122 Using the Production Library 123 Placing clips into the Production Library 123 Using the Storyboard 124 Working wi...

Page 7: ... 149 Making selections in the Timeline 150 Using the Clip Selection tool 150 Using the Time Selection tool 151 Using the Track Selection tool 152 Using the Track buttons 152 Grouping clips 153 Working with clips 153 Pasting attributes 154 Snapping to clips 155 Splitting the audio from video clips 155 Changing the speed of clips 155 Reversing the frames of a clip 156 Relinking clips 156 Calibrating...

Page 8: ... 178 Previewing on an external device 179 Managing preview files 179 The chapter in review 180 Chapter 3 Using effects 181 Using transition effects 182 Transition effects basics 182 Customizing a transition 184 Fade to black 185 Audio transitions 187 Using key frame controls 188 Video overlay effects 190 Overlay key types 192 Understanding Alpha Channels 193 Using Gamma correction 194 Working with...

Page 9: ...deo file s data rate 225 Creating an audio file 227 Audio Mixing Panel 228 Grouping audio tracks 232 Modifying volume controls in real time 233 Frame by Frame Audio Preview 234 Creating an image sequence 235 Creating an Edit Decision List EDL file 236 Posting timecode 237 Outputting to analog video tape 238 Creating a VCD 240 Creating an SVCD 241 Creating a DVD 241 Creating MPEG 2 files 242 Creati...

Page 10: ...l Viewer 264 Fitting an image in the edit window 265 Working with frames in a project 265 Inserting frames 266 Duplicating frames 267 Deleting frames 267 Replacing frames 267 Customizing Video Paint 269 The chapter in review 274 Chapter 2 Painting 275 Working in different display modes 276 Normal mode 276 Ruby Mask mode 276 Onionskin mode 278 No Source Video mode 279 Making selections 280 Understa...

Page 11: ...01 Previewing your work 302 Performing a flick preview 302 Performing a preview 303 The chapter in review 304 CG Infinity Chapter 1 Getting started 307 Understanding the basics 308 Understanding objects 310 Starting a new CG Infinity project 310 Changing the background of an edit window 311 Changing the view of an edit window 312 Viewing objects 312 Saving your work 313 Creating video and image fi...

Page 12: ...the Envelope tool 331 Adjusting shapes 332 Creating a moving path 334 Changing the shape of a moving path 335 Changing the size and style of an object over time 336 Changing the speed of an object 337 Timing the movement of objects 338 The chapter in review 340 Audio Editor Chapter 1 Getting started 343 Understanding the basics 344 Playing audio files 346 Creating a new edit window 346 Saving file...

Page 13: ...65 Mixing tracks 365 Removing a mixed track 366 Applying special effects 367 Performing a fade 367 Changing speed 368 Performing a stereo pan 369 Reversing a file 369 Performing an echo 370 Performing a cross fade 371 Using DirectX Audio and DMO Audio Effect plug ins 371 The chapter in review 372 More Programs Ulead DVD MovieFactory 376 Getting around Ulead DVD MovieFactory 376 Which task should y...

Page 14: ...x Background information 395 The world of analog video 396 Inside the video signal 396 How analog video is displayed 397 The world of digital video 397 Inside digital video 398 Working with the data rate 398 Understanding the frame rate 399 Understanding the frame size 399 Understanding data types 399 Understanding video compression 400 Aspect Ratio 401 Frame type 402 DV Type 1 402 DV Type 2 402 W...

Page 15: ...ms MediaStudio Pro is the first choice for anyone wanting to work with video MediaStudio Pro offers Realtime MPEG Capture Realtime Preview and Realtime Output With intui tive controls and seamless integration creating video has never been easier or more accessible In this introduction you will learn about Using the MediaStudio Pro documentation p 16 Installing MediaStudio Pro on your system p 17 R...

Page 16: ...be able to begin editing your own movies in just half a day Help As you work you will certainly have many questions that can be quickly answered by accessing the extensive online Help Hold your mouse over an object in the program that you have a question about and press F1 on the keyboard Every item has a help topic associated with it so this is a surefire way to get instant answers You can also l...

Page 17: ...allation The MediaStudio Pro installation program runs from within Windows and contains complete instructions to take you through the installation process To install MediaStudio Pro 1 Read the license agreement that comes with the MediaStudio Pro package The license agreement contains important legal requirements that you need to be aware of If you agree to abide by it continue with the installati...

Page 18: ...grams click on the appropriate command in the Start Programs Ulead MediaStudio Pro 7 submenu This submenu may differ depending on the choices you made during installation If you are already working in any of these programs the easiest method to run another MediaStudio Pro program is by using the Switch menu located on the right of the Menu bar Read Me In the fast paced world of software change occ...

Page 19: ...it for a render Realtime performance however depends on the processor s speed and available memory MPEG 1 MPEG 2 and Windows Media Format native editing DVD and SVCD parameters can be difficult to set manually Using presets users can quickly and easily create DVD and SVCD compliant files There are also options for RealMedia and Windows Media Format files for streaming on the Web and users can crea...

Page 20: ...more eye catching title options at their disposal Video capture enhancement MediaStudio Pro allows Realtime capture via FireWire of a variety of formats such as Native DV MPEG 1 MPEG 2 and Windows Media Format 16 9 Widescreen format Capture edit and output in the increasingly popular 16 9 Widescreen format Scene detection enhancement Scene Detection makes clip preparation and management much faste...

Page 21: ...ility especially for 3D titles and objects filters and effects and Internet output Sony MICROMV support Sony s super small MICROMV camcorders use a proprietary MPEG 2 codec which MediaStudio Pro allows users to capture edit and convert to DVD ready MPEG 2 MICROMV users have so far had very limited options with editing and output of their video material MediaStudio Pro is the first full featured vi...

Page 22: ...er for the user to locate a particular clip or position in the project This is especially useful for long form projects DVD VCD authoring Ulead DVD MovieFactory LE is included and integrated This is a complete VCD DVD authoring package with templates for backgrounds menus etc including a Runtime player that the user can burn on to disc ...

Page 23: ......

Page 24: ......

Page 25: ...digital video DV p 26 Video Capture Video Capture is where you ll begin Hook up your camcorder and you re ready to capture video to your computer for professional editing MediaStudio Pro supports direct Digital Video DV native MPEG capturing and DV device control giving you more creative freedom ...

Page 26: ...l bar If you can t control it go back to the Device Control dialog box and select another device To capture digital video DV 1 Connect your digital capture device e g DV camcorder to your PC via the IEEE 1394 FireWire interface card 2 Turn your device ON and set it to Play or VCR mode 3 Run Video Capture 4 Click Setup Switch Capture Plug in In the dialog box select a capture plug in to use from th...

Page 27: ...ate a final video production Here you can insert your files and then arrange them into their playing sequence adding impressive transition effects overlays and moving paths as you go Tutorial 2 In this tutorial you will learn about Creating video projects p 28 Working with clips p 30 Adding special effects p 33 ...

Page 28: ...ect 1 Run Video Editor Click File New 2 In the New dialog box select an Existing project template You can also open this dialog box at any time by clicking the New button 3 Click OK When you save your project you will save it as a DVP file which can be opened only in MediaStudio Pro Selecting a project type is a one time event but it can be a complicated process that depends on what country you ar...

Page 29: ...rowse for a video file clip There are a number of sample files on the MediaStudio Pro CD or use a file you have previously captured 3 Click Open 4 Move your cursor to the beginning of the Va track and click How your Timeline should look Try repeating the above procedure with another video clip this time inserting it into the Vb track just below the first clip Any material placed in lower tracks ap...

Page 30: ...mber of techniques you can use the following is one of the easiest To trim a video clip 1 Select a video clip on the Timeline by clicking on it 2 Move the cursor to the very right edge of the clip The cursor should change to a double arrow 3 Click and drag the edge to the left to trim it This will shorten the clip in the project and on the Timeline but will not alter the original source clip in an...

Page 31: ...the dialog box that opens set up the details of your effect In most cases you may not have to change anything 6 Click OK Performing a Flow transition effect between two clips Previewing your work Previews are an important aspect of any video project as they allow you to see how your work is developing The process of creating a movie or a preview is called rendering and depending on the speed of yo...

Page 32: ...window is not already open 2 Click on the Trim bar Then drag the handles on either side of the Trim bar to set the duration of the preview 3 Click the Play the Preview Range button To perform Instant Playback 1 Select a clip on the Timeline 2 Click the Preview Window Menu on the bottom right side of the preview window then select Instant Play 3 Click Play to preview the clip along with your modifi...

Page 33: ... speed of a filter as it moves from the first frame to the last To apply a video filter 1 Select the Video Filter 2D Mapping gallery from the Production Library and drag and drop the Ripple filter onto a clip in the video track of the Timeline The Ripple dialog box opens 2 In the Direction group box select the From center option and in the Frequency group box select the Medium option 3 Set the Lev...

Page 34: ... overlay tracks V1 V99 2 From the Production Library select the Moving Path 2D Basic gallery 3 Drag and drop the 2D Basic thumbnail onto a clip in a video overlay track of the Timeline The 2D Basic Moving Path dialog box opens 4 Adjust the path in the Motion control box 5 Click the Play button to preview the path 6 Click OK to close the dialog box and apply the moving path Performing a 2D Basic mo...

Page 35: ...n 3 Drag the control point upward to increase audio level downward to decrease it Place additional control points to determine where to start and end your changes To remove a control point drag it off the top or bottom edge of the clip Note Hold down the SHIFT key while dragging a control point to view a precise volume indication as a percentage and in decibels dB Changing the audio level of an au...

Page 36: ...as wipe peel or split screen Below is an example of how to create a split screen To create a split screen effect 1 Insert a clip into Va and another into Vb 2 From the Transition Effect gallery click the Slide folder Then drag the Side thumbnail to the Fx track 3 Set the Transition degree to 50 for the Start key frame 4 Click the End key frame and set the Transition degree to the same value as the...

Page 37: ...ture in Picture folder onto the clip in the overlay track The 2D Basic Moving Path dialog box opens 3 Click the Keep aspect ratio option and enter a new width value of one third the size of the original in the Width spin box for both the start and end key frames 4 Drag the Start control point to the location where you want the overlay video to appear 5 Click on the End control point Manually enter...

Page 38: ...Double click on the audio clip to open it in the Source window Play back the clip and when you hear the sound you wish to synchronize the video clip to press F5 This places a cue on the cue bar above the waveform Click the Apply button and then close the Source window 4 Repeat this procedure to add a cue in the video clip 5 Click the Next Edit Point button or press PAGE DOWN repeatedly until the V...

Page 39: ...n you want a particular image to appear in sync with your chosen audio track 4 Click Production Library Media Library Storyboard Click Import Image File to import the image files you want to use for your slideshow 5 Right click on an image in the Storyboard then select Add A B Roll The Add to A B Roll dialog box appears 6 In Add to A B Roll click Overlap then enter the overlap duration in seconds ...

Page 40: ...he aspect ratio for high definition wide screen digital systems is 16 9 To convert 16 9 aspect ratio videos to 4 3 aspect ratio 1 Open the file with the display aspect ratio of 16 9 in the Production Library then place it on the Timeline 2 Click File Project Settings Edit to open the Project Options dialog box 3 In the Video Editor tab select Perform non square rendering 4 In the General tab selec...

Page 41: ... track from the drop down list under the General tab If it s just a sound track select the Audio Only option If it s all video select the Video Only option If it s a combination of both select the Video and Audio option 4 Specify the frame type the frame size and the display aspect ratio whether it be 4 3 or 16 9 in the General tab 5 Specify the TV standard and the number of overlay tracks in the ...

Page 42: ...Device Control to make sure that the proper device is connected Select the appropriate DV device then click OK 10 Click File Print to Tape Timeline then choose whether you d like to print the entire project or the selected preview range 11 Click OK to begin recording the contents of your Timeline to your tape MediaStudio Pro will automatically render your project 12 When the rendering process is f...

Page 43: ...tion and rotoscope individual frames of a video project With it you can create such effects as laser blasts background mattes and cloned actors and props Tutorial 3 In this tutorial you will learn about Getting to know Video Paint p 44 Common techniques p 49 Advanced techniques p 52 ...

Page 44: ...me saver and allows you to perform edits quickly without draining system resources To open a video file for editing 1 Click the Open Video File button on the Standard toolbar to open the Open Video File dialog box and select any video file from the Samples folder of your MediaStudio CD 2 Click the Duration button to open the Duration dialog box 3 Drag the Preview slider to locate the first frame o...

Page 45: ...it As you drag a selection marquee appears outlining the area included in the selection When finished move the selection to a new location on the image This selection is now referred to as a floating selection and appears in the Paint Layer 3 To better see the Paint Layer click the No Source Video button on the Standard toolbar The image disappears from view leaving only the background film color ...

Page 46: ...then adjust either the vertical or horizontal slider tabs until the Height and Width spin boxes read 7 Once completed set the Brush Angle to 0 and the Soft Edge to 34 3 In the Options tab set the Application method to Pigment and then click the Freehand button Also set the Transparency and the Wet Control both to 0 if not already set 4 In the Color tab right click the color square and select a col...

Page 47: ...indow 2 Click Edit Power Duplicate to open the Power Duplicate dialog box 3 Select the Paint Layer option in the Source group box and the Apply after current frame option in the Apply group box In the same group box set the duration to cover the number of frames you want your edits to appear over The default is the maximum number of frames in your project 4 Click OK to apply your edits over the sp...

Page 48: ...r macro You can also give it a name and description 4 Click OK The macro is saved to the proper location and the edits are removed from the edit window Note To have the macro play back automatically select the Play macro after recording option in the Preferences dialog box 5 Click the Production Library button on the Standard toolbar and locate the folder you saved the macro to 6 Double click the ...

Page 49: ...you want to apply the filter to the entire clip make no selection 2 Select the Video Filter Camera Lens gallery from the Production Library and drag and drop the Kaleidoscope filter onto the edit win dow containing the image you want to apply the effect to The Kaleido scope dialog box opens 3 Drag the View circle on the Original preview image and place it where you want the effect to start 4 Click...

Page 50: ...e Brush panel click the Absolute button if it is not already selected 2 Move to the image you want to clone Then whil holding down the SHIFT key click over the object or feature you want to clone A crosshair pointer appears indicating the area to be cloned 3 Start painting where you want the object or feature to appear As you paint a brush head marquee appears around the crosshair pointer indicati...

Page 51: ...K The dialog box closes and a new project is created Use the default settings if you do not yet have a Video Editor project to work with 3 Click the Lasso tool on the Tool panel and then click the Anti alias button on the Attribute toolbar 4 Create a selection area with the size you want for your matte and then right click and choose the Soft Edge command from the pop up menu In the dialog box tha...

Page 52: ...ill dialog box 2 Select the color you want to use as the fill from the Color group box and enter 15 in the Transparency spin box 3 Click OK to close the dialog box and apply the fill Once applied duplicate by using power duplicate the fill over the number of frames you want to include in the effect 4 Click the Paint tool on the Tool panel and then select the type of brush you want to use from the ...

Page 53: ...tains the edits you want to duplicate and then click Edit Power Duplicate to open the Power Duplicate dialog box 2 Select the Paint Layer option in the Source group box 3 Select the After current frame option in the Apply group box In the Duration spin box enter the number of frames on which the edits will appear The default number represents all frames in the project 4 Move to the Start tab and e...

Page 54: ...ct The Animation Texture dialog box opens displaying various options for controlling the display and movement of a texture 3 Select thumbnail 11 from the Pattern group box and then click on the End key frame in the Key frame controller to jump to the last frame in the sequence Click the Lock button so that the Preview image changes 4 Select thumbnail 11 from the Pattern group box again and then cl...

Page 55: ...ng then deselects these areas Keep doing this until all areas of the sea are no longer part of the selection If you need to add areas of the fish to the selection area hold down the A key When finished copy and paste the fish into the edit window containing the image of the sky 5 Switch to the Transformation tool and click the Resize button on the Attribute toolbar A bounding box appears around th...

Page 56: ...sh from the Attribute toolbar 3 In the Shape tab of the Brush panel specify a small brush size with no soft edge and in the Options tab set the blur value to one 4 Zoom in on the edit window containing the background image and begin painting over the edges of the largest fish As you paint notice how the jagged edges are blended into the background Once finished move to the other fish and retouch t...

Page 57: ...el click the Straight Line button Set the laser s color in the Color tab and the brush s height and width in the Shape tab 3 Click the Recording button and then click OK The edit window is centered in the workspace 4 In the edit window draw the laser beam from the starting reference point to the ending reference point 5 Click the Recording button again to stop recording The Add To Library dialog b...

Page 58: ...n the original background in a second edit window background win dow 3 Click the Clone tool on the Tool panel In the Options tab of the Brush Panel click the Frame button and with the SHIFT key click anywhere on the background window 4 In the video window paint over the person you want to disappear 5 Next duplicate by using power duplicate the paint layer of the video window you just cloned across...

Page 59: ...ation With CG Infinity s tools you can send text and objects flying into the third dimension This tutorial is de signed to give you everything you need to get started at creating your own CG sequences Tutorial 4 In this tutorial you will learn about Common techniques p 60 Advanced techniques p 66 ...

Page 60: ...r Rectangle select Draw From Center deselect Equal Sides deselect 2 In Preview mode draw a rectangular path within the frame of the edit window and in the Object Style Panel set the fill color to blue with no line color or shadow 3 Switch to the Ellipse option on the Attribute toolbar and create a long elliptical path 4 Using the Object tool position the new path so that its middle starts at the b...

Page 61: ...text alignment font or any other characteristics select the text and then choose the appropriate options from the Attribute toolbar 3 Switch to the Envelope tool A red border appears around the text as well as nodes on the corners and edges of the border 4 Drag the nodes to adjust the envelope Each time you select a node two control handles appear which you can adjust independently Keep adjusting ...

Page 62: ...b of the Object Style panel 2 Click the Gradient square to open the Magic Gradient dialog box 3 Click the Edit button in the Palette ramp group box to open the Palette Ramp Editor dialog box and select the CD thumbnail and then click OK The dialog box closes and the color ring in the Magic Gradient dialog box changes to reflect the new palette 4 Drag on the Hue shift to change the hue of the color...

Page 63: ...and node to change the object s perspective 4 Duplicate the object and then click the Resize button on the Attribute toolbar and drag the left side of the object to the right flipping it To make sure it is the same size as the original enter its width in the Width spin box on the Attribute toolbar 5 Switch to the Shape tool and create a rectangular shape the size of the original object filling it ...

Page 64: ...hape 4 Click Edit Duplicate to make a copy of the current object giving it a yellow fill color with no line color Then switch to the Object tool and drag the left side over to the right flipping the object To get the same width enter its original value in the Width spin box When finished place both objects side by side 5 Add four more rectangular objects for the cap left eye left nose and left mou...

Page 65: ...e End control point follows the path of your mouse Releasing your mouse then creates the moving path 3 Click the Play button on the Time Control panel to see how your animation looks If you want to change the position of the control points click the Adjust Moving Path button on the Attribute toolbar and click on the point concerned You may need to click twice before moving a control point dependin...

Page 66: ...e background Gradient mattes require a little more work To create a gradient matte 1 Select the tool you wish to create the path with and draw the shape of the matte in the edit window 2 Select the Gradient Transparency button in the General tab of the Object Style panel and click on the Gradient square to open the Gradient Transparency dialog box 3 Move the Start and End sliders to determine the ...

Page 67: ... two nodes to the left and right of the top node on the larger circle Click the Adjust Path button on the Attribute toolbar and drag the center node upward 4 Click the Cusp node button on the Attribute toolbar and drag the left control handle downward to increase the angle of the curve When happy with the angle do the same to the right control handle 5 Switch to the Object tool and select the Grad...

Page 68: ...ng Delete Remove the darker ones first and then drag the remaining nodes so that the darker colors appear to the left of the circle and the lighter ones to the right When finished click OK and then select the fifteenth button in the Mode group box and drag on the image in the sample window to have the light source appear from the top right Also change the slope value to 200 degrees in the bottom S...

Page 69: ...t window 7 Move the slider to the 1 second mark and add a key frame This is the time you want the object to commence its movement Place your pointer on the object in the edit window and drag it back so that it is in the same place as the Start point Move the slider to the last frame in the Time Control panel and add a key frame and then move this key frame back to the 2 second mark This is where t...

Page 70: ...nter 68 in the Width spin box Click the Keep Aspect Ratio button to ensure the height changes proportionally After resizing position the object in the center of the edit window frame 6 Click on the letter A and then click on the Start key frame in the Time Control panel 7 Drag the transparency control point to the top of the transparency graph and then move the slider to the 2 second mark and add ...

Page 71: ......

Page 72: ......

Page 73: ...erent sources such as VCRs TVs DVDs or DV camcorders Once captured you can then play back those files or take them into Video Editor to start constructing your own video project Chapter 1 In this chapter you will learn about Understanding the basics p 74 Preparing video for display p 76 Improving your video signal p 79 Customizing Video Capture p 83 ...

Page 74: ...nalog capture board digital video interface card e g IEEE 1394 or USB port If you do not have a video source installed you can still use Video Capture to play back existing video files Once you have your video source connected and playing the video automatically appears in the Video Capture video window Otherwise the video window displays a color bar test pattern instead Video Capture s program wi...

Page 75: ...previous frame Play a video repeatedly Go to the last frame Go to the first frame Go to the next frame Mark in the start of a selection Mark out the start of a selection Record a video Play back a video Stop playing a video Note Depending on the video source connection used some commands and buttons in Video Capture may not be applicable and may be grayed out Capture a frame to the clipboard Captu...

Page 76: ...ched on Video Capture prompts a message asking if you want to use the new device Connecting to an analog video source If your video capture board is correctly installed running pictures should immediately appear in the video window of Video Capture If this does not happen then you need to tune Video Capture to your video source To do this click Setup Video Source The Video Source dialog box opens ...

Page 77: ...mode by clicking the Playback icon on the Standard toolbar or selecting View Playback Note If you are only viewing video not necessarily capturing you may want to hide certain features such as the toolbars for a cleaner look and feel To hide these or show them once hidden select the appropriate option in the Toolbars Panels dialog box opened by clicking View Toolbars Panels or by right clicking on...

Page 78: ...y how sound is captured depends on a combination of factors namely the video source the video capture board and the sound card installed in your computer In general the video capture board handles the capturing of video frames while your sound card captures the audio portion Video Capture then merges this information into the resulting video file To define audio input 1 Click the Audio Format butt...

Page 79: ...nd that the colors do not appear as vibrant or are darker than you expected Such examples indicate that your video capture board and the video source are not properly adjusted or calibrated By having a well calibrated display you can capture and see video particularly color as it was originally recorded Calibrating your display To get the best possible calibration your video source needs to be abl...

Page 80: ...deo source s color signal broken down into its component parts Composite Chroma Luma and Parade Composite displays all the component parts combined Chroma shown in green the color values and Luma shown in white the brightness values Parade uses a different method from the others and is applicable for video capture boards which have support for the parade method The preview window is a small repres...

Page 81: ...ion dialog box redraws itself regularly To do this set the Get video frame for every option in the Color Calibration dialog box to 1 second This ensures that at every second the preview test pattern refreshes itself thereby reflecting any adjust ments you make If the test pattern only appears for a short time click the Get Image button after each adjustment to refresh the preview window 5 Adjust t...

Page 82: ...veform monitor the typical settings are about White Yellow Cyan Green Magenta Red Blue Black 100 65 50 50 30 20 20 0 Note White and black should always be 100 and 0 respectively though the other colors may vary slightly Adjusting color with your video capture board If you cannot use color calibration your video capture board should still provide controls that allow you to adjust the contrast color...

Page 83: ...ch frame number in the Status bar as it is being displayed When clear only the starting frame number is shown 4 Display capture options before capturing opens the Capture Video Dialog box every time you click the Record button When clear Video Capture begins recording immediately 5 Image capture deinterlace downsamples captured images to minimize the file size 6 Use Split dialog box for capture se...

Page 84: ...eo source by clicking Capture on the Standard toolbar see page 77 When viewing in Preview mode set the frame size and frame rate of the video in the Preview Options dialog box see page 77 Calibrate Video Capture to your video source before capturing see page 79 Use the File Preferences command to customize the Video Capture working environment see page 83 ...

Page 85: ...ndividual frames that you want to incorporate into the other projects you are working on Chapter 2 In this chapter you will learn about Tips for capturing good video and audio p 86 Capturing video and images p 88 Capturing from a DV camcorder p 93 Seamless DV capture p 94 Controlling the DV camcorder p 95 Scanning a DV tape p 101 Capturing a color palette p 106 ...

Page 86: ...ard converts the original analog video source into digital data In general the faster this board is the faster video can be digitized and then used by your computer While the video capture board handles video input it is the CPU which handles the delivery The faster the CPU is the more video as data can be processed and thus the better captured video file If you have a DV camcorder you will need t...

Page 87: ... system which has to share the job of compressing with anything else running While software based compression is unable to match the compression ratios of hardware based compression this type of compression is device independent and therefore compatible on a variety of machines You can play back the captured video on most computers This makes software based compression the ideal choice for video i...

Page 88: ...s for improving your audio captures When capturing audio there are three areas that you can control which determine the size and quality of the audio file They are the sampling rate sample size and the number of channels CD quality audio has a sampling rate of 44KHz a 16 bit sample size and two channels or stereo If you intend to play back your video over low quality speakers then capturing at thi...

Page 89: ... capture board setup 2 Click the Record button on the Control bar or Capture Video F5 to open the Capture Video dialog box If the Display capture options before capturing option is cleared in the Preferences dialog box Video Capture begins capturing immediately using your current settings Capture Video dialog box 3 Specify the desired frame rate in the Frame rate spin box If capturing full motion ...

Page 90: ...he Capture Method group box select the appropriate method for capturing Auto captures video according to the time specified in the Auto spin box while Auto with no time limit continues capturing until you press the ESC key If you want to perform single frame captures then select the Manual option If you have a controllable device select the Device control option For more on capturing with a contro...

Page 91: ...t to Video Editor and drag and drop the file into a video project This is also useful for batch captures as the library creates an icon for each captured file which you can then use to storyboard and arrange before placing your work into a video project 10 Click OK Video Capture begins capturing according to your settings If you chose to capture manually the Manual Capture dialog box opens display...

Page 92: ... Play video file after capturing plays back each file after capturing Leave this clear if you want to continue viewing your video source after capturing 3 Synchronize video with audio ensures that during capture the video portion maintains correct timing with the audio portion When clear both captures are done independently by your system which may result in bad synchronization between audio and v...

Page 93: ...hat options to specify or are unsure about your system s setup Capturing from a DV camcorder using an IEEE 1394 FireWire card interface card MediaStudio Pro allows you to save your files in a DV file format of your choice There are two types DV file format Type 1 and Type 2 Now you can pick which type of format you want your project to have by clicking the appropriate selection in Options Microsof...

Page 94: ...1 or Type 2 Click OK 7 Click OK to start capturing Press ESC to stop capturing anytime Video Capture should have automatic control device control of your camcorder and should play your tape The output from the camcorder should be visible in the Preview window on your computer Note Sometimes Video Capture can lose its connection with your camcorder if it is turned off or disconnected When this happ...

Page 95: ...henever there is a scene change At file size limitation Cuts the file when the size reaches the value in the Cut file when file size reaches box At first scene after Cuts the file when the captured video file size exceeds the value entered in the box 5 Click OK Controlling the DV camcorder MediaStudio Pro allows you to play stop or pause the DV tape by using the Control bar or the keyboard hotkeys...

Page 96: ...to go to the first frame of the video End to go to the last frame of the video Repeat to play the video in a continuous loop Mark in to set the current frame as the starting point of a video selection Mark out to set the current frame as the ending point of a video selection Direct MPEG capturing from a DV camcorder You can directly capture MPEG files from your DV camcorder by switching your captu...

Page 97: ...th of capturing under Capture Method MediaStudio Pro automatically stops the capturing process for you Direct WMV capturing Now you can capture directly from an analog source or DV camcorder straight to Windows Media Video WMV WMV is an extensible file format that handles synchronized multimedia data and supports live content transmission over a wide array of networks Selecting this will automatic...

Page 98: ...rty Setting In the dialog box click Select Profile to select from the list of available profiles installed in your computer 8 Click OK to start capturing If you want to start capturing immediately after pressing the Record button clear Display capture options before capturing in Preferences dialog box 9 To stop capturing press Esc If you have specified the length of capturing under Capture Method ...

Page 99: ...deo when working in Capture mode 8 Specify the Capture method then click Properties to define the video and audio capture settings of the WMV file Click OK to return to the Capture Video dialog box 9 Enter a file name for the video Click Browse to locate the target directory You also have the option to select a different profile to generate the WMV file Note If you want to use another profile in c...

Page 100: ...o Capture and click Setup Switch Capture Plug in 4 In Current capture plug in select Windows Media Format Capture Plug in 5 Click Setup Video Capture Property Settings In the dialog box click Select to open Select Profile 6 Under Select Profile click Customize 7 Manage Profiles lists all the available profiles installed in your computer The profiles are categorized into two types System defined pr...

Page 101: ...og of the entire tape for future reference The Scan menu item and toolbar button are enabled when the DV camcorder is on and the device control and capture plug in have been initialized When you press the Scan button Video Capture opens the Scan DV Tape dialog box Note The dialog box should not contain any data under List view control when it is opened To scan a DV tape 1 Connect your DV camcorder...

Page 102: ...the name and description before closing the DV Vide Capture will prompt a warning message to notify you We recommend that you do so 6 Press Run to execute your preferences 7 Select the scenes you want to capture then click Capture Note Scanned scenes can be combined and treated as one before capturing To do this select the scenes that you want to combine and then click Join To undo this action sel...

Page 103: ...pped frame on playback it keeps displaying the previous frame until the dropped frame or frames have passed If a video has dropped a large number of frames then the playback will look very choppy To reduce the occurrence of dropped frames you can lower the quality settings for your video For example try a smaller frame size higher compression or a lower frame rate Capturing single frames Capturing...

Page 104: ...een Click Capture Video to open the Capture Video dialog box Select Manual as the capture method then click Settings 5 Under Capture Sequence Settings set the attribute for the capturing work Set the capture interval time in Sequence settings The capture engine will capture a frame based on the set interval time Select Capture duration and set how long you want the capturing process to 4 Select th...

Page 105: ...dio Pro provides a capture history dialog box in Video Capture to track the latest captured files Select File Capture History to invoke the Capture History dialog box The video files can be sorted by file name file size or captured date Click Play to display a preview of a selected file You can also use Capture History to copy or delete of files to or from the Production Library of the Video Edito...

Page 106: ...s more colors than the monitor is capable of showing In Video Capture you can select which frames in a video to create the color palette from To capture a color palette 1 Click the Capture Palette button on the Standard toolbar or Palette Capture Palette to open the Capture Palette dialog box 2 Specify the number of frames from which you want to create the palette in the Continuous frames entry bo...

Page 107: ...not Indexed 256 Color or the data on the clipboard is not palette data Changing a file s properties Whenever you capture a video sequence you must first specify a file in which to save the resulting video There will be times however when you wish to save this video again to change its attributes such as frame rate or the compression scheme This is particularly true if you have a hardware compresse...

Page 108: ...nformation to the file using the Subject and Description entry boxes and assign a thumbnail image to the file by clicking the Select button If you plan on using the file in Video Editor click the Save to library option to automatically place it in the Production Library for easy retrieval 3 Click the Options button The Video Save Options dialog box opens with four tabs Video Capture General Advanc...

Page 109: ...ded settings for different device control drivers 3 Click Setup Switch Capture Plug in and select the appropriate capture plug in 4 Click Capture Reel Properties and in the Reel Properties dialog box type a name for the source tape in the Reel name entry box You can assign any name but be sure to change the name when you change the source tape 5 In the File name entry box of the Reel Properties di...

Page 110: ...r DVP file from which to capture Using batch lists in this way allows you to capture exactly the same source each time and is very helpful for creating high resolution files to replace low resolution files you may have been using for editing To view or edit a batch list 1 Click Capture Batch Settings to open the Batch Settings dialog box This dialog box displays a list of each marked segment of th...

Page 111: ...button next to the Device Control option Note If there are dropped frames during a capturing process the Batch Log dialog box appears Click the Re capture button if you want to try recapturing that marked portion again Capture plug ins Video Capture provides different plug ins for capturing different formats of video such as AVI MPEG and digital video DV See the tutorial on Video Capture for detai...

Page 112: ...page 96 Use direct WMV capturing to allow your file to handle synchronized multimedia data and support live content transmission over a wide array of networks see page 97 Capture a file based on its profile see page 99 Edit and customize a video s profile see page 100 Scan a DV tape see page 101 Capture a single frame see page 103 Lower your quality settings if you get dropped frames see page 103 ...

Page 113: ......

Page 114: ......

Page 115: ...d any effects and transitions you are ready to create a video production which can be saved as a file placed on the Internet distributed on a CD or DVD or sent back to video tape Chapter 1 In this chapter you will learn about Understanding the workplace p 116 Working with video projects p 118 Using the Production Library p 123 Working with the Timeline p 127 Converting files p 140 Customizing Vide...

Page 116: ...racks These tracks hold the many different events that occur over time In Video Editor these events are referred to as clips and they combine together to make up a video project The other windows in the Video Editor workplace such as the Production Library and the Preview window are there to help you in the editing process Video clip in the Va track Track buttons Transition effect clip in the Fx t...

Page 117: ... a previous action Create a video file Show and edit Project Settings Open or close the Preview window Open or close the Source window Context Sensitive Online Help Open Ulead Homepage Open or close the Production Library Insert Title Clip Insert Color Clip Insert Silence Clip Insert Image File Insert Voice File Insert Audio File Insert Video File Zoom in out Scissors Clip Selection Time Selection...

Page 118: ...ips that you place into the Timeline but also defines the properties for the resulting video such as the television standard and the size of the frames used Any clips that you place into the project subsequently adopt those properties regardless of their original attributes To create a new video project 1 Click the New button on the Standard toolbar or File New CTRL N The New dialog box opens disp...

Page 119: ...mplate Options dialog box opens up 2 Select and set the attributes for your new template Note For a more detailed explanation of setting up a template see page 108 or refer to Video Editor Help Also it is a good idea to consult the manual of your particular video capture board to see the recommended specifications 3 Click OK The Save New Template dialog box opens up 4 Select Save the current setti...

Page 120: ... properties of your project 2 To change any of the settings click the Edit button to open the Project Options dialog box Click through the various tabs and then specify the television standard you are using such as NTSC or PAL the frame rate and the frame size You can also control the number of overlay tracks displayed and view the files currently used by the project Notes The number of tabs which...

Page 121: ...a template by clicking the File Save Project Template command In the dialog box that opens you can give the template a name as well as a description Any existing templates are also displayed in the Existing template list box If you wish to replace one of these templates with the properties of the current video project select it and then click OK The aspect ratio is also important when dealing with...

Page 122: ...ile and its source files to another PC use the same directory structure as the original to ensure the clips are correctly linked Smart Relink Since a DVP file contains links to potentially hundreds of files on your computer it is not uncommon for these files to occasionally get lost This can happen when you have moved them or maybe edited the files in another program From the File menu select Smar...

Page 123: ... the most glamorous part of the movie making process spending a short period of time at the beginning of your project setting up and populating the Production Library will save you hours later Placing clips into the Production Library To place clips into the Production Library 1 Click the Production Library button on the Standard toolbar to open up the Production Library 2 Select Media Library fro...

Page 124: ...ide the Production Library you want to use into the Storyboard folder Note You can only use the Add to A B Roll function when you are inside the Storyboard folder 2 Arrange the sequence of the video clips by dragging them to the desired positions 3 Right click on a clip and select Add to A B Roll to open the Add to A B Roll dialog box 4 In the Add to A B Roll dialog box determine the layout option...

Page 125: ...click the All folder icon in the selected library s folder tree Drag and drop The mouse is a powerful tool in MediaStudio Pro You will find that it is effortless to drag and drop clips among many parts of the program Try dragging a clip from Windows Explorer to the Production Library to organize your project Then drag the clip s thumbnail from the Production Library to the Source window to do a li...

Page 126: ...ed thumbnail as well as editing deleting and customizing the Production Library preferences this menu can also be accessed by right clicking on a thumbnail When customizing the preferences you can choose to control the size of the thumbnails as well as to display or hide the name below each of the thumbnails If you want to maximize the space available for displaying thumbnails click the Preference...

Page 127: ... To start work on a video project you need to first insert clips into the Timeline Once inserted you can begin to edit and arrange them into your final video production Clips that have been inserted directly onto the Timeline will also automatically be added to the Production Library s Project gallery Adding effects to the Production Library In the Production Library you can edit any clip or effec...

Page 128: ...can also drag and drop clips directly from Windows Explorer You can also insert clips currently displayed in the Source window to another track in the Timeline Press F11 and select from the pop up menu in which track you want to insert the clip Note The files you insert should match the properties of your video project to ensure the best possible output results When you insert clips they are place...

Page 129: ...ow offers a voice over function to meet the voice over requirements of narrated videos The Voice Over function allows you to incorporate narration and voice overs into your videos using five easy steps To insert a voice over 1 Use the Preview bar to determine the section of the video where you want to add your narration Note Make sure the Project cursor is not over an existing audio clip on the se...

Page 130: ...allows you to use multiple audio clips for your projects For a video file with multiple audio clips only the first audio clip can be used MediaStudio Pro has added a button Tracks in the Insert Video File dialog box that allows you to extract audio files from a video that contains multiple audio clips With this feature users can extract any or all the audio clip and insert them on the various audi...

Page 131: ... affect other clips on the Timeline You must be in No Ripple mode for this to work and it only works on a single track The key to this technique is to press SHIFT while inserting clips To use Push Away insertion 1 Click the No Ripple button then click the Insert Video File button on the Timeline toolbar 2 In the Insert Video File dialog box select a clip click it once 3 Click Open 4 While you pres...

Page 132: ...s section see page 181 Silence and color clips can be used as placeholder clips which can stand in for other clips you want to insert later For example you may want to start working on a video project but you have yet to acquire all your source files or some may still be in the editing stage You can use a color clip to substitute for an image or video clip and a silence clip for an audio clip that...

Page 133: ...lor clip 4 Click OK Drop the clip into position on a video track If you choose different colors for the start and end key frames you can create a gradient effect such as a fade from black to white The more key frames you add the greater the variety of colors you can have For more on adding key frames see the section on Using key frame controls on page 188 Working with tracks Video Editor has three...

Page 134: ...e lower tracks in the Timeline lower physically not numerically will always play over on top of clips located in higher tracks Since V2 is lower in the Timeline than V1 it will play over V1 This hierarchical structure lets you perform various effects such as transitions and overlays with precise control over the transparency or strength of the effect The lowest clip plays over all higher clips Dis...

Page 135: ...no visual reference to the clip s contents In the same dialog box you can also choose to show a cue bar which is useful for marking areas on a clip for future edits as well as for determining the size and height of video and audio clips Changing the size of clips is especially useful if you are running in a high resolution display mode and find it hard to identify clips and their contents Zooming ...

Page 136: ...h frame Holding down the SHIFT key as you click zooms out one ruler unit toward Fit in Window This method is best if you are zooming in on a particular clip or frame and want it to remain in view at all times You can also use the and keys found on the keyboard to zoom in and out General Timeline and Summary Timeline Ulead MediaStudio Pro provides two types of timeline views General Timeline and Su...

Page 137: ...ll the clips in your project In the Summary Timeline mode you get an overall picture of the whole project similar to a storyboard Clips are displayed in similar thumbnail sizes regardless of the clip s actual time length making it easier to select it The number of thumbnails you will see will depend on the number of segments your project has The numbers on the illustration below display an example...

Page 138: ...ify the number of commands to appear in custom and cache areas The custom area displays commands you specifically insert into the panel while the cache area automatically tracks the last commands you have used Selecting the Save when program closes option saves your changes whenever you quit Video Editor Leave this clear if you want to save the current configuration Note Custom commands appear at ...

Page 139: ... format that allows you to select a sequence of images to be loaded into a video project with the Insert Video File command These images can be from any source such as animation targa files or even a hand drawn series of images created in a drawing program The only restriction is that these files must have consecutively numbered file names such as VID0001 TGA VID0002 TGA VID0003 TGA and so on Note...

Page 140: ...ination for the converted file 4 Click the Options button to set the attributes for the converted file 5 Click Save Smart Check Convert Smart Check Convert is related to the above procedure but is specifically designed to bring video files in line with a project s settings Since your project s settings determine the final movie s format any clips you have inserted that are different from this fina...

Page 141: ...ert directly inside the Production Library To save select Options in the Batch Convert dialog box then select Save to Library in the Library tab 3 Select the files you want to convert Use the SHIFT and CTRL keys to select multiple files Click Convert Note Select Save in current folder to automatically overwrite the old files with the newly converted ones The process of converting these files could...

Page 142: ...ustomizing certain aspects of Video Editor s behavior Understanding these options will improve the way you work with Video Editor as well as help optimize Video Editor for each project The following pages offer explanations for the many options you have in Preferences to customize Video Editor PREFERENCES DIALOG BOX GENERAL TAB 1 2 3 4 5 6 7 8 9 10 11 13 12 14 2 ...

Page 143: ...ctly into the Timeline from the Production Library 6 Display data rate warning message halts the creation process of any video file once it exceeds the specified data rate Leave this cleared if the data rate is not important or you are creating video files unattended and do not want the creation process to be stopped 7 Display New dialog box opens the New dialog box whenever the New button or File...

Page 144: ...s Ulead Web site at a specified number of days interval for product news and updates 13 Customize background color for Timeline and Production Library makes the background color of the Timeline and Production Library similar to the background color of the Source and Preview windows 14 Temporary folder defines the folder that Video Editor uses as a temporary workspace for compiling compressing or d...

Page 145: ...ear 6 Default field order option choose the default field options for the selected video clips whose field options are unknown Field based video stores video data as two distinct fields of information for each frame If your video is only for computer playback select Frame based 7 Default display aspect ratio choose the default display aspect ratio for the selected video clips whose display aspect ...

Page 146: ...h as AVI or WAV you want to associate with a program 2 Associated program indicates the program to open whenever the Edit Open in Associated Program command is selected 3 Include trim information allows a video clip opened in the associated program to display any marked portions that you have created in Video Editor ...

Page 147: ...e to save preview files Specify other folders if you have additional drives or a partitioned drive If you only have one drive leave the other boxes empty 2 Hard disk displays how much free space you have left on your hard drive 3 Limit hard disk usage to specifies how much memory you want to allocate just for Video Editor s purposes If you are only using Video Editor and want to optimize performan...

Page 148: ... clips into the Timeline see page 127 Insert color title and silence clips into the Timeline see page 128 Control the display of the clips with Display Mode see page 134 Zoom in and out of clips using the Ruler Unit button and the Zoom button see page 135 Use the General Timeline mode to view all clips and corresponding timecodes Switch to the Summary Timeline mode to view all clips in a project t...

Page 149: ...ediaStudio Pro and this chapter is the most important section in this book Chapter 2 In this chapter you will learn Making selections in the Timeline p 150 Working with clips p 153 Working with cues p 160 Locating clips p 162 Trimming clips p 163 Ripple Editing p 167 Using the Source window p 170 Previewing your work p 174 ...

Page 150: ...ed a clip you can move it or drag on its borders to trim the clip To select all the clips in a particular track click the Track button on the left side of the track If you want to select all the clips in the Timeline select Edit Select All CTRL L Select a clip by clicking on it Select a track by clicking the track button To select multiple clips 1 Select the Clip Selection tool 2 Press and hold th...

Page 151: ...an group them together so that they remain as a unit see page 153 Using the Time Selection tool The Time Selection tool allows you to select a period of time including any clips or portions of clips that occur within that time period To perform a time selection 1 Select the Time Selection tool The pointer now has a Timeline icon under it when placed over the Timeline 2 Drag your mouse over the are...

Page 152: ...ck Selection tool on the Timeline toolbar 2 Click on a clip The clip along with the rest of the track to the right of the clip is selected Therefore if you click on the first clip in a track you will then select the entire track Note If you press SHIFT while clicking on a clip you will select all clips in all of the tracks in the Timeline to the right of the clip Using the Track buttons Enable or ...

Page 153: ...your project and manipulating them is the most important skill you can master The next few pages cover the basics cutting copying pasting and trimming To cut or copy a selected clip to the Clipboard Click either the Cut or Copy button on the Standard toolbar Select either the Edit Cut or Copy command Hold down CTRL and drag the clip to a different location Use the keyboard shortcuts Cut CTRL X or ...

Page 154: ...consistency between clips To paste the attributes of a clip only 1 Select the clip 2 Right click the clip or use the Edit Paste Attributes command 3 From the drop down menu select Paste Attributes This will open the Paste Attributes dialog box which allows you to select individual attributes to paste When pasting filters there are two additional options Append and Replace Append adds the new filte...

Page 155: ...responding audio track Va with Aa Vb with Ab and the two clips are locked together as a unit To delete or move either of the clips separately the two must first be split This is useful when you are creating a music video and the audio track is not needed You will also need to split the audio from a video clip in order to perform a freeze frame effect see page 157 To split the audio from video clip...

Page 156: ... will automatically find all of the clips in the project that have missing file links and locate the rest of the source files This can be a huge time saver If you choose the Ignore button in the Relink dialog box the clips on the Timeline appear blacked out You can still work with them but you won t be able to create previews or final video files Another way of relinking source files to their clip...

Page 157: ... the video see page 155 2 Right click the clip and select Freeze Frame The Freeze Frame dialog box opens 3 Use the slider under the Preview window to find the frame you want to freeze 4 Check Freeze before frame or Freeze after frame or both and then click the corresponding arrow button You can also directly enter the timecode and set it as the frame to freeze See notes on the next page for detail...

Page 158: ...frame was also selected with the value of 11 and the frame is repeated frozen until the end of the clip So this clip freezes at two different points If you want to freeze more frames within this one clip you must first use the Scissors tool to cut your clip into separate clips see page 165 Setting field options for video clips Video Editor allows you to work with both field based and frame based v...

Page 159: ...the Flicker reduction option to help Video Editor create the two fields necessary for each frame This may require some initial experimentation and may only be apparent when you output your movie to video tape Click OK when you are done setting the options Notes Display aspect ratio may be disabled if Perform non square pixel rendering is not selected in Project Settings or if the video clip has a ...

Page 160: ...te location on the Timeline A triangular blue cue marker appears on the cue bar Working with cues Cues are simply bookmarks for your video project As your projects get larger and more complex you can use cues to quickly jump from one place to another or mark the location of a particular event You can name the cues and add descriptions Cues can be added to the Timeline as a whole project cues or to...

Page 161: ... edges of the Timeline Click View Cue Manager to delete cues rename them or jump to a specific cue Placing clip cues You can also place cues on individual clips In this case the cues are black and appear on the Timeline immediately below the clip These cues cannot be named but can be used as navigation points in the Source window by clicking the Next Previous Edit Point buttons To place clip cues ...

Page 162: ...o a clip select it under Start Time in the list box 3 Click OK To go to another clip from the same source file click the Find Next button on the Standard toolbar or click Search Find Next F2 Note You can also use the Production Library to view all the clips in the current video project and search through text annotated to the clips To jump to a cue or a specific time 1 Click Search Go To 2 In the ...

Page 163: ...imming and editing clips is the basis of making movies There are a number of convenient methods for doing this in Video Editor Each of these offers different advantages depending on the type of clip and the operations you wish to perform To trim using the Clip Selection tool 1 Click the Clip Selection tool 2 Drag the left or right border of the clip How far you can drag depends on the type of clip...

Page 164: ...w Tip Use the left arrow or right arrow key on your keyboard to go through your video frame by frame Each key press moves you one frame forward or back You can also hold down SHIFT and use the mouse to drag the Jog bar This feature is particularly useful if the video clip duration is very long or you want to make precise trimming You can also use the Source window to cut your video clips Video Edi...

Page 165: ... that you can then move around the Timeline If you place two previously cut clips back in their original positions you can reattach them together by clicking with the Scissors tool selected over the cut line Note Hold down the SHIFT key on your keyboard to cut across multiple tracks Using the Trim window The Trim window is the most precise method of trimming your clips frame by frame To use the Tr...

Page 166: ...m the clip back it will reveal the underlying portion of the other clip which is then untrimmed This is useful if you want to merge two clips together and need to see the frames of each clip in the Trim window If the two clips are not adjacent you can only trim the active clip to the duration of the clip slot An example of stitching one clip over another Smart Trim The trimming procedures describe...

Page 167: ...e editing will move everything including empty space out of the way to make room for the inserted clip but only on the target track Multi Track Ripple editing will move everything including empty space out of the way to make room for the inserted clip moving all clips audio and transitions included on all tracks Notes With any of the Ripple Editing modes selected you cannot trim clips toward the s...

Page 168: ...s again inserted between the red and yellow clips This time Single Track Ripple is selected RippleEditingexamples The following illustrations will help you understand the sometimes complex but extremely important and useful aspects of Ripple Editing Note All of the following examples involve the initial insertion of a clip from outside of the Timeline When moving already inserted clips around with...

Page 169: ...ertion point To insert a clip into another 1 Select Edit Ripple Editing Single or Multi Track 2 Click the Insert Video File button 3 In the Insert Video dialog box select the clip you want to insert As green avi is about to be inserted the part that overlaps the yellow clip turns bluish When the clip is actually inserted the yellow clip and the one second space are moved to the right three seconds...

Page 170: ...operations and place clip specific cues Clips can be dragged to and from the Source window and into the Timeline or Production Library A quick double click will immediately open up a clip in the Source window The Source window itself is made visible by selecting the Source Window button on the Standard toolbar or by using the Window Source Window command Once a clip is opened you can use the menu ...

Page 171: ...ded into the Source window 6 Navigation bar See details on the next page 7 Current position displays and allows you to edit the time of the current position of the Jog bar 8 Trim area displays and allows you to edit the current duration of the trim area 9 Apply button applies all editing done in the Source window to the clip in the Timeline 10 Menu button displays several options for resizing the ...

Page 172: ...bers to automatically readjust the Jog bar and or Trim bar 1 Play Pause plays the entire clip from beginning to end 2 Play Mark Area Pause plays only the trim area from Mark in to Mark out point 3 Play from the current position to Mark out Pause plays the clip from the current position of the Jog bar to the Mark out point 4 Previous Edit Point moves the Jog bar to the previous cue or the beginning...

Page 173: ... the corresponding video track Zoom tool Mark in point Visible area Mark out point Trim area To trim an audio clip 1 Place the red vertical line where you want to begin the trim selection area 2 Select the Mark in button The unselected area changes to a blue waveform on a gray background 3 Repeat steps 1 and 2 with the Mark out button 4 Click the Apply button The clip on the Timeline is adjusted ...

Page 174: ...w window itself is very similar to the Source window Where the Source window is used to view trim and add cues to individual clips the Preview window is used to view your project either in full or in part or to add project cues 1 Toggle button switches between Instant Playback and High quality playback 2 Play Pause plays a preview of all the clips in the video project 3 Play the Preview Range play...

Page 175: ...en over the Preview bar A blue bar indicates the period for preview A right click on the cue bar will delete the preview range Use the Preview window to create a preview range Use the Trim handles to define the preview range This is also represented as a blue line both in the Preview window and on the Preview bar above the Timeline Click Edit Preview Range and enter specific timecode values to def...

Page 176: ...f special effects in different segments you can set the Performance Level by right clicking the Toggle button to determine whether Video Editor renders a preview file or not when previewing your video clip Video Editor renders only when a segment s complexity level is above the performance level you set The performance level you set should be relative to your CPU speed The faster your CPU the high...

Page 177: ...t with a DV file format templates only directly from the Timeline out to a DV camcorder or other IEEE 1394 devices without rendering a final movie file It also lets you view a project on an external monitor at any time To use DV SmartPlay 1 Select File Project Settings and click Edit Here select the options corresponding to your video clip attributes For example on the AVI tab make sure the audio ...

Page 178: ...ming a regular preview however scrubbing an area with too many effects may not be smooth Before performing a scrub preview set scrubbing preferences such as preferred preview playback source in the Scrubbing Options dialog box You can access this through the Preview Window menu To perform a scrub preview 1 Move the pointer up to the top of the ruler above the Timeline It will change to a star 2 Dr...

Page 179: ...files The files that are created for the preview if high quality playback is selected are saved in a temporary directory that can be set from File Preferences on the Preview tab Preview files can take up a huge amount of disk space so it is important to set these folders up properly Sometimes MediaStudio Pro will generate a Not enough disk space error when previewing This error often occurs becaus...

Page 180: ...p or its attributes only see page 153 Select the Edit Snap command to snap clips to cues or to the edges of other clips see page 155 Use cues in the Timeline as well as the Source window to identify and mark areas of interest see page 160 Use the Trim window to accurately trim clips see page 163 Use the Ripple Editing feature when inserting clips see page 167 Use the Source window to view the cont...

Page 181: ...y run wild as you learn about the most fun and exciting features of Video Editor Chapter 3 In this chapter you will learn about Using transition effects p 182 Using key frame controls p 188 Using a video overlay effect p 190 Working with mattes p 195 Applying video filters p 197 Creating a moving path p 202 Applying audio filters p 209 Creating titles p 212 ...

Page 182: ... the effect To apply a transition effect 1 Place a clip in the Va track and another in the Vb track making sure the clips overlap a little 2 Open the Production Library and select the Transition Effect folder to display its gallery of effects 3 Drag and drop an effect to the Fx track between the overlapping clips 4 The Transition Options dialog box appears Click OK and preview Drag and drop transi...

Page 183: ...utton plays the effect with its current settings 12 Preview Playback Options opens a dialog box where you can specify where to preview the filter effect 13 Play in Preview Window or External Monitor outputs the results in Video Editor s Preview and or an external monitor 14 Transition degree specifies the degree of completion at the current frame 15 X and Y indicate the coordinates for the startin...

Page 184: ...n at the same time Note Double click a previously inserted transition to open the Transition Options dialog box It is automatically opened when you insert a new transition only when the Display Options dialog box option is selected in File Preferences General tab 3 Enter a Border value of 1 Change the color of the border by clicking on the Color square and selecting a color 4 Select one of the two...

Page 185: ...rom the jump cut with no transition and the crossfade are probably the only two that are commonly used in Hollywood movies Another popular technique is to fade to black at the end of a program or scene To fade to black 1 Place a video clip onto the Va track 2 Create a black color clip see page 132 and drag it onto the Vb track making sure the start of the color clip overlaps the end of the video c...

Page 186: ...s easy to get carried away and use them between every clip A fancy transition is not always the best artistic choice however and can at times be distracting Simple jump cuts or fades are often your best choices It is of course trivial to reverse this effect to fade from black at the start of your movie Just make sure that the color clip precedes the video clip in the Timeline and then make sure th...

Page 187: ...p When you click the second clip the audio levels are automatically faded in and out on both clips You can also use this technique in a more general way across all of the overlapping clips in your project After you ve finished all your editing in your project follow the procedure below to crossfade the audio across two entire tracks To perform an audio cross fade between tracks 1 Click the Audio C...

Page 188: ...nt The proce dure below uses the Circle Wipe transition effect dialog box to create a customized transition animated with key frames To use key frames to animate a transition effect 1 Place a clip in the Va track and another in the Vb track making sure the clips overlap 2 From the Wipe folder in the Production Library under Transition Effect drag the Circle thumbnail into the Fx track bridging the...

Page 189: ...nological in nature it is impossible to drag a key frame beyond a neighboring key frame on either side To reverse key frames 1 Click on any key frame diamond on the Key frame Controller 2 Click the Reverse Frame button Note This does not simply reverse the key frames but actually inverts the entire effect Using key frames to animate a transition For a list of shortcut keys when using key frame con...

Page 190: ... folder drag the photo2 jpg clip onto the V1 track and line it up underneath the clip in the Va track 3 Click the Overlay Options button on the Timeline toolbar or click Clip Overlay Options This command can also be selected from the right click pop up menu The Overlay Options dialog box opens 4 From the Type list choose Color Key 5 On the Overlay clip click on the green area with the Eyedropper 6...

Page 191: ...sparent 8 Advanced control window displays a representation of the threshold cutoff max value min value and gamma value parameters Click any of the parameter handles and drag to adjust 9 Play in Preview Window or External Monitor outputs the results in Video Editor s Preview and or an external monitor 10 Preview Playback Options opens a dialog box where you can specify where to preview the filter ...

Page 192: ...ere are two main types you can choose from color based and mixed based Color based types such as Color Luma Chroma Gray Key and Blue Screen all work by making a specified key color transparent These types also allow you to control the Similarity and Transparency of the effect Mixed based types such as Multiply Add Subtract and Difference determine how the overlaying and underlying clips merge with...

Page 193: ...arent overlays involves using Alpha Channels This technical term simply means an area or areas of an image that have been selected to be transparent in an image or video In many ways an Alpha Channel is the same as a color key and could be based on a color in a clip Many image editing programs allow you to create and save Alpha Channels and it is the technique employed by CG Infinity to control tr...

Page 194: ...contribute to the levels of highlight and shading that appear in an image The Gamma graph is a visual guide which allows you to change these values and thus affect changes in the highlights and shadows as well as change the midrange or midtone values If you move the gamma value higher up the graph you darken the clip whereas moving it lower lightens it You can move the thumbtacks that appear along...

Page 195: ...ing To create an image matte 1 Run your favorite image editing software such as Ulead PhotoImpact Video Paint or CG Infinity can also be used and create a rectangle the same size as the frames in your video project 2 Draw an area where you want the video to appear such as a circle or a square 3 Fill this area with a solid color like blue and then fill the background with a contrasting color like g...

Page 196: ...box Result Grayscale matte Foreground Background Using Grayscale mattes Mattes are generally comprised of two solid colors that make it easier to identify which areas to show and which to hide For greater control you can use a Grayscale matte which works by using a gradient transparency as a matte where the level of transparency directly corresponds to the level of gray For example lighter grays w...

Page 197: ...from the pop up menu 3 Select the filter you want to apply from the Available filters list box and click Add The filter is moved to the Applied filters list box 4 Click Region to select which frames you want the video filter s to be applied to in your video Click OK to return to the Video Filter dialog box 5 Click OK The Video Filters dialog box closes and the filter is applied to the clip Note If...

Page 198: ... your whole project To use global filters 1 Select File Project Settings 2 In the Project Settings dialog box click the Global Filters button 3 In the Video Filters dialog box select the video filters you want to apply to your whole project 4 Click OK Cloud Special Colored Pen Nature Painting Emboss Darkroom Diffuse Darkroom Project Settings dialog box ...

Page 199: ...rame from the clip after the filter has been applied VIDEO FILTER OPTIONS DIALOG BOX MONOCHROME To fine tune a video filter 1 Right click a selected clip with a previously added video filter and select Video Filters or add a new filter 2 Click the Options button to view the filter and change its attributes When you click Options a dialog box opens displaying two windows Original with the selected ...

Page 200: ...te to a video filter When you apply a video filter it affects the entire frame of a video clip There may be times however when you would prefer it to only affect a certain portion of the clip such as a highlighted area or a specific scene in the background You can do this by first creating an image or video matte see page 51 and then loading the matte into the Video Filters dialog box See the next...

Page 201: ...ilter 3 Type drop down box lets you select the key type to use in the Mask window 4 Mask drop down box lets you select the kind of matte to use 5 Enable filter start position enables the filter applied to the clip starting from the current position 6 Threshold slider determines the sensitivity to bright and dark pixels 7 Matte opens the Select Image Matte dialog box 8 Preview Playback Options open...

Page 202: ...deo overlay tracks and are most commonly used with title clips and objects created with CG Infinity To create a 2D basic moving path 1 Open the Production Library and select the 2D Basic Moving Path folder from the Moving Path gallery 2 Drag the 2D Basic thumbnail onto a clip in an overlay track This opens the Moving Path dialog box see the diagram on following page 3 Click the Start control point...

Page 203: ...near interpolation to logarithmic interpolation solving zoom quality problems that occurs when the size of the image is changed over its duration 9 Preview allows you to display the moving path before actually applying it 10 Show Background displays the background clip in the frame window 11 Speed determines the speed of the preview 12 Play performs a preview of the moving path 13 Preview Playback...

Page 204: ... a clip but are restricted by the size of the Motion Control window such as for long title credits By switching the reference of the clip to the top you can then drag the sample clip outside of the frame box and beyond the area of the window The Zoom button opens the Zoom window which displays the Motion Control window in greater magnification A green frame also appears in the Motion Control windo...

Page 205: ...d control point and repeat steps 5 and 6 entering exactly the same values 8 Click OK and preview the effect The 2D Advanced Moving Path dialog box is similar to the 2D Basic Moving Path except that you can spin a clip around a central point in two dimensions To create a 2D advanced moving path 1 Select the 2D Advanced thumbnail from the Moving Path gallery and drag it onto a clip 2 Enter a rotatio...

Page 206: ...xes have options for controlling the behavior of the path and the clip itself For example if you select the Clip Angle in the Adjust combo box you can adjust the rotation of the clip on the surface of the sphere or cylinder rotation values can be entered using the rotation dial the plus minus buttons or the entry boxes The X and Y coordinates deter mine the placement of the sphere or cylinder in r...

Page 207: ...r of the of the fixed project frame 3 Drag the Preview slider in the Key frame Controller halfway between the start and end key frames 4 Click Add Key frame and drag the red square the new control point to the bottom of the fixed project frame 5 Drag the End control point E in the Motion Control window to the top right of the fixed project frame Now watch the preview The clip should descend from t...

Page 208: ... distortion in the image To avoid this problem select Keep original size with moving path automatically in the Insert Image File dialog box When you apply a moving path attribute to the image file that you have just inserted the image file will be stretched to fit the dimensions of your project To maintain the original size of your image you have to change the Width and Height in the dialog box of...

Page 209: ...ibrary onto an audio clip To apply an audio filter 1 Select the audio clip you want to apply the filter to 2 Click the Audio Filters button or Clip Audio Filters or right click the clip and select Audio Filters from the pop up menu This opens the Audio Filters dialog box 3 Select the filter you want to apply from the Avail able filters list and click Add The filter is moved to the Applied filters ...

Page 210: ...o remove a control point drag it off the top or bottom of the clip If you hold down the SHIFT key before adjusting the control points you will see values in dB and for the exact audio level Adding a soundtrack Putting background music into your movie is simple but you must carefully control the volume of both the source video and the music audio file to make it work The best source for background ...

Page 211: ... at the beginning of the fade out and at the end of the fade out 4 Drag the two middle control points lower to set the volume Note For greater accuracy in editing zoom in on the clips with the Zoom tool or Ruler Unit button see page 135 It can be faster to simply preview the audio instead of both the audio and the video Create a preview area and click File Create Audio File to test the audio from ...

Page 212: ... the motion_plug folder b Type effect plug ins Place in the vte_plug folder 3 Close then restart the Title plug in Adding titles is an important part of nearly every video project The most common examples of this are the opening and ending titles and credits In Video Editor you can place title clips in any of the video tracks but in most cases you will want to place them into an overlay track V1 V...

Page 213: ...isplays the background video behind the preview 8 Play in Preview Window or External Monitor outputs the results in Video Editor s Preview and or an external monitor 9 Preview Playback Options opens a dialog box where you can specify where to preview the filter effect 10 Title safe area displays the title safe area in the Preview window 11 Text orientation toggles between making the text s orienta...

Page 214: ...red background to your text 10 Opaque background or Color bar select whether to apply a solid background for your text whole screen or a color bar behind your text Color bar options 11 Solid applies a solid colored bar behind the text 12 Gradient applies a combination of two colors for the color bar 13 Fill specify the direction of the gradient fill 14 Transparency enter the level of transparency ...

Page 215: ...eview of the selected animation type 3 Customize click to display a dialog box where you can adjust the settings of the selected animation effect thumbnail 4 Remove click to remove the selected animation effect applied on the clip ANIMATION TAB OF THE INSERT TITLE CLIP DIALOG BOX 1 2 3 4 TYPE EFFECT 1 Effect allows you to choose the available type effects from the drop down list 2 Effect Gallery d...

Page 216: ... to control the appearance of effects at different stages see page 188 Choose a key type and specify how you want an overlay clip to blend onto the background video see page 192 Use mattes to show or hide specific areas in a video see page 195 Load an image matte into the Video Filters dialog box to control which area of the video is affected by the filter see page 200 Make video clips fly rotate ...

Page 217: ...pter 4 In this chapter you will learn about Creating a movie p 218 Analyzing a video file s data rate p 225 Creating an audio file p 227 Creating an image sequence p 235 Creating an edit decision list EDL file p 236 Outputting to analog video tape p 238 Creating a VCD SVCD DVD p 240 Creating MPEG 2 files p 242 Creating WMV Quicktime streaming file p 243 Exporting to Ulead DVD MovieFactory VR Wizar...

Page 218: ...Options dialog box closes and you return to the Create Video File dialog box 6 Click Save Notes Render your video with exactly the same attributes as your captured video The movie should render very quickly and the quality will be the best you can get The most important attributes you should check are codec frame rate and frame size You can check these settings by right clicking on a selected vide...

Page 219: ...your video project has no preview area 2 Perform non square pixel rendering performs non square pixel rendering when previewing your video Non square pixel support helps avoid distortion and keeps the real resolution of DV and MPEG2 content Generally the square pixel is suited for the aspect ratio of computer monitors while the non square pixel is best used for viewing on a TV screen Remember to t...

Page 220: ... select between saving your work as field based or frame based video files Field based video stores video data as two distinct fields of informa tion for each frame If your video is only for computer playback you should save your work as frame based 5 Key frame control allows you to control the placement of key frames for compression schemes that support interframe compression such as Cinepak This...

Page 221: ...ange of predefined sizes or define your own 5 Display aspect ratio maintains the vertical and horizontal proportions of your video When cleared you can independently resize the video to create non standard effects such as widescreen TV Note The frame rate and frame size you choose should match the frame rate and size of your captured video clips if you intend to output your video back to tape You ...

Page 222: ...g on the amount of resampling involved After resizing the control box you can move its position by dragging it Use the slider beneath the window to preview how your changes affect the video Cropping video files Cropping is a useful method for controlling the frame size of a video without having to resize the actual frames This is important as resizing frames resamples the original video resulting ...

Page 223: ...ubsets under Media Type in the Video Save Options dialog box Users can now easily save their videos as DVD VCD SVCD NTSC or PAL by simply selecting the desired media type from the drop down menu Note Availability of MPEG 2 support depends on the product specifications in your region Save the settings that you have provided for your video as a template Instead of going over the steps again in just ...

Page 224: ...from Once selected click OK The standard Create Video File or Create Audio File dialog box opens 3 In the Create Video File dialog box enter a Name and set up any other Options Click Save when finished The dialog box closes and you return to the Create Multiple Files dialog box Select the next project file you want to render and repeat 4 Click OK The dialog box closes and the video files are creat...

Page 225: ... to open the Data Rate Analysis dialog box 2 Browse for and select the video file that you want to analyze and then click Analysis The Data Rate Analysis window details the various attributes of the file and shows a graph indicating the size of each frame in the video This graph contains a number of blue frames which indicate key frames in the video sequence key frame diamonds are also visible ben...

Page 226: ...eturn a clip to its original settings click Restore Note Removing a key frame doesn t remove the frame itself it only removes the reference to that frame as a key frame 3 Click Save As to save the new key frame information to a Key file KEY To apply the key file you need to re render the video file again making sure you specify the key file in the Key frame control group box in the Video Editor ta...

Page 227: ... the Save as type list 3 Enter a File name 4 Click the Options button to view or edit the specific details of the file in the Audio Save Options dialog box The Compression tab contains the options you need to specify to determine the quality and thus the size of the audio file Click OK to accept the current audio attributes 5 Click Save You can also append a subject line and a short description to...

Page 228: ...anel This panel allows you to do audio mixing by adjusting Volume Fader and Pan Balance controls Because this is a floating panel you can adjust audio settings while listening to them or viewing the videos It consists of Volume Fader Pan Balance Control and VU Meter for each audio track which is numbered according to the corresponding audio track in the Timeline You can also make 2 or more audio t...

Page 229: ...e Timeline instantly and continuously until you click Stop Options displays other audio settings that you can apply when doing audio mixing ID specifies the track or group number for both Track and Group Layout Solo monitors a single track and temporarily mutes all other tracks where this option is disabled Mute temporarily converts the audio track to silent This allows you to listen to other trac...

Page 230: ...o Write Auto Read reads the settings you made to Volume Fader and Pan Balance controls then uses these data to control the audio level of the track during playback This option only reads the modified settings but does not change the original audio settings of the audio clip Auto Write reads and then records the adjustments made to the audio settings The original settings will be replaced by the ne...

Page 231: ...e process stored in the memory Toggle between these buttons to control how MediaStudio Pro processes the adjustments you make for each track or group Located at the right side of the Audio Mixing Panel is the Master Mixer It consists of two controls to help you adjust the overall volume output of your system s sound card Instead of switching to Windows Volume Control you can adjust the volume here...

Page 232: ...the track that is included in the group To group audio tracks 1 After inserting audio clips to the Timeline click Window Audio Mixing Panel to do audio mixing 2 The Track Layout is the default layout of the panel To group preferred tracks click Options Group Tree Setting 3 In the Group Tree dialog box select the tracks you want to group first You can do this by holding CTRL while selecting the tra...

Page 233: ...Mixing Panel Select one of the following modes Select Default to edit the saved volume level and Pan Balance data without having to drag the controls during recording to begin the write process In this Auto Write mode all previous adjustments in the audio track will be erased This is ideal if you want to keep a particular control setting throughout a recording or if you want to write automation at...

Page 234: ...anges you have made in the audio settings even when Auto Read is activated by clicking Apply on the lower right corner of the Audio Mixing Panel 9 Drag the edit line towards the beginning and click Play to preview your changes Frame by Frame Audio Preview Aside from working with audio cues and setting audio mark in and mark out times you can also preview your audio files frame by frame using the c...

Page 235: ... a Ulead Image Sequence UIS file of the video project or preview region When you create a Ulead Image Sequence Video Editor sequentially numbers each frame and saves it as a standard image file You can convert these images back to a video file using the File Convert Video File command and selecting the UIS file type To create a Ulead image sequence 1 Click File Create Video File 2 Select Ulead Ima...

Page 236: ...an EDL it is important that you contact your post production house to determine the format they use as well as which effects are supported particularly because not all post production companies support the wide array of effects available in Video Editor Note You must post the timecode see the next page onto each of your clips in a video project before creating an EDL To do this you first need to h...

Page 237: ...ately post timecode you need to have recorded the timecode at the time of capture using a controllable device To post timecode 1 Click Clip Post Timecode to open the Post Timecode dialog box Post Timecode dialog box 2 Type the name of your source video in the Reel name entry box for example Wedding 1 3 Specify the appropriate time to start recording from the source in the Timecode spin box The tim...

Page 238: ... the pop up menu to see this information If you have already created an avi file with your project it is easy to print the finished movie to tape Note To output a video to tape you need a video capture board which supports this or a similar device with a VGA to TV converter It is also advisable to have a controllable device that allows you to control the recording from Video Editor To output an av...

Page 239: ...Click File Print To Tape Timeline to open the Select Timeline dialog box 2 Choose whether to output the Entire project or just a selected Preview range 3 Select Options to open the Print To Tape Options dialog box and follow steps 3 and 4 of the outputting an avi file procedures 4 Click OK to close the dialog box and then OK again to begin playing back the sequence The movie then plays back while ...

Page 240: ...B and load them into MediaStudio Pro s Timeline sequentially You can then use Timeline playback to play the files back seamlessly to tape Creating a VCD A VCD is simply a special version of a CD ROM The exciting thing about this format is that it can be read by most newer stand alone DVD players which are becoming very popular The format used on a VCD is MPEG 1 When you want to create a VCD file y...

Page 241: ...CD or PAL SVCD depending on your TV standard 6 Click OK Enter a name and click Save to render your movie Creating a DVD DVD stands for digital video disc or digital versatile disc and is considered as the next generation of optical disc storage technology What makes it exciting is that it is a bigger and faster CD which can hold cinema like video high quality audio which is better than an ordinary...

Page 242: ...s so powerful it requires a fast CPU or a dedicated MPEG 2 video card not only to create the video files but also to view them a 450MHz CPU is a recommended minimum With that in mind MPEG 2 is an excellent choice for any type of movie MPEG 2 s highly compressed nature means that you can fit about 16 20 minutes of video onto a CD This is plenty of space for most home movies To create MPEG movies 1 ...

Page 243: ... File 2 Select QuickTime Movie Files mov qt from the Save as type list 3 Click the Options button 4 Click the Compression tab 5 Select Prepare for Internet Streaming This makes the file available for Internet viewing 6 Select the streaming method to be used from the drop down list This determines how the video file will be delivered over the Internet Fast Start Uses HTTP Hypertext Transfer Protoco...

Page 244: ... Profile tab This displays the current template used for compressing media files so they can be streamed over the Internet 5 Click Customize to select the desired template for optimizing media files for simultaneous download and playback on the Web Note When choosing a template consider the type of users that will be playing your media files over the Internet For instance use the Dial up modems IS...

Page 245: ... click OK 3 The DVD MovieFactory program opens 4 In the Select Project Format dialog box select the output disc format DVD VCD or SVCD you want to use then click OK Exporting to Ulead DVD VR Wizard In MediaStudio Pro you can record or add videos to a device that supports DVD RAM using DVD VR format or DVD R To export your videos to DVD VR Wizard 1 Select File Export Ulead DVD VR Wizard 2 In the Se...

Page 246: ...rted even the very first DV products on the market this latest version now offers comprehensive support for DV in all of its manifestations This includes but is not limited to Type 1 Type 2 PAL NTSC and even the device control of your camcorder To record a movie to your DV camcorder 1 Turn on your camcorder and set it to Play mode or VTR mode See your camcorder s manual for specific instructions 2...

Page 247: ...on the External playback device option of the dialog box To preview using an external playback device 1 In the Production Library select Transition Effect Moving Path or Video Filter from the drop down list 2 Double click on the thumbnail to open the corresponding dialog box 3 Click the Preview Playback Options button below the Preview window 4 In the Preview Playback Options dialog box choose an ...

Page 248: ... the key frames to optimize compression see page 225 Adjust audio settings using the Audio Mixing Panel see page 228 Make multiple tracks share one audio setting by grouping them together see page 232 Modify volume controls in real time see page 233 Preview your audio clips frame by frame using the Source Window see page 234 Remember to post timecode when creating an EDL see page 236 If outputting...

Page 249: ......

Page 250: ......

Page 251: ... such as lightning bolts lasers beams virtual sets and mattes You can also use the wide range of natural and particle based painting tools to work on single images for use in other projects such as Web pages and presentations Chapter 1 In this chapter you will learn about Understanding the basics p 252 Viewing edit windows p 263 Working with frames in a project p 265 Customizing Video Paint p 269 ...

Page 252: ...of the frames appears as a clip in the Filmstrip panel You can scroll through this panel to view the clip or select a specific frame to work on When you select a frame it opens automatically as an image in an edit window Once an image is displayed in an edit window you can begin to work on it paint or enhance it using various Video Paint tools Video Paint s program window ...

Page 253: ...Paste an image View in Composite mode View in Paint Layer mode Redo an undone action Undo a previous action View in Normal mode View in Onionskin mode View in Ruby Mask mode View in No Source Video mode Production Library Shape Selection tool Lasso tool Magic Wand tool Transform tool Clone tool Zoom control Foreground background colors Zoom tool Grabber tool Painting tool Retouch tool Eyedropper t...

Page 254: ...he top marker indicates the frame s position timecode in the current view while the bottom marker indicates the frame s position relative to the entire clip Markers indicating the position of the current frame in view top and its position relative to the entire clip bottom Adjusting the view of the Filmstrip panel You can change the frames currently displayed in the Filmstrip panel by dragging the...

Page 255: ...eo Paint file UVP UVP files do not save the source video file just the clip information which contains a pointer to the original video file as well as a list of all the edits performed on each frame in the video sequence This serves to keep the file size down and doesn t force you to have to duplicate existing video files When you open a UVP file you need to ensure that the source file is still pr...

Page 256: ...es that make up a video sequence The maximum duration for any file you open is 30 seconds Note Video Paint automatically converts any file you open into its workspace to True Color If you want to constrain your editing to an indexed color palette then load the palette into the Custom tab of the Color panel see page 286 To open a video file 1 Click the Open Video File button on the Standard toolbar...

Page 257: ...ed in Video Paint saves the project if changes have been made and then reloads it so only the selected frames appear To edit frames outside of the current project use the File Open command and select the frames in the Duration dialog box Note If you want to work on each frame in a large video file such as 30 seconds first open the entire file into Video Paint and then save it as a UVP file You can...

Page 258: ...ur edits with the original source file To create a video file click File Create Video File This opens the standard Create Video File dialog box which has the same options as those in Video Editor To learn more about these options see the Creating a movie section page 218 If you plan on using your work in a Video Editor project insert the UVP file directly by selecting the UVP file type from the Fi...

Page 259: ...s an image either from Video Paint or any other image editor you can paste it into an edit window To do this click the Paste button on the Standard toolbar or Edit Paste CTRL V Images are pasted at the same location they were cut or copied from If the pasted image was from a frame or other image larger than the active frame then the image is pasted at the top left corner of the current view Anothe...

Page 260: ... Duplicate Last Floating Selection CTRL K or Duplicate Last Paint Layer CTRL L Duplicate Last Floating Selection places a copy of the last active floating selection while Duplicate Last Paint Layer copies every thing present in the last active paint layer To duplicate an action over several frames you need to perform a power duplication Power duplication is much more flexible than the other Duplic...

Page 261: ...pearing before or after the active frame In the Duration spin box indicate how many frames to duplicate over 5 Set the Start and End frame transparency in the Start and End tabs Default is 0 or no transparency You can also specify the X and Y coordinates from where to place each duplicated edits By having different start and end coordinates you can have the duplicated edits appear to move linearly...

Page 262: ...ultiple frame actions option or decrease the number of frames to duplicate over Creating a matte frame 2 and then power duplicating it across the others Placing cues In Video Paint you can place cues at any frame in a project to mark it for later editing or identification To place a cue click the Cue bar located under the Preview bar of the ruler at the appropriate location in the Filmstrip panel ...

Page 263: ...box Viewing edit windows Whenever you open a file the first frame of the sequence appears in an edit window at its original size 1x Video Paint allows you to control the size of this edit window as well as zoom in or out from the image This helps you to see more easily the areas you are editing as well as identify areas for further enhancement Zooming on an image When you edit an image you may wan...

Page 264: ...lso press the and keys to zoom in and out on images regardless of the current tool selected Pressing the Z key while using another tool automatically switches that tool to the Zoom tool Releasing the Z key then switches the tool back Using the Global Viewer When an entire image cannot be displayed within the edit window scroll bars appear allowing you to navigate around the expanded image The Glob...

Page 265: ...w By submenu The maximum zoom level available is deter mined by the size of the image and your current display mode An alternative to the Fit in Window By command is the Fit in Window button on the Attribute toolbar or View Fit in Window This automati cally resizes the image to fit within the edit window at the largest possible size without introducing scroll bars Working with frames in a project ...

Page 266: ... Select the frame in the Filmstrip panel where you want to begin inserting the additional frames 2 Click Frame Insert to open the Insert Frame dialog box Insert Frame dialog box 3 Specify the number of frames to insert in the Insert duration spin box and then select either the Before current frame or After current frame options to determine whether the inserted frames precede or follow the active ...

Page 267: ...rames The Frame Delete command removes a frame or frames from your project shortening the duration accordingly This does not remove them from the actual source file When you click this command the Delete Frame dialog box opens allowing you to specify which frames in the sequence to remove You can enter the timecode of the frames in the Start and End spin boxes or use the Mark In and Mark Out butto...

Page 268: ...ox and then specify what to replace the frames with in the Link with group box The Empty frame option replaces the frames with the current film color while the Source video option uses frames from the source video file starting from the position specified in the Timecode spin box Select the Only preview source video option if you do not want the preview video to display any edits currently in the ...

Page 269: ...e this option clear 2 Levels of undo redo specifies the maximum levels of undo redo allowed by Video Paint up to 99 As Video Paint allocates more memory for each level of undo redo you may find that too high a level adversely affects performance In such cases restrict the level to 3 4 only You can of course choose not to have undo redo to maximize performance but any editing performed is final 3 C...

Page 270: ...equence to the first frame after it has been played like a CD player When clear the sequence stops on the last frame after playing like coming to the end of a tape in the VCR 7 Play macro after recording plays a macro immediately after recording it Leave this clear if you are content with your macro recording or if you want to test it yourself on another frame PREFERENCES DIALOG BOX PREVIEW TAB Th...

Page 271: ...much total disk space is allocated for virtual memory as well as how much space is allocated in RAM for use by all MediaStudio Pro programs 1 Define additional folders for virtual memory allows you to specify the folder used by the MediaStudio Pro programs as additional working space For example when you don t have enough RAM the MediaStudio Pro programs can use extra memory from the hard disk vir...

Page 272: ...ay adapters or the environment in which you work as lighting and temperature can also affect a monitor s performance 1 Hi Color dithering allows you to improve the display of True Color images when you are in Hi Color display mode 2 View images with a common palette displays all images using the system palette This is only enabled when you are in 256 Color display mode and makes your work more eff...

Page 273: ...nitor both of these squares should look approximately the same 2 Examine the two color squares and if the two squares look different adjust the Monitor gamma spin box until the bottom square looks similar to the top square The monitor gamma value can be any number from 0 01 to 7 99 If none of the squares exactly match try and estimate the best match In general your value should fall within 0 8 2 4...

Page 274: ...e in an edit window see page 252 Control the size of frames in the Filmstrip panel by using the right mouse pop up menu see page 254 Open only a few seconds of a video file for speedier editing see page 256 Use Power Duplicate to copy edits over multiple frames see page 260 Use cues to identify important frames in a project see page 262 Calibrate your monitor to get the best possible display of im...

Page 275: ...uch and Clone tools to the more common Paintbrush and Transform tools Chapter 2 In this chapter you will learn about Working in different display modes p 276 Making selections p 280 Working with color p 285 Using the Painting tools p 289 Transforming selections p 294 Using the Clone tool p 295 Using the Retouch tool p 296 Recording macros p 298 Applying filters p 301 Previewing your work p 302 ...

Page 276: ...arious painting and retouching tasks Ruby Mask mode The Ruby Mask mode is useful when you want to create a video or image matte that protects certain areas of an underlying video from any edits you may perform Mattes are often used in conjunction with Video Editor A good example of this is a hold out matte that is used to remove the matte lines that often occur around objects which have been filme...

Page 277: ...pe tab of the Brush panel Now when you paint the ruby mask is applied 5 Select the next frame and click Edit Duplicate Last Paint Layer The paint layer from the previous frame is copied to the current frame Once duplicated you can start painting on it as in the previous step 6 Repeat steps 4 and 5 until the matte is complete If the object you are creating the matte over does not move then you only...

Page 278: ...e page 290 3 Click the Onionskin mode button on the Standard toolbar or View Display Mode Onionskin 4 Click View Onionskin Options to open the Onionskin Options dialog box Onionskin Options dialog box 5 Select on which frames to apply the onionskin in the Overlay combo box Use Succeeding if you are editing frames to the right of the active frame toward the last frame or Preceding if you are editin...

Page 279: ...ns have a transparency applied If left clear the transpar ency is applied to the source video plus the paint layer Depending on the type of video this may produce no noticeable effect 9 Click OK The dialog box closes and the settings take effect immedi ately Painting over frames in Onionskin mode No Source Video mode When working on an image it can often get confusing trying to determine where the...

Page 280: ...e a selection a dotted line appears around the edges of the selected area This dotted line is called the selection marquee The marquee can either be floating containing image data or non floating selecting the source video Floating selections appear in the paint layer of an image and are created whenever you move a selection area perform a transformation on a selection area paste a selection into ...

Page 281: ...n area the edges blend in slightly with the surrounding background An added feature of selecting in the paint layer is the Shrink button on the Attribute toolbar When you select this button any selection you make snaps to the edges of your edits as long as the edits are included in the selection Selecting regularly shaped areas The Shape tool allows you to select areas of an image based on a prese...

Page 282: ...our mouse allows you to draw precise curved segments clicking your mouse allows you to define straight line segments By combining both drawing techniques you can quickly outline selection areas that contain both irregular and straight segments When you have finished outlining the selection area double click to release the Lasso and Video Paint automatically selects all image data within the bounds...

Page 283: ...ective way to select large solid colored portions of an image such as a blue screen or patches of skin and clothing When you use the Magic Wand tool it operates in one of two modes Line or Area In Line mode dragging your mouse over an image creates a line that calculates the largest and smallest color values of the pixels under the line any values entered in the Similarity spin box are also includ...

Page 284: ...rs thereby selecting the entire image A value of 50 selects neighboring pixels that have values that differ from the pixel you click on by 50 For example if you click on a pixel with values R25 G60 B190 neighboring pixels with values between R0 G10 B140 and R75 G110 B240 are selected Adding to or subtracting from a selection area Once you ve created a selection area you may discover that you left ...

Page 285: ...ion pixel by pixel To move a selection marquee to another frame first copy it and then click Edit Paste As Mask see page 259 Working with color Before you start painting on images you need to select the color you wish to apply In Video Paint you can do this in a number of ways from picking colors out of a palette to selecting colors directly from an image At any time two colors are active the fore...

Page 286: ...lor then replaces the current foreground color If you already know the RGB values of the color you want you can enter them directly in the appropriate RGB spin boxes Note When you run Video Paint for the first time the Color palette is docked to the program window in Compact mode and shows the colors of the default method To see all methods at the one time deselect the View Color Palette Compact c...

Page 287: ... amount of brightness from left to right When you move your mouse over any colors their respective RGB color values are displayed at the bottom of the dialog box and the color itself appears in the left color square If you click and hold your mouse button over a color a saturation bar appears and allows you to select a specific color Releasing your mouse selects the color subse quently displaying ...

Page 288: ... foreground and background squares on the Attribute toolbar The next time you select a color the active color square changes Attribute toolbar of the Eyedropper tool Loading and saving color tables There may be times during your work that you find yourself continually using the same colors with which to paint You can store these colors as color squares on the Attribute toolbar of the Eyedropper to...

Page 289: ...everal frames To view the painting tools click the Paint tool button on the Tool panel The Brush panel opens and all the various brushes are displayed along the Attribute toolbar To apply a paint tool select the brush to use and then click and drag over the areas of the image where you want the paint to appear For greater control over which areas are affected select the area and or zoom into the i...

Page 290: ...l you are using BRUSH PANEL SHAPE TAB 1 Height specifies the height of a brush You can also drag the vertical slider to the right of the preview To keep aspect ratio click the Lock button 2 Width specifies the width of a brush You can also drag the horizontal slider at the bottom of the preview To keep aspect ratio click the Lock button 3 Erase removes previously applied paint from the paint layer...

Page 291: ...etermines how paint is applied to an image Depending on the tool you can choose one of the following Always replaces the original colors with the painted color Hue and Saturation applies only the hue and saturation values of the painted color Hue Only applies only the hue value of the painted color Saturation Only applies only the saturation values of the painted color Luminosity applies only the ...

Page 292: ... resulting color For example if the resulting color is black the inverse will be white Pigment applies the color which is produced from blending the painted color with the original colors much in the same way an artist creates new colors by mixing paints 2 Freehand defines the drawing mode as Freehand Freehand mode mimics painting by hand applying paint as you move your mouse 3 Straight Line defin...

Page 293: ...alled these options are disabled 2 Spacing determines how close each drop of color is applied as a percentage to the current brush size The higher the value the farther away drops are applied Likewise a lower value applies color closer together For example a value of 100 places each drop of color next to each other creating a dotted line effect whereas a value of 300 places each drop of color at a...

Page 294: ... mode This removes the white from the paint layer revealing the underlying image This is a good technique for creat ing quick video mattes Transforming selections After you ve made a selection area you can change its shape size and orientation using the Transform tool When you click the Transform tool button on the Tool panel the Attribute toolbar changes to show each of the possible transformatio...

Page 295: ...ls you can use to paint with and the Brush panel changes to show the available attributes for the selected tool 2 Hold down the SHIFT key and click your mouse over the area you wish to clone This area is marked with a crosshair and the mouse pointer changes to the clone pointer You can clone from the same image or from another edit window 3 Move to the area on the image where you want the clone to...

Page 296: ...rosshair appears in the top left corner of the image and as you clone the crosshair moves to the exact same location to ensure you are cloning accurately between both the active and target frames Cloning an image from a second edit window to another Using the Retouch tool The Retouch tools are not strictly painting tools in the sense that they do not paint over an image with a selected color Inste...

Page 297: ...refining the degree of retouching To learn about cloning over several frames see the Duplicating changes over frames section page 260 Notes Confine the area to retouch by first creating a selection area You need to be in Composite mode before you can start using a Retouch tool Once you have edited an image you can switch to Paint Layer mode to work on just that area Original Dodge Burn Blur Sharpe...

Page 298: ...emoves intensity from colors making them lighter Warping distorts an image as you drag your mouse Transparency determines the transparency of the paint as it is applied Wet adds water to the paint making it blend more smoothly with the colors of an image Dry removes water from the paint making it appear more distinct from the colors of an image Smear controls the amount of paint overrun Note The a...

Page 299: ...ctions which are ignored when you play the macro back 3 When finished click the Macro button again to end the recording The Add To Library dialog box opens 4 Select the folder in the Macro gallery where you want to store the macro and then enter a name for the macro in the entry line below the thumbnail image as well as a brief description in the Annotation box 5 Click OK The macro is now saved to...

Page 300: ...g method group box Select Entire image if you want the macro to appear the same on each frame To have the macro animate sequentially over each frame click either the Progressive or Regressive options Progressive starts the playback of the macro from the first stroke of the macro to the last while Regressive starts from the last stroke to the first If you want to determine where the macro should st...

Page 301: ...y find that they take longer to apply depending on your system resources or the type of filter To apply a video filter 1 Drag over the Preview bar in the Filmstrip panel to select the frames you want to apply the filter to If you want to apply the filter to the entire clip make no selection 2 Select the Video Filter gallery from the Production Library and locate the filter you want to apply from o...

Page 302: ...avigator or View Flick SHIFT F The preview is then performed on the image in the edit window Before you perform the preview however you need to set your flick options to determine which area of the image is previewed as well as how many frames to flick through Performing a flick preview To set your flick options 1 Click View Flick Options to open the Flick Options dialog box 2 Specify the number o...

Page 303: ...e a preview file To do this first define your preview options by clicking the Preview Options button on the Standard toolbar or View Preview Options Once the Preview options have been defined drag over the Preview bar on the Filmstrip panel a blue selection line appears and select the frames you want to preview When ready click the Preview Selection button or View Preview ENTER to create the pre v...

Page 304: ...278 In Composite mode you select areas of an image in Paint Layer mode you select areas of your edits see page 280 Use the Eyedropper tool to select colors from an image in an edit window see page 288 Save regularly used brush attributes to the Production Library see page 290 Perform changes over multiple frames using the macro recorder see page 298 Perform a flick preview over a selected area to ...

Page 305: ...Programs ...

Page 306: ......

Page 307: ...cts or as standalone video and image files With CG Infinity you can easily produce television and film quality opening and ending credits as well as an extensive range of both regular and freehand graphical objects Chapter 1 In this chapter you will learn about Understanding the basics p 308 Controlling the alignment of objects p 315 Customizing CG Infinity p 317 ...

Page 308: ...need to create a new edit window At the center of the edit window is a frame indicating the size of the video frames for your CG project Everything outside the frame is part of the pasteboard area which can be used for storing objects or for placing objects outside of the frame before moving them into view You control the size of the pasteboard in the Preferences dialog box see page 317 While a CG...

Page 309: ...de Redo an undone action Undo a previous action Bring an object to the front Bring an object forward Send an object backward Send an object to the back Show the Time Control Panel Show the Object Style Panel Show the Production Library Object tool Shape tool Freehand tool Envelope tool Eyedropper tool Zoom control Default object style Adjust tool Path tool Moving Path tool Text tool Zoom tool ...

Page 310: ...ject Once created you can begin adding text and objects and then manipulate them with various drawing tools When you are finished you can create a video file of your work or insert the CG Infinity project into Video Editor as part of a larger project To create a new CG Infinity project 1 Click the New button on the Standard toolbar or File New CTRL N to open the New dialog box 2 Specify the durati...

Page 311: ...source group box You can select a general background color by right clicking on the color square and selecting a color from the pop up menu that appears You can also enter the RGB values for a color directly into the RGB spin boxes To use an existing image or video file click on the appropriate option and then click the Select button When choos ing a video file you can select a specific frame to i...

Page 312: ...all the toolbars and panels present click View Remove Menu Bar This removes the title and menu bars of the CG Infinity screen only leaving all other screen elements present You can still use the menu commands with their keyboard shortcut keys To return to the Normal screen mode press the ESC key Viewing objects In CG Infinity you can view objects in one of two modes Preview or Wireframe Preview mo...

Page 313: ...ave finished working on a CG Infinity project you can create a new video or image file that combines the project s objects with the current background To create a video file click File Create Video File This opens the Create Video File dialog box which has the same options as Video Editor To learn more about these options see the section on Creating a video file page 258 To create an image file cl...

Page 314: ...V This places the object in the center of the current view To paste only certain attributes such as the fill color or shadow click Edit Paste Object Style This opens the Paste Object Style dialog box which allows you to select which attributes to paste Once you click OK the attributes are pasted to all selected objects If no objects are selected this command is disabled Two other paste commands Mo...

Page 315: ... the base reference point X 0 Y 0 at the top left corner of the frame in the edit window You can reset this reference point by dragging the intersecting ruler lines from the Base Point button at the corner of the rulers to any position in the edit window This is especially helpful if you have zoomed in on an object and want to reset your ruler at a new view Note Double clicking the Base Point butt...

Page 316: ...vertical spacing between each point in the grid If you want your objects to snap to grid points or guides select the Snap to distance option and specify the range within which a snap should occur For example a range of 5 pixels pulls an object to a grid point whenever it is placed within 5 pixels of that grid point s position Notes Snap to works on the rectangular area of an object s bounding box ...

Page 317: ...d in CG Infinity based on the NTSC or PAL color models Select the appropriate option if you plan on having your video played back on an NTSC or PAL device such as a television If you are designing for monitor display only leave this option clear 2 Levels of undo redo specifies the maximum levels of undo redo allowed by CG Infinity up to 99 As CG Infinity allocates more memory for each level of und...

Page 318: ...selection and Touch selects objects that are touched by the marquee of a selection area In most cases use Touch as it allows you to quickly select objects without having to draw a selection over its entirety Inside is useful if you have a lot of overlapping objects and only want to select a specific one without affecting any others The chapter in review Here are some key points and tips to remembe...

Page 319: ...reate these objects by tracing over existing images drawing your own shapes or using the Text tool to create impressive titles and text effects Chapter 2 In this chapter you will learn about Defining an object s style p 320 Creating text and shape objects p 323 Selecting and transforming objects p 328 Adjusting shapes p 332 Creating a moving path p 334 ...

Page 320: ... particularly useful for text objects Leave this clear if you want a sharp edge such as with square or rectangular objects 3 Transparency controls how transparent an object appears The first option Normal Transparency provides an even transparency over the entire object based on the value entered in the neighboring Transparency spin box A value of 0 has no transparency and 100 full transparency Th...

Page 321: ... same way as explained in Video Paint see page 286 The third option Gradient fills an object with a special gradient pattern To choose the gradient click the color square to open the Magic Gradient dialog box and select a gradient from one of the available methods The final option Texture fills an object with a special texture pattern To choose this texture click on the color square to open the Ma...

Page 322: ...BJECT STYLE PANEL SHADOW TAB 1 Shadow options determine the type of shadow to apply to an object The first option None does not apply any shadow while the second option Drop applies a drop shadow You can specify the position of the shadow in the X and Y spin boxes as well as control its transparency and the amount of soft edge in the Transpar ency and Soft edge spin boxes The third option Glow app...

Page 323: ...ingly to reflect the new style You can also change the default style by dragging and dropping a style directly from the Style gallery in the Production Library to the graphic on the Tool panel If you wish to apply the default style to another object first select the object and then choose the Use Default Style command from the right mouse pop up menu Properties dialog box Creating text and shape o...

Page 324: ...2 Select the font you want to use as well as any other font characteris tics such as size bold and italics You can also specify the alignment of the text as well as the kerning and leading Note Kerning decreases the amount of space between letters in a word making it appear tighter while leading affects the spacing between words on different lines The default 100 uses the font s own leading with l...

Page 325: ...ft corner down as you draw The second option Equal Sides ensures that the sides of the shape are all of equal length If not selected you can draw a shape with variable width and height The final option Fixed Size allows you to specify the exact width and height of an object in the neighboring Width and Height spin boxes Selecting this option disables the Equal Sides option Another option Sides is ...

Page 326: ...ty of shapes with the Shape tool Using the Freehand tool The Freehand tool allows you to create any kind of shape you want by allowing you to draw it with your mouse This is particularly useful for tracing over elements in a background video or image file such as a person s head or a corporate logo Once you have finished drawing your path CG Infinity then places nodes in positions on the path wher...

Page 327: ...ase the value in the Accuracy spin box on the Attribute toolbar 4 When you are satisfied with the accuracy of your path switch to the Object tool or click outside the area to place the shape as an object If you chose an Open Path you need to specify a line width and fill color in the Object Style Options panel to see the path clearly Using the Path tool The Path tool is similar to the Freehand too...

Page 328: ...e Open Path button on the Attribute toolbar This fills the line of the shape only leaving the contents clear To view an open path you need to specify a line width in the Object Style Options panel Selecting and transforming objects Once you have created an object you can move and manipulate it in a variety of ways The easiest is with the Object tool which allows you to select objects and then move...

Page 329: ...al copies Grouping objects is especially useful at the end of a project when you have layered them in their final positions To group objects select them and then click Edit Group To ungroup them select the grouped object and then click Edit Ungroup Layering objects An important part of working with objects is being able to layer them on top of and behind one another to create a variety of effects ...

Page 330: ...ounding box of a selected object Depending on the type of transform you are perform ing these handles appear either on the sides and corners of the bounding box or just the corners To manipulate the actual path of an object you need to use the Adjust tool see page 332 Using the Object tool The Object tool provides five options on the Attribute toolbar for resizing and rotating an object The first ...

Page 331: ...r form from a particular font By changing the envelope of the text you have much greater flexibility over how the text is warped and distorted For example you could make the text appear as a wave or have it bend in three dimensions To change the envelope of an object 1 Create a text object and then select the Envelope tool from the Tool panel A bounding box appears around the text with nodes on th...

Page 332: ... Adjust tool The Adjust tool is particularly useful if you have traced an object or created your own freehand drawing and need to modify it so that it better takes the shape you want To adjust a path 1 Select the Adjust tool from the Tool panel The Attribute toolbar changes to display the options for adjusting a path Nodes also appear on the path of the selected object You cannot adjust the path o...

Page 333: ... active only if the Curved Node option is selected This option is best for performing general changes to a path s curvature Smooth Node changes the curvature of the path between the preced ing following and active nodes allowing you to change the length of the control handles independently from each other they still remain on a linear path Use this option for greater control over the curvature wit...

Page 334: ...tool and then click Edit Delete DELETE If there is no moving path the object is deleted To create a moving path 1 Position the object where you want it to start its movement and then select the Moving Path tool from the Tool panel The Attribute toolbar changes to display the various options available and Start and End nodes appear on the selected object Note Selecting the Moving Path tool should o...

Page 335: ...same options as the Adjust tool see page 332 To create greater movement you can add nodes anywhere along the path and edit them as you would with the Adjust tool To assign the path of an object as a moving path first select the object and then copy it Now select the object you want to move and click Edit Paste Object as Moving Path The path of the copied object now appears in the center of the sel...

Page 336: ...Time Control Panel A key frame is added to the Key frame slider Key frames are explained in detail in the Using key frame controls section page 188 4 Change the style and size of the object using the Object Style Panel as well as the resize buttons on the Attribute toolbar If you are changing the style any changes to the fill color options produces a fade effect from one to the other as long as tw...

Page 337: ...reate a fast motion effect as the object has to cover more ground within the same time period Likewise by moving the object back you create a slow motion effect as the object has less distance to travel within the same time period To change the speed of an object 1 Select the object you want to change with the Moving Path tool The moving path of the object appears 2 Click a key frame in the Time C...

Page 338: ...g File Properties To change the start time of a moving object 1 Select the object you want to change with the Moving Path tool The moving path of the object appears 2 Move the Preview slider in the Time Control Panel to the frame where you want the object to begin its movement and click the Add Key frame button The object moves to that position on the moving path 3 Drag on the bounding box of the ...

Page 339: ... end 4 Move the Preview slider to the start or click on the Start Key frame to return the object back to its beginning position 5 Click the Play button to see the motion of the object Performing minor adjustments in time After laying out all your objects and specifying their various moving paths you may find that you need to go back and adjust the timing of a particular object by a few frames but ...

Page 340: ...und see page 326 Make general path adjustments using the Symmetric node specific adjustments using the Cusp Node see page 333 Position your objects at their starting point before making a moving path see page 334 To have an object follow another paste the other as a moving path see page 335 You can create gradient shifts over time if the object shares the same fill type at each key frame see page ...

Page 341: ......

Page 342: ......

Page 343: ...d over your soundtrack With it you can play record and edit the audio components of your video project with drag and drop ease and a click of the mouse Chapter 1 In this chapter you will learn about Understanding the basics p 344 Recording sound p 350 Customizing Audio Editor p 353 ...

Page 344: ... an edit window as a waveform This waveform represents the various positive and negative peaks that a natural sound wave makes If it is a mono file single channel only one waveform is present while stereo files two channels have two waveforms representing the left and right channels accordingly Audio Editor displays sound in this manner to help you visualize the contents of an audio file and make ...

Page 345: ...d Run a mixer program Fit a selection in the window Mark the start and end of a selection Go to next cue Add a cue Go to previous cue Drag and drop file to another program Alternate between the last two views Zoom slider Toolbar Overview strip Edit window Selection area View box Active waveform ...

Page 346: ...ve it to the end click Control Go To End CTRL END If you have created a selection area you can play the contents of the selection by clicking the Play Selection button on the Toolbar or Control Play Selection F2 Creating a new edit window To record sound you first need to create a new edit window to hold that sound If you do not create a new edit window the sound is recorded into the currently act...

Page 347: ...d files clicking Save instantly overwrites the existing file with the new data Save As opens the Save Audio File dialog box where you can specify a new name and or destination The Save Audio File dialog box also allows you to append subject and description information as well as assign a thumbnail image to use as a visual representation of the file in any preview enabled dialog box or browser Ther...

Page 348: ...r needs For more on these see the section on Creating a new edit window page 346 Once you click OK the dialog box closes and the waveform is changed accordingly Viewing waveforms When you edit a waveform you may want to see part of it in greater detail or display it in a more compressed format You can do this in three ways click View Zoom In and Zoom Out by dragging the Zoom slider or by dragging ...

Page 349: ...iew Note If you have created a selection area you can fit the selection to the edit window by clicking on the Fit Selection In Window button on the Toolbar Controlling the display and time unit of waveforms In the Preferences dialog box see page 353 you can determine the detail with which Audio Editor displays waveforms choosing between a precise scan and a quick scan Precise scans produce a very ...

Page 350: ... In Audio Editor there are two methods to record an audio file The first is by recording sound to any open edit window this can be an existing file or a new empty edit window The other way is to copy a sound file directly from a CD Depending on your system s configuration you can record from a variety of sources such as a CD ROM MIDI player microphone or MIDI file before you start recording you ne...

Page 351: ...the sound into and click the Record button on the Toolbar or click Control Record CTRL R A message box appears displaying the current recording level Set Recording Level dialog box 4 Adjust the recording level with the controls on the mixer control panel For better recording quality your peak level should stay close to but not touch the right side of the indicator 5 Click Start A message box appea...

Page 352: ... it right away when using Video Editor Tips for determining audio quality Generally it is quite straight forward to determine the properties you should use for recording a waveform The determining factors are the file size and the type of speakers the audio will be played back over For example if disk space is limited and the sound is intended for playing over small computer speakers then there is...

Page 353: ...an choose between film 24 fps PAL 25 fps and NTSC 30 fps or for irregular frame rates define your own such as 15 for example For detailed editing of audio select the Samples option this displays time in samples per second For example if your sampling rate is 11 025 kHz then the waveform shows 11 025 sample points per second 2 Waveform display controls the detail with which Audio Editor draws wavef...

Page 354: ...or files destined to be played back over the Internet or from CD ROM see page 352 Match the properties of a waveform to the speakers it will be played back on see page 352 Set the time measurement unit to SMPTE when working on files for use in video projects see page 353 4 Snap to cues makes selection areas snap to any nearby cues 5 Number of recently opened files specifies how many file names are...

Page 355: ...nificantly easier With a number of advanced audio effects and enhancements Audio Editor will soon have you creating audio files that add impact to your work and multimedia presentations Chapter 2 In this chapter you will learn about Creating selection areas p 356 Working with cues p 357 Sound sweetening p 361 Mixing tracks p 365 Applying special effects p 367 ...

Page 356: ...ld like to select This method is very useful for creating selections as your ear can hear the sound more clearly than your eyes can see it Drag on the waveform in the Overview strip This can only be done if the file has been zoomed on and there is space outside the Global View panel to select Notes To deselect a selection area click anywhere within the waveform or click Edit Select None CTRL K Cli...

Page 357: ...dicate the starting and ending positions for the area your cursor currently spans which depending on your zoom level may be the same or different The bottom box for stereo files there will be two one for each channel indicates the negative and positive amplitudes in that region Working with cues Cues are the best way to bookmark spots in a waveform that you want to frequently reference or come bac...

Page 358: ... Cue Placing cues on a waveform Managing cues You can manage cues in waveforms in several ways such as changing their position and description removing them from the edit window and switching between them For example you can Right click the cue handle at the base of the cue line to view its descrip tion Double click the handle to change a cue s name this opens the Change Cue Name dialog box where ...

Page 359: ...r can be viewed in Audio Editor for WAV files only This makes it much easier when editing video as you can identify key areas in an audio track with which to match the appropriate action in the video track Clearing audio data Often when you open or record a waveform there may be areas which you don t want or no longer need In such cases you can remove them from the file by selecting them and click...

Page 360: ...the duration of the audio file by the duration of the pasted segment Replace overwrites the waveform at the cursor position replacing it with the audio data from the clipboard If the clipboard data is longer than the waveform Audio Editor truncates the excess Mix opens the Paste Mix dialog box which allows you to combine waveforms by adjusting their relative amplitudes A 100 mix means that the dat...

Page 361: ...ply a number of studio quality filters that correct and enhance or sweeten the sound in your audio files Note If you only want to sweeten a certain portion of an audio file you must select it first otherwise the entire waveform is affected Changing the audio level Audio level refers to how loud or quiet an audio file plays back at Gener ally you can use your computer s volume controls to adjust th...

Page 362: ...le In some cases you may not see much change to the waveform after normalizing depending on the existing audio levels Waveform before changing audio level Waveform after changing audio level by 200 Changing pitch An audio file s pitch defines how high or low it sounds A high pitch may be very shrill like a whistle while a low pitch may be very deep like a fog horn To adjust an audio file s pitch c...

Page 363: ... amplitude point 0 in a waveform the baseline Silence is useful in audio editing particularly for what it isn t rather than what it does For example silence is responsible for adding and removing time to an audio file and timing is perhaps one of the most important aspects of any audio sequence For example the sound of a door opening must be timed to occur after the sound of the key entering the l...

Page 364: ...g Effect Remove Noise Any sound which occurs within this level is then removed from the waveform As background noise is usually of a low amplitude selecting a 2 5 threshold is often adequate Setting the threshold range too high you run the risk of removing essential data Waveform before removing noise Waveform after removing noise Muting a waveform Often when you are working with waveforms you wil...

Page 365: ...In the DC Offset dialog box you can drag the Offset slider to move the waveform above or below the baseline Moving to the right shifts the baseline up while moving to the left pulls it down This does not affect the amplitude of the file only its waveform representation In this way you can calibrate any mismatched files to have roughly the same baseline before you decide to mix them into the same a...

Page 366: ... files together you may want to remove one of the files from the mixture For example you may be preparing an audio project for a client and after having created a master file they decide they want to remove the voice of one of their managers Initially this seems like an impossible task as all the files have been truly integrated Fortunately the solution is not as difficult as it seems All you need...

Page 367: ... of special affects that you can use to add impact to your audio files and provide enhancements which are difficult to replicate when recording from the original source These can be anything from performing fades to the beginning and ending of a waveform to adding a variety of echo effects such as stadium and resonance Performing a fade Performing fades is a frequent task in audio editing as you o...

Page 368: ...ade starts quickly and fades more slowly For best results it is a good idea to first experiment with a variety of different settings Waveform before applying a fade effect Waveform after applying a Fade In Fade Out effect Changing speed Changing the speed of an audio file is a useful way to increase or decrease its duration as well as for producing interesting distortion effects When you click Eff...

Page 369: ... and end level of 0 results in complete silence while 100 leaves the output unchanged As with the Fade command you can choose between Linear Exponential and Logarithmic changes to help smooth the effect Reversing a file An interesting effect in Audio Editor is the Effect Reverse command which allows you to reverse a file so that it plays in the opposite direction In most cases this will produce an...

Page 370: ...of time that passes before you hear an echo while Decay accounts for the loss of sound in each repetition Bound determines the next round of repetition and is repeated until the echo fades away entirely Below is a description of the characteristics for each of the echo commands Long Echo has a long delay and a strong decay which results in longer repetitions though it fades away faster Long Repeat...

Page 371: ...e to occur between the two tracks A Linear fade produces a constant fade from one to the other while an Exponential fade begins slowly and ends quickly and the Logarithmic fade begins quickly and ends slowly When finished click OK The dialog box closes and a new waveform is created cross fading between the two files Using DirectX Audio and DMO Audio Effect plug ins Audio Editor has the latest plug...

Page 372: ...elections see page 357 Use Cues to mark events in a waveform see page 357 Click the Edit Mute command to remove areas without affecting the duration of a waveform see page 359 Normalize a waveform before changing its amplification see page 362 Quantize a waveform to decrease its file size while retaining audible quality see page 363 Select a 2 5 Threshold for removing noise see page 364 Use the Ef...

Page 373: ...Programs ...

Page 374: ......

Page 375: ...aStudio Pro DVD MovieFactory allows you to author DVD VCD and SVCD to discs while the DVD VR Wizard enables you to add or record videos to a device that supports DVD RAM or DVD R Learn how to use these programs in this chapter In this chapter you will learn about Ulead DVD MovieFactory p 376 Ulead DVD VR Wizard p 390 ...

Page 376: ...ine Help you can further receive the latest program updates tutorials technology advance such as the newest hard ware compatibility list and technical support by visiting your local Ulead Web site Getting around Ulead DVD MovieFactory Once you open the program the first screen you will see is this The current step you are in Four tasks to choose from Options for each task Quick guideline for each ...

Page 377: ... then click Next to start editing See page 378 for details Edit Disc Choose this task if you would like to edit your DVD R RW DVD R RW or an existing DVD MovieFactory project directly on a recordable disc Please select the disc location on your computer and then click Next to start editing Direct to Disc Choose this task if you want to capture videos straight from your video device and burn a disc...

Page 378: ...n be videos and or slideshows For example using a compatible video capture card you can capture videos from a video device such as a DV camcorder You can also add videos from a disc hard drive or create slideshows using a series of still images Once these clips are inserted you can make further editing and set up selection menus later Add Edit Media Clip step Media clip list Click a thumbnail to s...

Page 379: ...e browse button The Capture Video dialog box is strictly for video capturing Playing a captured video clip is only possible in the Media clip list of the main window Capture settings Ulead DVD MovieFactory automatically detects and determines capture settings for you However if you need to customize the settings click Here you will see the menu as depicted below The menu shows available options ca...

Page 380: ...you want to set a particular variable bit rate See online Help for details Tip If you experienced dropped frames in your captured video adjust the Quality level in the MPEG Settings dialog box to a lower value or turn on the DMA setting of your hard drive Tips If you are having problems viewing in the Preview window select Force to use preview mode in Capture Options If the captured video appears ...

Page 381: ...e the first scene frame of this video clip is a black screen To change it double click to select this video clip and move the Jog Bar to the scene you want Next right click the thumbnail and select Change Thumbnail Adding a slideshow 1 Click Add Slideshow 2 Locate the folder where the still images are and select one or more images Use Ctrl or Shift to select multiple images 3 Click Add Image Repea...

Page 382: ...os Depending on the video time length wait a while until the capture process completes Note Sometimes you might see some white video thumbnails in the Select Scenes to Capture dialog box This is normal because the first frame for this type of video thumbnails is white or black Jog Bar Set Mark in Mark in Set Mark out Mark out Navigation controls Before trimming Trim a video You can trim a video us...

Page 383: ...ut 4 Now the trimmed video is ready You can preview the trimmed video by pressing SHIFT and clicking Play Another way to trim your videos is to use the Extract Video feature To learn about this feature see the section Extract video on the next page Edit video or slideshow If you have Ulead VideoStudio 6 installed on your computer you can edit your video in the Media clip list using VideoStudio 6 b...

Page 384: ... the portion you want then click Out when you reach the end of the portion you want extracted 3 Repeat step 2 as often as necessary to extract more portions from your clip 4 Your extracted videos will appear on the Media clip list Preview the clips you have extracted by pressing SHIFT and clicking the play button Click OK 5 The dialog box closes and you return to the Add Edit Media Clip step In th...

Page 385: ... the scene you want as the separating point Next click You can keep moving the Jog Bar and add as many video thumbnails as you like Note that the original video thumbnail is still retained while new ones are added accordingly based on the number of newly added videos Add Edit chapters This feature is only available when the Create menus option is selected By doing so you can create submenus linked...

Page 386: ...t Step 3 as needed You can also use Remove or Remove All to delete unwanted chapters 5 Click OK Tips If you want to use Auto your video must be at least one minute long or the video has scene change information If you click Auto and your video is a DV formatted AVI file captured from a DV camcorder DVD MovieFactory can automatically detect scene changes and add chapters accordingly If the selected...

Page 387: ...s no submenu for Clip 2 Editing menus 1 By default DVD MovieFactory automatically makes all required menus for you Use Current displayed menu to switch to the menu you want to edit 2 Click My Title to customize the menu heading You can also click the text description under each video thumbnail for customization In this example Clip 1 has three chapters so when you click the Clip 1 video thumbnail ...

Page 388: ... 5 You can also click to use your own background image or click to use your background music 6 To further customize and create your own menu template in the My Favorites folder click 7 When you re done click Next to preview the movie Preview your movie Now it s time to see how your movie looks like before you burn it onto a disc Simply move the mouse and click Play to watch your movie and test the...

Page 389: ...put disc 2 In Output settings select one or more tasks you want to do For example select the recording format that best suits your need See the notes below You can also click Output Advanced Settings if you want to add additional components such as a video disc player or your personal data 3 Select a disc burner and make settings such as the recording speed compatible with your output disc format ...

Page 390: ... be available If DVD Video fast editable is selected keep in mind that there is a 30MB file size limitation for menus background audio and project file combined Audio files have larger file sizes and therefore it takes up the bulk of this file size limitation Reduce the file size of your audio e g shorter length if you plan to have a lot of menus If you choose DVD Video you will be using the indus...

Page 391: ...older on the DVD RAM disc in the Browse Folder dialog box To add other files click Add MPEG File and then select the files you want to add in the Select Video File dialog box Next click Open Tip If you record your videos on a new DVD RAM disc it must be pre formatted in the DVD VR format After formatting a DVD_RTAV folder is automatically created on the disc Step 3 Select Playlist Select a play li...

Page 392: ...the list is displayed in the lower pane while the upper pane shows all available video clips Here you can add or delete any clip in the play list Drag and drop is also supported Once you re done click Next Step 6 Playback Simulation and Output Use Select playlist to preview any content as needed Once you re done click Record Notes While recording is in progress all buttons are temporarily gray out...

Page 393: ......

Page 394: ......

Page 395: ...ehind digital video editing and video in general This means an appreciation of both the analog and digital video worlds and how the sound and moving pictures that make up video move between those worlds Appendix In this chapter you will learn about The world of analog video p 396 The world of digital video p 397 ...

Page 396: ...why you cannot view video recorded in England on a television set in the United States and vice versa without special equip ment Inside the video signal The standard video signal defines color by two factors luminance and chrominance Luminance is the black and white values of color and serve to control the brightness and contrast of the picture whereas chrominance is the colors of the video itself...

Page 397: ...the time had trouble scanning so many lines for each field To compensate for this it was decided to interlace the display scan alternate lines rather than every line For example the first scan would pass over every even line the second every odd As such it took two fields of information to display an actual image This was still quick enough to fool the human eye into believing that it was seeing a...

Page 398: ...e different machines and mediums have different abilities at moving amounts of video data This ability is referred to as the data rate which measures how much data can be moved within one second Working with the data rate The problem with most venues where video is transmitted and viewed e g DVD players computer disc players the Internet etc is that they have trouble moving large amounts of data c...

Page 399: ... can include more detail in your video But larger frame sizes carry two distinct problems First each frame requires more data to store the information For example an uncompressed frame with a size of 320 x 240 might require about 250KB of memory A 640 x 480 frame twice the size would require about 1MB four times as much memory The frame size also affects how well the video plays back for another r...

Page 400: ...mpress the images in certain frames of a video by finding repeated or similar patterns in the image Then the compression method refers to preselected frames key frames and creates baseline data to compare against the information in the following frames This time the compression method seeks differences from the previous frame and discards everything else It is for this reason that videos that use ...

Page 401: ...odec promotes superior quality transcoding and real time encoding for MPEG 1 and 2 It supports real time features e g direct MPEG capture from IEEE 1394 interfaces Aspect Ratio Aspect ratio is the relative horizontal and vertical sizes of the screen or image usually expressed as width height If an image has an aspect ratio of 4 3 it means that it is wider than it is tall which of course is mostly ...

Page 402: ...th Type 1 the entire DV stream is saved without modifications as a single AVI stream The good thing about storing your video as DV Type 1 is that the DV data does not need to be processed and is stored precisely in its original format DV Type 2 It is possible for interleaved DV data to be divided into one video stream and multiple audio streams about 1 to 4 within a single AVI file This method of ...

Page 403: ...er and can connect approximately 63 periph eral devices IEEE 1394 is also known by other names Apple calls their version Firewire while other companies call theirs iLink or Lynx System Tweaks The following are useful video specific tweaks for improving the perfor mance of your system Some of the paths may vary slightly between various versions of Windows If you have two hard drives on your system ...

Page 404: ...ing file limits to 512 Note After each of these tweaks restart your computer and make sure it is running well before proceeding to the next one Direct Memory Access DMA is a method of transporting data from the system s main memory without passing through the CPU It is also useful when making direct back ups while doing real time capturing Write Behind Caching otherwise known as copy back caching ...

Page 405: ......

Page 406: ......

Page 407: ...ward through the video clip Moves back a single frame Moves forward a single frame Home Goes to the first frame of the video clip End Goes to the last frame of the video clip Shift F Goes to a specified location using a controllable device Only works if you are in Capture Mode Ctrl R Plays the video clip in a continuous loop Only works if you are in Playback Mode F3 Selects an individual frame and...

Page 408: ...tle bar Maximizes or restores the active window Esc Closes dialog boxes without making changes Double click Status bar Opens the Preferences dialog box Double click any toolbar Floats or docks the toolbar Shift F10 Invokes the About Windows Help dialog box Video Editor Shortcuts Video Editor has many shortcuts that allow you to access commands and open dialog boxes without having to go through the...

Page 409: ... Timeline Ctrl B Deselects any selection area F7 Invokes the selected clip s associated program View Menu Zooms in Zooms out F9 Toggles between the current and previous view Search Menu Ctrl G Displays the Go To dialog box Ctrl F Displays the Find Clip dialog box F2 Repeats the last search Clip Menu Ctrl D Displays the Video Filters dialog box Ctrl A Displays the Audio Filters dialog box Ctrl R Di...

Page 410: ...ert Video or Image File dialog box Empty audio track Displays the Insert Audio File dialog box Empty F X track Switches the Production Library to the Transition effect gallery when displayed Title clip Displays the Title Options dialog box Project Cues Displays the Rename Cue dialog box Video audio or image clip Displays the clip in the Source Window Video Editor Title bar Maximizes or restores th...

Page 411: ...ource Window Shift drag Create new selection in the audio clip Source Window only F8 Refresh Preview Window only Ctrl 2 Activates the Preview Window Ctrl 3 Activates the Source Window J Displays the previous frame L Displays the next frame Timeline Toolbar C while selecting a clip Allows you to select a clip using the Clip Selection Tool E while selecting the first clip in a track Allows you to se...

Page 412: ...cal Preview Line one frame forward or backward when there are no clips selected Also displays the current frame when the Preview Window is open Page Up Page Down Moves the Vertical Preview Line to the previous or next project cue clip edge the beginning or end of a project F3 Marks the beginning frame for a preview area F4 Marks the last frame for a preview Esc Closes dialog boxes without making c...

Page 413: ...e Arrow up down Select or move clip Arrow left right Jog Shift Arrow up down Scroll video tracks Alt Arrow up down Scroll audio tracks Shift Arrow left right Shuttle scroll Timeline Ctrl I Split clip F10 Invoke menu Shift 0 Change speed range to 8 0 Shift 1 Change speed range to 4 0 Shift 2 Change speed range to 2 0 Shift 3 Change speed range to 1 0 Shift 4 Change speed range to 0 5 Shift 5 Change...

Page 414: ...ditor Edit Menu Ctrl Z Undoes the last applied command Ctrl X Cuts a selection area and places it onto the clipboard F3 F4 Set mark in mark out F5 Add clip cue Arrow up down Change active clip Arrow left right Jog Shift Arrow left right Shuttle control speed F11 Shift F11 Add active clip into Timeline Ctrl F11 Apply change back to Production Library F10 Invoke menu L Doubles the current play speed...

Page 415: ...ds a selection during playback Ctrl Home Goes to the start of the selected area Ctrl End Goes to the end of the selected area F5 Places a cue on the waveform Shift Tab Goes to the previous cue Tab Goes to the next cue Ctrl G Displays the Go To Cue dialog box View Menu Ctrl A Displays the actual view of the waveform Zooms in on the waveform Zooms out on the waveform Ctrl 1 Fits the entire waveform ...

Page 416: ...es dialog box Esc Closes dialog boxes without making changes Alt Backspace Undoes the last applied command Shift Insert Pastes the clipboard contents Shift F6 Toggles between showing iding the Sample information window Shift Delete Cuts a selection area and places it onto the clipboard Insert Copies a waveform or selection area onto the clipboard Video Paint shortcuts Video Paint has many shortcut...

Page 417: ...nt selection Ctrl K Duplicates the last floating selection Ctrl L Duplicates the last Paint Layer Ctrl F Opens the Fill dialog box Ctrl A Selects the entire contents of the current frame View Menu Enter Preview current project Shift F Begins flicking the current video Zoom in Zoom out Ctrl 1 Fit in window by 1 x Ctrl 2 Fit in window by 1 2 x Frame Menu Ctrl Home Go to previous cue Ctrl Left arrow ...

Page 418: ...ift F10 Right mouse click on workspace Displays the Edit menu as a floating menu Double click on file Title Bar Maximizes or restores current window Double click on Toolbar or Tool Panel title bar Closes window Double click on Status Bar Displays Preferences dialog box Shift click on Filmstrip Scroll Bar Displays the next or previous frame in the Strip View Ctrl click on Filmstrip Scroll Bar Displ...

Page 419: ... Menu Ctrl Z Undoes the last applied command Ctrl Y Redoes the previous action Ctrl X Cuts a selection and places it onto the clipboard Ctrl C Copies a selection onto the clipboard Ctrl V Pastes the clipboard data into the current project as an object Ctrl A Selects all objects in the current project Del Deletes a selection or object View Menu Resizes the image on the screen for better detail Resi...

Page 420: ...lick title bar Maximizes or restores the active window Double click toolbar or panel title bar Hides the toolbar or panel Double click any toolbar Makes toolbar floating if docked or docks toolbar when floating Double click Status Bar Opens the Preferences dialog box Esc Closes dialog boxes without making changes ...

Page 421: ......

Page 422: ......

Page 423: ...files 346 cross fading sound 371 cues 354 356 357 managing 358 using in Video Editor 359 customizing 353 decay 370 delay 370 drag n drop functions 350 echo 370 editing 355 fading sound 367 filling 361 filters 361 global viewer 349 inserting 360 mark in mark out 356 mixing 360 mixing sounds 365 removing 366 mono channel 344 muting sound 359 364 pitch 362 playing files 346 preferences 353 quality 35...

Page 424: ...ontrolling your DV device 95 customizing 91 FAT32 file system limit 94 from a DV camcorder 93 history log 105 IEEE 1394 FireWire capture card 93 improving 87 88 MPEG video 96 save to library 91 Scan DV Tape 101 seamless capturing 94 still image sequence 104 video auto 90 DV camcorder 93 hardware concerns 86 manual 90 WMV video 97 Capturing a sequence of frames 104 Capturing MPEG video 96 Capturing...

Page 425: ...rting text objects 61 creating mattes 66 drawing regular shapes 60 fade ins and distortion 69 manipulating objects 63 timing multiple objects 68 viewing objects 312 preview mode 312 wireframe mode 312 CG Infinity shortcuts 419 Changing an object across time 336 Chroma 80 Clearing data 359 Clip Selection tool 150 163 Clips calibrating 156 changing the playback speed 155 Clip Selection Tool 163 colo...

Page 426: ... 326 shape 325 text 324 SVCDs 241 VCDs 240 video files 218 313 videos 258 WMV Quicktime streaming files 243 Creating a new project 28 Creating audio files 227 Creating DVDs 241 Creating MPEG movies 242 Creating SVCDs 241 Creating titles 212 Creating VCDs 240 Creating WMV Quicktime streaming file243 Cropping video clips 222 Cross fade 371 Cues 160 161 262 354 356 357 audio cues in Video Editor 359 ...

Page 427: ...tracting audio 130 Eyedropper tool 288 F Fade to black 185 Fade In Out 69 Fading 211 Fading sound 367 Field options 158 File properties 107 Files changing views 349 creating 257 346 saving 255 313 347 viewing 312 348 Filling an area with color 294 Filmstrip panel 254 settings 254 Filters applying 301 Find 162 163 Flicking 302 Frame rate 120 Frames deleting 267 duplicating 267 inserting 266 replaci...

Page 428: ...al capturing 90 Mark in Mark out 109 356 Mattes 195 creating 51 66 MCI devices 109 Mixing sounds 360 365 removing 366 Modifying volume controls 233 Moving objects 330 selection marquees 285 Moving path dialog box 203 Moving paths 34 37 202 334 adjusting 335 MPEG 1 240 MPEG 2 242 Muting sounds 359 364 N New features 19 New project creating 28 No Source Video mode 279 Normal 166 Normal mode 276 O Ob...

Page 429: ...eo Paint 285 Parade 80 Pasting CG objects 314 styles 314 color palettes 107 masks 259 selections 259 Pasting attributes 154 Pasting clips 154 Path tool 327 performing instant playback 32 Picture in Picture effect 205 Pitch 362 Placing an object on a moving path 334 Playback mode 77 Posting timecode 237 Power Duplicate 47 260 Power duplication 53 Preferences 269 353 Preferences dialog box 142 Assoc...

Page 430: ...o 347 audio to video 347 captured video 107 Scan DV Tape 101 Scissors tool 165 Seamless Capturing 94 Selecting areas in the Timeline 150 Clip Selection tool 150 multiple clips 150 Selecting colors 287 with the eyedropper 288 Selecting multiple clips 150 Selection area marquee hiding 280 Selection areas 356 adding or subtracting to 284 color fill 294 color similarity 283 determining 284 composite m...

Page 431: ...e ripple editing 167 168 169 using 129 136 Timeline track buttons 152 Titles 212 Track buttons 152 Track Selection tool 152 Tracks 133 Transform tool 294 Transformation curve 368 Transforming objects 330 selections 294 Transition effects 182 audio 187 cutomizing 184 dialog box 183 saving 185 Transition track 133 Trimming clips 163 options 166 Scissors tool 165 Trimming in Source window 164 Tutoria...

Page 432: ...Ulead DVD MovieFactory 2 376 getting around 376 which task should you choose 377 working on a project 378 Ulead DVD VR Wizard 390 Ulead file types 139 Ulead Image Sequence 139 Using DV SmartPlay 177 Using Instant Play 175 Using the Audio Mixing Panel 228 Using the storyboard 124 V VCD 240 Vectorscope 80 chroma 80 luma 80 parade 80 Video synchronizing 38 tracks 133 Video Capture shortcuts 407 Video...

Page 433: ...rting files 140 creating files audio 227 edit decision list 236 video 218 219 220 222 cropping video clips 222 cues 160 161 customizing preferences 142 display modes 134 Effects 182 audio 187 cross fade 185 customizing 184 saving 185 effects adding 127 field options 158 filters 197 freezing a frame 157 gamma correction 194 grouping clips 153 inserting 127 133 Instant Play 175 jumping to clips 162 ...

Page 434: ... an audio track 35 creating a new project 28 creating a split screen 36 creating a transition effect 31 creating ma picture in picture 37 creating moving paths 34 37 cross fading audio 35 inserting files into the Timeline 29 previewing your work 31 synchronizing audio video 38 transition effects 31 trimming clips 30 working with clips 30 Ulead file types 139 Ulead Image Sequence 139 using DV Smart...

Page 435: ...ode 281 transforming 294 shape tool 281 transform tool 294 tutorial advanced cloning 58 advanced macro techniques 57 advanced power duplication 53 advanced techniques 52 applying video filters 49 cloning 50 common techniques 49 creating a project 44 creating background sets 54 creating video mattes 51 customizing paint brushes 46 editing a frame 45 erasing 52 macros 48 retouching frames 56 video f...

Page 436: ...436 Volume 210 W Waveform display 349 Waveform monitor 82 Windows color picker 288 WMV capture profile 98 editing and customizing 100 Working with CG Infinity objects 319 Working with color 285 Z Zoom tool 264 Zooming 135 263 348 ...

Reviews: