44
Basic Setup
D: Remote control settings
Perform this step according to your preference and usage.
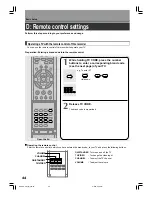
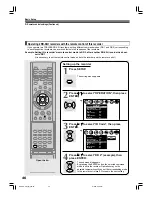
Operating a TV with the remote control of this recorder
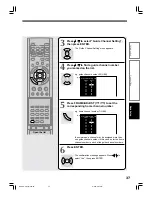
You can use the remote control of this recorder to operate your TV.
Preparation: Entering a brand code into the remote control
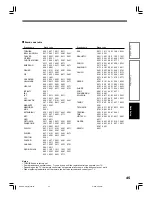
1
While holding TV CODE, press the number
buttons to enter a corresponding brand code
(see the next page) of your TV.
e.g. To enter 07
Hold down.
2
Release TV CODE.
The brand code is memorized.
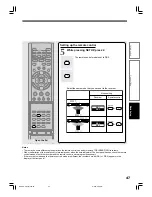
Operating the remote control
Point the remote control into which you have entered the brand code, to your TV and press the following buttons.
TV/VIDEO
CHANNEL
DISPLAY
REMAIN INPUT SELECT
ZOOM
TIME BAR
VOLUME
P in P
TV/VIDEO
CHANNEL
DISPLAY
REMAIN INPUT SELECT
ZOOM
TIME BAR
VOLUME
P in P
DIMMER
CHP DIVIDE
TV
TV/VIDEO
ON/STANDBY
CHANNEL
VOLUME
TV CODE
1
2
3
4
5
6
7
8
9
0
TV CODE
7
0
ON/STANDBY: To turn on and off the TV
TV/VIDEO
: To change the video input
CHANNEL
: To select the TV channel
VOLUME
: To adjust the volume
REC MENU
ENTER
DVD
HDD
SETUP
1
2
3
4
5
6
+10
7
8
9
DELETE
T.SEARCH
VCR Plus+
REC MODE
CLEAR
0
1
2
EXTEND
TV CODE
ENTER
PLAY
STOP
PAUSE
REC
LIBRARY
EDIT MENU
CONTENT MENU
DVD
HDD
V-REMOTE
FR
AM
E/A
DJU
ST
SL
OW
SK
IP
P
IC
TU
RE
SE
AR
CH
INSTANT SKIP
INSTANT REPLAY
QUICK MENU
TIMESLIP
Open the lid.
RD-X2U.Prep.(E)p40-52
9/3/02, 9:48 AM
44
Summary of Contents for RD-X2U
Page 24: ...24 RD X2U Prep E p13 24 9 3 02 9 47 AM 24 ...
Page 50: ...50 Memo RD X2U Prep E p40 52 9 3 02 9 48 AM 50 ...
Page 51: ...51 Introduction Connections Basic Setup Memo RD X2U Prep E p40 52 9 3 02 9 48 AM 51 ...
Page 52: ...Printed in Japan RD X2U Prep E p40 52 9 3 02 9 48 AM 52 ...
Page 54: ......
Page 78: ... RD X2 Ope US p018 026 9 3 02 11 23 AM 26 ...
Page 114: ...62 RD X2 Ope US p045 062 9 3 02 11 24 AM 62 ...
Page 134: ...82 RD X2 Ope US p063 082 9 3 02 11 24 AM 82 ...
Page 200: ......

