– 70 –
10-5-3. Refrigerant Piping Connection
Flaring
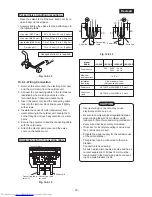
1. Cut the pipe with a pipe cutter.
Fig. 10-5-5
2. Insert a flare nut into the pipe, and flare the pipe.
• Projection margin in flaring : A (Unit : mm)
Rigid (Clutch type)
Fig. 10-5-6
Imperial (Wing nut type)
• Flaring size : B (Unit : mm)
Fig. 10-5-7
• In case of flaring for R410A with the conventional
flare tool, pull it out approx. 0.5 mm more than that
of R22 to adjust to the specified flare size.
The copper pipe gauge is useful for adjusting
projection margin size.
90˚
Obliquity
Roughness
Warp
Die
Pipe
A
B
Tightening Connection
Align the centers of the connecting pipes and tighten
the flare nut as much as possible with your fingers.
Then tighten the nut with a wrench and torque
wrench as shown in the figure.
Fig. 10-5-8
CAUTION
• Do not apply excessive force.
Otherwise, the nut may break.
(Unit : N·m)
• Tightening torque for connection of flare pipe
The pressure of R410A is higher than R22.
(Approx. 1.6 times.)
Therefore securely tighten the flare pipes which
connect the outdoor unit and the indoor unit with
the specified tightening torque using a torque
wrench.
If any flare pipe is incorrectly connected, it may
cause not only a gas leakage but also
trouble in the refrigeration cycle.
Fig. 10-5-9
Half union
Flare nut
Externally
threaded side
Internally
threaded side
Use a wrench
to secure.
Use a torque wrench
to secure.
Flare at
indoor unit side
Flare at
outdoor unit side
Outer dia. of copper pipe
Ø6.35 mm
Ø9.52 mm
Ø12.7 mm
Tightening torque
14 to 18 (1.4 to 1.8 kgf•m)
33 to 42 (3.3 to 4.2 kgf•m)
50 to 62 (5.0 to 6.2 kgf•m)
Outer dia. of
copper pipe
6.35
9.52
12.7
R410A
tool used
0 to 0.5
0 to 0.5
0 to 0.5
Conventional
tool used
1.0 to 1.5
1.0 to 1.5
1.0 to 1.5
Outer dia. of
copper pipe
6.35
9.52
12.7
R410A
1.5 to 2.0
1.5 to 2.0
2.0 to 2.5
+0
–0.4
Outer dia. of copper pipe
6.35
9.52
12.7
B
R410A
R22
9.1
9.0
13.2
13.0
16.6
16.2


