background image

77

Connecting your TV

2

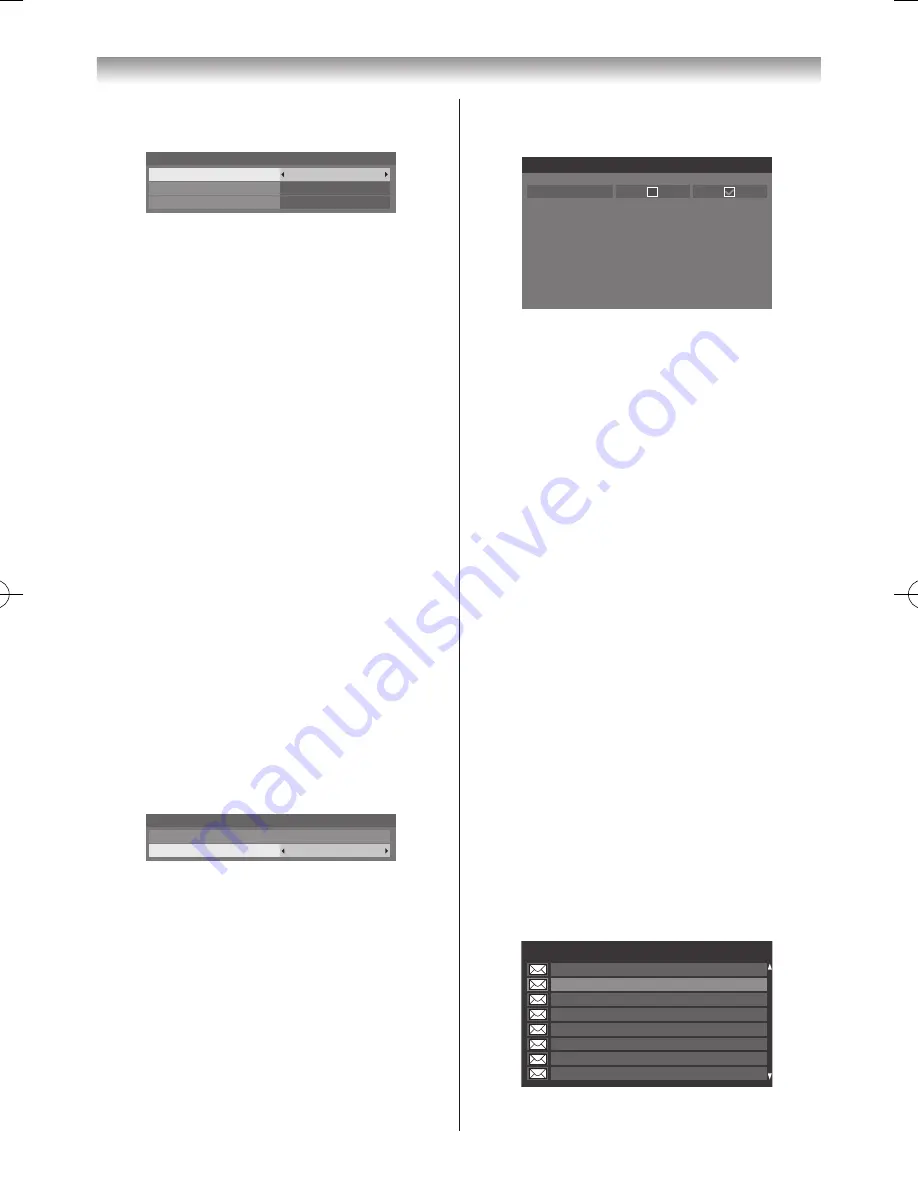
  Press 

s

 or 

r

 to select 

One Touch Recording


Time

Recording Setup

End Padding Time

None

Start Padding Time

None

One Touch Recording Time

Programme End Time

3

  Press 

v

 or 

w

 to select the recording time�

You can set the 

Programme End Time

 and per 

30-minute increments in the range of 30 minutes to 

360 minutes�

To set the padding time for programmed recording start 
time and end time�

1

  From the 

Recording Setup

 menu, 

s

 or 

r

 to select 

Start Padding Time

2

  Press 

v

 or 

w

 to select a time�

You can select from 

None

, 1 minute, 3 minutes, 5 

minutes and 10 minutes� Recording will start at the 

selected number of minutes prior to the recording start 

time�

3

  Press 

s

 or 

r

 to select 

End Padding Time

 from the 

Recording Setup

 menu�

4

  Press 

v

 or 

w

 to select a time�

You can select from 

None

, 1 minute, 3 minutes, 5 

minutes and 10 minutes�
Recording will end at the recording end time plus the 

selected number of minutes�

Setting USB HDD Energy-Saving Mode

1

  From the 

Recording Setup

 menu, 

s

 or 

r

 to select 

Recording Devices

2

  Press 

s

 or 

r

 to select 

Device Energy-Saving 

Mode

Recording Devices 

Device Energy-Saving Mode

Nomal

Device List 

3

  Press 

v

 or 

w

 to select 

Normal

 or 

Energy Saving

Notes:

 When set to 

Energy Saving

, it may take a while for 

the USB HDD to function.

 When set to 

Energy Saving

, depending on the 

type of USB HDD, the USB HDD indicator lamp 
may not indicate standby status even when in 
standby status.

To change the name of the USB HDD

1

  Press 

s

 or 

r

 to select 

Recording Devices

 from 

the 

Recording Setup

 screen and press 

OK

2

  Press 

s

 or 

r

 to select 

Device List

 and press 

OK

The 

Device List

 screen will appear�

Device Name

Registered

Connected

USB HDD 1

Device List

3

 Press the 

GREEN

 button�

Edit the desired name by using the software keyboard 

(

-

 page 61)� The maximum number of characters is 

10�

Note: 

If multiple USB HDD appear on the Device List 
screen in Step 2, press 

s

 or 

r

 to select the USB 

HDD whose name you want to change.

To perform a USB HDD operation test

1

  Press the 

YELLOW

 button on the 

Device List


screen�
USB HDD operation test will start�
Wait until the test ends�

Note: 

The results of the device test are only a guide.
The device may not function as shown in the results.

To confirm/delete Recording Information

If programmed recording is not performed correctly or 

some other error occurs, you can check the error content 

using 

Recording Information

� Up to 64 

Recording 

Information

 entries will be recorded and when the 

maximum is exceeded, entries will be deleted starting 

from the oldest. You can delete 

Recording Information


after you have checked it�

1

  Press 

QUICK

 to open the 

Quick Menu

2

  Press 

s

 or 

r

 to select 

Recording Information


and press 

OK

� The 

Recording Information

 screen 

will appear�

8888


□□□□□

  Tue, 25 Apr    10:00 – 11:00

Recording Information

15/64

8888


□□□□□

  Tue, 25 Apr    10:00 – 11:00

8888


□□□□□

  Tue, 25 Apr    10:00 – 11:00

8888


□□□□□

  Tue, 25 Apr    10:00 – 11:00

8888


□□□□□

  Tue, 25 Apr    10:00 – 11:00

8888


□□□□□

  Tue, 25 Apr    10:00 – 11:00

8888


□□□□□

  Tue, 25 Apr    10:00 – 11:00

8888


□□□□□

  Tue, 25 Apr    10:00 – 11:00

110920c1_55WL800AZ_En.indb   77

11.9.21   11:37:39

Summary of Contents for 46WL800A

Page 1: ...Owner s Record Y TV o ow v TOSHIB g VX1A00215900 Integrated Digital LCDTV OWNER S MANUAL TOSHIBA CORPORATION 2011 All Rights Reserved TD CA 55WL800AZ ...

Page 2: ...49 Connecting HDMI and DVI devices 50 Selecting the PC HDMI 3 audio mode 51 Setting the HDMI 3 audio mode 52 Connecting a computer PC 52 REGZA LINK connection 54 Using the PC Settings 55 Connecting a home network 55 Using your home network 56 Setting up the Network 57 Network Connection Test 60 Setting the Network Lock 61 Using the software keyboard 61 Setting Network Device setup 61 Using the Med...

Page 3: ...th or other material placed between the TV and supporting furniture The TV may drop or fall off which may cause an injury or damage 3 Never stand or climb on the TV Educate children about the dangers of climbing on furniture to reach the TV or its controls Be especially careful in households with children to prevent them through climbing on top of the TV It may move fall over break become damaged ...

Page 4: ...carry it upright Never carry the TV with the screen facing up or down Introduction 11 Precautions for installing on outdoor aerial An outside aerial system should not be located in the vicinity of overhead power lines or other electric light or power circuits If the aerial falls down or drops it may cause an injury or an electric shock Use 1 Never place hot objects or open flame sources such as li...

Page 5: ...e cord or apply excessive force or tension to it Never place heavy objects on the cord or allow it to overheat as this may cause damage a fire or an electric shock Contact a service technician if the power cord is damaged 7 If there is thunder or lightning never touch the aerial cable or other connected cables You may suffer an electric shock Service 1 Never repair modify or disassemble the TV by ...

Page 6: ...damage the cabinet and LCD screen 3 Some pixels of the screen do not light up The LCD display panel is manufactured using an extremely high level of precision technology however sometimes some pixels of the screen may be missing picture elements or have luminous spots This is not a sign of malfunction 4 Interference The LCD display may cause interference in image sound etc of other electronic equi...

Page 7: ...n the United States Japan and other countries 2010 ACCESS CO LTD All rights reserved This software is based in part on the work of the Independent JPEG Group This product contains Adobe Flash Player software under license from Adobe Systems Incorporated Copyright 1995 2009 Adobe Systems Incorporated All rights reserved Adobe and Flash are trademarks of Adobe Systems Incorporated MPEG Layer 3 audio...

Page 8: ...rder Back of TV Exploring your new TV Installing the remote control batteries Remove the battery cover Insert two R03 AAA batteries matching the polarities of the battery to the marks inside the battery compartment Cautions Dispose of batteries in a designated disposal area Batteries must not be exposed to excessive heat such as sunshine fire or the like Attention should be drawn to the environmen...

Page 9: ...een these keys select the programme position pages 17 20 U u menu up down When a TV menu is on screen these keys function as up down menu navigation keys page 16 2 33 volume When no menu is on screen these keys adjust the volume level I i menu left right When a TV menu is on screen these keys are used for left right menu navigation and to adjust settings page 16 MENU 44 Press to access the TV menu...

Page 10: ...udio and uncompressed digital video from a DVI device pages 51 53 Note The audio terminals are shared with o RGB PC o HDMI 4 input terminal only For use when connecting a MHL Device mobile phone etc page 82 o 111 RGB PC and PC HDMI3 AUDIO input terminal RGB PC For use when connecting a personal computer PC page 52 PC HDMI 3 AUDIO input terminal PC audio input terminal is shared with the HDMI 3 ana...

Page 11: ...screen information Initial index This button turns the sound off on Position up down To display the channel list To display digital on screen Programme Guide To menu up down left or right To exit menu To access TOSHIBA PLACES Top Page To access Media Player Menu To access More Information Menu These buttons adjust the volume level To access the Quick Menu Switch the Audio Description On Off Number...

Page 12: ...ccessed Press to STOP Press to PLAY Press to PAUSE Press to SKIP BACK Press to REVERSE Press to FORWARD Press to SKIP FORWARD Getting started Note These functions are dependent on the connected device Not all of the remote control buttons may be available Please refer to the owner s manuals of the connected devices Location of controls for REGZA LINK ...

Page 13: ...me Reset TV page 38 is executed Menu Language English 2 Press v or w to select the menu language English or Français 3 Press OK to display the Primary Secondary Language and Primary Secondary Audio Language item Press s r v or w to set the selectings as desired 4 Press OK to display the Location menu page 19 Press v or w to select Home or Store For normal home use select Home Location Home To use ...

Page 14: ...mme or pictures from the external input Picture Mode page 23 Picture Size page 22 3D Settings pages35 37 Personal Mode page 80 More Information page 20 Channel Options page 45 Sleep Timer page 38 REGZA LINK Device Control page 41 Speakers page 41 Headphone Level page 30 Wireless Information page 59 Recording Information page 77 When viewing in 3D mode Picture Mode page 23 Picture Size page 22 3D S...

Page 15: ...age 30 Wireless Information page 59 When using Media Player Music List Sound page 28 Personal Mode page 80 Sort page 70 Repeat page 70 Shuffle page 70 Speakers page 41 Headphone Level page 30 Device Information page 71 Wireless Information page 59 When using Media Player Music Fullscreen Play Sound page 28 Personal Mode page 80 Repeat page 70 Shuffle page 70 Sleep Timer page 38 Speakers page 41 He...

Page 16: ...gramme Timers Jump to Library Media Player Photo Movie Music Media Player Setup Jump to Photo menu Jump to Movie menu Jump to Music menu Media Player Setup Menu Toshiba Places Jump to Toshiba Places Function Photo Frame On Timer Sleep Timer Jump to Photo Frame On Timer Menu Sleep Timer Menu Setup Picture Sound Preferences System Setup Picture Menu Sound Menu Preference Menu System Setup Menu TV Pr...

Page 17: ...hannel and press OK to view ATV Manual Tuning analogue Use the Manual Tuning operation if desired channels cannot be preset by Auto Tuning or if you would like to preset channels to specific position numbers one by one 1 From the System Setup menu press s or r to select ATV Manual Tuning 2 Press OK to display the ATV Manual Tuning menu Press r or s to select the position you want to set Pos Label ...

Page 18: ...other channels will move to make room 4 Press v to store your move Repeat as necessary and press EXIT DTV Manual Tuning digital This feature is available for service engineers or can be used for direct channel entry if the multiplex channel is known 1 From the System Setup menu press or to select DTV Manual Tuning and press OK DTV Manual Tuning WEAK Signal Strength Quality Channel GOOD Start Scan ...

Page 19: ...o select Sort and press OK Setting the Standby Channel Update digital If the Standby Channel Update is set to On when the TV is in standby mode Digital Tuning is automatically executed and any new channels are saved 1 From the System Setup menu select DTV Settings and press OK 2 Press s or r to select Standby Channel Update and press v or w to select On Selecting Dynamic Scan digital If the broadc...

Page 20: ...On Screen Display 1 From the System Setup menu press or to select Menu Language 2 Press v or w to select the desired language Location Quick Setup Auto USB 2 Port Setup System Setup Menu Language Auto Tuning ATV Manual Tuning DTV Manual Tuning DTV Settings Antenna English Recorder Displaying the on screen information analogue 1 Press to display the following on screen information ABCD 4 Mono The i...

Page 21: ... mark will appear if the timer is a Reminder Timer Note The Programme Timer LED indicator page 9 will appear orange when a timer is set Displaying the Clock Display You will always see a time display on screen when using this feature 1 From the Preferences menu press or until Clock Display is selected 2 Press v or w to select On or Off Note This feature will not be available until a digital channe...

Page 22: ... true 4 3 broadcast Super Live This setting will enlarge a 4 3 image to fit the screen by stretching the image horizontally and vertically holding better proportions at the centre of the image Some distortion may occur Cinema When watching all sides panel format films video tapes this setting will eliminate or reduce the black bars on all sides of the screen by zooming in and selecting the image w...

Page 23: ...position of the picture may be made to suit your viewing preferences 1 From the Display Settings in the Preferences menu press or to select Picture Position Auto Format On 4 3 Stretch Off Picture Position Display Settings 2 Press OK and press or to select the item you want to adjust 0 0 Picture Position Horizontal Position Reset Vertical Position 3 Press v or w to adjust the settings as desired Ho...

Page 24: ...ack White Level Noise Reduction Static Gamma 3D Colour Management Advanced Picture Settings Off Middle 3 Press v or w to adjust the settings as required Using ClearScan 400Hz This function eliminates motion blur without adding flicker or reducing image brightness and improves the viewing quality of a motion picture 1 From the Advanced Picture Settings menu press s or r until ClearScan 400Hz is sel...

Page 25: ...just the settings as required Note If you set 3D Colour Management to Off Base Colour Adjustment will not be available Resetting Base Colour Adjustment The reset function returns base colour adjustment to the factory settings 1 From the Base Colour Adjustment menu press s or r to select Reset 2 Press OK Activating MPEG NR Noise Reduction If the incoming MPEG signal exhibits noise is grainy dependi...

Page 26: ...l video will be restored 1 From the Picture menu s or r until Expert Picture Settings is selected and press OK 2 Press s or r to select Test Pattern 3 Press v or w to select On or Off RGB Filter This feature individually enables or disables the red green and blue components of the picture to allow for more accurate adjustment of each colour 1 From the Expert Picture Settings menu press s or r to s...

Page 27: ...s 0 9 Red Green Blue 0 640 0 300 0 330 0 060 x y 0 150 0 600 4 Press s r v or w and input the values to fill all RGBxy matrix table 5 Highlight Start and press OK Please wait until you see Manual Colour Calibration has been completed on screen To return to factory setting Select Reset and press OK Auto Colour Calibration 1 From the Colour Calibration menu press s or r to select Auto Colour Calibra...

Page 28: ... Off Balance Advanced Sound Settings Dolby Volume Dynamic Range Control Headphone Settings Audio Description Audio Level Offset 2 Press v or w to select Dual 1 or Dual 2 Note The Dual menu setting status is stored even when the TV is turned off Stereo and Bilingual transmissions For ATV programmes If stereo or dual language broadcasts are transmitted the word Stereo or Dual will appear on the scre...

Page 29: ...ement To turn the vocal emphasis effect On or Off Dynamic Bass Boost To select the desired bass expansion level Off Low or High Using Dolby Volume This feature provides a consistent sound volume regardless of programmes channels or input sources 1 From the Sound menu press s or r to select Dolby Volume 2 Press v or w to select Low High or Off Notes This feature does not affect the audio signal out...

Page 30: ... settings Activating Blue Screen With the Blue Screen function On the screen will automatically turn blue and the sound will be muted when no signal is being received 1 From the Preferences menu press s or r until Blue Screen is selected 2 Press v or w to select On or Off Activating 4 3 Stretch When 4 3 Stretch is activated the size switching system changes 4 3 programmes into full screen picture ...

Page 31: ...ain or indisposition Do not use the 3D glasses if they are broken or have any cracks Do not stand or walk while wearing 3D glasses You may lose your balance which could result in falls or other accidents Do not wear the 3D glasses for any purpose other than viewing 3D programming 3D glasses do not function as sunglasses Do not drop exert pressure on or step on the 3D glasses Doing so may damage th...

Page 32: ...harp objects Do not drop or bend the 3D glasses Health precautions Due to the possible impact on vision development viewers of 3D programming should be age 6 or above Children may be more susceptible to health effects from viewing 3D images and should be closely supervised Some viewers may experience a seizure or blackout when exposed to certain flashing images or lights contained in certain 3D TV...

Page 33: ...sses only one supplied Compatible 3D playback device or 3D source 3D capable HDMI cable For 3D signal formats see page 88 Names and functions Power switch Power light ON OFF Protective films Peel these off before beginning use DC IN Lens liquid crystal shutter A right and left liquid crystal shutter opens and closes alternately with the images for the left eye and for the right eye alternately pro...

Page 34: ...ll not switch to 3D If the appropriate mode and format are not selected the 3D image will not display correctly There will be restrictions on the Picture Size settings for 3D Mode and 3D to 2D Mode There are individual differences in perception of 3D images When viewing 3D images wear the 3D glasses The Auto Format function is not available for 3D Mode and 2D Mode The Picture position control is n...

Page 35: ...D 2D Correct 3D image To select the 3D format from the Quick menu in 3D mode 1 Press QUICK Select 3D Settings 2 Press or to select 3D Format Select Press OK 3 Press v or w to select Side by Side or Top and Bottom Trigger of Switching Display Mode Input Signal Quick menu Type Additional Information Format Source Signal SBS TAB 3D Format Signal With 3D Auto Detect Information FP 3D 3D SBS 3D 3D TAB ...

Page 36: ...o Start mode This mode controls what the TV does when it detects a 3D format signal with 3D Auto Detect Information 1 From the Preferences menu press or to select 3D Setup and press OK 2 Press or to select 3D Auto Start and press or to select 3D 2D or Off Option Description 3D Displays as 3D mode automatically when 3D format signal with 3D Auto Detect Information is received 2D Displays as 2D mode...

Page 37: ...mportant Info 2 Press OK Adjusting 2D to 3D Depth You can adjust an effect quantity to change the 2D mode for the 3D mode From the Menu 1 From the Preferences menu press or to select 3D Setup and press OK 2 Press or to select 2D to 3D Depth and press OK 3 Press or to select 1 2 3 4 or 5 From the Quick Menu 1 Press QUICK on the remote to open the Quick Menu 2 Press or to select 2D to 3D Depth and p...

Page 38: ...nnot be selected Volume Select the volume level that will be set when the TV turns on Time until Power On only for DTV Clock Off mode Set the amount of time from now until the TV turns on using the Number buttons maximum of 12 hours 5 When all the details have been entered select Done and press OK to start the timer To cancel the On Timer 1 From the On Timer menu select Enable On Timer 2 Press v o...

Page 39: ... RGB PC PC input Notes If a REGZA LINK device is connected to an HDMI input the REGZA LINK icon will appear When the TV is switched on it will take a few minutes for the REGZA LINK icon to appear in the list when an HDMI cable is removed it will take a few minutes for the icon to disappear If the HDMI cable from a connected device or an HDMI setting for a connected device is changed Enable REGZA L...

Page 40: ... input To save your settings press the BLUE button 4 Repeat step 3 for other video inputs Using REGZA LINK This feature uses CEC Consumer Electronics Controls technology and allows the control of Toshiba REGZA LINK compatible devices from the TV remote control via HDMI connection page 54 Note Not all Toshiba products currently support REGZA LINK REGZA LINK Setup 1 From the Preferences menu press o...

Page 41: ... is set to Amplifier in the REGZA LINK Setup menu or in the Quick Menu Speakers Notes The above functions are dependent on the connected device and TV setting When you turn on the AV amplifier change its input source or adjust the sound volume the sound will be output from the AV amplifier s speakers even if TV Speakers has been selected for Initial Speaker Setting Turn the TV first to standby and...

Page 42: ...g up the teletext screen Press again to superimpose the teletext over a normal broadcast picture Press again to return to normal TV mode You need to return to normal viewing if you wish to change channels When you first press TEXT to access the text service the first page you see will be the initial page In Auto mode this displays the main subjects available and their relevant page numbers In LIST...

Page 43: ...ctions k To display the index initial page In Auto mode Press k to access the index page The one displayed is dependent on the broadcaster In LIST mode Press k to return to the 100 page or initial page A To reveal concealed text Some pages cover topics such as quizzes and jokes To discover the solutions press A B To hold a specific page At times it is convenient to hold a page of text Press B and ...

Page 44: ...3 Press or to select Primary Subtitle Language or Secondary Subtitle Language and press v or w to select an option The SUBTITLE button can be used to select subtitle on or off for the current channel only and to select the subtitle language if more than one subtitle is available Selecting Audio languages digital This feature allows a programme or film to be viewed with a choice of soundtrack langu...

Page 45: ...n still be accessed by direct number entry when tuned a 8 icon will be displayed in the banner to indicate as a skipped channel Locking Channels Locking Channels stops the viewing of digital channels Locked channels can only be accessed by entering the PIN 1 Select a channel you want to lock in your channel list 2 From the Quick Menu press or to select Channel Options and press OK 3 Press w repeat...

Page 46: ...ime Settings This function allows you to manually set the time Please note that if you manually change the time setting all existing entries under Programme Timers will become invalid as they are still based on the old time It is recommended that you delete all entries under Programme Timers before proceeding with the steps described below 1 From the DTV Settings menu press or to select Local Time...

Page 47: ...ed Audio EXT 2 Input Labeling 3 Press OK to display Digital Audio Format menu and press s or r to select an option Audio Format Press or to select PCM or Auto PCM This mode outputs PCM format to the digital audio output socket Auto This mode outputs Dolby Digital if available or PCM to the digital audio output socket Dolby Digital Dolby Digital Dolby Digital Plus Dolby Digital MPEG PCM HE AAC Dolb...

Page 48: ...und menu press or to select Dynamic Range Control 2 Press v or w to select On or Off Note This feature will automatically switch Off when Dolby Volume is set to Low or High Selecting the USB 2 Port Setup You can set USB Port 2 to be used for Recording or for Playing media 1 From the System Setup menu press s or r until USB 2 Port Setup is selected 2 Press v or w to select Recorder or Media Player ...

Page 49: ...EXT 3 Connecting an audio system digital You can enjoy high quality dynamic sound by connecting the TV to an audio system Notes DO NOT connect the DIGITAL AUDIO output terminal to the AC 3 RF input of a Dolby Digital Receiver with a built in Dolby Digital decoder Connect the DIGITAL AUDIO output terminal to the OPTICAL input of a receiver or processor Refer to the owner s manual of the connected e...

Page 50: ...The HDMI input on your TV can receive digital audio and uncompressed digital video from an HDMI device and uncompressed digital video from a DVI device This input is designed to accept HDCP programme material in digital from CEA 861 D compliant consumer electronic devices such as a set top box and DVD player with HDMI and DVI output The HDMI input is designed for best performance with 1080i 50 Hz ...

Page 51: ... The audio terminals are shared with o RGB PC VIDEO AUDIO L R IN OUT DVI OUT DVI device Back and left side of TV RGB PC HDMI HDMI 3 AUDIO HDMI type A connector to DVI adapter cable For proper operation the length of an HDMI to DVI adapter cable should not exceed 3m The recommended length is 2m Standard analogue audio cables An HDMI to DVI adapter cable transfers only video Separate analogue audio ...

Page 52: ...Full is selected RGB output signal is output in the range from 0 to 255 Notes If your HDMI connection is capable of 1080p and or your TV is capable of refresh greater than 50 Hz or supports Deep Colour you will need a Category 2 cable All of the above HDMI settings need proper HDMI source devices If the HDMI source products do not support these features the TV may not work properly by activating t...

Page 53: ... Signal name 1 R 9 NC 2 G 10 Ground 3 B 11 NC 4 NC not connected 12 NC 5 Ground 13 H sync 6 Ground 14 V sync 7 Ground 15 NC 8 Ground Connecting a PC to the HDMI terminal on the TV When connecting a PC to the HDMI terminal on the TV use an HDMI to DVI adapter cable and analogue audio cables If connecting a PC with an HDMI terminal use an HDMI cable type A connector Separate analogue cables are not ...

Page 54: ...is limited to models incorporating Toshiba s REGZA LINK However Toshiba is not liable for those operations Refer to the individual owner s manuals for compatibility information This function is able to operate one PC and one AV amplifier but the PC may not operate properly with the AV amplifier Some PC models may not be controlled properly by the TV REGZA LINK connection You can control the basic ...

Page 55: ...ot clock frequency of the PC picture details will be blurred screen width will change or drift patterns in vertical lines may be apparent This function allows you to adjust and optimize the picture 1 From the PC Settings menu press s or r to select Sampling Clock 2 Press v or w to optimize the picture Sampling Clock 0 Resetting the PC Settings The Reset function adjusts the PC Settings to the fact...

Page 56: ...th one another If you use Bluetooth and Wireless LAN devices simultaneously you may occasionally experience a less than optimal network performance or even lose your network connection If you should experience any such problem immediately turn off either your Bluetooth or Wireless LAN device Actual performance can vary including lower wireless network capacity data throughput rate range and covera...

Page 57: ... of wireless LAN equipment and security setup easy WPS will automatically configure all wireless settings Assisted Setup setup by using the AP s notification information Network Name Authentication and Encryption are decided based on information from the AP You will manually set the Security Key Manual Setup manual input of all settings Easy Setup using PBC Push Button Configuration 1 From the Pre...

Page 58: ... 5 Input the Network Name by using the Software Keyboard page 61 To save your setting press the BLUE button 6 Press s or r to select Authentication and press v or w to select Open System Shared Key WPA PSK or WPA2 PSK 7 Press s or r to select Encryption and press v or w to select None WEP TKIP or AES Notes Certain encryption types are only compatible with specific authentication types When Authent...

Page 59: ... Default GATEWAY DNS Address of the DNS Note Even if an AP for IEEE 802 11n is used when Encryption is set to WEP or TKIP the Speed value might be low It is recommended that Encryption be changed to AES Notes on wireless LAN environment The function of all IEEE802 11 is not supported The ad hoc mode is not supported It is recommended to use IEEE 802 11a or IEEE 802 11n on 5 GHz band for audio and ...

Page 60: ... Setup and press OK 4 Select Auto Setup and press v or w to select On Note Other items will be greyed out when Auto Setup is set to On Manual setup 1 From the Preferences menu select Network Setup and press OK 2 Press s or r to select Advanced Network Setup and press OK 3 Press s or r to select DNS Setup and press OK 4 Select Auto Setup and press v or w to select Off 5 Press s or r to select Prima...

Page 61: ...sor Button Description GREEN Cycles through upper case lower case numbers and symbols if available YELLOW Chooses an accented version of the current letter if applicable BLUE Saves changes and closes the Software Keyboard window BACK Closes the Software Keyboard window without saving changes Setting Network Device setup External Control Setup This setup allows you to operate a home network connect...

Page 62: ...lue in effect when DMR playback was started Selecting the Power Control Mode When the TV is connected to the home network via WLAN it can be turned on with Wake on LAN from an external device connected to the home network 1 From the Network Device Setup menu press s or r to select Power Control Mode 2 Press or to select On or Off Notes When Wired is selected for the Network Type in Network Setup m...

Page 63: ...notice You cannot post videos to service included in the Toshiba Places from this TV Please use a PC to post videos Not all contents can be viewed normally when you access other websites from services in Toshiba Places using this TV If you have any questions about YouTube content please contact YouTube LLC YouTube content have been independently managed by YouTube LLC Using the Function Menu The F...

Page 64: ...enation Sets effect non effect of the Japanese hyphenation Pop up window Sets effect non effect of pop up windows Animation Sets display non display of animations JavaScript Sets effect non effect of JavaScript Word wrap Sets effect non effect of Word Wrap If Word Wrap is enabled a word not finished at the end of line is shifted to the next line Rapid Render Sets effect non effect of Rapid Render ...

Page 65: ...to use your TV as a DMR set Media Renderer to On page 62 Media Player Specifications Device USB device Interface version USB 2 0 HS USB Mass Storage Class devices MSC Notes Connectivity is not guaranteed for all devices USB Hub will not be properly operated File System FAT16 and FAT32 Maximum memory size Unlimited DLNA CERTIFIED Server Your PC for example You must obtain any required permission fr...

Page 66: ... in the box To remove the check press again 5 Press w to select Done and press OK to save Notes Up to 8 DMSs can be selected If the device is checked it will still be displayed with grey out in the Select Device window even if it is currently powered off When OK is pressed with the highlight on a greyed out item a confirmation window for Wake on LAN will be displayed If Yes is selected the TV will...

Page 67: ...select the desired mode 2D Mode All photos are displayed in 2D 3D Mode 1 2D photos are displayed in 2D and 3D photos in 3D 3D Mode 2 All photos are displayed in 3D Notes When switching to 2D or 3D mode the selected mode is displayed at the top left of the photo list 3D photos in the photo list are indicated as 3D Settings Interval Time and Repeat 1 Press QUICK to open the Quick Menu 2 Press s or r...

Page 68: ...ring playback Press W w to pause You can move to the desired replay position by pressing v or w during PAUSE PAUSE or operations during PAUSE may not be available depending on the content DMC or DMS To resume normal playback press c To play in fast reverse or fast forward directions press CC or cc during playback Each time you press the CC or cc the playback speed will change CC or cc may not be a...

Page 69: ...OUT DIVX VIDEO ON DEMAND This DivX Certified device must be registered in order to play purchased DivX Video on Demand VOD movies To obtain your registration code locate the DivX VOD section in your device setup menu Go to vod divx com for more information on how to complete your registration DivX Certified to play DivX and DivX PlusTM HD H 264 MKV video up to 1080p HD including premium content To...

Page 70: ...r DMS To play in fast reverse or fast forward directions press CC or cc during playback Each time you press CC or cc the playback speed will change CC or cc may not be available depending on the content DMC or DMS To locate a specific file press Z or z repeatedly Press to display the file status information Notes The information may not be correctly displayed depending on the content DMC or DMS Du...

Page 71: ... can overwrite the pre installed file with a file from your USB storage device or DLNA CERTIFIED server To open Photo Frame set up Open from Menu 1 From the Preferences menu select press s or r to Photo Frame Setup Network Setup Network Device Setup Photo Frame Setup Teletext Panel Lock Network Lock Off REGZA LINK Setup Personal TV Setup Auto Off Off Preferences 2 Press OK The preview screen will ...

Page 72: ...e Digital Position Press or to select Left or Right Auto Power Off Press or to select Off 00 30 01 00 02 00 04 00 06 00 or 12 00 If Photo Frame is started and left active the TV will automatically turn off after the set length of time maximum 12 hours 4 Press BACK 5 Select Start and press OK Apr 26 Tue AM 10 53 Notes The clock display will only appear when time from a digital broadcast is availabl...

Page 73: ...recording another If the recording time to the USB HDD is too short data may not be saved You cannot record video input signals on the USB HDD Not all types of broadcasts may be recordable After programming the TV to record digital broadcasting do not disconnect the power plug before recording starts Also leaving the power switch ON until recording is scheduled to start may cause the recording to ...

Page 74: ...tart Time Select the time to start recording End Time Select the time to end recording Repeat Select Once Daily or Weekly Once The selected content is recorded once Daily The same time slot on the same channel is recorded every day on and after the selected day Weekly The same time slot on the same channel on the same day of the week is recorded on and after the selected day Protect Select this fu...

Page 75: ... you want to view The content of the title selected on the thumbnail screen is played To change the order in which the titles are listed press the BLUE button to select New or Old To display the titles by week or by Personal Mode press the YELLOW button to select All Weekly or Personal Grouping Press v or w to select a day tab or Personal Mode tab Note If no titles have been registered to Personal...

Page 76: ...Grouping None 3 Press v or w to select the Personal Mode to which you want to register the title and press OK The title will be registered to the selected Personal Mode You can remove a title from the registered Personal Mode by selecting None To check the remaining USB HDD capacity You can check the remaining capacity of the USB HDD using Remaining Capacity Tue 26 Apr 10 00 Tue 26 Apr 10 00 Wed 2...

Page 77: ... even when in standby status To change the name of the USB HDD 1 Press or to select Recording Devices from the Recording Setup screen and press OK 2 Press or to select Device List and press OK The Device List screen will appear Device Name Registered Connected USB HDD 1 Device List 3Press the GREEN button Edit the desired name by using the software keyboard page 61 The maximum number of characters...

Page 78: ...ch to the next scheduled programme At this time depending on how far the scheduling times overlap the beginning section of the next scheduled programme may not be recorded When End Padding Time is set for the first programmed recording page 77 depending on how far the scheduling times overlap the End Padding Time may be ignored and recording of the next scheduled programme may start As priority is...

Page 79: ...ern from that when your face was registered Personal Identification accuracy can be enhanced by registering additional facial images under different conditions A different lighting environment from when your face was registered such as during the day and at night Personal Identification accuracy can be enhanced by registering your face under various lighting environments Whether or not you are wea...

Page 80: ...ock icon will be displayed If the Personal PIN entry screen is displayed enter the correct Personal PIN Facial Recognition After registering faces beforehand for each Personal Mode the Welcome Window will be displayed when the camera detects a corresponding face The Personal Name corresponding to the detected face will be displayed in the Welcome Window Change Personal Modes by pressing the corres...

Page 81: ...dit Name You can edit the name of your Personal Mode Press s or r to select Edit Name and press OK Edit the desired name by using the software keyboard page 61 The maximum number of characters is 25 Personal PIN Setup Press s or r to select Personal PIN Setup and press OK Enter your personal PIN in same manner as Parental PIN Setup page 45 Volume Type Press s or r to select Volume Type and press v...

Page 82: ...le charging starts automatically Note Do not connect an MHL compatible device to any port other than the HDMI 4 port Operating an MHL compatible Device When an MHL compatible device is connected to the HDMI 4 port on the TV input automatically switches to the HDMI 4 port Note Depending on the connected MHL compatible device it may be possible to perform operations from the device Selecting the MHL...

Page 83: ...n a connected REGZA LINK device does not work correctly after you have changed device settings turn off your TV and unplug the power cord Then plug the TV in and turn on again If several devices are connected the REGZA LINK feature may not operate properly Read the owner s manual furnished with the connected REGZA LINK device Symptom and solution digital Poor picture Check the aerial connections M...

Page 84: ...06 G 0 07 same as 0 08 0 08 PGR 0 09 same as 0 0C 0 0A same as 0 0C 0 0B same as 0 0C 0 0C AO 0 0D 0 0E 0 0F show programme block programme Media Player Supported Format Media Player Media Format File Extension Video Audio codec USB DMS Note Photo JPEG jpg jpeg JPEG yes yes USB Data compatibility JPEG Exif ver 2 2 Maximum viewable resolution 4096 4096 HW decode 16384 16384 SW decode Maximum photo ...

Page 85: ... 3 L PCM yes yes Audio Dolby Digital Plus AAC HE AAC yes no MPEG 2 TS mpg mpeg ts Video MPEG 1 Video yes no Video MPEG 2 Video H 264 MPEG 4 AVC yes yes Audio MPEG 1 Layer1 MPEG 1 Layer2 MPEG 2 Layer2 Dolby Digital AC 3 yes yes Audio Dolby Digital Plus AAC HE AAC yes no MP4 mp4 m4v Video H 264 MPEG 4 AVC yes yes Audio AAC yes yes Audio HE AAC Dolby Digital AC 3 Dolby Digital Plus yes no DivX Plus H...

Page 86: ...25 502 510 506 26 510 518 514 27 518 526 522 28 526 534 530 29 534 542 538 30 542 550 546 31 550 558 554 32 558 566 562 33 566 574 570 34 574 582 578 35 582 590 586 36 590 598 594 37 598 606 602 38 606 614 610 39 614 622 618 40 622 630 626 41 630 638 634 42 638 646 642 43 646 654 650 44 654 662 658 45 662 670 666 46 670 678 674 47 678 686 682 Channel Channel Limits MHz DTT Centre Frequency MHz 48 ...

Page 87: ...5 C52 719 25 C53 727 25 C54 735 25 C55 743 25 C56 751 25 C57 759 25 C58 767 25 C59 775 25 C60 783 25 C61 791 25 C62 799 25 C63 807 25 C64 815 25 C65 823 25 C66 831 25 C67 839 25 C68 847 25 C69 855 25 S mode OSD RF Frequency MHz S1 105 25 S2 112 25 S3 119 25 S4 126 25 S5 133 25 S6 140 25 S7 147 25 S8 154 25 S9 161 25 S10 168 25 S11 231 25 S12 238 25 S13 245 25 OSD RF Frequency MHz S14 252 25 S15 25...

Page 88: ...9 24 000 Hz 54 000 kHz 148 500 MHz Frame Packing 27 000 kHz 74 250 MHz Side by Side Half Top and Bottom 30 000 Hz 67 433 67 500 Hz 148 352 148 500 MHz Frame Packing 33 716 33 750 Hz 74 176 74 250 MHz Side by Side Half Top and Bottom 50 000 Hz 56 250 kHz 148 500 MHz Side by Side Half Top and Bottom 59 940 60 000 Hz 67 433 67 500 Hz 148 352 148 500 MHz Side by Side Half Top and Bottom 3D Support For...

Page 89: ...5 6 7 8 COMPONENT VIDEO INPUT terminals the signal format 480i 480p 576i 576p 720p 50 60 Hz 1080i 50 60 Hz These signal formats are converted to match the number of pixels of the LCD panel Colour system analogue TV system PAL SECAM NTSC 3 58 4 43 Aspect ratio 16 9 Visible size diagonal 138 7 cm Number of pixels 1 920 H dots 1 080 V dots Audio power Main 10 W 10 W Woofer 10 W Speakers Main 20 120 m...

Page 90: ...z 2 400 2 4835 GHz Security WEP64 128 TKIP AES WPA WPA2 PSK WPS None Supplied accessories Owner s manual 1 Remote control 1 Batteries 2 Clip 1 page 3 Screw 1 page 3 Cleaning cloth 1 A V adaptor cables 2 page 49 Component adaptor cable 1 page 49 RGB PC and audio adaptor cable 1 page 52 Cable holder 2 page 10 Pedestal stand 1 3D Glasses FPT AG02 1 page 33 Optional accessories USB HDD Not guaranteed ...

Page 91: ...91 ...

Page 92: ......

Reviews: