background image

35

Connecting your TV

Connecting an audio system 

You can enjoy high quality dynamic sound by 

connecting the TV to an audio system�

Notes:

  DO NOT connect the 

DIGITAL AUDIO output 

terminal to the AC-3 RF input of a Dolby Digital 

Receiver with a built-in Dolby Digital decoder.

  Connect the 

DIGITAL AUDIO output terminal to 

the 

OPTICAL input of a receiver or processor.

  Refer to the owner’s manual of the connected 

equipment as well.

  When you connect the TV to other equipment, 

be sure to turn off the power and unplug all 

of the equipment from the wall outlet before 

making any connections.

  The output sound of the TV has a wide 

dynamic range. Be sure to adjust the audio 

amplifier’s volume to a moderate listening level 

before turning on the power. Otherwise, the 

speakers and your hearing may be damaged 

by sudden high volume audio.

  Turn off the amplifier before you connect or 

disconnect the TV’s power cord. If you leave 

the amplifier power on, the speakers may be 

damaged.

Warning:

When you are connecting (via the 

DIGITAL 

AUDIO output terminal) an AV decoder that does 

not have Dolby Digital decoding function, be sure 

to set 

PCM for Digital Output menu (

-

 page 26). 

Otherwise, the speakers and your hearing may 

be damaged by sudden high volume audio.

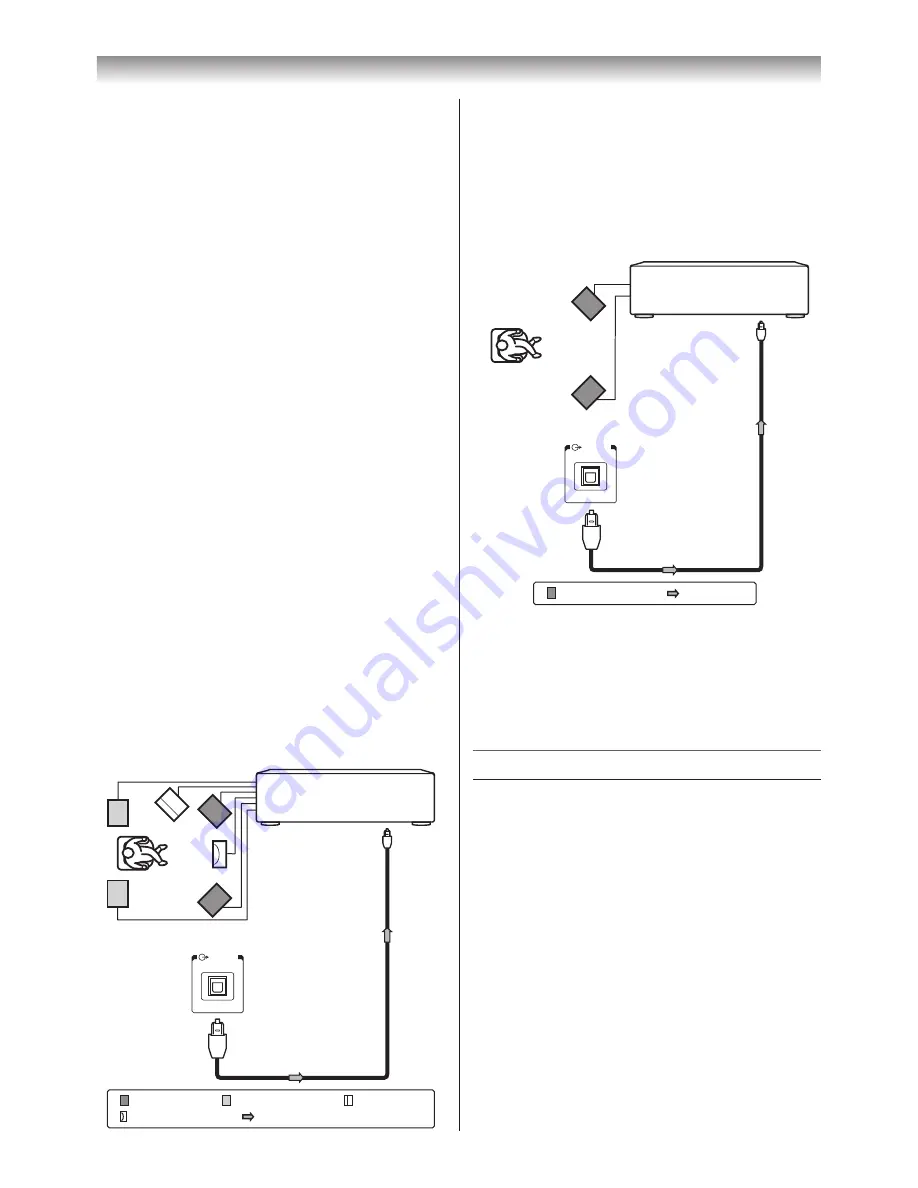
Connecting an amplifier equipped with a 

Dolby Digital decoder

To Digital Audio

output terminal

To 

Optical

 type

digital audio input

Optical

 digital cable

(not supplied)

Amplifier equipped with

Dolby Digital decoder

Back of TV

Front speaker

Surround speaker

Sub woofer

Centre speaker

Signal flow

DIGITAL

AUDIO

You can enjoy dynamic realistic sound by 

connecting the TV to an amplifier equipped 

with a Dolby Digital decoder or Dolby Digital 

processor� When using this setup, select 

Auto

 in 

the Digital Output menu�

Connecting an amplifier equipped with a 

digital audio (optical) input

DIGITAL

AUDIO

Front speaker

Signal flow

To Digital Audio

output terminal

To 

Optical

 type

digital audio input

Optical

 digital cable

(not supplied)

Amplifier equipped with

digital audio input

Back of TV

You can enjoy the dynamic sound of a 2-channel 

digital stereo by connecting the TV to an amplifier 

equipped with a digital audio (optical) input and 

speaker system (right and left front speakers). 

When using this setup, select 

PCM

 in the Digital 

Output menu�

Connecting HDMI or DVI devices

•  When turning on your electronic components, 

turn on the TV first, and then the HDMI and DVI 

device�

•  When turning off your electronic components, 

turn off the HDMI and DVI device first, and then 

the TV�

•  This TV may not be compatible with features 

and/or specifications that may be added in the 

future�

•  This TV is only operable with L-PCM and Dolby 

Digital on 32/44�1/48 kHz� If there is no sound 

when using HDMI, use the analogue audio 

cables to connect the TV and the HDMI device, 

and select 

Analogue

 in 

HDMI 3 Audio

 of the 

AV Connection

 menu�

•  This TV is able to connect with HDMI devices. 

But it is possible that some HDMI devices may 

not operate properly with this TV�

Summary of Contents for 42XL700E

Page 1: ...n the back of the TV Record these numbers in the spaces provided below Refer to them whenever you call upon your TOSHIBA dealer regarding this product Model number Serial number 42XL700E 42XL700T 47XL700E 47XL700T 55XL700E 55XL700T 2010 TOSHIBA CORPORATION All Rights Reserved VX1A00172900 TD J ...

Page 2: ...ware Licences 28 Confirming software version 28 Selecting the video input source to view 28 Setting the Colour System 29 Setting the external input skip 29 Labeling video input sources 29 Channel List 30 Using REGZA LINK 30 Teletext 31 Connecting your TV Side connections 34 Back connections 34 Connecting HDMI or DVI devices 35 Selecting the PC HDMI 3 Audio mode 37 Setting the HDMI 3 Audio mode 37 ...

Page 3: ...hing plug About the fuse In a three pin earthing type the fuse fitted in this plug is approved by ASTA or BSI to BS1362 It should only be replaced by a correctly rated and approved type and the fuse cover must be refitted 2 Never insert or remove the power plug with wet hands This may cause an electric shock 3 Never place the TV in an unstabilized location such as on a shaky table incline or locat...

Page 4: ...o prevent injury use the exclusive optional stand or wall hanging bracket to install this TV on the floor or wall securely in accordance with a qualified technician Top view Sturdy tie as short as possible Clip Clip Clip Side view 9 Precautions for moving the TV When moving the TV be sure to remove the plug from the wall outlet and disconnect the aerial cable and audio video cables any steady ties...

Page 5: ... with children to prevent them through climbing on top of the TV It may move fall over break become damaged or cause an injury 5 When the TV will not be used for a long period of time such as during vacation or travel remove the power plug from the wall outlet for safety The TV is not completely disconnected from the power supply line as minute current is consumed even when the Power switch is tur...

Page 6: ... is broken be careful when handling the TV to prevent an injury Contact a service technician for inspection and repair 4 When the TV reaches the end of its useful life ask a qualified service technician to properly dispose of the TV Cleaning 1 Remove the power plug before cleaning Never use solvents such as benzine or thinner to clean the TV These solvents may distort the cabinet or damage its fin...

Page 7: ... data etc caused by use or inability to use of product Toshiba is not liable for any damage caused by neglect of the instructions described in the owner s manual Toshiba is not liable for any damage caused by misuse or malfunction through simultaneous use of this product and the connected equipment Trademark Information Manufactured under license from Dolby Laboratories Dolby and the symbol are tr...

Page 8: ...ons Dispose of batteries in a designated disposal area Batteries must not be exposed to excessive heat such as sunshine fire or the like Attention should be drawn to the environmental aspects of battery disposal Never mix battery types or combine used batteries with new ones Notes If the remote control does not operate correctly or if the operating range becomes reduced replace both batteries with...

Page 9: ...creen this button selects the input source page 28 OK When a menu is on screen this button will make a selection or take you to the next available menu layer page 15 6 SD memory card input terminal For use when inserting an SD Memory Card page 45 7 USB input terminal For use when inserting a USB device movies DivX photo JPEG music MP3 page 45 8 o HDMI 4 input terminal High Definition Multimedia In...

Page 10: ...d with HDMI1 analogue audio input terminal and their use can be configured in the SETUP menu pages 37 38 20 O MONITOR output terminals Standard video and standard audio outputs page 34 21 o 1 Video 1 input terminals Optional S video or standard video and standard stereo audio inputs page 34 22 o 3 Video 3 input terminals High definition component video and standard stereo audio inputs page 34 23 o...

Page 11: ...age 15 To display on screen information pages 16 17 Initial index function for Teletext page 33 Teletext function Teletext on Superimpose Teletext off page 32 To reveal concealed text page 33 To hold a specific page page 33 To enlarge the teletext display size page 33 To select a page while viewing a normal picture page 33 To select the time display page 33 Power on Standby page 13 Press to STOP P...

Page 12: ... exit menu To return to previous menu accessed Press to EJECT Press to STOP Press to PLAY Press to PAUSE Press to SKIP BACK Press to REWIND Press to FAST FORWARD Press to SKIP FORWARD Press to turn the device on off Press SET UP to access the on screen Setup menu for adjusting settings Press AUDIO to toggle between different audio modes Press the MENU keys to operate each menu Note These functions...

Page 13: ...iếng Việt Русский Français 2 Press s r v or w to select the Menu Language English Chinese CS Malay Thai Vietnamese Russian Arabic Persian or French 3 Press to display the Location menu page 18 Press v or w to select Store or Home For normal home use select Home Location Home To use the TV for displaying in a store showroom please select Store Home mode is recommended for normal use Store mode A co...

Page 14: ...evice Information page 47 When using Media Player Photo Single View Slide Show PICTURE page 21 Picture Size page 19 Interval Time page 46 Repeat page 46 Sleep Timer page 27 When using Media Player Photo Play DMR PICTURE page 21 Picture Size page 19 Sleep Timer page 27 When using Media Player Movie List Sort page 48 Repeat page 48 Device Information page 48 Mode Quick menu item Description When usi...

Page 15: ...guage Panel Lock Auto Off 4 Auto 4 Off SETUP Menu Language Auto Tuning Location Quick Setup Germany Antenna Software Licences Manual Tuning System Information Reset TV English Home Auto Tuning Location Quick Setup Software Licences Manual Tuning System Information Reset TV Home SETUP Menu Language English Off Off Standard Notes In the video input mode o1 o4 and HDMI Auto Tuning Manual Tuning and Q...

Page 16: ...DMI signal information is as follows Resolution Scan Type Frame Rate Aspect Bit Depth Colour Space RGB YUV Chroma Format and Content Type if available Programming channels into the TV s channel memory First use the Auto Tuning function to preset all the active channels in your area automatically Then arrange the preset channels with the Manual Tuning function so that you can tune into only desired...

Page 17: ...Pu The 8 mark will appear when you use the Number button on the remote control E Signal Class selection page 53 Press s or r to select C or S C 1 ch 12 ch 21 ch 69 ch S 1 ch 41 ch 51 ch 55 ch F Channel selection Press s or r until your desired channel is displayed page 53 G Search operation Press r to search up the band or s to search down the band Press s or r repeatedly until your desired signal...

Page 18: ...P Pos Manual Tuning Channel C2 C4 C5 C7 C12 C23 C27 C9 Label 3 Use s or r to move through the list to your preferred position As you do so the other channels will move to make room 4 Press v to store your move Repeat as necessary and then press EXIT Setting the Location You can select either Home or Store mode Home is recommended for normal home use Select Store when using a TV for displaying in a...

Page 19: ... Super live This setting will enlarge a 4 3 image to fit the screen by stretching the image horizontally and vertically holding better proportions at the centre of the image Some distortion may occur Cinema When watching all sides panel format films video tapes this setting will eliminate or reduce the black bars on all the sides of the screen by zooming in and selecting the image without distorti...

Page 20: ...inge the copyright protected by the copyright laws Adjusting the picture position Adjustment to the position of the picture may be made to suit your viewing preferences 1 From the Display Settings in the PREFERENCES menu press or to select Picture Position Auto Format On 4 3 Stretch Off Picture Position Display Settings 2 Press then press s or r to select the item you want to adjust 0 0 Picture Po...

Page 21: ...n of dark areas of the picture 1 From the PICTURE menu press s or r until Advanced Picture Settings is selected 0 0 0 0 100 PICTURE Backlight Contrast Brightness Colour Tint Advanced Picture Settings Sharpness 0 Reset 70 PICTURE 2 Press and then press s or r to select Black White Level 7 0 100 PICTURE Base Colour Adjustment Colour Temperature Auto Brightness Sensor Settings LED Backlight Control B...

Page 22: ...igh or Off Adjusting the Colour Management You can adjust the picture colour quality by selecting from 6 base colour adjustments Red Green Blue Yellow Magenta or Cyan 1 From the Advanced Picture Settings menu press s or r to select 3D Colour Management 2 Press v or w then press v or w to select On 3D Colour Management On 3 Press then press s or r to select Base Colour Adjustment 4 Press then press...

Page 23: ... press s or r until Reset is selected 2 Press Activating Auto Brightness Sensor When the Auto Brightness Sensor is activated it will automatically optimise the backlighting levels to suit ambient light conditions 1 From the Advanced Picture Settings menu press s to select Auto Brightness Sensor Settings and then press 2 Press v or w to select On and then press Auto Brightness Sensor Settings Backl...

Page 24: ...ss b to select the sound to be heard The sound differs according to the transmission system NICAM or German stereo bilingual broadcast Dual 1 Viewing the Control Visualization This feature displays the brightness histogram and control curve of each scene 1 From the PICTURE menu press s or r until Control Visualization is selected and then press The histogram window will appear Brightness Number Of...

Page 25: ...r w to select Stand or Wall depending on how your TV is installed and then press the RED button 4 Press v or w to select the frequency range you want to adjust from the equalizer window and then press s or r to adjust the level TV Mounting Stand Sound Navigation 20 0 20 100 330 1K 3 3K 10K Hz 0 0 0 0 0 Level Equalizer 5 Repeat step 4 for other frequencies Using the Advanced Sound Settings Surround...

Page 26: ...of 12 hours 4 When all the details have been entered select Done and press to start the timer To cancel the On Timer 1 In the On Timer menu select Enable On Timer 2 Press v or w to select Off and then press Headphone Settings This setting is used to set the sound output when headphones are connected Speaker Link Headphone Speakers On Sound is output 2 is available No sound Off Sound is output Head...

Page 27: ...n or Off Panel Lock Panel Lock disables the buttons on the TV All buttons on the remote control can still be used 1 From the PREFERENCES menu press s or r to select Panel Lock 2 Press v or w to select On or Off Note When Panel Lock is On a reminder will appear when the buttons on the TV are pressed If the standby button is pressed the TV will switch off and can only be brought out of standby by us...

Page 28: ... to display the software version System Information TOSHIBA 2010 16 1 x x Xxx xx 2010 xx xx xx FW xx Note The software version displayed is just for the illustration Selecting the video input source to view 1 Press on the remote control until the video input mode list appears on the screen then press s r or to select appropriate input source or press o on the TV right side panel to select required...

Page 29: ...put Labeling 3 Press s or r to select the input you want to skip and then press the RED button to turn on the skip Input Label Input Labeling EXT 1 EXT 2 EXT 3 EXT 4 HDMI 1 HDMI 2 HDMI 3 HDMI 4 PC 4 To turn off the skip press the RED button again The input set to Skip is greyed out in the Input Selection window and is skipped over when you press on the remote control Labeling video input sources T...

Page 30: ...k Menu Speakers Notes When you turn on the AV amplifier change its input source or adjust the sound volume the sound will be output from the AV amplifier s speakers even if TV Speakers has been selected Turn the TV first to standby and on again to output the sound from the TV s speaker The proper function may not work by operating AV amplifier The above functions are dependent on the connected dev...

Page 31: ...ice connected then switch the mode on the remote control to REGZA LINK and press the available button on the remote control page 12 The TV features that can be controlled by the connected device remote control are Power standby Volume Programme channel Sound mute Input selection Number buttons Previous programme channel etc Note These functions are dependent on the connected device Not all the rem...

Page 32: ... the setting Note If Subtitle is On the TV will always display subtitles whenever such information is available for the channel you are viewing Using Auto mode There are two Modes Auto will display FASTEXT if available List will display your four favorite pages In either mode as an alternative to the coloured buttons you can access a page by entering a 3 digit number using the Number buttons on th...

Page 33: ...olutions press A B To hold a wanted page This function is included as it is part of the broadcast teletext system but you will not need it as this TV allows you to control the display of sub pages C To enlarge the teletext display size Press C once to enlarge the top half of the page press again to enlarge the bottom half of the page Press again to revert to the normal size D To select a page whil...

Page 34: ...DEO WOOFER VARIABLE PC HDMI 3 AUDIO AUDIO R Y L PR CR PB CB Y PR CR PB CB MONITOR Back of TV DVD video player with component video outputs Set Top Box VCR Recording VCR Normal Woofer system with amplifier Before connecting any external equipment turn off all main power switches The unauthorized recording of television programmes DVDs video tapes and other materials may infringe upon the provisions...

Page 35: ...gital cable not supplied Amplifier equipped with Dolby Digital decoder Back of TV Front speaker Surround speaker Sub woofer Centre speaker Signal flow DIGITAL AUDIO You can enjoy dynamic realistic sound by connecting the TV to an amplifier equipped with a Dolby Digital decoder or Dolby Digital processor When using this setup select Auto in the Digital Output menu Connecting an amplifier equipped w...

Page 36: ... signal format S VGA VESA 800 5 600 56 60 72 75 Hz XGA VESA 1024 5 768 60 70 75 Hz W XGA VESA 1280 5 768 60 75 Hz W XGA VESA 1360 5 768 60 Hz S XGA VESA 1280 5 1024 60 75 Hz However these signal formats are converted to match the number of pixels of the LCD panel Therefore the TV may not display small text properly If you connect this unit to your PC the compressed image is displayed in S XGA mode...

Page 37: ...ct PC HDMI 3 Audio then press v or w to select PC or HDMI 3 Setting the HDMI 3 Audio mode You can select sound of an HDMI or DVI device connected to the HDMI input terminals from three modes Auto Digital or Analogue Note This function is available only when the PC HDMI 3 audio mode is set to HDMI 3 1 From the AV Connection menu press s or r to select HDMI 3 Audio 2 Press v or w to select Auto Digi...

Page 38: ...rizontal Frequency 67 5kHz H Pixel Clock Frequency 148 5MHz Notes Some PC models cannot be connected to this TV If connecting a certain PC model that signal is particular the PC signal may not be detected correctly There is no need to use an adapter for computers with DOS V compatible mini D sub 15 pin terminal A bar may appear in the upper lower right or left side of the screen or parts of the pi...

Page 39: ...g HDMI none of these function will be available Signal names for mini D sub 15 pin connector Pin assignment for RGB PC terminal Pin No Signal name Pin No Signal name 1 R 9 NC 2 G 10 Ground 3 B 11 NC 4 NC not connected 12 NC 5 Ground 13 H sync 6 Ground 14 V sync 7 Ground 15 NC 8 Ground Using the PC setting Most of the picture controls and functions are available However features not available will ...

Page 40: ... those operations Refer to the individual owner s manuals for compatibility information This function will be able to operate one PC and one AV amplifier But PC may not operate properly with the AV amplifier Some PC models may not be effect properly by the TV Connecting a home network The LAN port allows your Toshiba TV to connect to your home network You can use this revolutionary home entertainm...

Page 41: ...es When the DHCP function of the router connected with this TV is On you can set Auto Setup to On or Off This should usually be set to On When the DHCP function of the router is Off set Auto Setup to Off and set the IP Address manually IP Address Setup Auto Setup 1 From the PREFERENCES menu select Network Setup and press 2 Press s or r to select IP Address Setup and press IP Address Setup Wired MA...

Page 42: ...B C D E F G A a 1 AAA H I J K L M N O P Q R S T U V W X Y Z Input operation on the remote control Button Description Inputs the selected character 0 9 Inputs the number directly s r v w Moves the character select CC cc Moves the cursor Z Moves the cursor to the head of a character string z Moves the cursor to the end of a character string RED Deletes 1 character to the left of the cursor GREEN Cyc...

Page 43: ...ss v or w to select On or Off Device Name Setup The TV s device name as a DMR can change The device name can be confirmed from the DMC 1 From the PREFERENCES menu select Media Renderer Setup and press 2 Press s or r to select Device Name Setup and press 3 Select the Device Name field and press The Software Keyboard window will appear 4 Input the Device Name by using the Software Keyboard page 42 T...

Page 44: ...SB 1 device or photo files on a SD Memory Card Moreover you can also play photos movies or music files from your PC by connecting the TV to your home network Terminology DMP DLNA CERTIFIED Player DMS DLNA CERTIFIED Server DMR DLNA CERTIFIED Renderer DMC DLNA CERTIFIED Controller DMP The TV can control and play content from a DMS A DMS is a device that can function as a server for DMP or DMR DMR Th...

Page 45: ... or r to select a file or folder 2 Press to move to the next layer or press RETURN to return to the previous layer Closing the Media Player 1 Press EXIT Using the Media Player with a DLNA CERTIFIED Server You need to configure a home network before using this feature page 41 1 Select Media Player from APPLICATIONS menu and then press 2 Press s or r to select Photo Movie or Music and press The thum...

Page 46: ... right thumbnail the screen will move to the next page PU Pu buttons can be used to page up down the photo list when there are more photos than will fit onto one screen When the PU Pu buttons are pressed the highlight shall be on the photo at the top left of Previous Next list 2 When you select a folder press to move to the next layer Press RETURN to move back to the previous layer 3 Press to view...

Page 47: ...iles 2000 folder Viewing movie files on a DLNA CERTIFIED Server or USB device You can select movies from a list of available files DLNA screen example Movie Folder Total Time Sort Title 00 00 00 00 00 00 1 Page Back OK P RETURN QUICK Features Play 2 16 Movie 1 Movie 2 WWWWWWWWW 00 00 00 WWWWWWWWW 00 00 00 WWWWWWWWW 00 00 00 WWWWWWWWW 00 00 00 WWWWWWWWW 00 00 00 WWWWWWWWW 00 00 00 WWWWWWWWW 00 00 0...

Page 48: ...te and time when the contents were updated Note Sorting may not be supported by some DMSs Displaying the device information 1 Press to open the Quick Menu in list mode 2 Press s or r to select Device Information Note When the movies are located on a USB or SD card device or when the TV is used as a DMR this feature is not available Registering your TV to a DivX account This TV allows you to play b...

Page 49: ...00 WWWWWWWWW 00 00 00 WWWWWWWWW 00 00 00 WWWWWWWWW 00 00 00 WWWWWWWWW 00 00 00 Total Time Page Back OK P RETURN QUICK Features Play 00 00 00 00 00 00 1 2 16 1 Press s or r to select a file or folder Pu or PU buttons can be used to page up down the music list when there are more files than will fit onto one screen 2 When you select a folder press to move to the next layer Press RETURN to move back ...

Page 50: ...the information Note The information may not be correctly displayed depending on the content DMC or DMS Closing the Music Player 1 Press EXIT File Compatibility USB device use File format MP3 Sampling frequency 16 kHz 22 05 kHz 24 kHz 32 kHz 44 1 kHz 48 kHz Bit rate From 8 to 320 kbps Maximum number of files 500 folder Content on DLNA CERTIFIED Server File format Linear PCM MP3 Sampling frequency ...

Page 51: ...o Select Folder select Folder or File Sort File Name 1 54 E05265464 jpg 06 36 Tue 26 Apr 1920 x 1080 Photo Edit 1 Press or to select Photo Edit and then press 2 Press or to select Rotate or Delete OK RETURN Photo Edit Rotate Delete Back Enter 3 Set the following items as desired Rotate Press to rotate the image 90 clockwise Delete Press or to select Delete and then press A confirmation message wil...

Page 52: ...reen comes down or the flickers of the screen are caused or some parts of the screen do not light up it may reach the end of its life Contact a service technician Some pixels of the screen do not light up The LCD display panel is manufactured using an extremely high level of precision technology however sometimes some pixels of the screen may be missing picture elements or have luminous spots This...

Page 53: ...C51 711 25 C52 719 25 C53 727 25 C54 735 25 C55 743 25 C56 751 25 C57 759 25 C58 767 25 C59 775 25 C60 783 25 C61 791 25 C62 799 25 C63 807 25 C64 815 25 C65 823 25 C66 831 25 C67 839 25 C68 847 25 C69 855 25 S mode OSD RF Frequency MHz S1 105 25 S2 112 25 S3 119 25 S4 126 25 S5 133 25 S6 140 25 S7 147 25 S8 154 25 S9 161 25 S10 168 25 S11 231 25 S12 238 25 OSD RF Frequency MHz S13 245 25 S14 252 ...

Page 54: ...ent countries or region NTSC 4 43 MHz is used in special VCRs to playback NTSC recorded video tapes through PAL television equipment Specifications LCD colour television Model 42XL700E 42XL700T 47XL700E 47XL700T 55XL700E 55XL700T Power source 42XL700E 47XL700E 55XL700E 220V 240V AC 50 60Hz 42XL700T 47XL700T 55XL700T 110V 240V AC 50 60Hz Power consumption 42XL700E T 149 W 0 2 W standby 47XL700E T 1...

Page 55: ... Variable o RGB PC Input Mini D sub 15 pin Analogue RGB o PC HDMI1 Input AUDIO 3 5 mm Diameter stereo o HDMI1 Input type A 19 pin A V Digital o HDMI2 Input type A 19 pin A V Digital o HDMI3 Input type A 19 pin A V Digital o HDMI4 Input type A 19 pin A V Digital Dolby Digital HDMI 1 HDMI Audio Return Channel ARC Content type HDMI 2 4 HDMI Content type Headphone jack 3 5 mm Diameter stereo O Digital...

Page 56: ......

Reviews: