13-1
ZR Owner’s Manual
OM_ZR_0913RevA
CHAPTER 13: ANTI-TIPS
Rear Anti-Tips
Adjusting
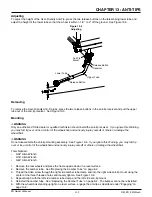
1. The bottom of the anti-tip wheels should be between
1-1/2” and 2” above the floor to ensure proper functionality.
To adjust the height, press the two release buttons on
the telescoping lower tube, then adjust the height of the
lower tube. See Figure 13-1.
2. To rotate the anti-tips upward, press the release button
on the extension tube to release the extension tube and
rotate upward until the release button locks in place on
the opposite side of the anti-tip receiver.
3. To remove the anti-tip, press the release button on
the extension tube and pull the extension tube out of the
anti-tip receiver.
Mounting
I
WARNING
Only an authorized TiLite dealer or qualified technician should install the rear anti-tip receiver.
If you ignore this
Warning, you may fall, tip over or lose control of the wheelchair and seriously injure yourself or others or damage the
wheelchair.
Tools Needed:
• 5/32” Allen Wrench
• 3/16” Allen Wrench
• 7/16” Open End Wrench
1. Remove the rear wheels and place the frame upside
down on a level surface.
2. Remove the camber tube. See “Replacing the Camber
Tube” on page 8-2.
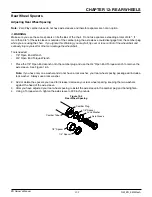
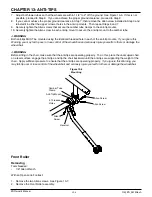
3. Thread the Allen screw through the right side camber
clamp, right side anti-tip receiver and washer and
secure the nylock nut. See Figure 13-2.
Note: Make sure that the anti-tip receiver is oriented
to be parallel to the floor.
4. Repeat Step 3 on the left side camber clamp and left
side anti-tip receiver.
5. Reinstall the camber tube. See “Replacing the Camber
Tube” on page 8-2.
6. Tighten the Allen screw in each anti-tip receiver so that
it securely clamps into the camber tube.
7. Reinstall the rear wheels.
Figure 13-1
Adjusting
Lower
Tube
Button
Release
Receiver
Extension
Tube
Button
Release
Figure 13-2
Mounting
Allen Screw
Camber
Clamp
Receiver
Allen
Screw
Camber
Tube
Nylock Nut
Washer


