background image

409-10100

31 of 59

Rev C

6. CONTROL PANEL

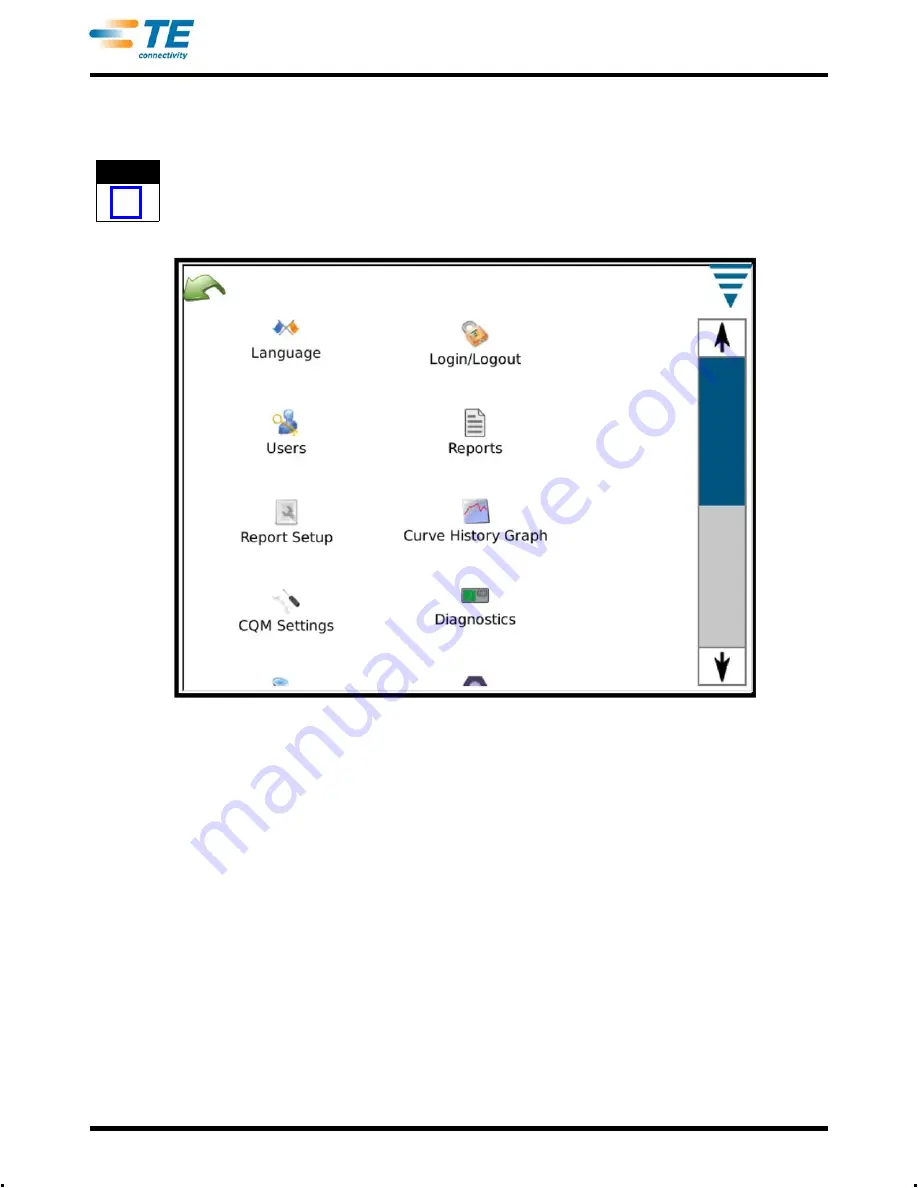
Touching the Control Panel icon on the main menu screen brings up the control panel. The following control 
panel tools are to be used by the CQM administrator.

NOTE

i

For System Settings, refer to Paragraph 3.3. For CQM II settings, refer to Paragraph 3.4.

.

A. Language Icon

To pick a language, touch the language icon, then select the appropriate language and save it.

Touch the icon to select the Language screen. Choose the language from the drop down list. If you want the 
selected language to be used when the unit powers ON, select the radio button 

Default Language

 when the 

language is selected.

B. Login/Logout

Touch the icon to select the Login/Logout screen.   The user that is logged on will be displayed. Choose 

Logout

 to select a new user. Choose the new user from the drop down list and then enter the password for 

that user.

The initial system only has a single User, the Administrator. If no password is selected there is none needed 
to Login/Logout of the system. Once additional users are added or a password is entered for the 
Administrator,  

then

 a password will be required to Login/Logout of the system.

C. Users

Add New User

First enter the user name. Then enter the user password and then verify the password by entering it again. 
Choose 

Add User

 to finish.


Summary of Contents for Crimp Quality Monitor II

Page 1: ...5 2 3 Control Panel Screen 6 2 4 Help 7 2 5 Screen Information 7 2 6 Graphing Information 7 2 7 Task Bar 7 2 8 Definitions 7 3 RECEIVING INSPECTION AND INSTALLATION 8 3 1 Receiving 8 3 2 Inspection a...

Page 2: ...ds into installed application equipment NEVER alter modify or misuse the application equipment TOOLING ASSISTANCE CENTER CALL TOLL FREE 1 800 722 1111 CONTINENTAL UNITED STATES AND PUERTO RICO ONLY Th...

Page 3: ...Quality Monitor II is a PROCESS monitor It is influenced by many variables that include changes in wire terminal applicator terminal condition operator environment etc Changes in any of these variabl...

Page 4: ...Max Host and DAQ data aquisition operating Voltage 24 VDC AMBIENT OPERATING ENVIRONMENT Temperature 5 40 degrees C 40 104 degrees F Relative Humidity 95 non condensing SENSORS Force Strain Gage Wheat...

Page 5: ...included with the system ensure that it is plugged into a circuit that has over current protection of no greater than 15 20 amps country dependent Using the AC power cord that is appropriate with your...

Page 6: ...e readings Refer to the control panel section Section 6 Touching the Error Log Viewer icon allows the CQM errors to be viewed by time and date Refer to the control panel section in Section 6 Touching...

Page 7: ...ices for parameter editing Following the arrows leads you from the start of setting up a work order all the way to production You can easily pass over steps and go back to others by touching the appro...

Page 8: ...peak force values The peak force is the maximum force reading that occurs during the crimp minus the idle force reading The peak force is a relative value It has no specific units associated with it...

Page 9: ...uring the system boot process several TE images will appear After approximately 30 seconds the system will be ready to accept a Work Order or be presenting a user login screen depending on the user se...

Page 10: ...QM Settings refers to the initial setup of the CQM II PRIOR to production and is to be performed by the CQM administrator For system setup information refer to Section 6 Touch the control panel icon t...

Page 11: ...installed on your terminating machine Selections are Linear Encoder Encoder 30mm for 30 mm stroke machines Analog Height sensor original CQM position sensor Trigger for force only systems and CQM App...

Page 12: ...100 12 of 59 Rev C C CQM Settings Force Sensor Tab Choose the Force Sensor tab to select the force sensor that is installed on the terminating machine Selections are Piezo Frame and Strain Gauge base...

Page 13: ...tings Learn Tab Choose the Learn tab to select the Learn settings TE recommends using the default of 5 crimps to properly learn the process You can lower it to 3 crimps if you are confident in your pr...

Page 14: ...ess you can choose to have each Accepted Learn crimp be counted in the total and batch counts Select Add Accepted Learn Crimps to Production F CQM Settings Control Limit Tab Choose the Control Limit t...

Page 15: ...ev C 4 PRODUCTION RUN SETUP 4 1 Options This is the first screen in the task bar It is also the home screen when the home icon is chosen from the menu bar In order to use the options select the corres...

Page 16: ...de additional detail in printed and saved Reports that the CQM II can provide To use a Work Order select the radio button Specify a Work Order You may select an Existing Work Order from the drop down...

Page 17: ...part number must be selected The part number contains the relevant analysis method selections and associated parameters for the product that you want to produce Select an Existing Part Number from th...

Page 18: ...ific Crimp Height and Tolerance for the part by touching the appropriate box For the entry of tolerance if the tolerance from the manufacturer is 0 002 inches enter 0 002 inches Select the Update Cont...

Page 19: ...m criteria of 35 or greater If the CQM II Fails crimps that you determine to be Good crimps then you may want to adjust the sensitivity of the analysis method that is causing this problem In this case...

Page 20: ...of the Point to Point and FFT Press Default to return the setting to the factory default Adjusting the sensitivity to eliminate problems or to enhance performance for these analysis methods is similar...

Page 21: ...ill be Refer to Paragraph 2 8 for an explanation of Head Room Basically once you have the system properly set up with the correct crimp height to perform a Quick Headroom Check produce a good crimp wi...

Page 22: ...to select a speed compensation for terminators that may have variable cycle rates due to incoming voltage variations pneumatic variations or load problems It is recommended that you first switch to t...

Page 23: ...e learn the process if something dramatically changes in the process such as changing to a new reel of terminals or a different type of wire It is also advisable to Re Learn if while in production you...

Page 24: ...Sample The production screens show the Work Order name Part name Total and Batch counters and the overall status of the last crimp Selecting from the seven tabs provides differing results graphics an...

Page 25: ...tting close to the tolerance and white for a crimp that was not analyzed by that method For example the learn crimps for analysis methods will show white with the exception of the Crimp Height that sh...

Page 26: ...as data that is relevant to the analysis method If any one analysis method fails the overall status of the crimp is a Fail The colors of the indicators are as previously described in the Crimp Status...

Page 27: ...on for the entire work order This screen is useful to observe the process with regards to the Crimp Height 5 4 Work Index The Work Index screen provides a crimp history graph showing the tolerance lim...

Page 28: ...orce recorded for each crimp To see more points than those shown simply touch the graph to enter a full screen mode and use the arrow keys to move forward and backward in time The other graph is a his...

Page 29: ...o observe the analysis of the 50 points used in P2P 5 7 FFT The Fast Fourier Transform FFT graph on this screen shows the component frequencies of the last crimp that are analyzed to ensure a good cri...

Page 30: ...409 10100 30 of 59 Rev C...

Page 31: ...it powers ON select the radio button Default Language when the language is selected B Login Logout Touch the icon to select the Login Logout screen The user that is logged on will be displayed Choose...

Page 32: ...Password With the user selected from the drop down list choose Change Password The user must enter a new password and then verify the password by entering it again Delete With the user selected from t...

Page 33: ...CESS Calibrate Screen SCREEN ACCESS Learn Screen Work and Part Data Change Enter a new Work Order or delete a Work Order Modify WO size Enter a new part or delete a part Selection of analysis methods...

Page 34: ...ssword D Locale Settings Touch the icon to select the Locale screen The thousands separator decimal symbol time format date format and default units selection can be made in this screen E Date Time Se...

Page 35: ...NOTE i NOTE i 409 10100 35 of 59 Rev C F Reports Touch the icon to select the Reports screen The reports screen is a very busy screen and it may be easier to navigate by plugging in a USB mouse...

Page 36: ...s opened initially the data table will show a list of all the PRODUCTION RUNS and some summary data The PRODUCTION RUNS are sorted so that the last production run is at the top The table can be sorted...

Page 37: ...iption of Data Crimp Number A unique identifier for the crimp in the production run Overall Result The final result of the crimp based on all the analysis methods active Batch Count Number of PASS cri...

Page 38: ...erformed on the crimp and its result in INVALID CALIBRATE_GAIN_MODE and CALIBRATE_CRIMP_HEIGHT_ MODE These are crimps that are done setting the force gain and crimp height reference These crimps have...

Page 39: ...powered on CALIBRATE RESULTS DATA ONLY SHOWN FOR CALIBRATE CRIMPS GAIN VALUE gain value after the gain calibration crimp HAND MEASURED CRIMP HEIGHT entered measured crimp height during calibration CA...

Page 40: ...analysis WORK INDEX work index value from the work index analysis UCL upper control limit LCL lower control limit SENSITIVITY sensitivity setting for the work index analysis P2P HISTORY DATA POINT TO...

Page 41: ...409 10100 41 of 59 Rev C...

Page 42: ...ouch the icon to select the Report Setup screen This mode allows you to format the statistic reports that are generated for printing or saving as a pdf to a USB Flash drive Touch the Company Name and...

Page 43: ...ersonnel to diagnose potential issues with the CQM I Network The CQM can be connected to a network via it s ethernet connection Currently the CQM only supports network printing No other network functi...

Page 44: ...nected to a network with a DHCP server such as a corporate network or a home internet gateway router the CQM will obtain it s IP address from the DHCP server If no DHCP server is available such as whe...

Page 45: ...play will be dark and the LED on the Host will be amber Simply touch the display and it will return to the normal operating state K Calibrate Touchscreen Touch the icon to select the Calibrate Touch s...

Page 46: ...rs so touching it in a similar manner will suffice NOTE i There is a time out for touching each corner of the display and for final Acceptance If you wait too long the calibration will abort L Mainten...

Page 47: ...uit Tab This screen is used to quit the software application Quitting should only be done following instructions from TE personnel Version tab This screen displays the various software versions that a...

Page 48: ...his screen is used to update the software on the CQM Follow the onscreen instructions This should be accomplished ONLY upon instruction of TE personnel File Operations Tab This screen is used for cert...

Page 49: ...d follow the on screen instructions Backup to a USB flash drive is provided for secure backup and restoration M Diagnostics The Diagnostics section is provided for authorized users to monitor the hard...

Page 50: ...Inputs and Outputs Output states can be changed by touching the appropriate icon Do not attempt to change output states without direction from TE personnel DAQ I O Tab The DAQ I O screen displays the...

Page 51: ...ezo screen provides a means to diagnose the Piezo sensor input Directions from TE personnel will be provided if this action is required CANOpen Node Tab The CANOpen Node screen provides information re...

Page 52: ...feature O Demo The Demo selection is primarily used for demonstration and training purposes When placed in the Demo mode the unit restarts the application utilizing a different database so as to not...

Page 53: ...Printer Button and follow the prompts to select a printer driver To configure a supported network printer touch Use Network Printers The CQM will automatically discover any supported network printers...

Page 54: ...dows servers Line Printer Daemon LPD Protocol LPR LPD printers use the following Connection format lpd hostname printer_name Internet Printing Protocol IPP IPP is the only protocol that CUPS supports...

Page 55: ...stic DAQ IO page A particular analysis method may not work for an unusual crimping application Use the Reports screen to examine any INVALID crimps that occurred in LEARN_MODE It is important to note...

Page 56: ...ensor kit must be replaced Base Plate Strain Gage Force Sensor Is the correct Force Sensor selected in CQM Settings Is the cable connected to the DAQ module and the base plate Check for damaged cable...

Page 57: ...oot switch still cycles the system when the CQM failed a crimp and the operator did not respond to the error Depends on which host is selected Is the appropriate host system selected in the CQM Settin...

Page 58: ...a clean damp nonabrasive cloth towel and any commercially available window cleaner to regularly clean the surface The cleaning solution should be applied to the towel rather than the surface of the t...

Page 59: ...t the cooling vents on the back and side panels are not blocked 8 5 Evaluation and Repair Crimp Quality Monitors can be returned to TE for evaluation and repair Call the TE T ooling Assistance Center...

Reviews: