background image

30

GETTING STARTED

1. In  the 

Tuner Settings screen

, tap

AM Active

. The system activates/

enables AM.

3.7.3 E

NABLING

 *DRM A

CTIVE

1. In  the 

Tuner Settings screen

, tap

*

DRM Active

. The system enables/

activates *DRM. Additionally, the
system also enables the *DRM
Settings option.

In the *

DRM Settings screen

, you can 

z

Enable/disable the *DRM text

3.7.4 E

NABLING

 *DRM T

EXT

1. In the 

Tuner Settings screen

 tap the

*

DRM Settings

 option. The system

displays the *

DRM Settings screen

.

2. Tap 

Show *DRM Text

.

3.8 MANAGE CONNECTIVITY 
SETTINGS

When your smartphone is paired and
connected with the system, using the
various Connectivity Settings options,
you can perform the following actions:

z

Handle the Smartphone linkage
settings

z

Handle the Phone settings

3.8.1 A

CCESSING


THE


C

ONNECTIVITY

 S

ETTINGS


S

CREEN

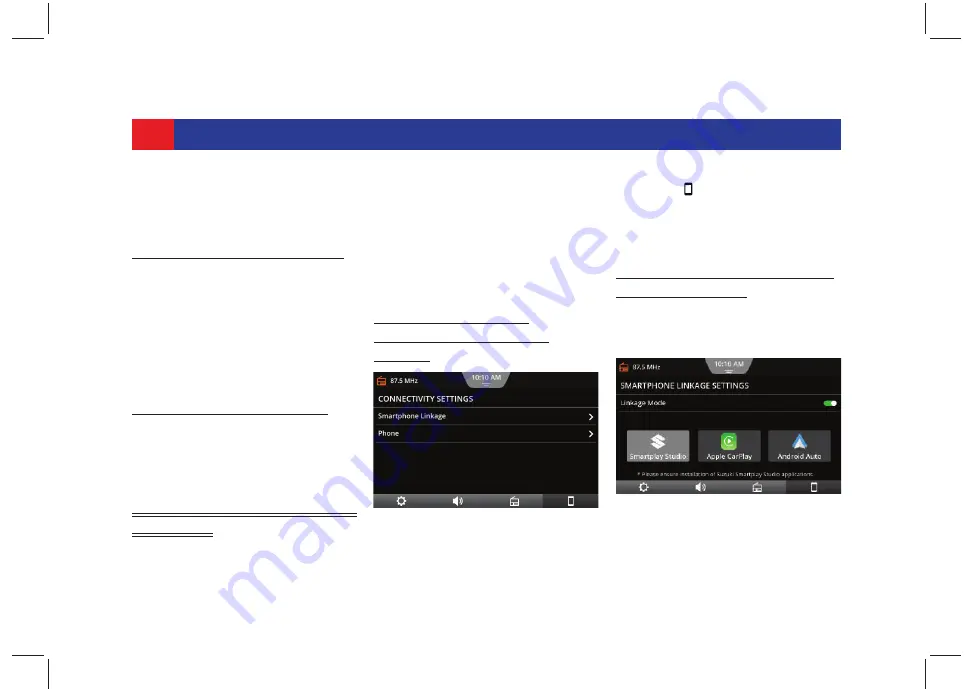
1. Tap the   icon displayed below the

settings screen. The system
displays the 

Connectivity Settings

screen 

with its various options.

3.8.2 M

ANAGING

 S

MARTPHONE


L

INKAGE

 S

ETTINGS

1. In  the 

Connectivity Settings screen

tap 

Smartphone Linkage

2. Enable the 

Linkage Mode

 option.

The Linkage Mode should be set to:

Figure 29: Connectivity Settings 

Screen

Figure 30: Smartphone Linkage 

Settings Screen

Summary of Contents for WagonR

Page 1: ...1 10 10 AM Phone Connect Media FM 1 87 5 MHz Tuesday 1 January 2019 1 2 3 4 8 7 6 5 Figure 1 Infotainment System Control Elements...

Page 2: ...ases volume till the button is released or maximum volume limit is reached 3 Volume Down Short tap Decreases volume by 1 level Long tap Decreases volume till the button is released or minimum volume l...

Page 3: ...de 18 3 3 Standby Mode 19 3 4 Manage Settings 19 3 4 1 Accessing Settings 19 3 5 Manage System Settings 19 3 5 1 Managing Display Settings 20 3 5 2 Managing Date and Time Settings 20 3 5 3 Managing Ve...

Page 4: ...Phone Functions 42 5 5 1 Making an Outgoing Call 42 5 5 2 Managing an Incoming Call 44 5 5 3 Managing the Second Incoming Call 45 5 5 4 Managing the Third Incom ing Call 45 5 5 5 Managing Active Call...

Page 5: ...tion 68 7 2 10 Viewing Route Stops 68 7 2 11 Viewing the Next Destina tion 69 7 2 12 Viewing Overview of the Route 69 7 2 13 Saving Ending a Route 69 7 2 14 Managing Navigation Set tings 69 7 3 AHA A...

Page 6: ...r Apps 85 8 VEHICLE INFORMATION 8 1 Vehicle Alerts 86 8 1 1 Managing Vehicle Alerts 87 8 1 2 Viewing Trip Details 87 8 1 3 Viewing Past Trip Details87 8 2 Rear View Camera RVC 88 8 2 1 RVC Settings 89...

Page 7: ...to be performed on will be highlighted using bold letters like OK z Features marked with a star are not standard in every vehicle Check with your Maruti Suzuki dealer to confirm the list of features...

Page 8: ...es some addi tional important information which when ignored can cause inconvenience or tips that will help you in using the equip ment ALERT Avoid exposure of the infotainment system to water or exce...

Page 9: ...lways contact the Maruti Suzuki dealer for the changes to the vehicle or system Do not open the infotainment system as incorrect usage may damage the system Further warranty is void if the Infotainmen...

Page 10: ...r Phone and Music supports like Phone book download and Audio playback z Handsfree Bluetooth support with advance functions like Set contacts as Favourite and Reject with SMS for incoming calls z Disp...

Page 11: ...me by 1 level z Long press Increases volume till the button is released or maximum volume limit is reached 2 Volume z Short press Decreases volume by 1 level z Long press Decreases volume till the but...

Page 12: ...martphone through Bluetooth or stops VR 7 Mode z Toggles between available audio sources z In the Standby Mode Powers ON the infotainment system 8 Mute z Mute Unmute the audio source 2 4 SCREEN ELEMEN...

Page 13: ...isplays the Phone Call Log screen b If phone is paired but not connected displays the Paired Devices screen c If phone is not paired displays the Bluetooth Pairing Options screen 5 Displays the curren...

Page 14: ...s Phone battery level Phone network signal strength Mute status 2 6 2 QUICK ACCESS HUB The hub can contain 12 shortcuts The first 2 shortcuts AHA and Paired Devices are fixed and set by default which...

Page 15: ...one Dialpad 10 Display Settings SETTING A SHORTCUT To set a shortcut 1 Tap the Add icon The system displays the Hub Settings dialog box 2 Browse through the list of predefined options and tap on the r...

Page 16: ...efore performing an action 2 8 SCREEN OPERATIONS The system screen elements can be accessed using the touch screen and or the SWC You can use the screen elements to perform the following actions z Tap...

Page 17: ...layed beside the list SWIPING THE LIST 1 Swipe through the list items USING THE SWC 1 Press the Up or the Down arrows as per your requirement SCROLLING THE VISIBLE MAP AREA 1 Touch the map display are...

Page 18: ...as active before system switch OFF or one of the currently available connected audio source The system is Switched OFF automatically when you switch the ignition lock of the vehicle from ACC to OFF 3...

Page 19: ...the respective settings screen 3 5 MANAGE SYSTEM SETTINGS Using the various System Settings options you can perform the following actions z Handle the system display settings z Set Change system date...

Page 20: ...f the headlights of the vehicle are Switched ON the system will be in Night mode else it will be in Day mode The display brightness will be automatically set accordingly 3 5 2 MANAGING DATE AND TIME S...

Page 21: ...Ensure Sync with GPS option is enabled 2 Tap the Time Zone option The system displays the Set Time Zone screen 3 Scroll through the time zones list and select the required time zone Manually setting...

Page 22: ...NG 24 HOUR FORMAT 1 Tap 24 Hour Format The system enables the 24 hour format ENABLING CLOCK DURING DISPLAY OFF 1 Tap Clock During Display Off The system will now display the clock in the Display OFF m...

Page 23: ...ngs screen 2 Tap the required vehicle alert The system disables the display of the selected vehicle alert 3 5 4 MANAGING KEYPAD DISPLAY While driving the system keypads Smart search keyboard Rename he...

Page 24: ...r the pin and tap OK The system displays a prompt confirming the PIN activation NOTE i SWC Scroll is unavailable in Apple CarPlay Android Auto Linkage modes Figure 18 Security PIN Setting Screen Figur...

Page 25: ...The system prompts you to enter the currently set 4 digit PIN 2 Enter the current PIN and tap OK The system displays a prompt confirming the PIN deactivation 3 5 7 VIEWING SYSTEM DETAILS To check the...

Page 26: ...automatically restart 3 6 MANAGE AUDIO SETTINGS Using the various Audio Settings options you can perform the following actions z Set Bass Middle and Treble values z Set Balance and Fader values z Set...

Page 27: ...ributing Volume Only to the Rear Speakers 1 In the Balance Fader Settings screen tap Rear Resetting Fader Settings 2 In the Balance Fader Settings screen tap Reset 3 6 4 SETTING EQUALIZER PRESETS 1 In...

Page 28: ...The default value of the fields is 8 3 6 6 MANAGING SPEED DEPENDENT VOLUME CONTROL 1 In the Audio Settings screen tap Speed Dependent Volume Control 2 In the displayed screen select the required Speed...

Page 29: ...n 3 7 2 ENABLING AM ACTIVE To enable the AM source availability in the source list and also in SWC Mode key you need to enable the AM Active option If disabled the AM source will not be displayed To e...

Page 30: ...MANAGE CONNECTIVITY SETTINGS When your smartphone is paired and connected with the system using the various Connectivity Settings options you can perform the following actions z Handle the Smartphone...

Page 31: ...ttings z Enable disable the phone ringtone z Sort the Contacts z Rename Head Unit MANAGING MESSAGE SETTINGS 1 In the Phone Settings screen tap Messages The system displays the Message Settings screen...

Page 32: ...one The system will play your smartphone ringtone when an incoming call is received However this feature is supported only if your smartphone projects its ringtone to the system SORTING CONTACTS 1 In...

Page 33: ...Shadow zones wherein the signal reception is obstructed or restricted Due to signal reflections from hills and tall buildings the signal reception quality might deterio rate multi path effect z DRM re...

Page 34: ...ets 2 Auto Seek z For FM AM band Initiates Auto Seek until previous next available station z For DRM band Automatically seeks to the previous next available service 3 Change Frequency Service z For FM...

Page 35: ...d to browse through the presets z Used to change the band AM FM DRM 6 Station List z Displays the FM AM DRM Station List screen 7 Auto Store z Automatically scans the available stations and stores the...

Page 36: ...reset list tap on the required Preset 4 3 5 USING SWC 1 Long press to perform Auto Seek Down or press to perform Auto Seek Up 4 4 MANAGE THE PRESETS The system supports 6 presets per radio band Use an...

Page 37: ...wever Low energy Bluetooth devices will not be supported The following Bluetooth profiles and standards are supported by the system z A2DP 1 3 z AVRCP 1 6 z HFP 1 6 z MAP 1 3 z PBAP 1 2 z SPP 1 2 z Vc...

Page 38: ...the top right corner of the screen 3 In the Bluetooth Devices screen scroll through the list of devices and select your phone 4 Select deselect the options for which you want to pair your phone and ta...

Page 39: ...y default phone will be paired for all Bluetooth functions You can deselect any function SMS synchronization can be different depending on the phone In some cases only SMS received after pairing might...

Page 40: ...an complete the pairing by authenticating using an access code or an access PIN 5 Tap Yes on the system to complete the pairing of the devices The system will be displayed in the Paired Devices List o...

Page 41: ...ed on phone behavior Details of supported phone is available on the Maruti Suzuki website Figure 42 Paired Devices NOTE i In case of user initiated discon nection for example By Blue tooth OFF ON from...

Page 42: ...Keypad z Using the Dialpad Search z Using the Favorite Contacts List USING CALL LOGS 1 Tap on the required call contact The system dials out to the contact using the same number that was available in...

Page 43: ...Details screen select the required contact number and tap USING DIALPAD SEARCH 1 Tap displayed in the bottom bar 2 Using the displayed Dialpad enter few or all numbers of the contact 3 Select the requ...

Page 44: ...z Tap to reject the incoming call with a message z Tap to accept an incoming call NOTE i You can set up to 10 contacts as your favourite contacts If available in phone the image associated with the fa...

Page 45: ...in progress and receive a third call perform one of the following actions z Tap to reject the incoming call z Tap to reject the incoming call with a message z Tap to end the call that is on hold and a...

Page 46: ...on mute unmute 4 Allows you to place the currently active call on hold or resume the call if it was on hold 5 Allows you to end an active call 6 Displays the Dialpad to provide responses to an Automa...

Page 47: ...automatically go on hold 5 5 8 MANAGING CONFERENCE CALLS 1 In the Active Call screen tap and dial out to the other contact to be added to the conference The system puts the current call on hold and ca...

Page 48: ...system SMS list 3 Enable display of messages and other message related settings Refer to Managing Message Settings on page 31 for more information 4 When the system displays an incoming SMS you can T...

Page 49: ...y played audio and you will hear a beep sound to indicate the activation of the voice recognition feature The system also prompt you to hear to the system response NOTE i Bluetooth VR will work only i...

Page 50: ...ormats are MP4 and AVI NOTE i Supported codecs AAC Bitrates 16 kBit s to 256 kBit s with VBR and CBR Sample rates up to 8 48 kHz NOTE i Supported codecs MPEG 1 Layer 1 Layer 2 Layer 3 MPEG 2 Layer 1 L...

Page 51: ...le z Devices without FAT16 FAT32 file system are not supported z Hard Disk Drives HDD are not generally supported z External USB hubs are not supported 6 1 2 CONNECTING A BLUETOOTH AUDIO 1 Pair your s...

Page 52: ...oth profiles and standards are supported A2DP 1 3 AVRCP 1 6 HFP 1 6 MAP 1 3 PBAP 1 2 SPP 1 2 Vcards 2 1 6 1 3 CONNECTING AN AUX SOURCE 1 Plug in your AUX device in the AUX socket 2 Once the connection...

Page 53: ...element 2 In the Media Source List screen tap on the required source icon if connected and enabled The system displays the Media Screen 6 3 MEDIA SCREEN NOTE i The controls in the Media screen in the...

Page 54: ...y Pause button Allows you to toggle between playing and pausing the currently played media track 9 Next Media Track z Short tap Moves to next media track z Long tap Starts fast forward and continues t...

Page 55: ...ume and pauses the track Tap the control element again to unmute the volume 6 5 4 REPEATING MUSIC TRACK 1 To repeat a single music track tap The system displays and repeats the current track 2 To repe...

Page 56: ...s under the selected category 6 5 9 PLAYING TRACKS FROM A FOLDER MEDIA CATEGORY 1 Tap The system displays the Media Browse screen with the content of the currently played media source 2 Tap In the Fol...

Page 57: ...se screen tap The system displays the list of images available in the currently played USB source 2 Tap on the required image from the list The system displays the image in the Image Viewer screen 3 T...

Page 58: ...rward Fast Rewind Short tap To play next or previous video Long tap To Fast Forward or Fast Rewind the video 3 Video Browse Tap to display the Video Grid View Screen NOTE i Viewing of videos is unavai...

Page 59: ...reference purpose For information on using smartphone applications please read your smartphone instruction manual For safety reasons you cannot access some applications when the vehicle is moving Down...

Page 60: ...the entered details and if successful prompts you for your mobile number 6 Enter your Phone Number and tap Next The system sends an OTP to the entered phone number 7 Enter the OTP and tap Verify Afte...

Page 61: ...1 2 ACCESSING SMARTPLAY Smartplay Studio can be accessed by connecting your smartphone with the Figure 60 Enter VIN or Registration Number Screen Figure 61 Enter Your Phone Number Screen Figure 62 Ent...

Page 62: ...ess the Navigation App and the AHA App including shortcuts to some of its functions NOTE i The Smartphone Linkage mode setting is required only for phone connected through USB The phone charging level...

Page 63: ...wing initial settings for the NaviMaps app 1 Enter your name and contact details in the KYC information section The system prompts you to download the desired regional and or international maps 2 Down...

Page 64: ...ou close any previous NaviMaps session before unlocking the premium function alities Figure 64 Navigation Disclaimer Figure 65 Navigation Screen NOTE i In case of rain or change in weather conditions...

Page 65: ...nually 2 Point of Interest POI icons to search for a specific point of location like Fuel pumps ATMs restaurants and so on 3 Last visited location to search or navigate to previously visited location...

Page 66: ...te locations List of Recent Destinations List of Nearby POIs Contacts Maruti Suzuki Dealership The system displays the screen corresponding to the selected search option with a list of available desti...

Page 67: ...ves option in the Navigation Route screen Tap Alternatives 2 Tap the required alternative from the provided list You can also tap on the required route displayed on the map to select the alternative 3...

Page 68: ...screen 2 Tap Overview 3 Tap 4 In the Search or Address screen search and tap on the required additional destination The system adds the selected destination as an additional stop on your route 5 Tap...

Page 69: ...tem prompts you to either end or save the route 1 Tap Save to save the route in the My Routes category 2 Tap End to end the navigation 7 2 14 MANAGING NAVIGATION SETTINGS 1 In the Navigation Map scree...

Page 70: ...NAGING DRIVER ASSISTS FEA TURE 1 Tap Driver Assists 2 In the Driver Assists screen tap Speed Alerts Traffic Signs Safety Camera Alerts POI Along the Route Signposts and Junction Views to enable disabl...

Page 71: ...P 1 In the Smartplay Studio Screen tap the icon The system displays the AHA Screen Figure 78 Route Settings Screen NOTE i AHA is a content aggregation application It does not own the content Maruti Su...

Page 72: ...th Music and Smartplay capabilities You can log into AHA using AHA Facebook Google credentials However if the emails IDs of these accounts are same AHA will support Facebook Google login only Figure 7...

Page 73: ...gged in as a Guest When logged in as a Guest you can only play and hear to music from Gaana If you have already logged in AHA you will be presented with a search icon in the Gaana Screen You can now a...

Page 74: ...S 1 In the Smartplay Studio Screen tap The system displays the AHA Favourites Screen Using AHA favourites feature you can perform the following actions 1 View the list of Favourties from the system 2...

Page 75: ...ZOMATO 1 Tap The system displays the Zomato Screen NOTE i Enable location access for the AHA app on your smartphone to use AHA Nearby Figure 87 AHA Favourites Player Screen NOTE i Restaurant informati...

Page 76: ...he downloaded content off line through the AHA Downloads feature To access the downloads perform the following steps 1 In the Smartplay Studio Screen tap 2 In the Downloads screen scroll through the l...

Page 77: ...phone or App Store on your iOS device 2 Search for the Smartplay Remote app and tap it The app page will be displayed 3 Tap the Install button The app will be downloaded and installed on your smartpho...

Page 78: ...d Setting Balance and Fader on page 27 sections for the steps to handle the various audio settings 7 4 5 ACCESSING VEHICLE INFO 1 In the Smartplay Studio Remote Screen tap Vehicle Info The system disp...

Page 79: ...Siri application for which Internet connectivity is necessary Performance may vary depending on data connectivity The settings of Apple CarPlay can be accessed from your iPhone only Refer to your pho...

Page 80: ...peak your voice action NOTE i On your iPhone Settings Siri Search enable Press Home For Siri option This will enable the system to launch Apple CarPlay on the system In regions where Apple Maps is sup...

Page 81: ...ogle Maps z Google Play Music and other important phone functions The Android Auto feature requires the installation of the Android Auto Mobile App NOTE i The other features like Music and so on can b...

Page 82: ...ive route guidance session will be cancelled automatically and vice versa Audio output The audio output of the connected smartphone e g announcements from a navigation app will be audible at a higher...

Page 83: ...required details in the Android Auto settings in your smartphone LAUNCHING THE APP 1 In the Home screen tap the tile The system displays the Android Auto Home screen with the supported list of apps 2...

Page 84: ...hone 7 6 5 ACCESSING CALLS 1 Tap The system displays the Dialer screen You can now make calls receive calls or handle any other communication actions from the system 7 6 6 RETURNING TO HOME SCREEN 1 F...

Page 85: ...ct the required app and start using it from the system Figure 104 Android Auto Media Screen NOTE i When Android Auto Apple CarPlay session is active on USB the Phone and Music options are disabled for...

Page 86: ...brake Check that parking brake is fully released 3 Seat belt Will appear when the driver is moving and driver has not fastened his seat belt 4 Low fuel warning Will appear to remind to fill the fuel F...

Page 87: ...n the Home screen Information tile swipe through to the Vehicle Information tile 2 Tap the tile The system displays the Vehicle Alerts screen In addition to the vehicle alerts the screen also displays...

Page 88: ...2 The system displays the RVC screen Violet lines are reference lines Red and Yellow colored lines are distance lines and indicate the distance of obstacle from your vehicle bumper Red indicates the...

Page 89: ...djust the contrast of the camera using the Contrast settings The contrast range is from 0 to 10 8 3 REVERSE PARK ASSIST SYSTEM RPAS To enter the RPAS feature perform the following steps 1 Engage the r...

Page 90: ...Touch Panel CTP actions will be disabled They will resume on disengaging the reverse gear NOTE i Safety related vehicle alerts and RVC RPAS features are also displayed in the lock down mode Voice Rec...

Page 91: ...dio Mondiale FAT File Allocation Table FM Frequency Modulation FPS Frames per Second GIF Graphics Interchange Format HFP HandsFree Profile JPEG Joint Photographic Experts Group MPEG Moving Picture Exp...

Page 92: ...WARE System software may be upgraded to enhance the system performance Please check with your MARUTI SUZUKI dealer for latest software availability and installation 2018 SUZUKI MOTOR CORPORATION All r...

Reviews: